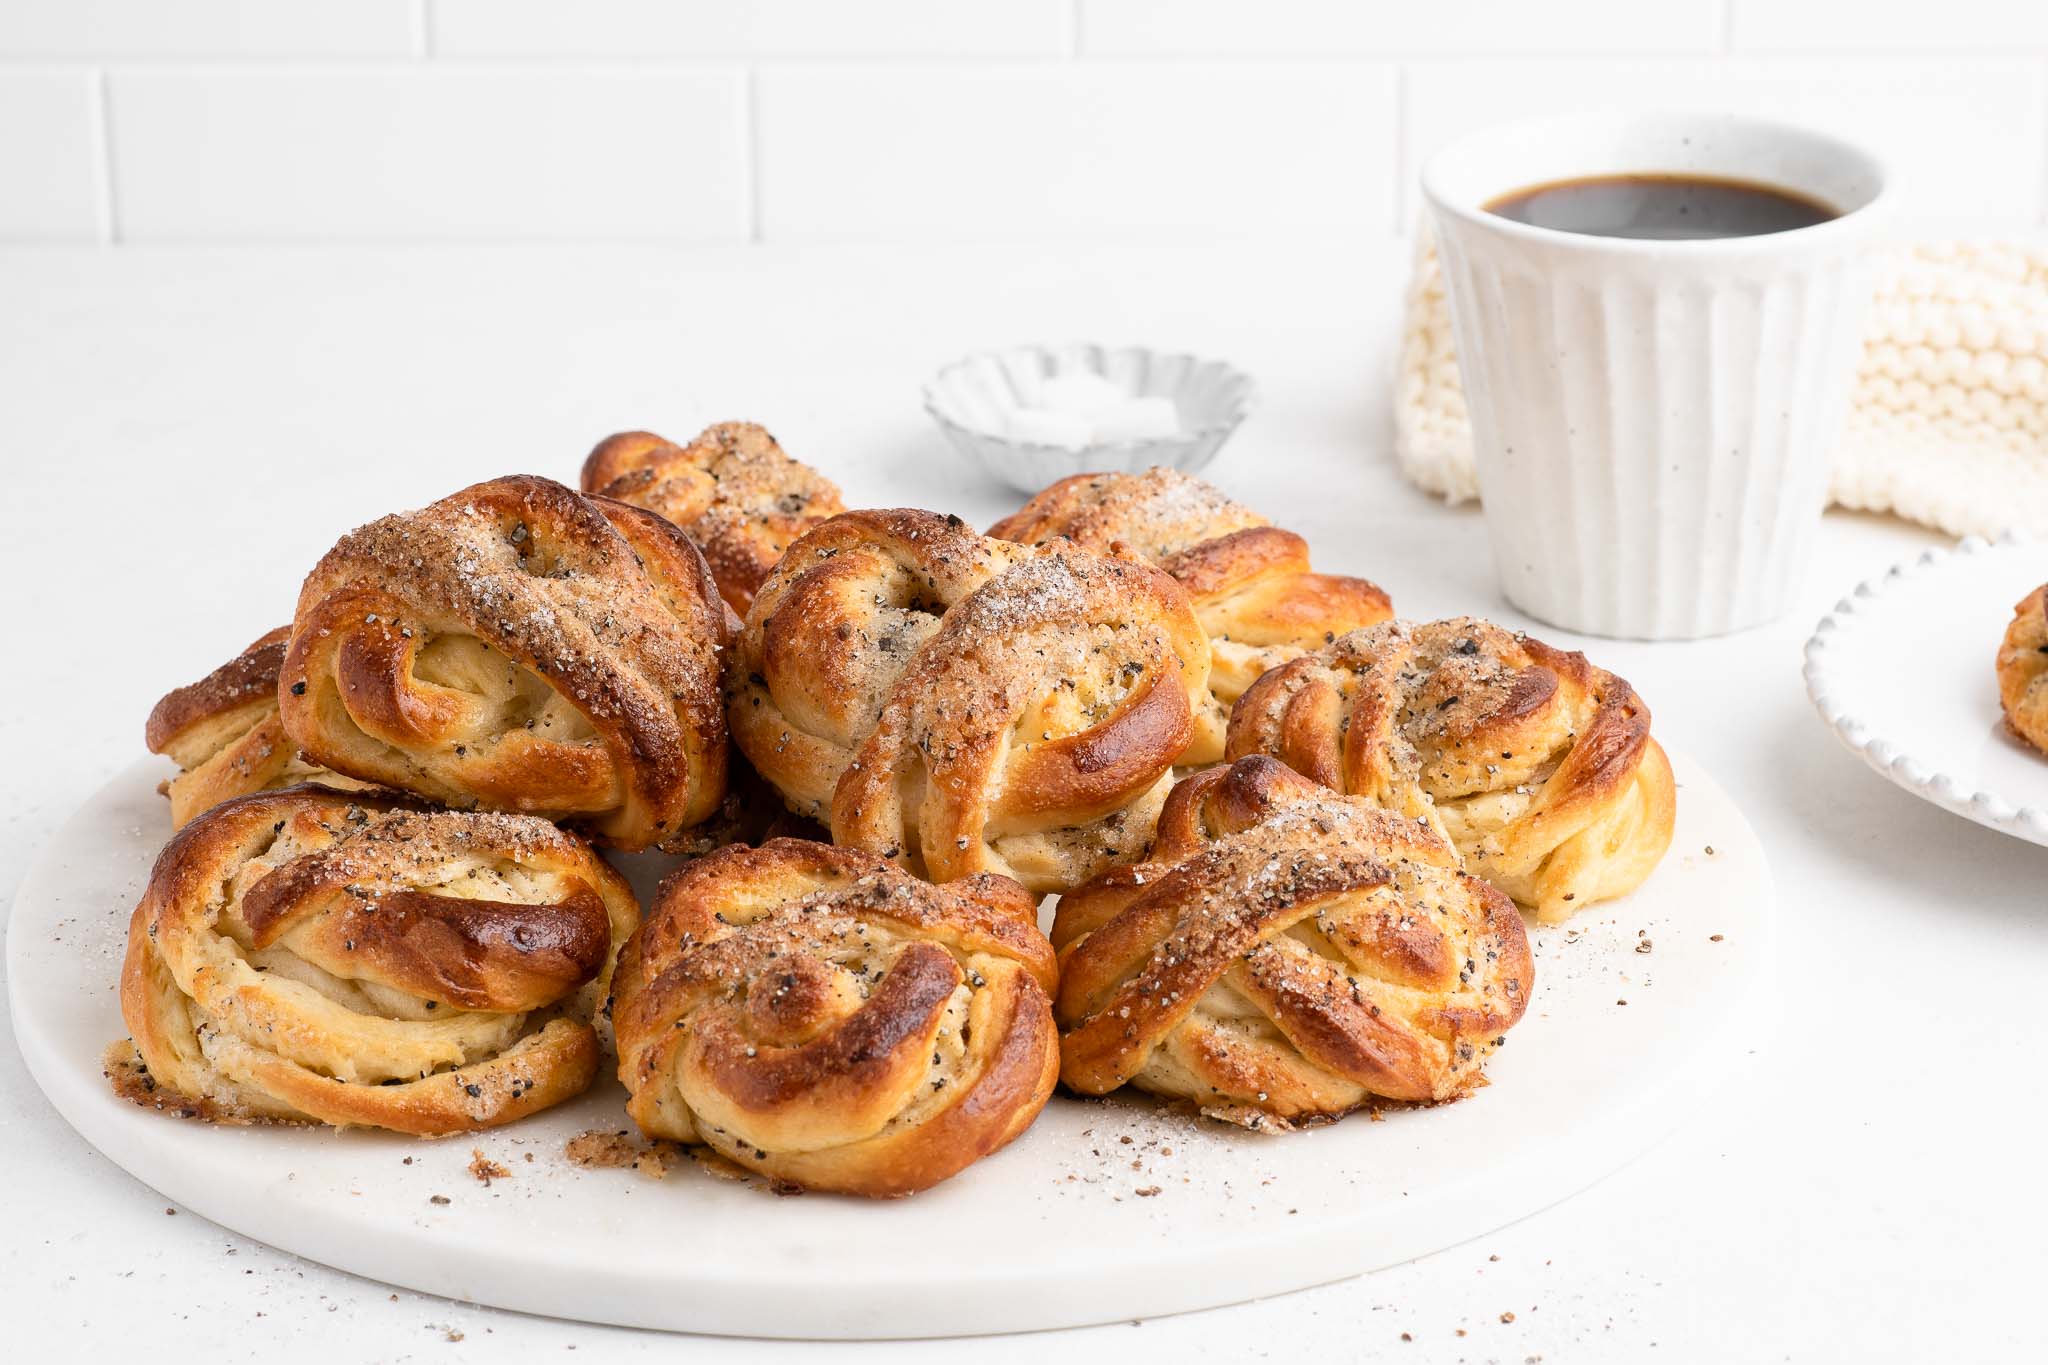
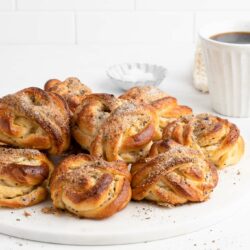
Cardamom Buns
I am a big fan of Scandinavian design, but perhaps an even bigger fan of Scandinavian baking. We are fortunate to be able to travel to Denmark and Sweden regularly, and my favourite pastime when we are there is to visit all of my favourite cafés and bakeries, plus any new ones that have popped up since our previous visit. High on the agenda is to squeeze in as many Cinnamon Buns and Cardamom Buns each day at breakfast!

What are Cardamom Buns?
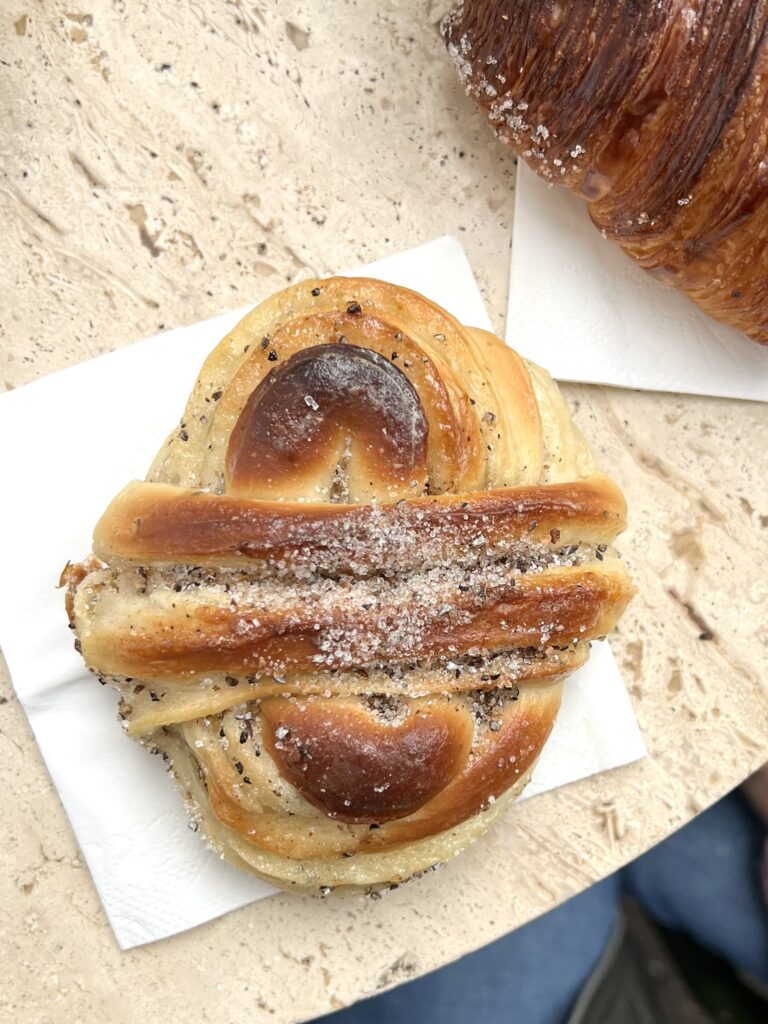
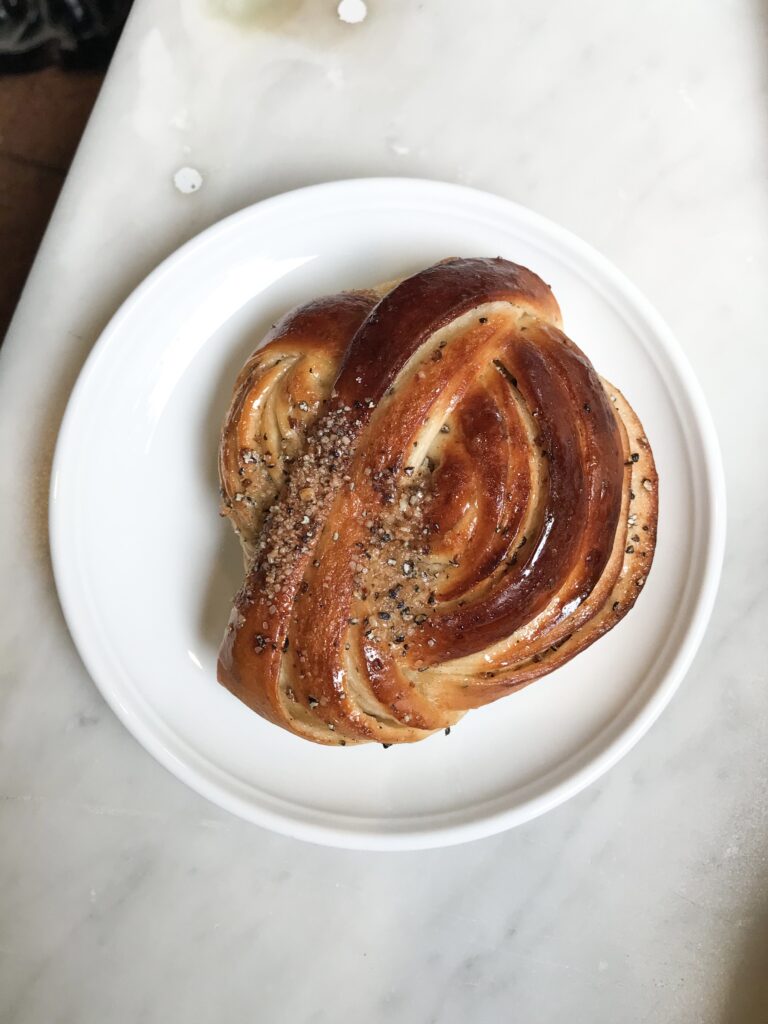
Cardamom Buns are often sold alongside Swedish Cinnamon Buns, and they are usually shaped differently so you can tell them apart. The main difference is that they are heady with freshly-ground cardamom which has a slightly peppery taste and a beautiful floral aroma.
Cardamom can be an acquired taste for some, but the advantage of making homemade Cardamom Buns is that you can add as much, or as little, cardamom as you like (I like to use a lot!).
I have heard that Cardamom Buns are more for adults, that kids in Sweden and Denmark usually prefer Cinnamon Buns. But my kids happen to love these Cardamom Buns as much as I do, and they will eat them with the maximum amount of cardamom that the recipe below calls for.
Cardamom Pods vs Cardamom Seeds
If you have ever tasted a fresh cardamom bun from a bakery in Sweden or Denmark, you will usually notice the distinct fragrance of cardamom right away, evidenced by the flecks of freshly-ground cardamom on top of the buns. They look like coarsely ground black pepper, but they are in fact ground cardamom seeds.
When making cardamom buns, I recommend using whole cardamom seeds which have already been extracted from the cardamom pods (also called decorticated cardamom seeds). If you can’t find cardamom seeds, you can remove the seeds from the cardamom pods themselves by pounding them open with a pestle and mortar. However, this process can be quite fiddly and time-consuming.
The cardamom seeds themselves are too large and coarse to use right away, so you will need to grind them coarsely, either with a pestle and mortar or an electric spice grinder. Some Danish households even have a dedicated spice grinder for cardamom seeds, a tip which I have adopted since I use freshly-ground cardamom seeds quite regularly.
In Scandinavian countries, you can buy tubes or packets of coarsely ground cardamom seeds, which will save you the effort of having to grind the seeds yourself.
If you are out of luck and can find neither cardamom pods nor cardamom seeds, you can use ground cardamom which is more readily available; this is the finely ground variety found in most supermarkets. However, store-bought ground cardamom is nowhere near as fragrant and punchy as freshly ground cardamom – you will smell and taste the difference right away.
If you opt to use store-bought ground cardamom in this recipe, I recommend adding an extra 1-2 teaspoons to increase the cardamom flavour.

Cardamom Bun Recipe
My Cardamom Bun recipe is similar to my recipe for Swedish Cinnamon Buns, as well as my other recipes which use an enriched dough, such as Finger Buns, Cream Buns, Cinnamon Rolls, etc.
It is an easy and reliable dough recipe which produces soft and fluffy buns each time.

How to Make Cardamom Buns
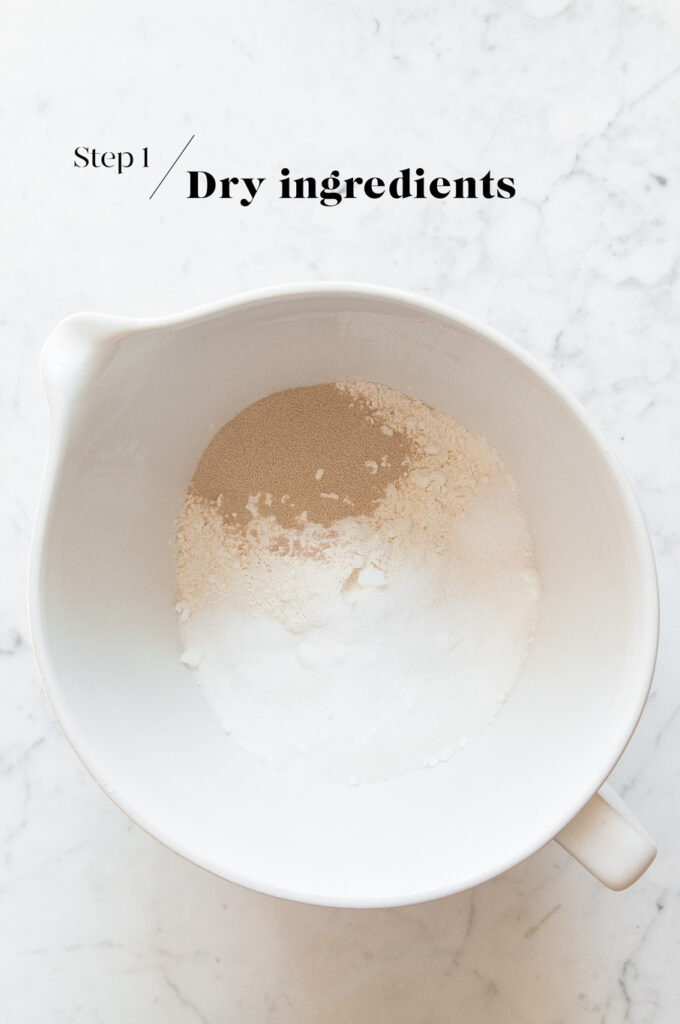
Step 1
Measure the flour, sugar, yeast and salt into the bowl of an electric stand mixer. Lightly mix the ingredients together.
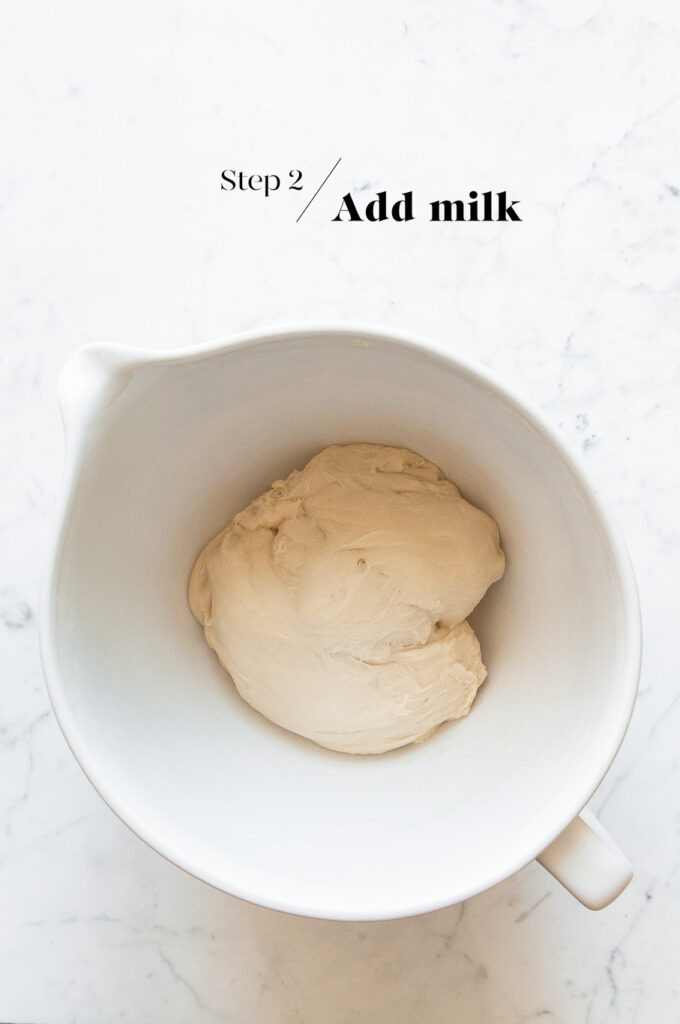
Step 2
Slowly add the warm milk (you may not need all of it), and lightly beat everything with the dough hook until it comes together into a large ball of dough. Only add as much milk as you need to bring the ingredients together into a dough.
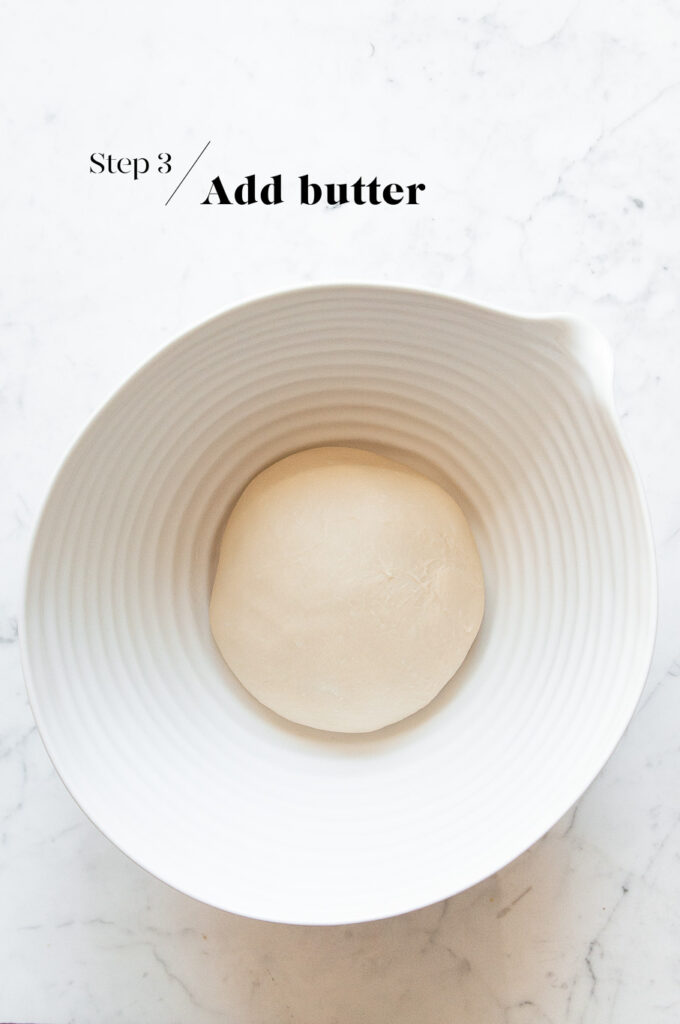
Step 3
Slowly incorporate the butter, one tablespoon at a time, until all of the butter has been used.
Then increase the speed to medium and continue kneading with the dough hook for 15 to 20 minutes, or until the dough is smooth and elastic.
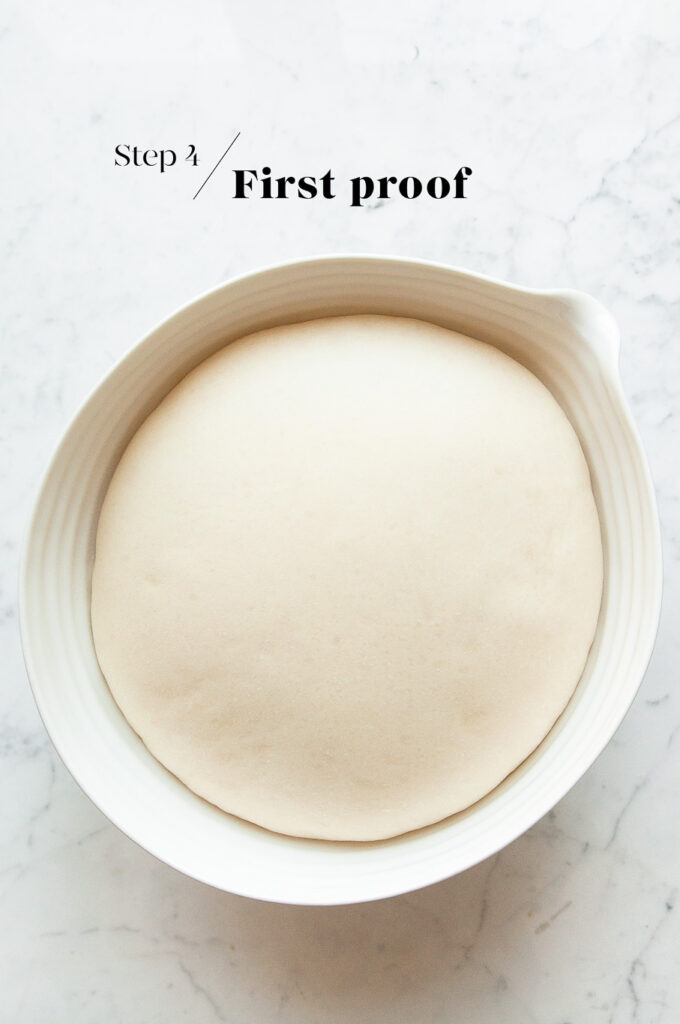
Step 4
Lightly oil a large mixing bowl, and place the dough into the bowl. Cover the bowl with a clean tea towel and leave it somewhere warm for 1 to 1.5 hours, or until the dough has doubled in size.
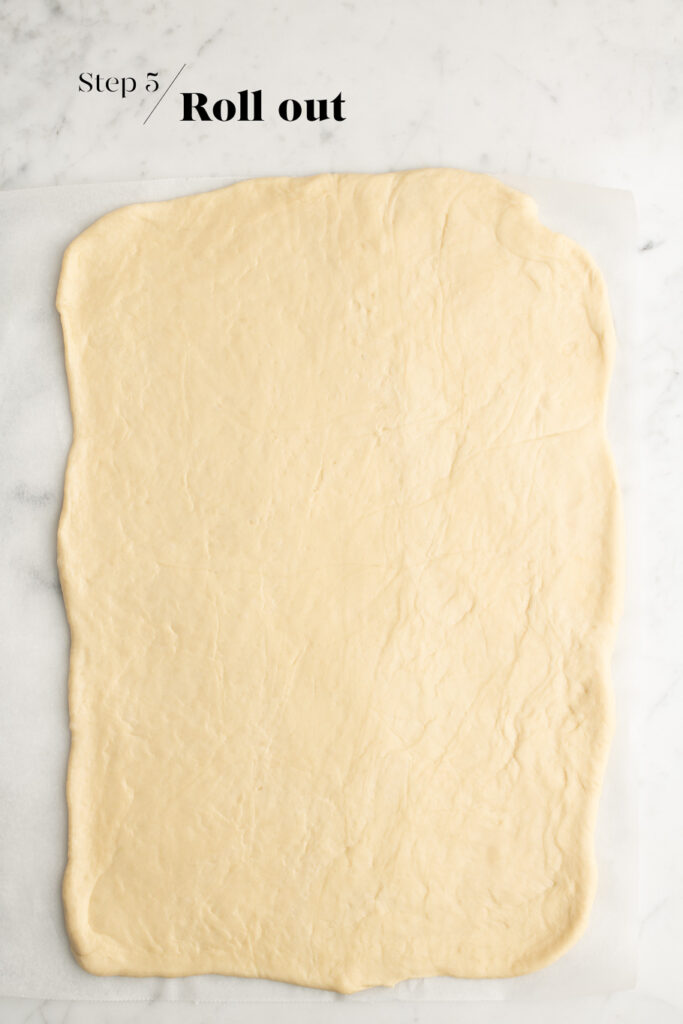
Step 5
Once the dough has doubled in size, gently remove the dough from the bowl. The dough will deflate as you handle it.
Roll out the dough into a rectangle shape measuring approximately 50 x 40 cm/20 x 16 inches.
Step 6
Make the filling by beating together the ingredients. Use a small palette knife to evenly spread the filling over one half of the dough.

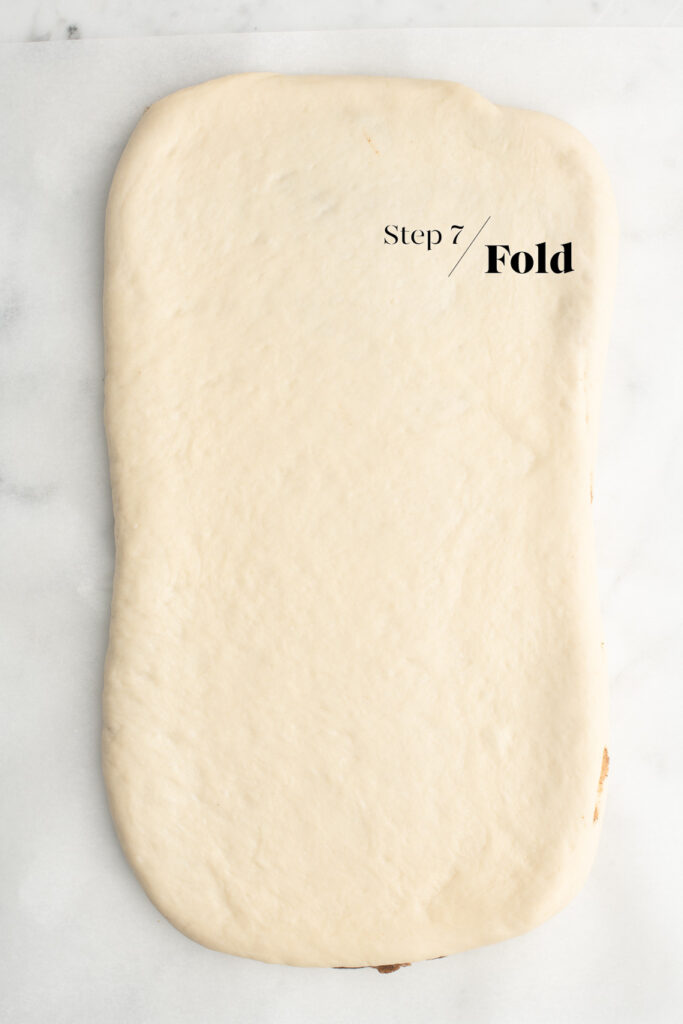
Step 7
Fold the dough over in half. You should have a rectangular shape measuring approximately 50 x 20 cm/20 x 8 inches.
Step 8
Cut the dough into thin strips measuring 1 cm/0.5 inch wide. You should have about 16 strips, but this will depend on how wide you rolled your dough. Each strip will produce one bun.

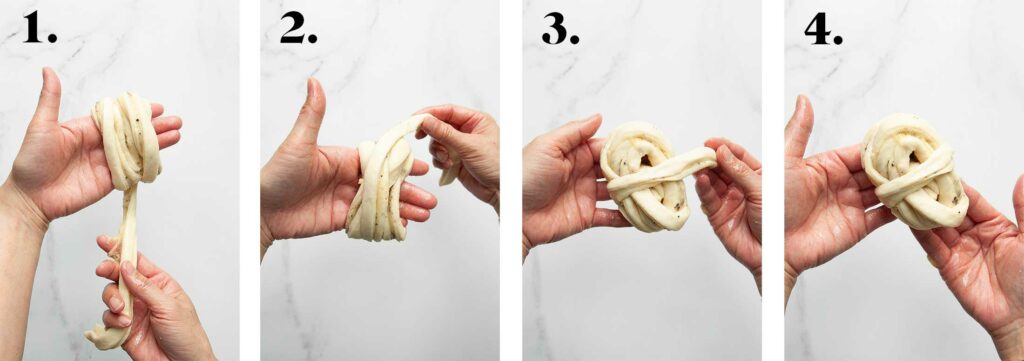
Step 9
Shape the Cardamom Buns as follows:
- Take one strip of dough.
- Gently wrap the dough around four fingers on one hand.
- As you come to the end of the strip of dough, gently loosen the wrapped dough from your fingers.
- Bring the end of the strip of dough across the middle of the bun, and then tuck it in securely underneath.
Once you have shaped a few buns, you will get a feel for when you should start to finish and secure the buns.
Try to work quickly as the dough will start to puff up slightly as it sits, making it a bit more difficult to work with.
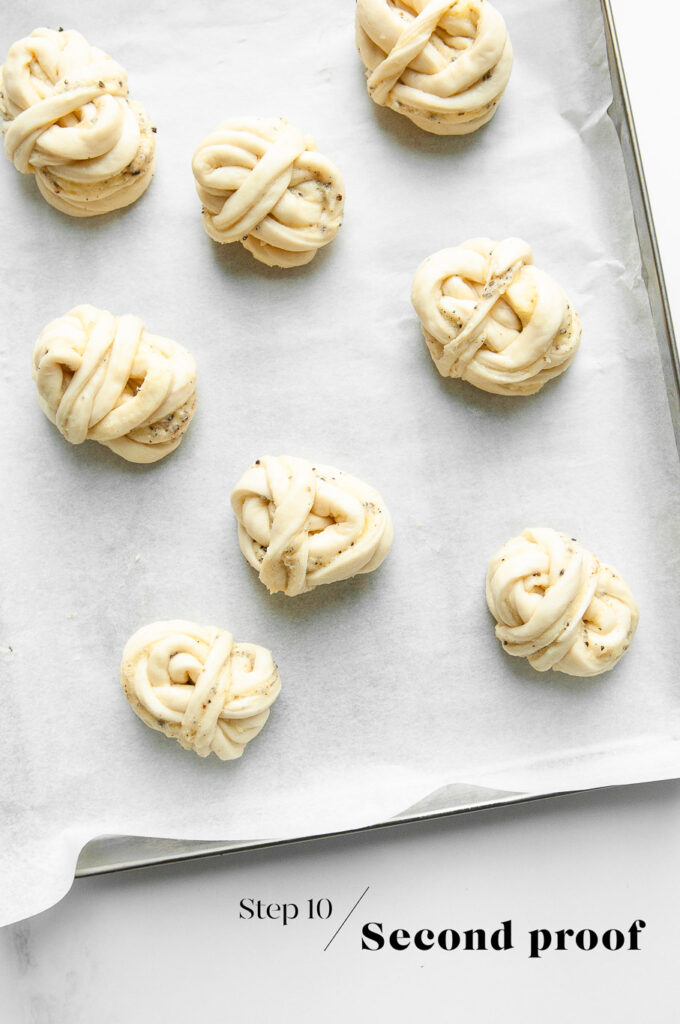
Step 10
Place the shaped dough on a sheet pan lined with baking paper. Space them apart generously. Set the pan aside somewhere warm until the buns have puffed up slightly. The timing will depend on how warm your room is (about 30-60 minutes). It is important that the room is not too warm, otherwise the butter from the filling will melt.
Meanwhile, preheat the oven to 200°C/390°F with a metal baking tray on the middle shelf.
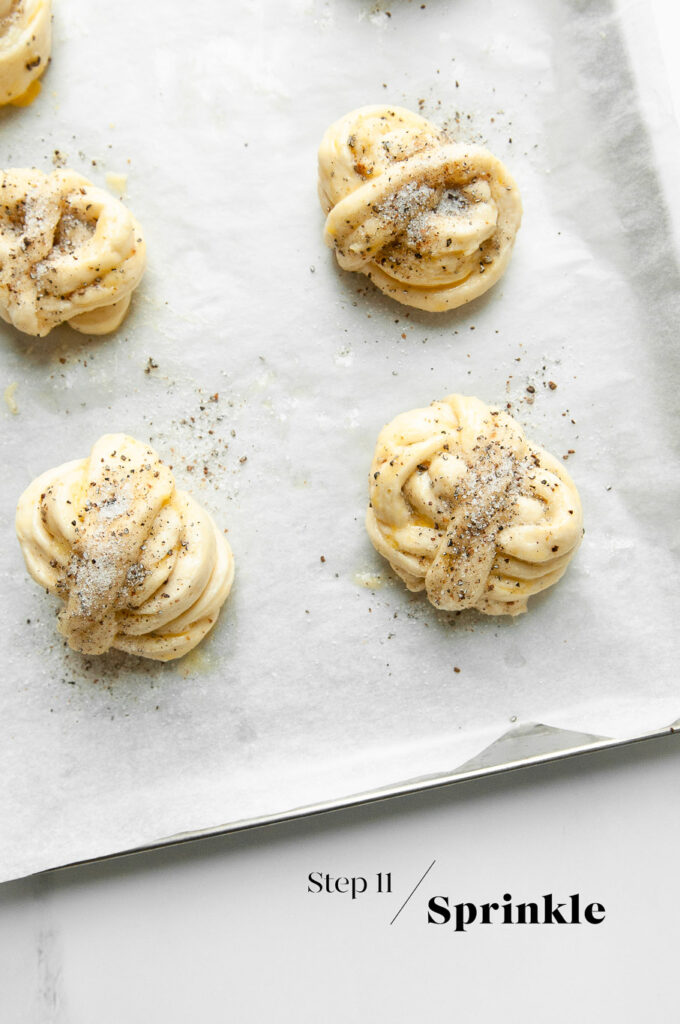
Step 11
Brush the buns with egg wash, and sprinkle generously with the cardamom sugar topping.
Step 12
Bake the buns for about 20 minutes, or until the buns are lightly golden. Check the buns at about 10 minutes, and if they are browning too quickly, cover them with a loose sheet of foil for the rest of the baking time.
The buns are cooked if an internal thermometer reads 85°C (185°F). Gently remove the buns (intact) to a wire rack, and leave them to cool completely.

Tips for Making Cardamom Buns
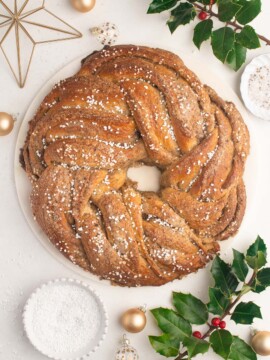
- The longer the strips of dough, the more “layers” of cardamom sugar you will have in the bun, which will also make the buns look nicer.
- In order to prevent the butter in the filling from melting and leaking during baking, it is important to do the second proofing in a warm, but not too warm, environment. That is, it needs to be warm enough to encourage the buns to rise, but not so warm that the butter in the filling will melt.
- As the buns are traditionally baked spaced apart, they will not be soft and fluffy on the outside of the bun.
- To make the buns as soft as possible, I like to bake them until they are just slightly golden, before covering them with foil for the rest of the baking time.
- Some butter (but not a lot) will leak and melt during baking, and this is normal. The melted butter and sugar will pool a little under each bun, and caramelise during baking. You can break off the caramelised bits or leave them on the buns.
Tips for Making Bread Dough Ahead of Time
I love baking bread, but I don’t love getting up extra early to get started on the dough. So I typically make the dough the night before and allow it to rise slowly in the fridge overnight. The longer proofing time has the added benefit of allowing the dough to develop more flavour and a better texture. Come the morning, the dough will have at least doubled in size, and it will be ready for shaping as per the recipe.
To make the dough the night before:
- Make the dough as per the recipe.
- Place the dough into a large oiled bowl.
- Cover the bowl with plastic wrap or a reusable bowl cover.
- Place the bowl into the fridge.
- Let the dough rise overnight, or for at least 8-10 hours.
- The next morning, the dough should have at least doubled in size.
- Gently remove the dough from the bowl.
- The dough is ready for shaping and the second proof as per the recipe.
- As the dough will be cold from the fridge, the second proof may take slightly longer.
Where to Buy Cardamom Buns
If you are travelling to Copenhagen or Stockholm, I highly recommend visiting the following places for a good cup of coffee and some pastries, including Cardamom Buns:
Juno the Bakery, Copenhagen
Andersen & Maillard, Copenhagen
Lille Bakery, Copenhagen
Hart Bageri, Copenhagen
Fabrique, Stockholm (also in London and New York)
Bageri Petrus, Stockholm
Café Pascal, Stockholm
Lillebrors Bageri, Stockholm
Cardamom Buns
Ingredients
For the Dough
- 600 g (4 cups) white bread flour
- 110 g (½ cup) caster sugar, (superfine sugar)
- 6 g (1 teaspoon) fine salt
- 14 g (4 teaspoons) instant dried yeast, see Kitchen Notes
- 375 ml (1 ½ cup) milk, warmed to 37°C/98°F
- 60 g (4 tablespoons) unsalted butter , softened
For the Cardamom-Sugar Filling
- 100 g (1 stick) unsalted butter, softened
- 110 g (½ cup) granulated sugar
- 2-4 teaspoons cardamom seeds, freshly ground, see Kitchen Notes
- 1/4 teaspoon fine salt
For the Topping
- 1 egg, lightly beaten with a splash of water
- 36 g (3 tablespoons) granulated sugar
- 2-4 teaspoons cardamom seeds, freshly ground, see Kitchen Notes
Instructions
To Make the Dough
- Measure the flour, sugar, salt and yeast into the bowl of an electric stand mixer.
- Lightly mix the ingredients together using the dough hook.
- Slowly pour in the warm milk, and continue mixing until everything comes together into a rough dough.
- Add the butter, one tablespoon at a time. Once the butter has been fully incorporated into the dough, add the next tablespoon of butter.
- Once all of the butter has been added, continue kneading the dough on medium speed for about 15 to 20 minutes.
- The dough is ready when it is soft and smooth, and no longer sticks to the side of the bowl. The dough will be somewhat sticky from the butter.
First Proofing Period
- Lightly oil a large mixing bowl.
- Place the dough inside the bowl.
- Cover the dough with a clean tea towel, plastic wrap, or a reusable bowl cover.
- Leave the dough somewhere warm for 1 to 1.5 hours, or until the dough has doubled in size (see Kitchen Notes below).
For the Cardamom-Sugar Filling
- Just before the dough has finished the first proofing period, make the filling by beating together the ingredients.
To Roll out the Dough
- Once the dough has doubled in size, gently remove the dough from the bowl. The dough will deflate as you handle it.
- Roll out the dough into a rectangle shape measuring approximately 50 x 40 cm/20 x 16 inches.
- Use a small palette knife to evenly spread the cardamom-sugar filling all over the dough.
- Fold the dough over in half.
- You should have a rectangular shape measuring approximately 50 x 20 cm/20 x 8 inches.
- Cut the dough into strips measuring 1 cm/0.5 inches wide. How many strips you cut will depend on how wide you have rolled your dough, but you should get about 16 strips.
To Shape the Cardamom Buns
- Take one strip of dough.
- Gently wrap the dough around four fingers on one hand.
- As you come to the end of the strip of dough, gently loosen the wrapped dough from your fingers.
- Bring the end of the strip of dough across the middle of the bun.
- Tuck the end of the dough underneath the centre of the bun.

Second Proofing Period
- Line a large baking pan with baking paper.
- Arrange the shaped buns on the lined baking pan. Space the buns apart generously.
- Place the pan somewhere warm for about 30 minutes, or until the buns have risen and puffed up slightly.
- During this time, preheat the oven to 200°C/390°F (without fan) with a metal baking tray on the middle shelf.
Bake the Cardamom Buns
- Gently brush each bun with some egg wash.
- Mix together the sugar and freshly ground cardamom.
- Sprinkle each bun with some of the cardamom-sugar.
- Place the pan of buns on the preheated baking tray.
- Bake the buns for about 20 minutes, or until the buns are lightly golden. Check the buns at about 10 minutes, and if they are browning too quickly, cover them with a loose sheet of foil for the rest of the baking time.
- The buns are cooked if an internal thermometer reads 85°C/185°F.
- Gently remove the buns to a wire rack, and leave them to cool completely.
Kitchen Notes
- WHAT TYPE OF CARDAMOM TO USE
* For the best (and most authentic) results, use freshly-ground cardamom seeds (also called decorticated cardamom seeds). Simply grind them to a fine powder to use in the dough and filling. Use a more coarse grind for sprinkling on top of the wreath.
* Alternatively, use the same quantity of regular ground cardamom, or add more to taste. - MAKE AHEAD TIPS
To start the dough the night before:
* Make the dough as per the recipe.
* Place the bowl of dough (covered) in the fridge to proof overnight, or for at least 8 to 10 hours. During this time, it should have at least doubled in size.
* The next day, proceed with the rest of the recipe. As the dough will be cold, it may require a bit more time for the second proofing period. - DIFFERENT TYPES OF FLOUR
For Swiss readers: I use Zopfmehl (or farine pour tresse) when making bread and enriched dough. - DIFFERENT TYPES OF YEAST
Please note that there is a difference between instant yeast (also called instant dried yeast or fast-action dried yeast) and dried yeast (also called active dry yeast). If you are not sure what type of yeast you have, please check the packaging for instructions on how to use the yeast.
* With instant yeast, you can add it directly to the flour mixture without having to activate it first.
* With dried yeast, you will need to activate it first (usually in some warm liquid).
* If you are using fresh yeast, you will need about 1 block (40 g fresh yeast = 14 g instant dried yeast). Crumble the fresh yeast into the warm milk, and stir to dissolve the yeast. - PROOFING THE DOUGH
Dough needs a warm environment for the yeast to activate and cause the dough to rise. If you don’t have an oven with a setting to proof dough, or a warm place in your home, try one of the following ideas:
* In the oven with the oven light switched on (works only for some ovens).
* In the oven with a tray of boiling water on the bottom shelf.
* In the oven or a steamer oven at a low temperature of about 25-40°C (77-104°F). - OVEN & STOVE TEMPERATURES
All recipes on this website have been tested on an induction stove and/or with a conventional oven (i.e. an oven without fan). All recipes on this website use temperatures for a conventional oven, unless otherwise mentioned. Convection ovens (i.e. fan-forced ovens) are typically 20°C/70°F hotter than conventional ovens, but please check your manufacturer’s handbook. - CONVERSIONS
To convert from cups to grams, and vice-versa, please see this handy Conversion Chart for Basic Ingredients.

Absolutely delicious. Thank you for this wonderful recipe.
I don’t see egg listed in the ingredients for the dough. How many eggs?
Hi Salli,
There is no egg in the dough itself, just egg for the egg wash to brush on top of the buns.
Thank you for the response!
Solid recipe, very tasty. I zested an orange into the butter mixture and it worked out really well.
So glad you enjoyed this recipe. I love the sound of adding orange – I will try that too!
I was really trying to replicate my ecstasy at Juno Bakery in Copenhagen. This recipe came very, very close. This is delicious. I think the thin strips, the filling and the second rise are all so important. Thank you so much!
Ooh what a wonderful compliment!! This recipe is in fact my attempt to recreate the same buns from Juno Bakery 🙂 I even stood at one of the windows watching one of the bakers effortlessly shape trays and trays of these cardamom buns. I would love to go back one day!
This is the best recipe for cardamom buns! The buns are nice and soft and the freshly ground cardamom is perfect here.
I really appreciate the step by step photos in this recipe. My cardamom buns came out beautifully thanks to your instructions.
What kind of milk should we use? Whole?
Hi Kate,
Yes, I recommend using whole milk (full cream milk). Hope you will enjoy this recipe!
These were wonderful. Super easy to make. I spread out the butter over the whole sheet before folding and I think it was nicely distributed. My only suggestion is that the oven temp and time might be a bit off, but this could be my own oven. 15 minutes at 375 and mine were close to being overdone. That being said, they are delightful right out of the oven and so incredibly soft.
Hi Maya,
I’m so glad you enjoyed this recipe! I recommend that you check the buns after 10-15 minutes and, if they are browning too quickly, to cover them with a sheet of foil for the remaining baking time. This ensures that the buns cook through, but don’t brown any further on top 🙂
Hello Sally, i discovered this delicious pastry in Aarhus and I would like to try to do it at home. In Aarhus it had a bit of a lemon taste, do you think this is done by adding lemon zest to the butter mixture?
These look absolutely incredible! Do you have any ideas of how to turn these into saffron buns? I tried the most incredible saffron bun in Copenhagen recently and am hoping to recreate it. How would you recommend incorporating saffron in place of the cardamom?
Hi Madeline,
Hope you enjoyed your time in Copenhagen! There are several variations of saffron buns. I would suggest using my base dough recipe, but infusing the milk with about 1/2 teaspoon of saffron threads. Some saffron buns are plain, but I have also tried those filled with an almond and/or vanilla paste. You might have to research recipes for the filling. Then shape the buns into an S shape before their second proof. Hope this helps!
I went to Denmark, Norway, and Sweden last year and ate many cardamom buns at different bakeries. I have wanted to make them ever since and cannot tell you how happy I am that this recipe was easier than I expected and the results are SUPERB! Thank you so much – Kim
Hi Kim,
Oh that’s wonderful to hear! I’m so glad you enjoyed this recipe ❤️ Cardamom buns are also my favourite, and I will be posting a new recipe shortly which is based on the cardamom buns I ate in Finland last year ☺️
Thank you for the recipe, it’s amazing!
Just a question. There are two different step by step, is that right? Which one is the one to follow? Thanks!
Hi Veronica,
I have checked and the step-by-step photo instructions should be the same as in the recipe card 🙂 Hope you will enjoy this recipe!
Hi! I made these today for the very first time & I thoroughly enjoyed the process & result, the most delicious, soft, beautiful flavors-just what i was craving!! but i did have an important question…which way do i fold the dough. in the step by step description you say “fold it in half” but in your recipe step by step you said “fold on third over to the center…& then fold the other third over to the center” so i did this but i was left with a 4 x 18ish dough. when what i needed was a 8 x 20. i would appreciate your clarification since i was confused & ended up finding an alternative that saved my dough!
Hi Emily,
I’m so sorry for the confusion! The correct version is the step-by-step photos where you “fold in half”. I have updated the recipe card so that it matches the step-by-step photos. My apologies again! I’m so glad the recipe worked out in the end and that you enjoyed the Cardamom Buns 🙂
Really good, easy to follow recipe – I was worried about the twisting but the instructions and pictures made that easy. The additions I tried to the recipe all seemed to work: 1) adding some orange zest and crushed cardomom to the dough itself – after the first overnight proof it smelled wonderful 2) adding some more orange zest to the filling, 3) adding vanilla bean paste to the topping. Result was full of flavour, fluffy and delicious. Thank you!
Hi Marc,
So glad you enjoyed this recipe! I love the additions you made as well – orange zest sounds really delicious here!
I fell in love with these during a recent trip to Sweden and your recipe is spot on! This was my first time making any type of buns and your directions and tips made it really easy! Thank you!
Hi Lisa,
So glad you found this recipe helpful! These Cardamom Buns are among my favourite 🙂
Hi! I was wondering, is it absolutely necessary to knead the dough for 15-20 mins? I made these about a month ago & want to make them again today but that was one of my concerns since my mixer was working so hard to knead the dough for that long. the mixer kept shaking & scooting to the edge of the counter???? I’m just wondering if I can stop the kneading right after the dough is formed into a ball? I appreciate your help!
Hi Emily,
How long you knead the dough does make a difference to the final texture as you want to develop the gluten to give the buns that bread-like texture. If you own a KitchenAid, use setting 1 (max 2) for kneading the dough. A damp teatowel under the stand mixer can help to prevent it from “walking” and jumping across the kitchen counter. But I generally keep an eye on my mixer while it is kneading to make sure it doesn’t fall off the counter. But at a low speed, the mixer shouldn’t move too much. If you are worried about over-working/over-heating your mixer, I would aim for at least 10 minutes of kneading. Hope this helps!
Thank you for responding to my question! the reply button is not working so I wanted to say thank you here! i was also curious, do you think making mini buns would be possible? like cut the 20 in in half so i have 32 strips?
Thank you for responding to my question! That is what I sort of did & it turned out well! Also the reply button is not working so I wanted to say thank you here! & I was also curious, do you think making mini buns would be possible? Like cut the 20 inches in half so i have 32 strips?
Hi Emily,
To make smaller buns, I would also do as you have suggested, i.e. follow the recipe to make 16 strips, and then cut these strips in half to make a total of 32 shorter strips. You will need to make smaller knots, so wrap the dough less times around your hand. The second proofing time should be similar, and you will need to reduce the baking time slightly (bake until lightly golden and/or a thermometer inserted in the dough reads 85°C/185°F). Please let me know how you get on! I will also give this a try myself 🙂
P.S. Sorry about the reply button not working. My website is currently undergoing a re-design so you will see a new look soon, and hopefully everything will be working better too!
A wonderful recipe! I made these again a year later and they turned out beautifully. I made a few tweaks on my end: after about 12 minutes in the stand mixer, the dough was slightly overworked and the machine overheated, so I gave it a longer rest than usual. After shaping the buns, the butter was starting to melt, so I did half of the second proof in the fridge. I also found that baking for around 15 minutes at 390°F was the sweet spot for a fully cooked interior and a beautifully browned exterior.
Fresh cardamom makes a huge difference — I used the maximum amount recommended in both the filling and the topping. I do think the dough and filling could use just a touch more salt. Overall, one of the best-written enriched dough recipes I’ve come across. They were devoured.
Hi Maya,
Thank you so much for your notes! I’m so glad you enjoyed this recipe 🙂 I love making these cardamom buns too!
Love, love, love this recipe! Great dough, I started making your Butterzopf too, and it is way better than many Swiss recipes I’ve tried.
I’m curious: What is the purpose of the baking sheet in the preheating oven? Does it stay i there? do you slide the buns on the parchment paper onto it to bake?
Hi Fabia,
Thank you so much! So glad you love this recipe, as well as the Butterzopf 🥰
I like to place a metal baking sheet in the oven to preheat because, once you place the tray of buns onto the preheated tray, this helps the buns to rise from underneath. It also helps the buns to brown nicely from underneath.
So yes, the preheated baking sheet stays in the oven, and you place the tray of buns onto the preheated baking sheet.
For the preheated baking sheet, I generally use the metal tray that comes with the oven. Hope this helps!
Made these a few weeks back, and they were delicious!! My friends and family keep asking when I’m gonna make them again. The instructions were very clear to follow, which was a relief as this was my first time making something this complicated!!
Hi Amelie,
I’m so glad you and your family enjoyed this cardamom buns! Once you have mastered cardamom buns, you can make almost anything 🙂
After eating cardamom buns all over Denmark and Norway, I’ve been wanting to make my own! I’ve purchased the ingredients for your recipe but don’t have a stand mixer. I can see you recommend kneading the dough for 15-20min using the mixer. How much longer would be needed by hand? Thanks ☺️
Hi Hannah,
This depends on your upper body strength 😉 I would estimate a good 10-15 minutes by hand, but it will be a sticky task when you try to incorporate the butter. I have made this dough a few times by hand and, whilst it is doable, an electric mixer is much easier. You just need to keep kneading the dough until it feels soft and elastic. If you are doing it by hand, I would suggest that you do it in a cool room and, preferably, on a cool surface (such as marble). Good luck!
Hi, is it possible to shape the buns and then freeze them before the second proofing? Would it proof properly after thawing in the fridge?
Hi Somya,
I don’t have any experience with freezing bread dough, unfortunately. I have read that you can freeze dough after the first proofing, but I have not tried it myself. The second proofing is difficult because once you have shaped the buns, they are quite fragile in that state. I imagine they would not keep their nice shape upon defrosting after the second proofing. You could certainly freeze the buns once they are baked.
These were fantastic – thank you so much! I just traveled to Copenhagen (live in SF full time) and have been craving the buns ever since I’ve been back in California. I was going to attempt the Juno the Bakery recipe, but found this one and thought it was more approachable. It was delightful and much less intimidating than I expected. Great tips and these turned out great with 4 tsp of store bought ground cardamom for the filling.