Brioche
If you live in France or Switzerland, brioche bread can be found in almost every bakery in every town, and it is quite a common treat for breakfast or morning tea.
Small brioche buns tend to be quite popular with children, but I know many adults who would happily devour a brioche bun alongside their strong morning coffee.
Why This Recipe Works
- Follow this easy brioche recipe with step-by-step photos for the perfect results.
- Letting the dough rest overnight improves the flavour and texture of the brioche.
- This brioche recipe produces a light, fluffy and buttery brioche which you can shape however you like.
What is a Brioche?
A French brioche is a type of yeasted bread which is sweetened and rich in butter.
In Europe, especially in France and Switzerland, brioche breads are commonly sold as small buns which are intended to eat at breakfast. I regularly put a small brioche bun in my childrens’ lunch box as a snack.
Some bakeries also sell large loaves of brioche which can be sliced and served toasted or untoasted.
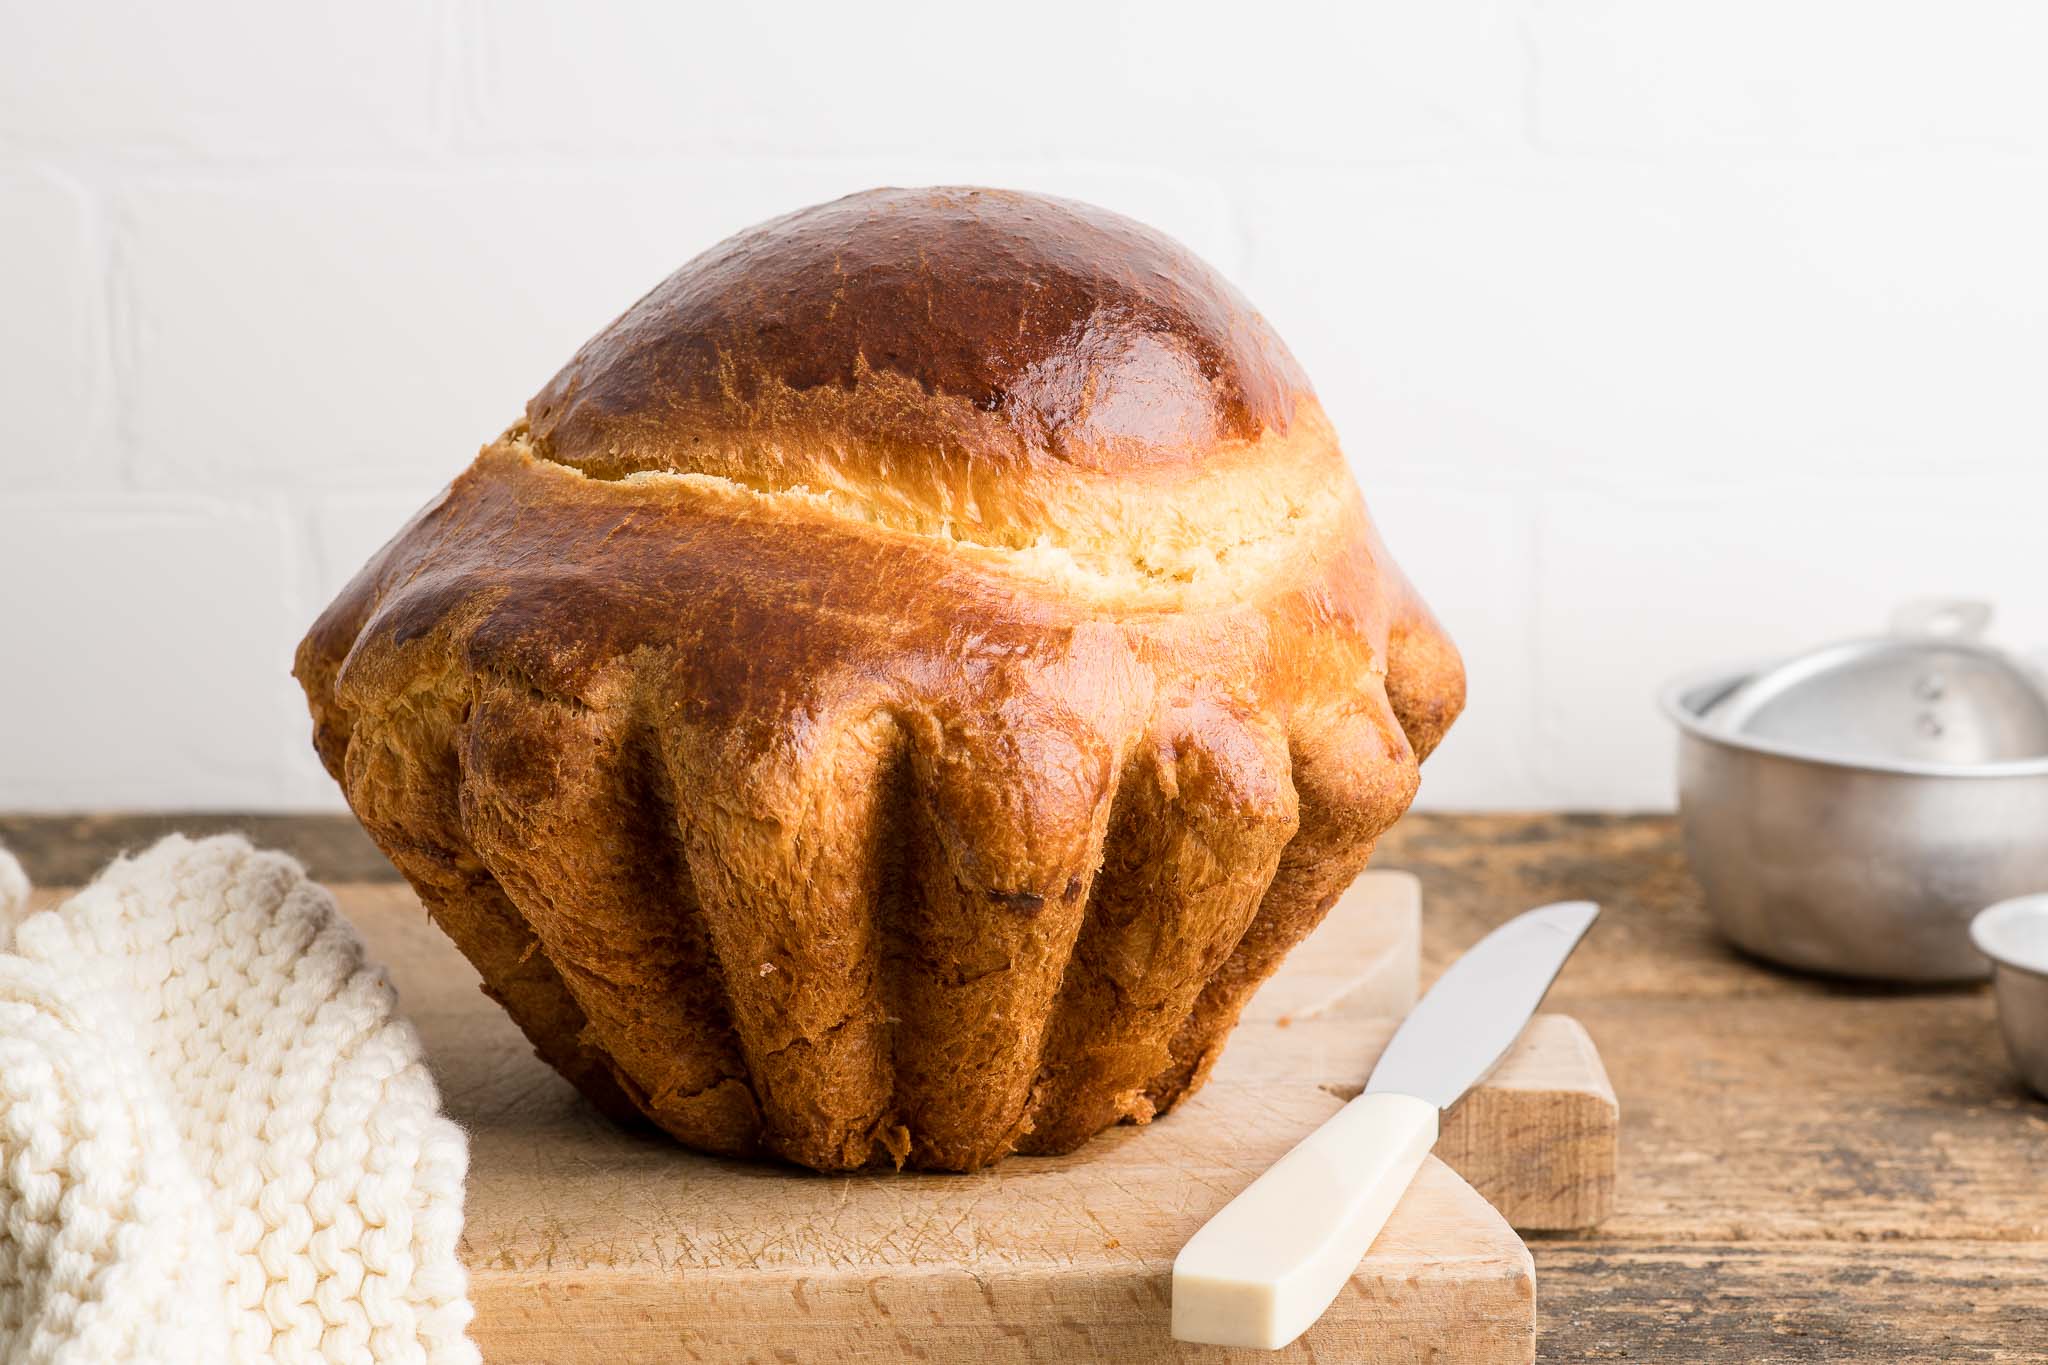
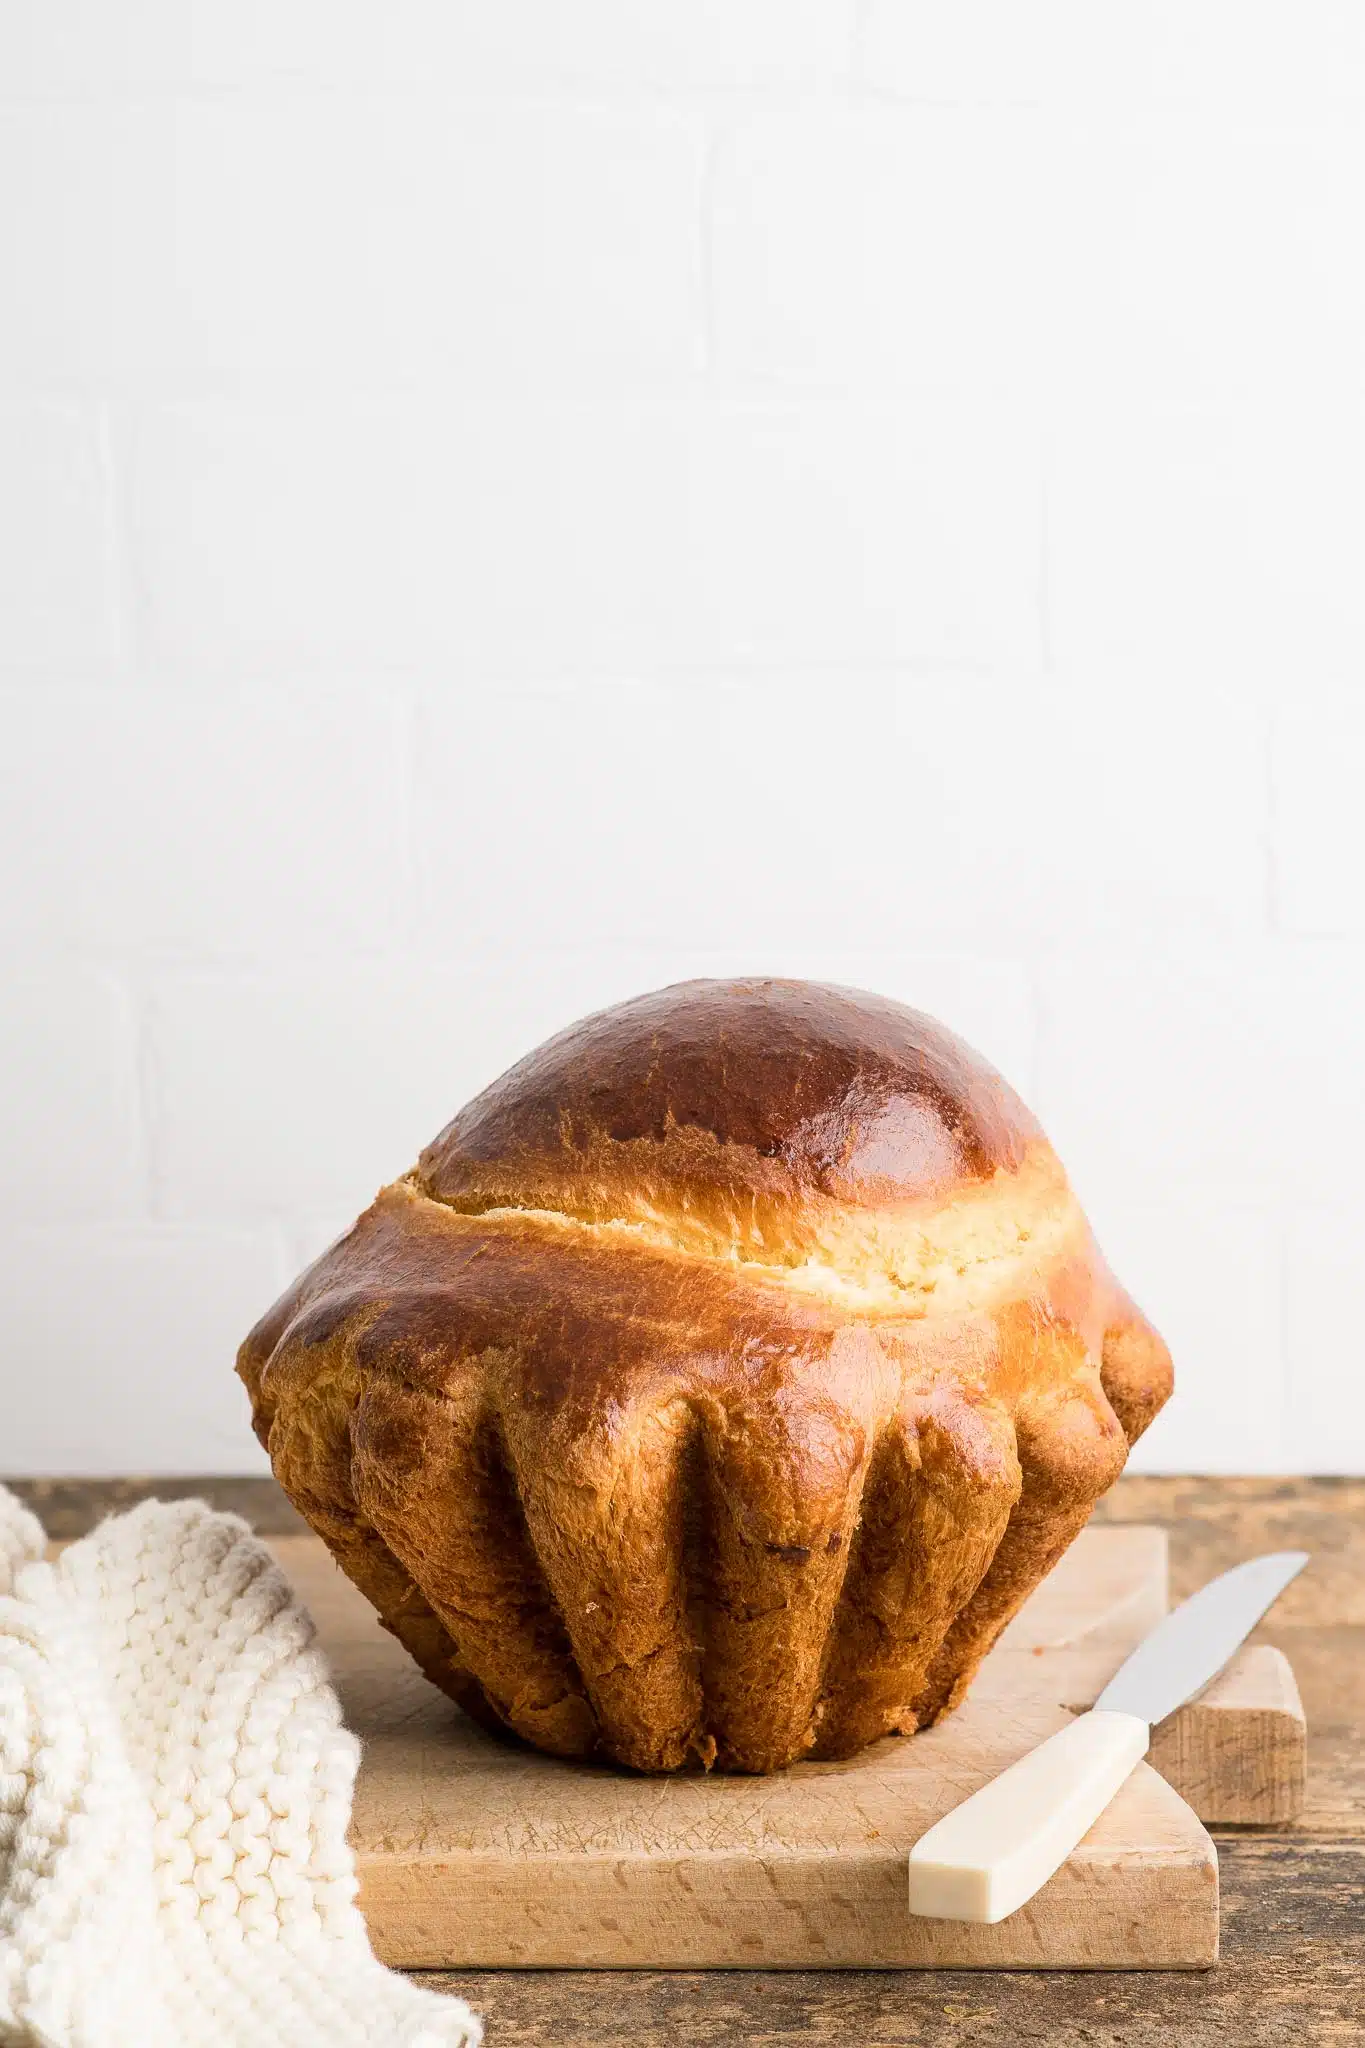
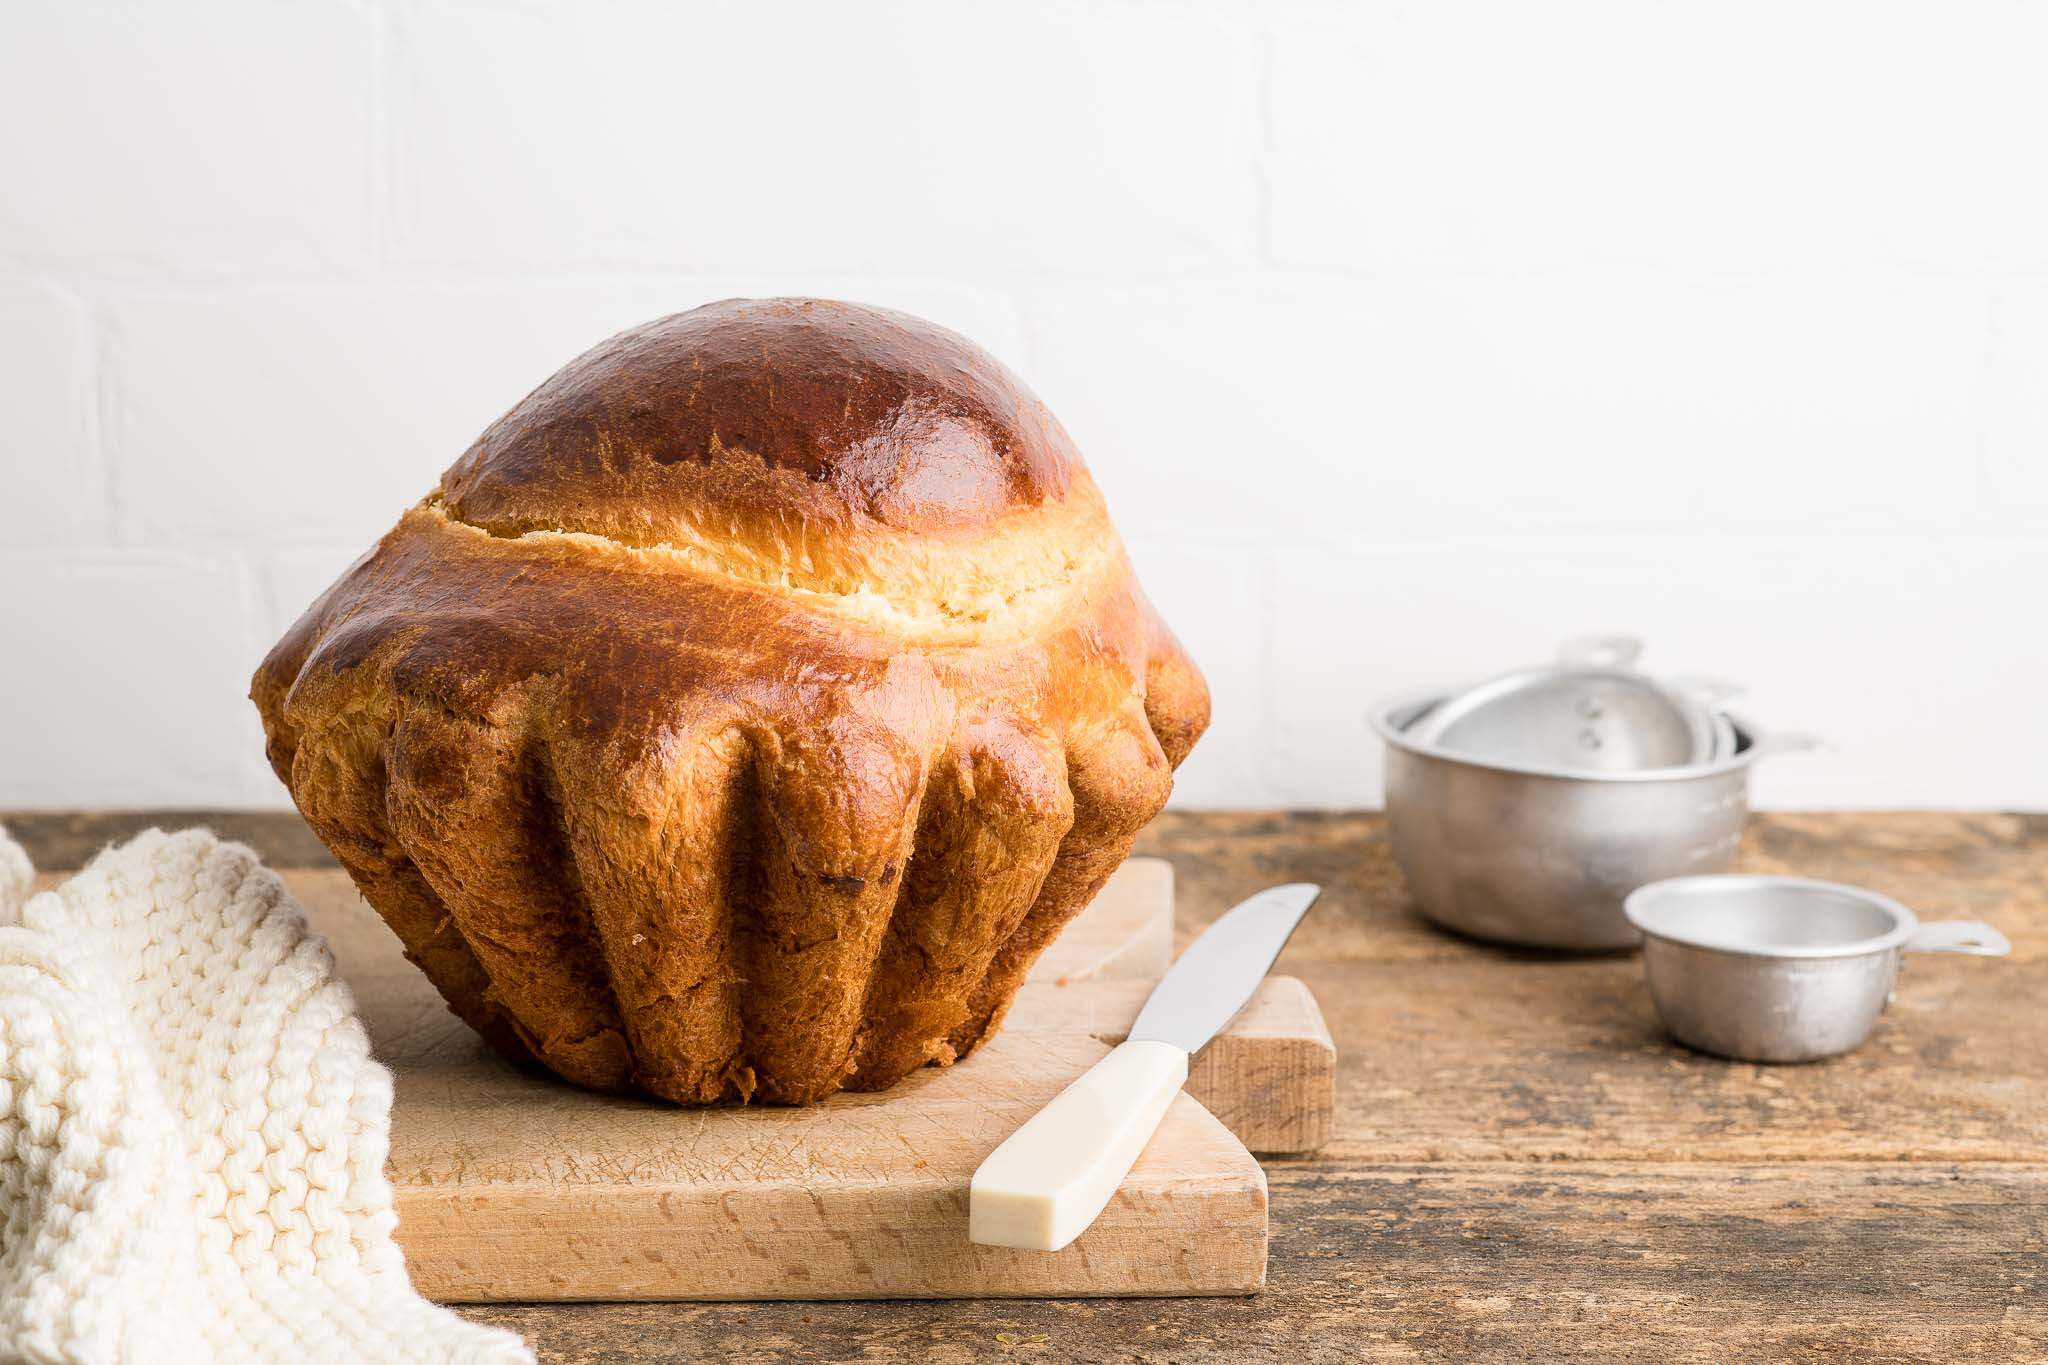
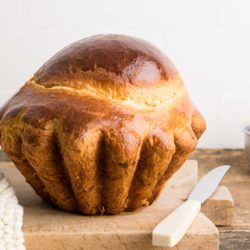
Brioche à Tête
The brioche buns commonly sold in Switzerland are called “Brioche à Tête” because the buns have a little “head” on top of the “body”. It is a funny, but cute, shape and my children always have a good laugh when they see me making this type of brioche.
This shape of brioche is also called “Brioche Parisienne“.
Brioche Recipe
Making French brioche is similar to making bread with yeast.
This brioche recipe requires you to start the day before because, due to the high butter content, chilling the dough will make it easier to handle and shape.
The brioche recipe below has instructions to make a “Brioche à Tête”, but you can use this dough to make other bread shapes as well.

How to Make Brioche Bread
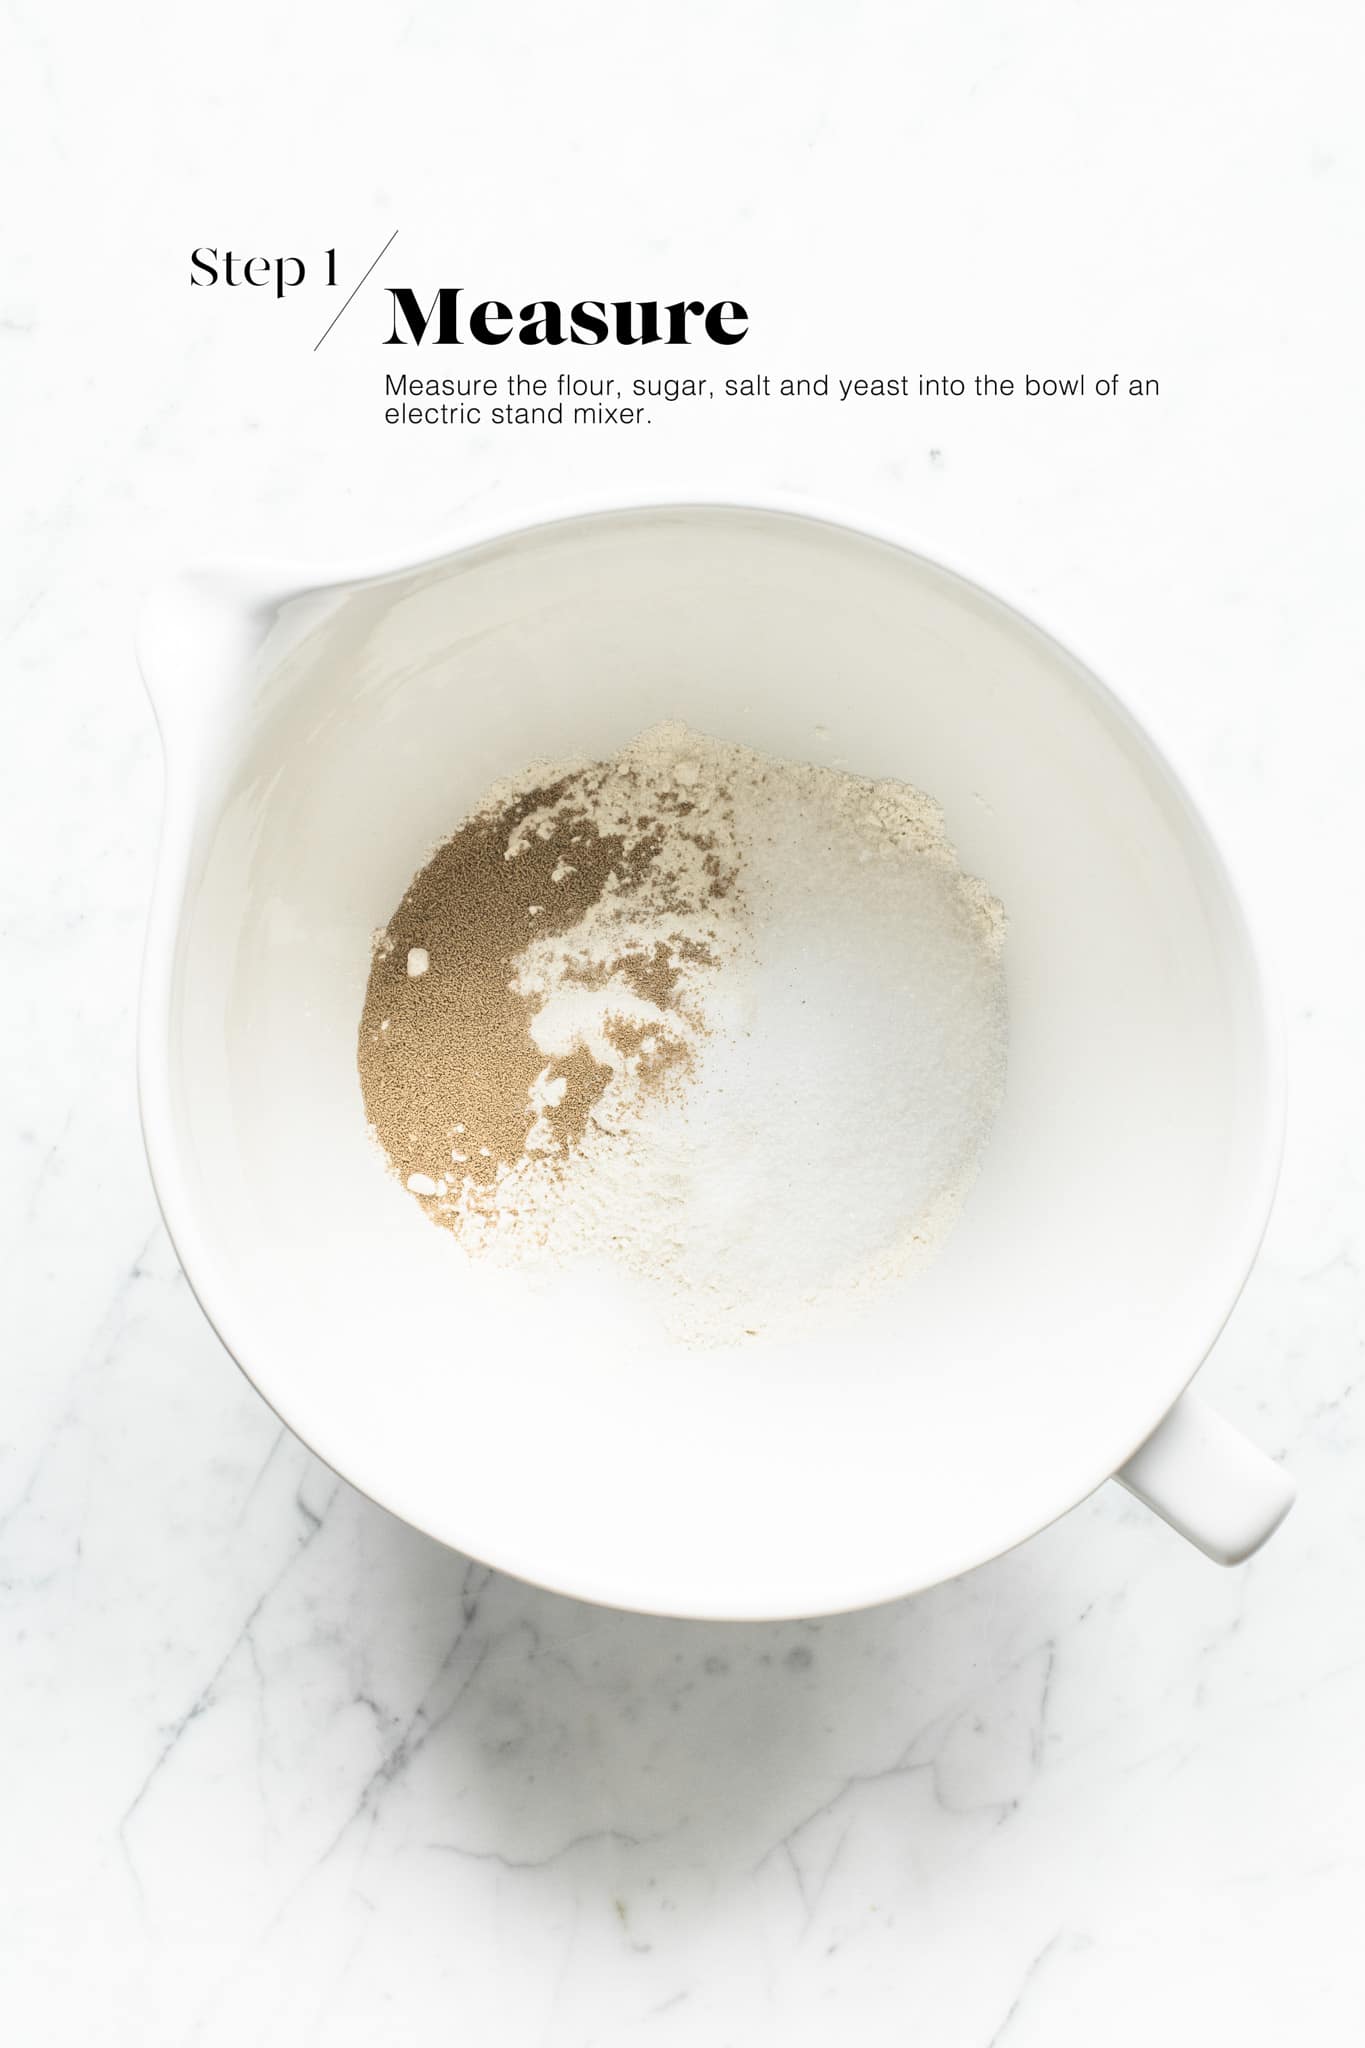
Step 1
Measure the flour, sugar, yeast and salt into the bowl of an electric stand mixer.
This recipe uses instant yeast, so you can add the yeast directly to the dry ingredients.
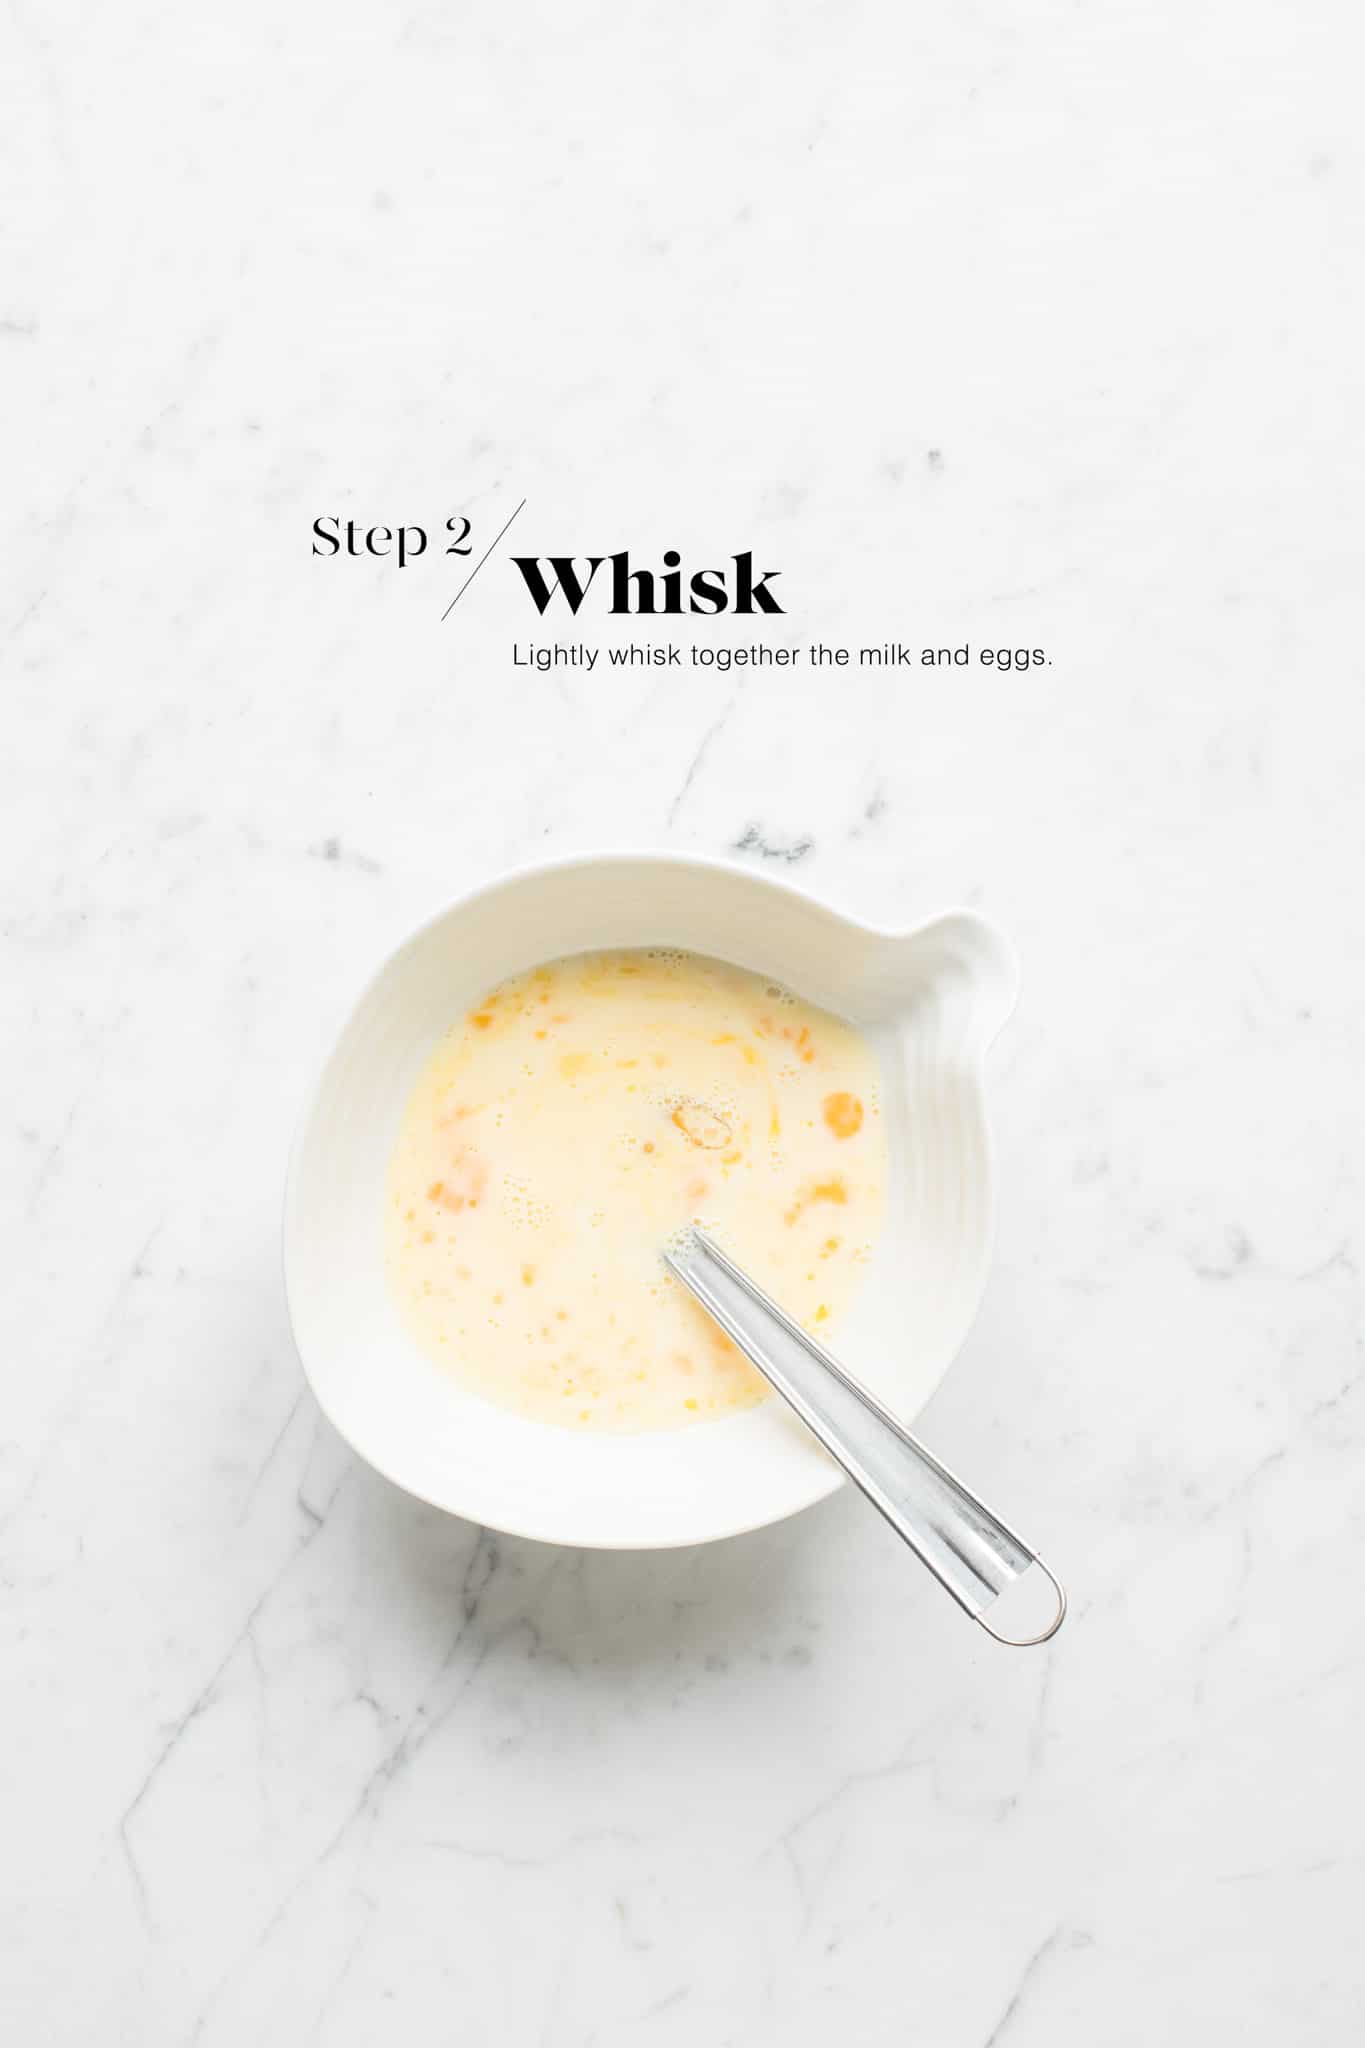
Step 2
In a small bowl, lightly whisk together the milk and eggs. The milk should be warmed to blood temperature, and the eggs should be at room temperature.
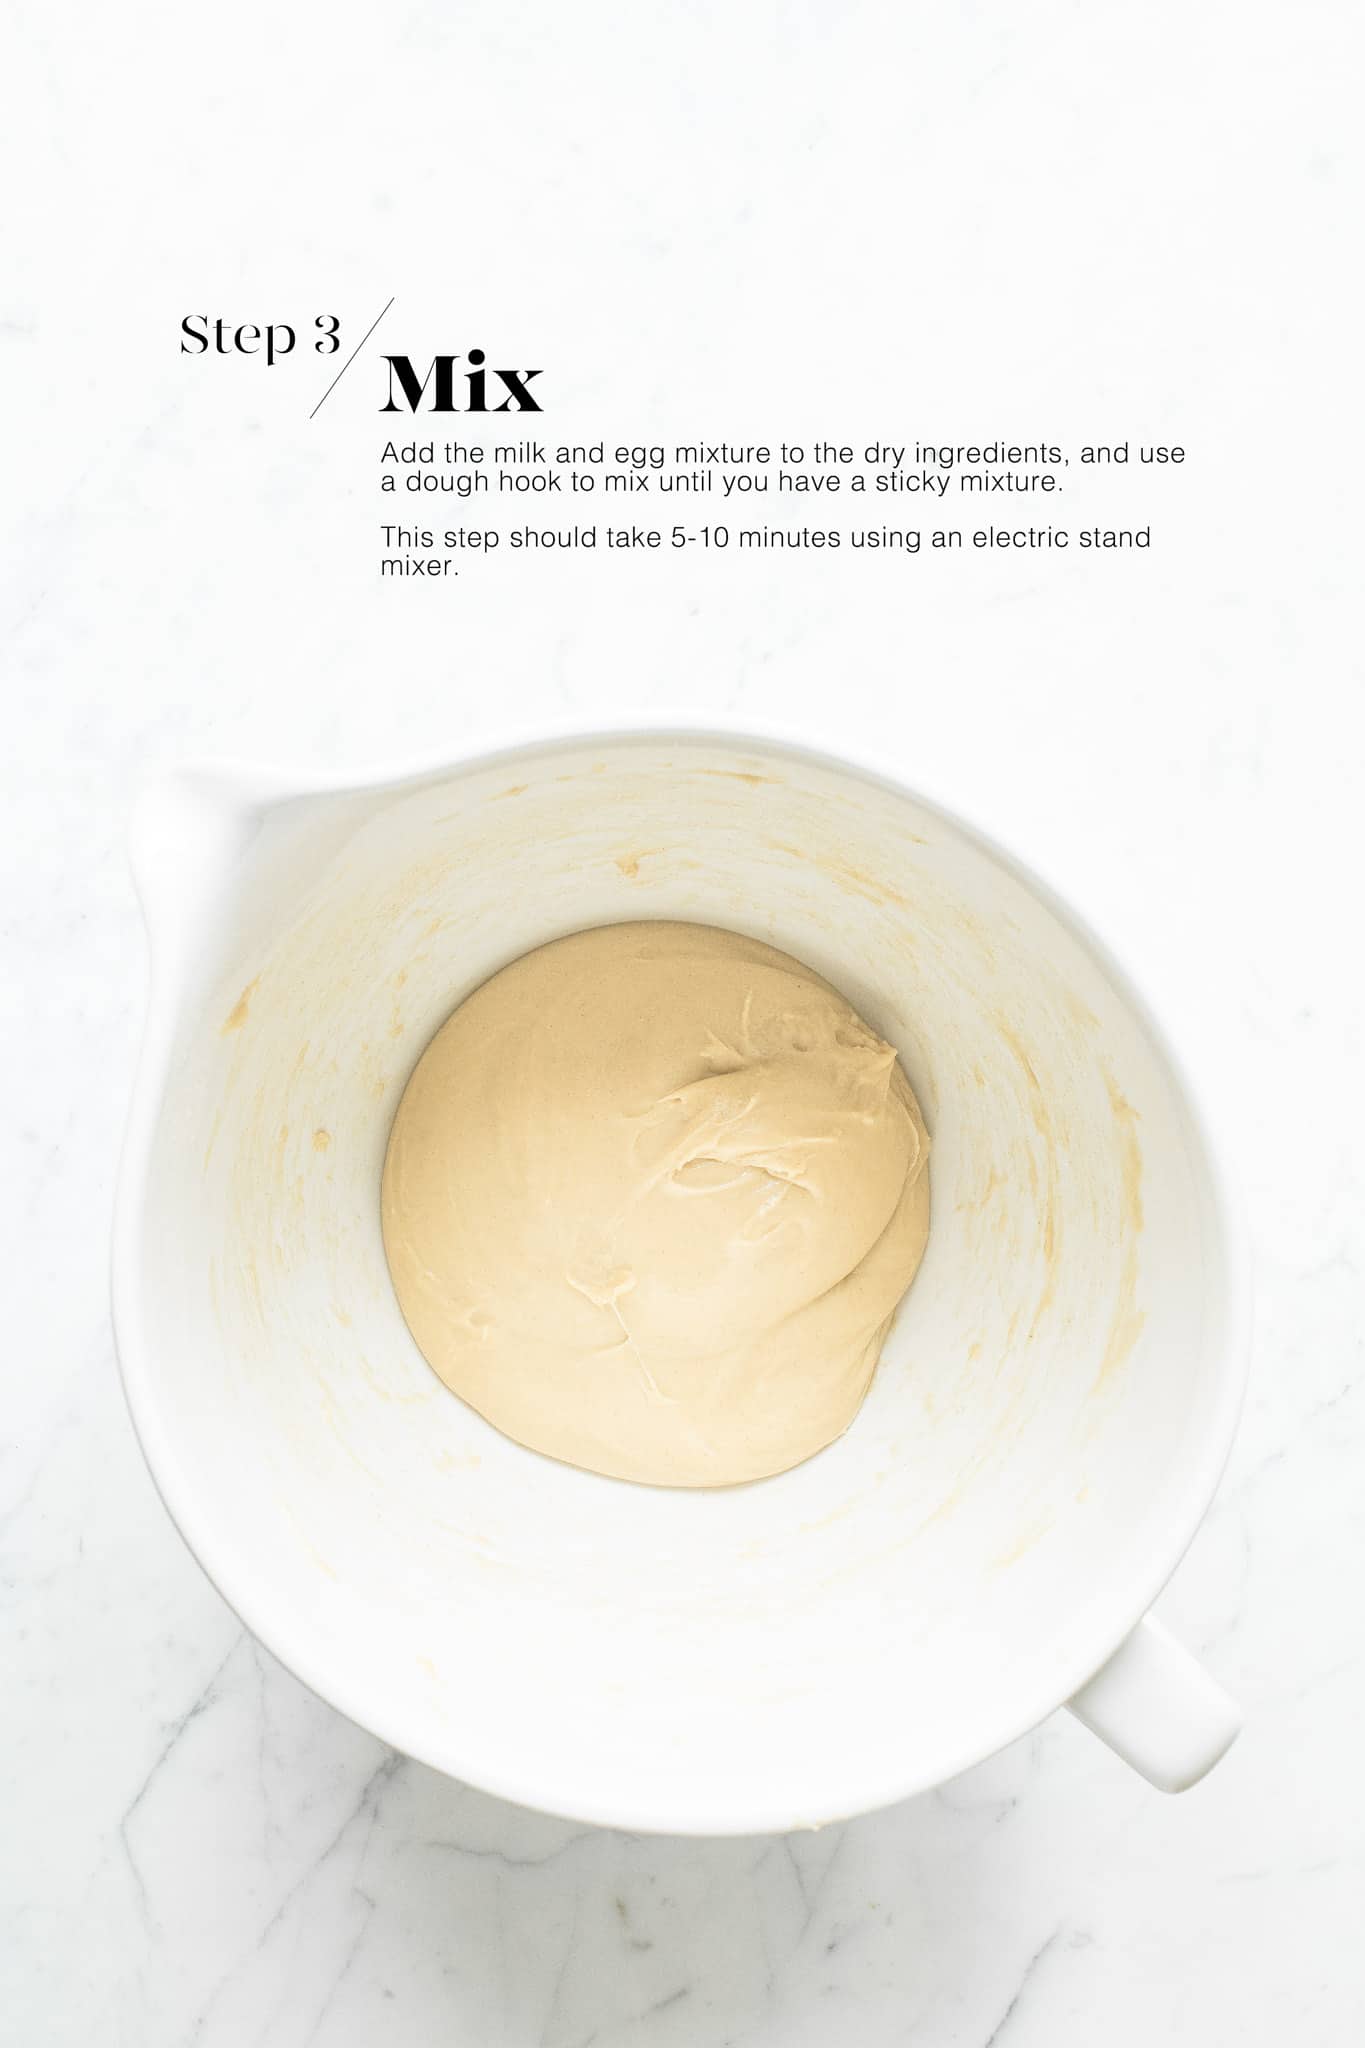
Step 3
Using the dough hook on the stand mixer, mix the liquid ingredients into the dry ingredients, and keep beating until everything comes together into a sticky dough.
You may need to scrape down the sides of the bowl once or twice.
Beat on medium speed for 5-10 minutes until you have a ball of sticky dough.
At this stage, the dough should be loosely forming around the bottom of the dough hook.
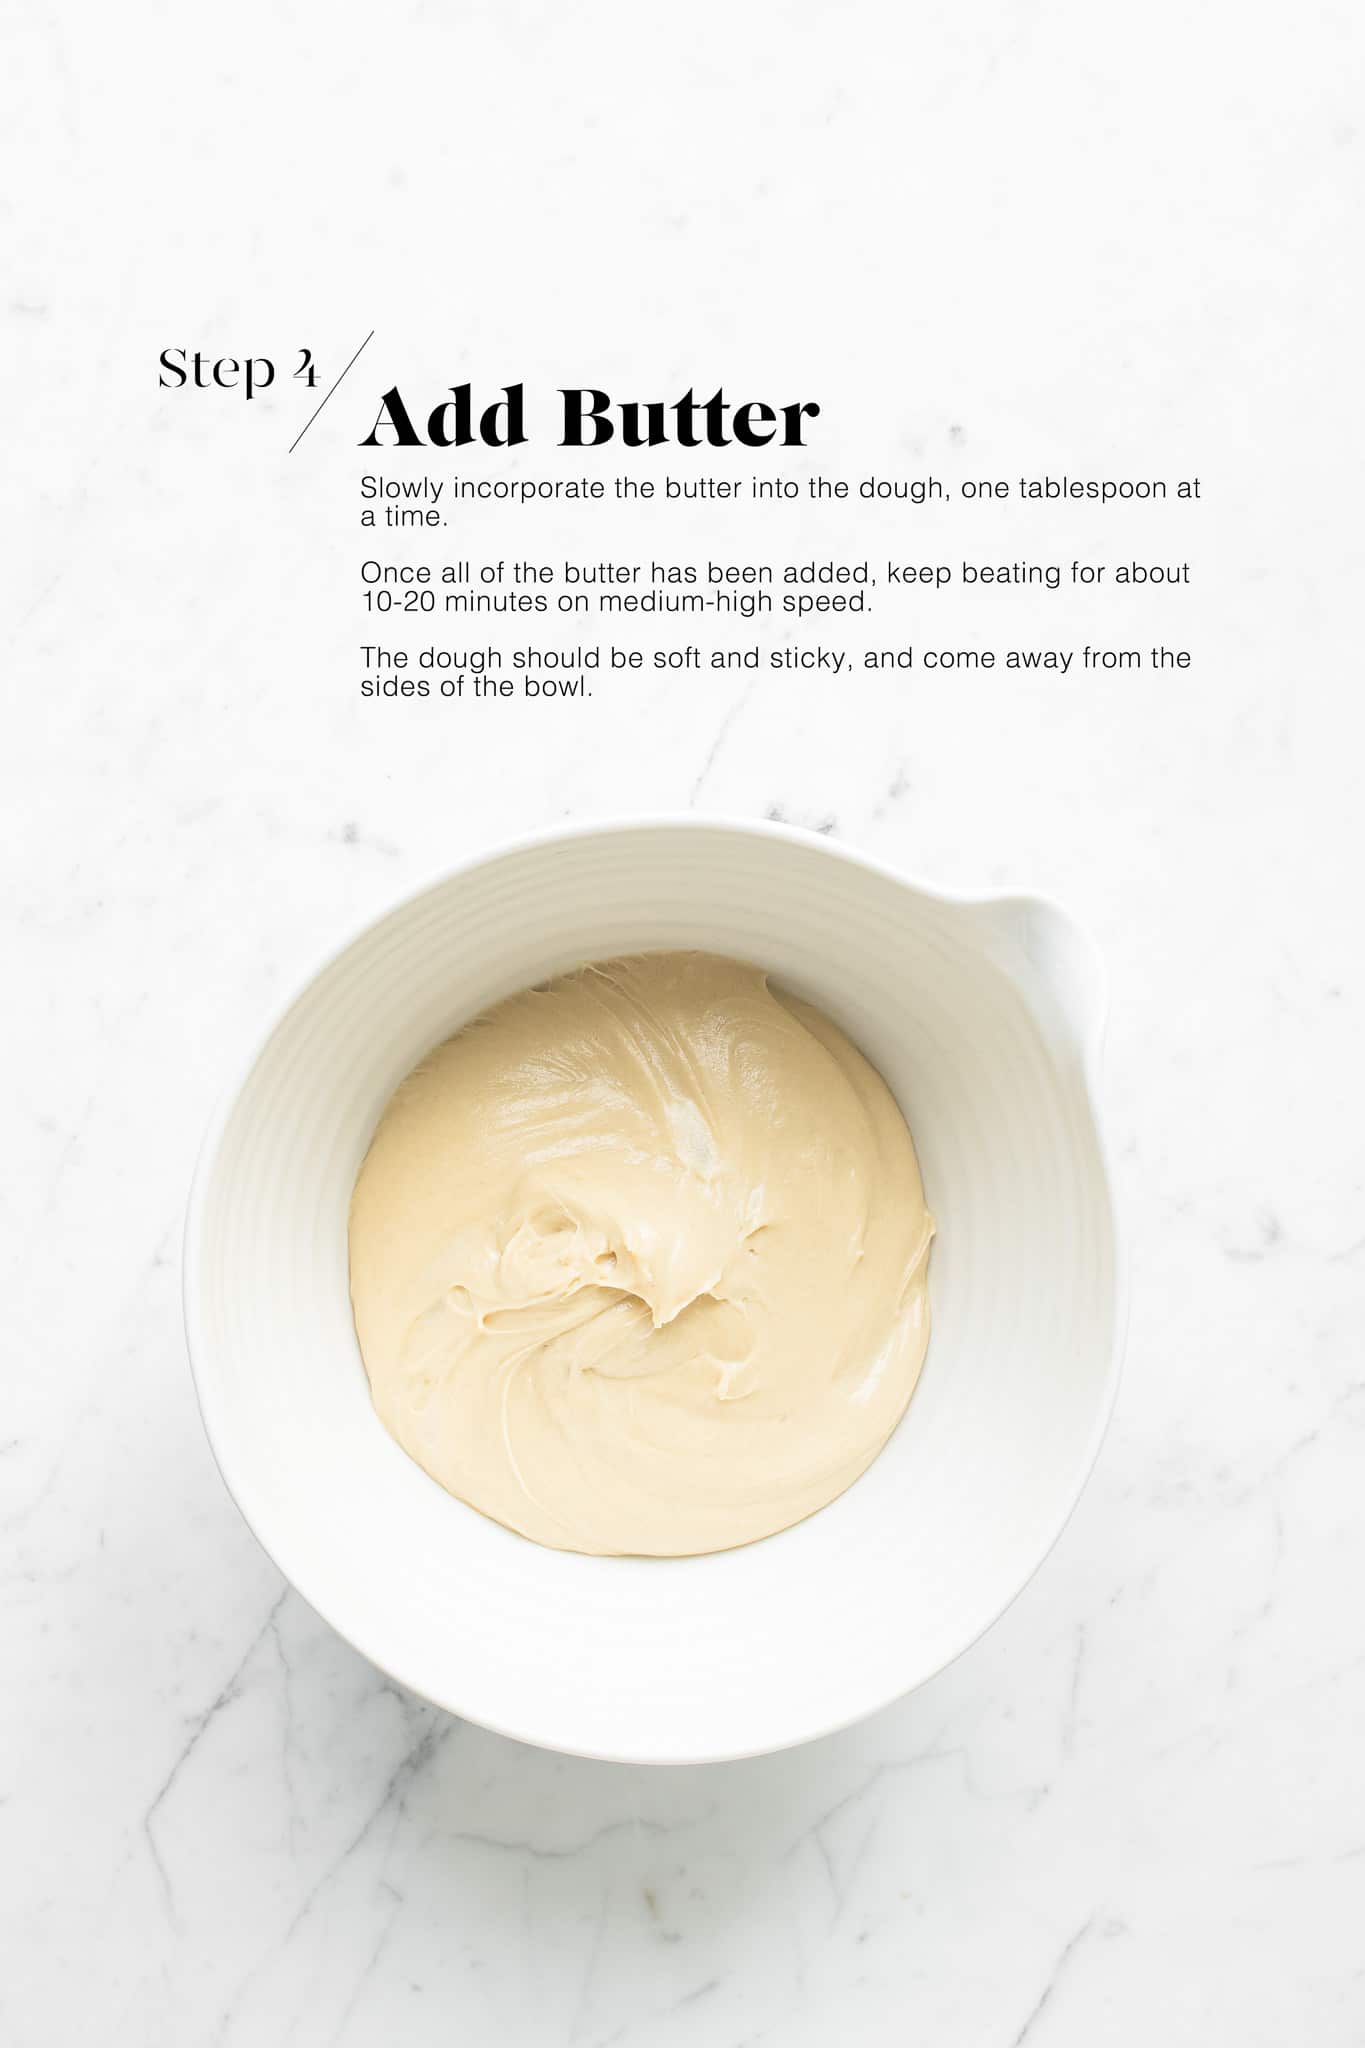
Step 4
Slowly incorporate the butter, one tablespoon at a time. Repeat until all of the butter has been used.
Beat again on medium-high speed for about 10 to 20 minutes, or until you have a very soft and sticky dough which comes away from the sides of the bowl.
I also recommend doing the windowpane test, which is to stretch a piece of dough from the dough hook, until it is thin enough that you can almost see through the “window” of dough, and without the dough breaking as you do this test.
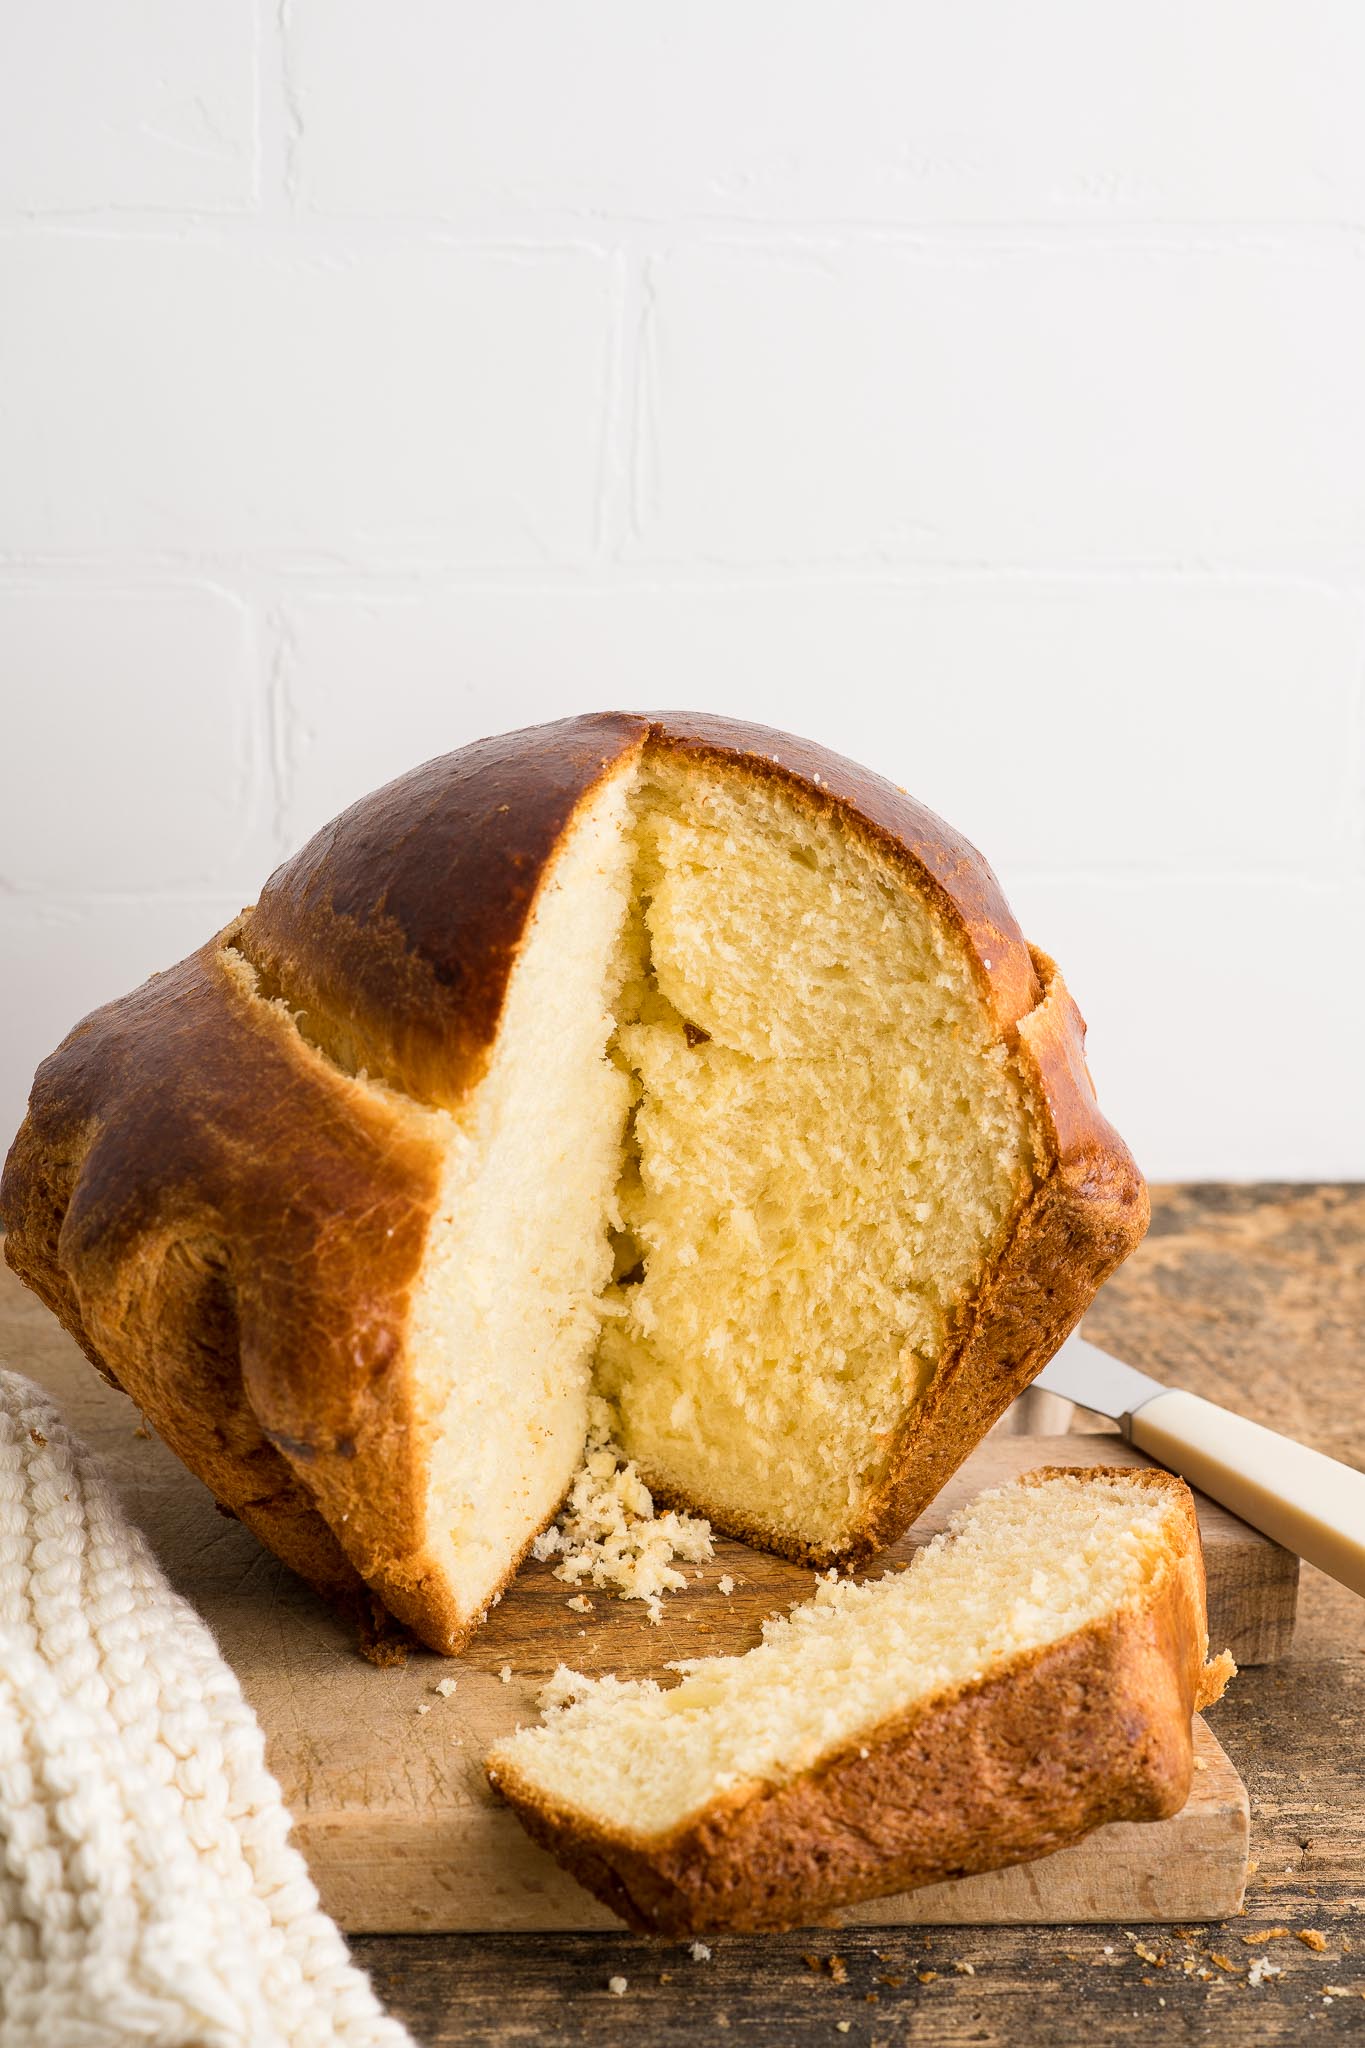
Beating (or kneading) the dough for a sufficient amount of time will allow you to develop the gluten in the dough, and it is the gluten which will give the dough some elasticity, which in turn will result in a nice chewy texture.
If you don’t knead the dough long enough, the resulting brioche will have a texture more similar to a cake than bread.
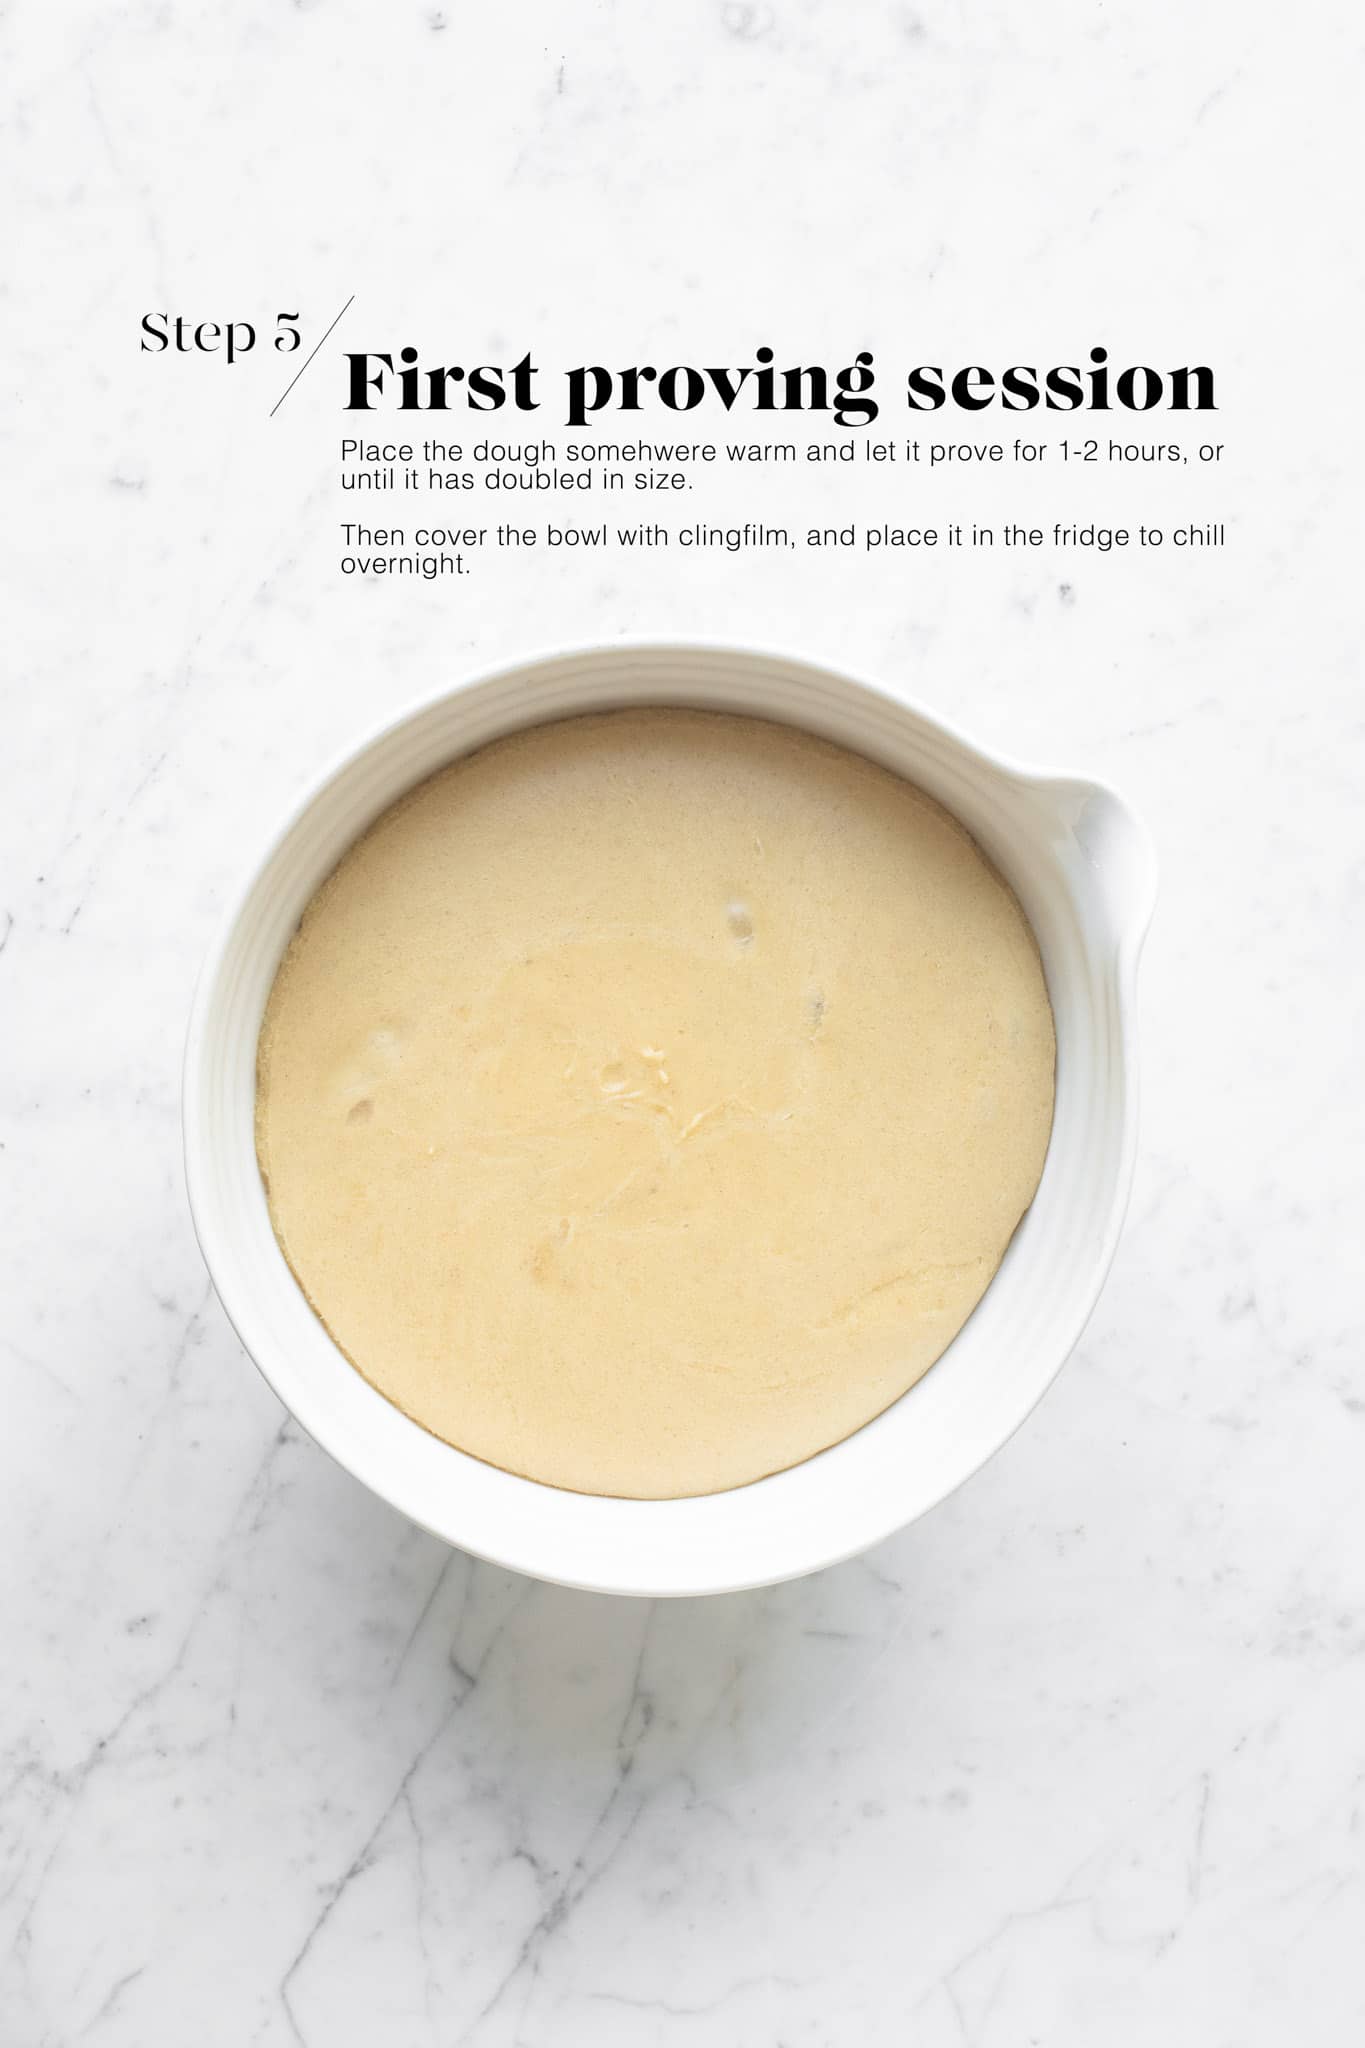
Step 5
Lighly oil a large bowl. You will need a bowl that is large enough for the dough to at least triple in size.
Use a dough scraper to remove the brioche dough to the bowl.
Place the bowl somewhere warm for the dough to prove for 1-2 hours, or until it has doubled in size.
Without touching the dough, cover the bowl with clingfilm, and place the bowl with the risen dough into the fridge to chill overnight.
The dough will rise some more overnight.
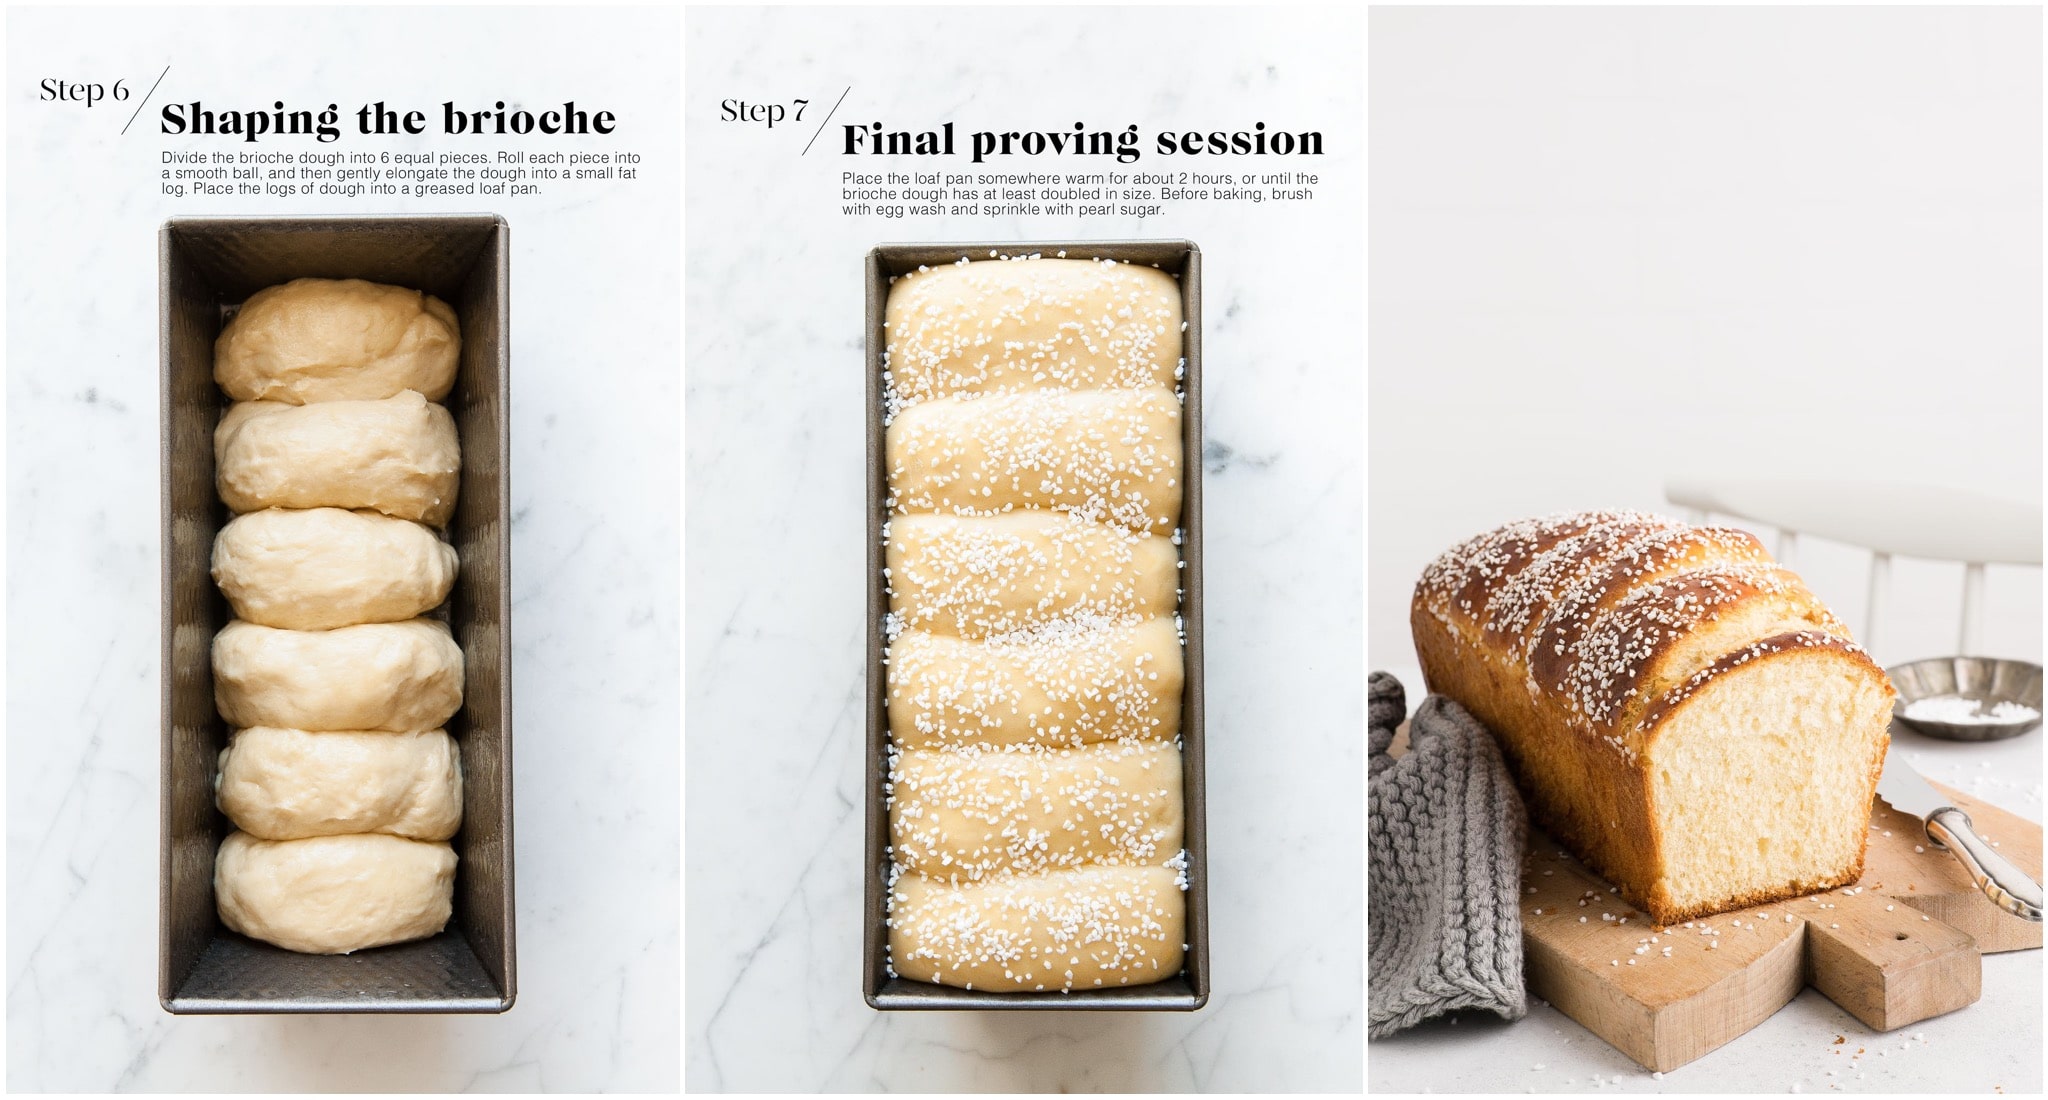
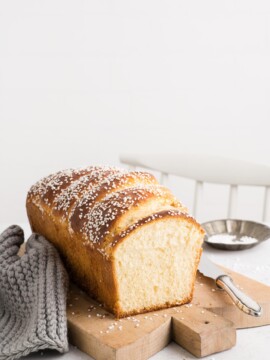
Step 6
Remove the bowl of dough from the fridge.
Punch down the dough and gently knead it into a smooth ball. The dough should be very cold and easy to manage.
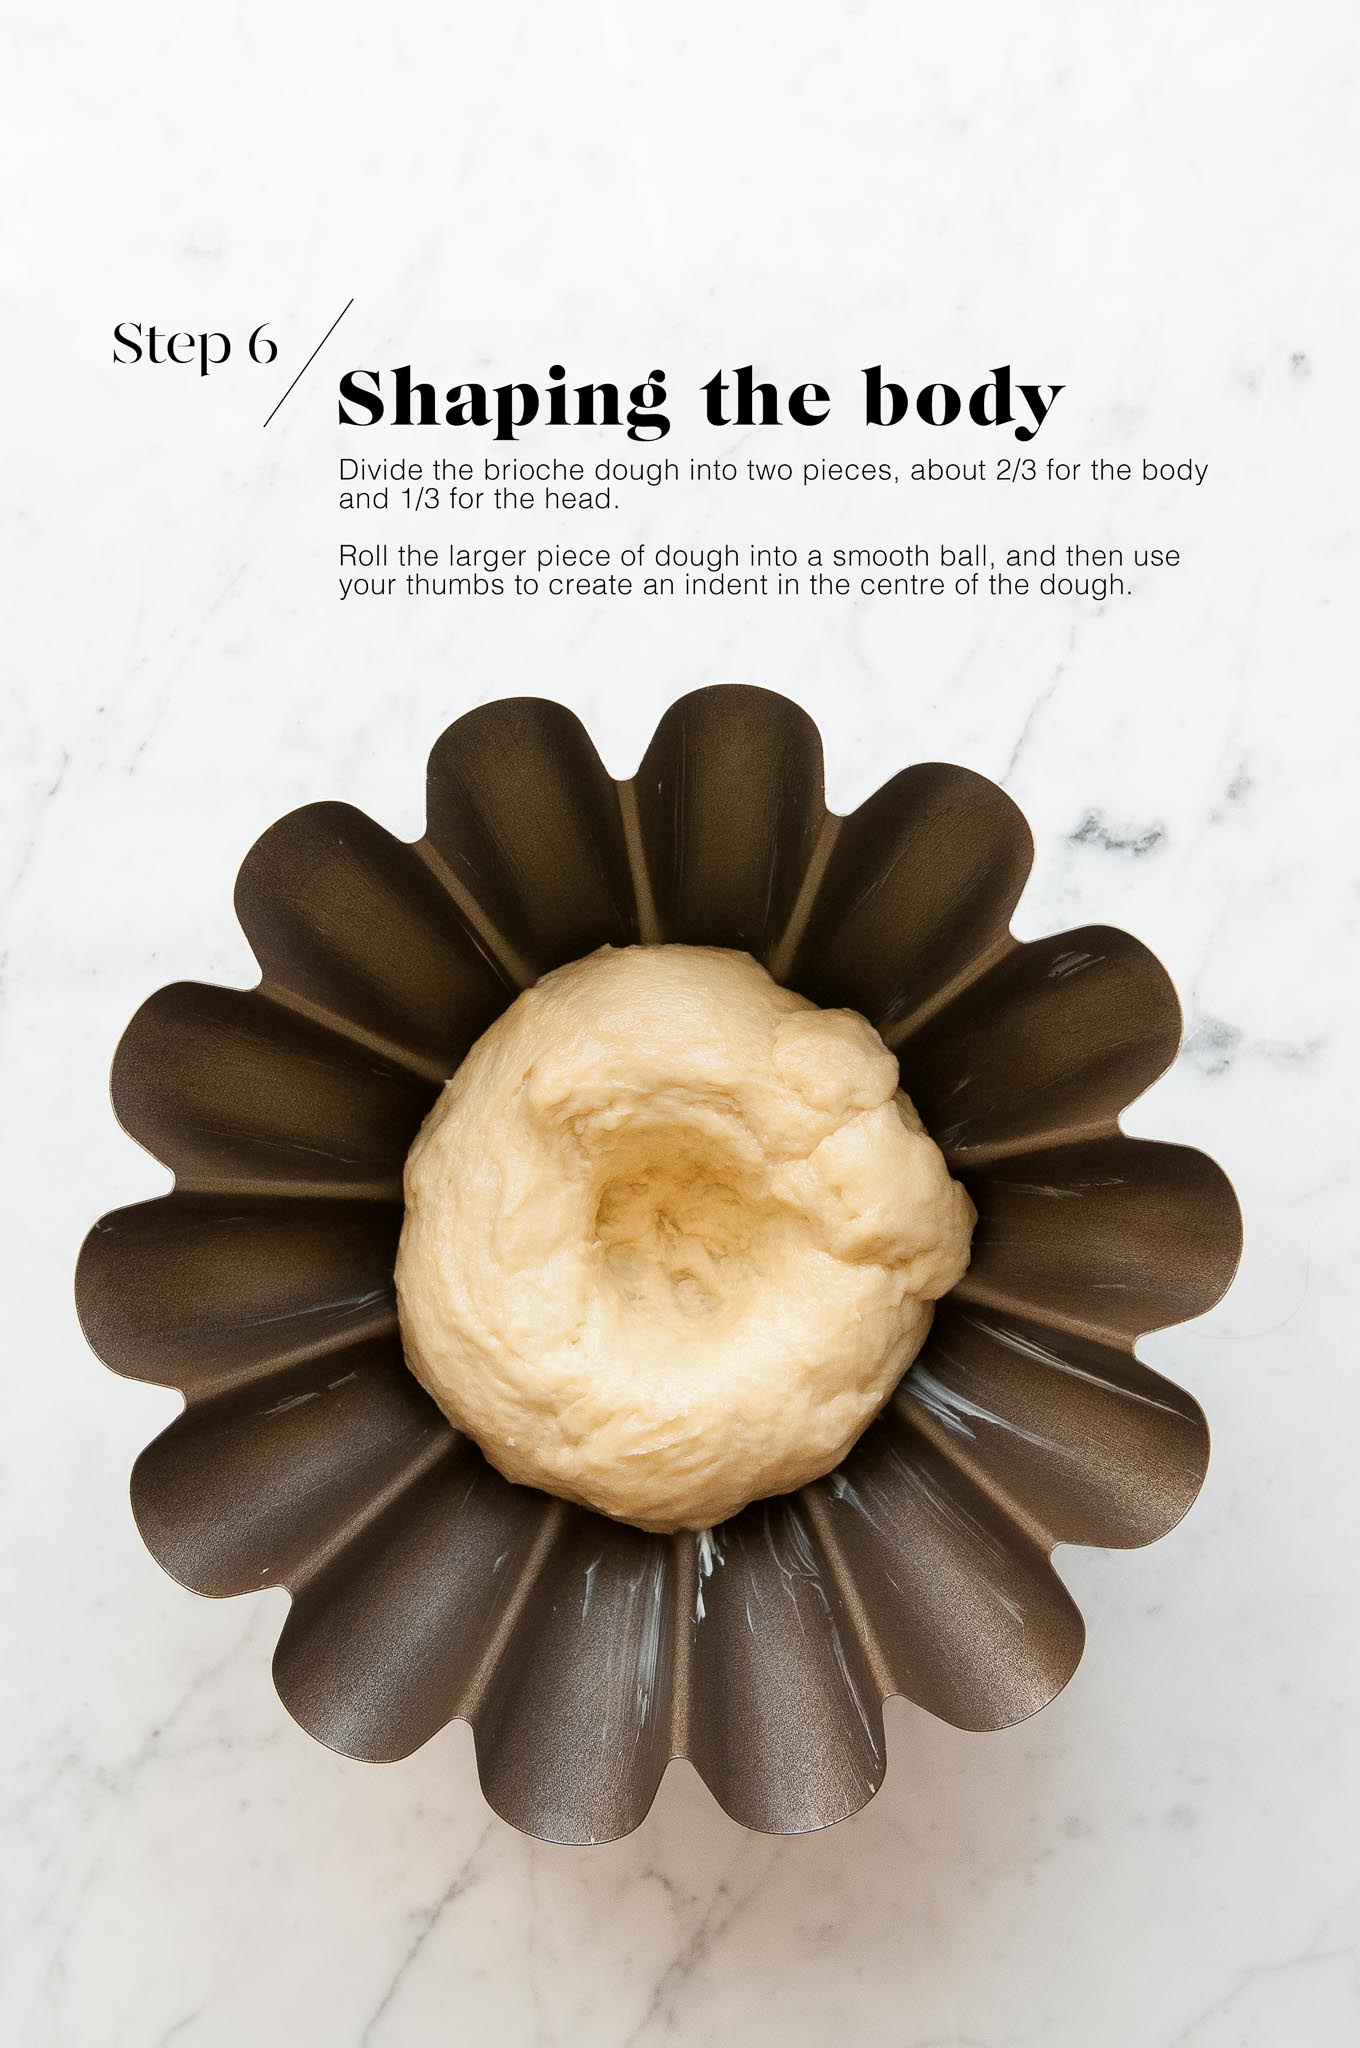
Butter a large brioche pan, or use some non-stick baking spray.
The brioche pan I use is 22.5 cm/9 inches wide.
To make a Brioche à Tête, separate the dough into two pieces – about 2/3 for the “body” and 1/3 for the “head”.
For the body, roll the larger piece of dough in your hands until you have a smooth ball. Tuck in any seams underneath. Use your thumbs to gently create an indent in the centre of the ball, as if you are creating a donut, but don’t create a hole – just an indent. Place the dough into the brioche pan.
Step 7
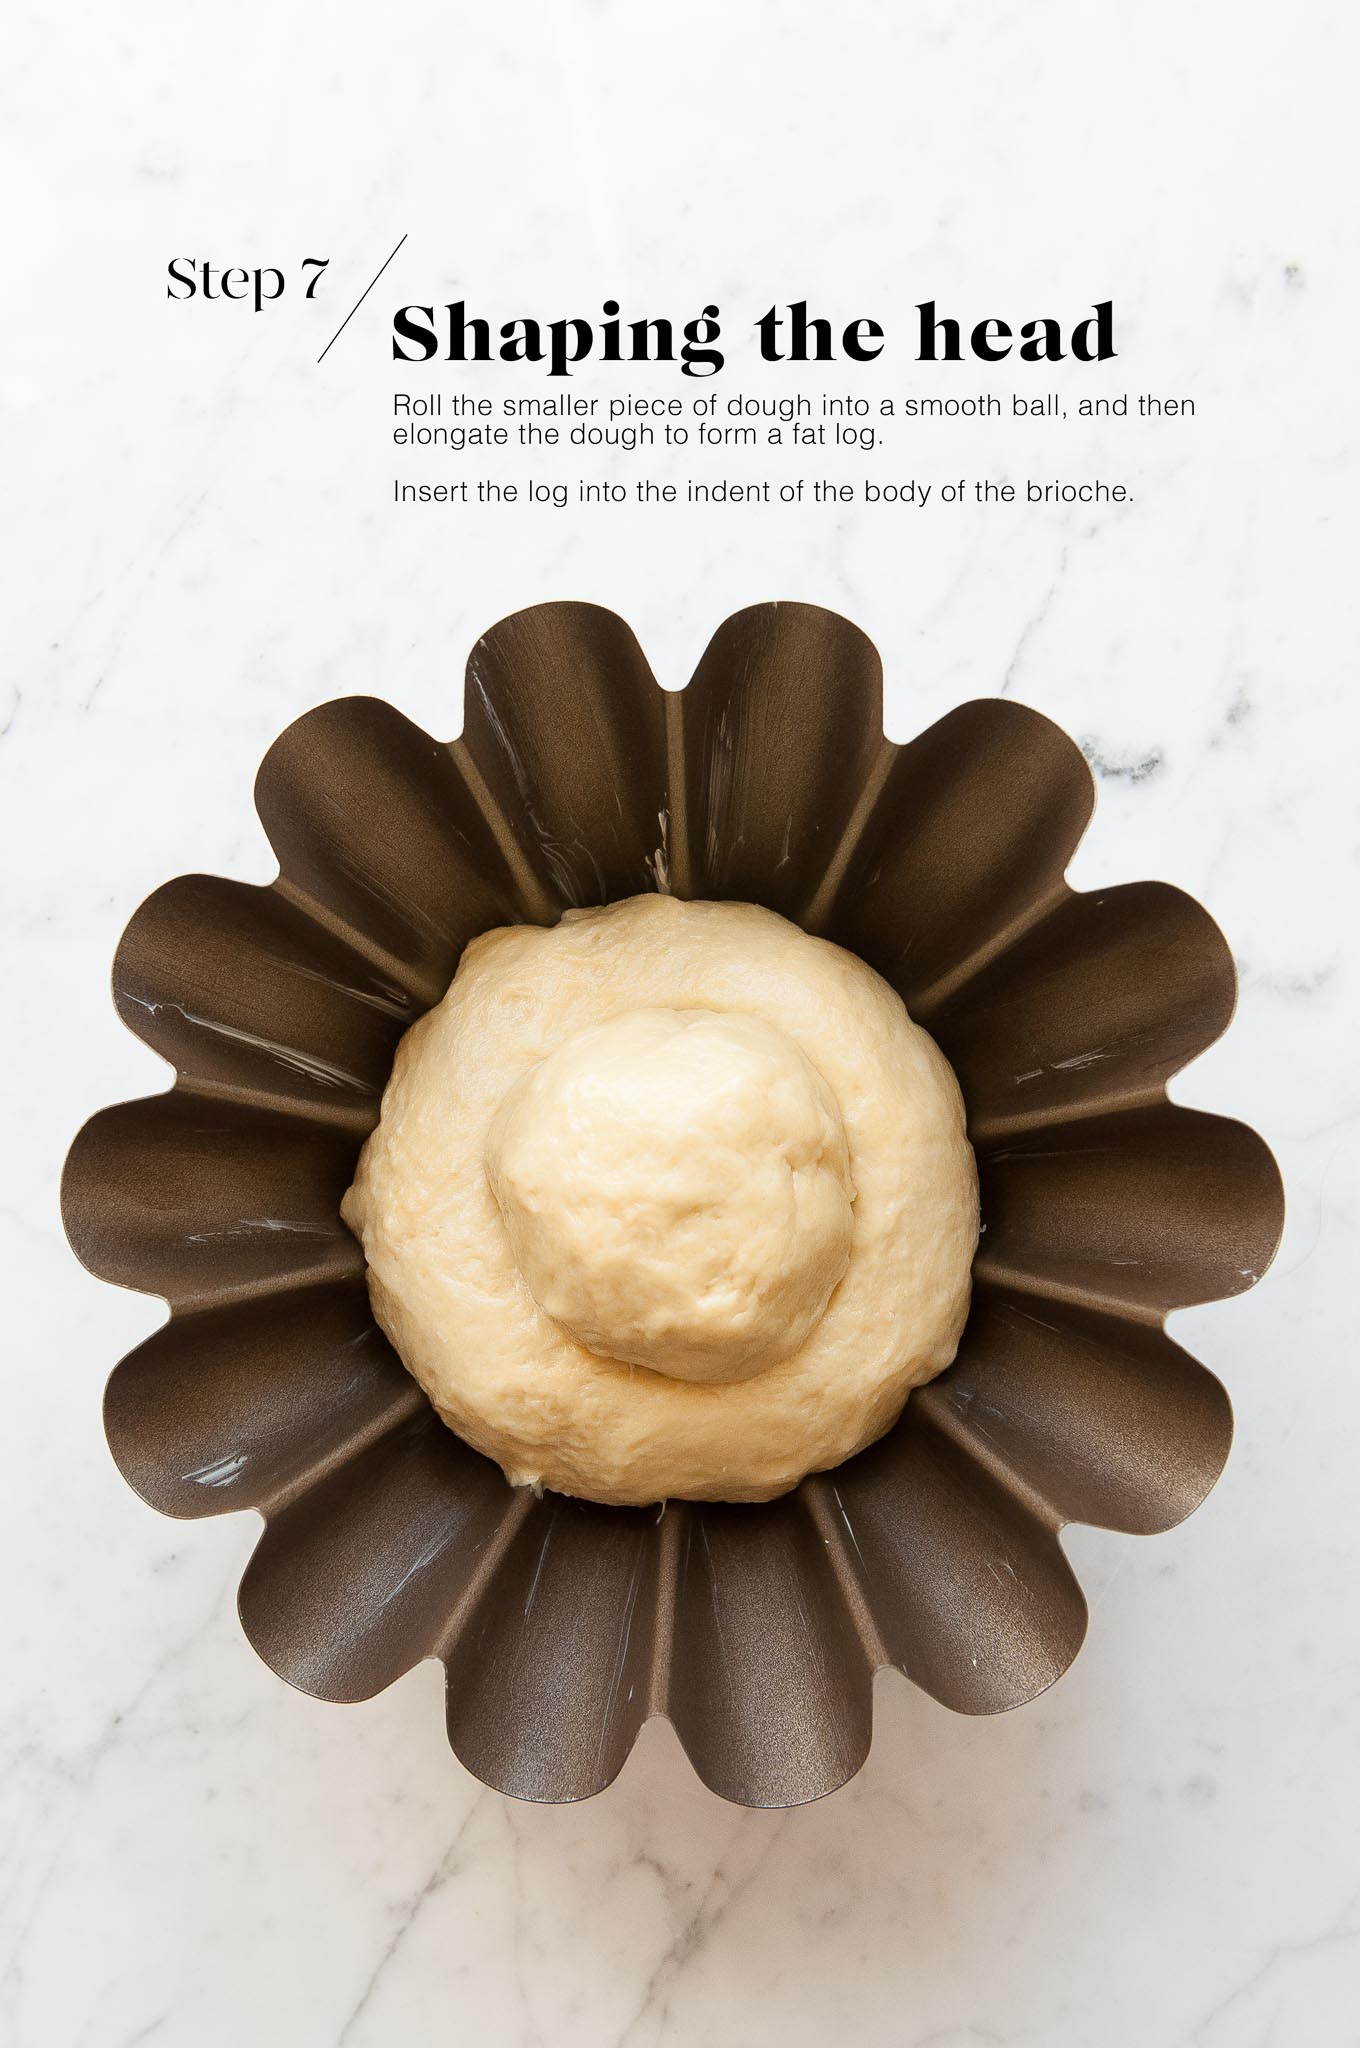
For the head, roll the smaller piece of dough until you have a smooth ball. Then gently elongate the ball until it is shaped like a fat log. Insert the log into the indent of the dough already in the brioche pan.
Step 8
Place the brioche pan somewhere warm for the dough to prove for 1-3 hours, or until it has doubled in size. Ideally, the body of the brioche should rise until just under the rim of the brioche pan.
As the dough is cold at this stage, it may need up to 3 hours to prove, but much depends on how warm your room is.

Step 9
When the brioche is ready to bake, gently brush the top with some egg wash.
Bake for about 30 minutes, or until it is lightly golden. If you have a digital thermometer, the brioche is cooked if the internal reading is 85°C/185°F.
If it is browning too quickly (check around the 10-15 minute mark), place a sheet of foil over the brioche to stop it from darkening further.
Tips for Making French Brioche
- I recommend using bread flour when making brioche. Bread flour contains more protein, which is necessary to create more gluten. And it is the gluten which helps to give the brioche bread some elasticity, which will result in a nice, chewy texture.
- The brioche dough requires at least 3 sessions of proving to develop flavour, as well as the chewy texture. I like to do one warm session of proving (which is “quick”, i.e. 1-2 hours), one overnight session in the fridge (about 8-10 hours), and then a final warm session before baking (about 1-3 hours).
- You could substitute the overnight proving session in the fridge with another warm session of proving, but the texture will not be as optimal (it will still taste great!).
- If, for whatever reason, your brioche dough deflates upon the final session of proving (this can happen if there is a sudden change in temperature in the room), simply punch down the dough, roll it into a smooth dough, and return it to the buttered brioche pan. Start the warm proving session again (about 1-2 hours). Your brioche will turn out even better for the extra proving time 😉
- Sometimes, when making Brioche à Tête, the head may collapse upon proving, or even upon baking, i.e. it will sink into the body of the brioche. It takes a bit of practice to work out the proportion of dough needed for the head, and also how it should be attached to the dough.
- For a quicker brioche bread, simply roll the dough into a large smooth ball, and prove as per the recipe above. After brushing with egg wash, sprinkle generously with pearl sugar before baking.
Brioche Loaf
To make a brioche loaf, please see my recipe with step-by-step photos here:
Tips for Making Bread Dough Ahead of Time
I love baking bread, but I don’t love getting up extra early to get started on the dough. So I typically make the dough the night before and allow it to rise slowly in the fridge overnight. The longer proofing time has the added benefit of allowing the dough to develop more flavour and a better texture. Come the morning, the dough will have at least doubled in size, and it will be ready for shaping as per the recipe.
To make the dough the night before:
- Make the dough as per the recipe.
- Place the dough into a large oiled bowl.
- Cover the bowl with plastic wrap or a reusable bowl cover.
- Place the bowl into the fridge.
- Let the dough rise overnight, or for at least 8-10 hours.
- The next morning, the dough should have at least doubled in size.
- Gently remove the dough from the bowl.
- The dough is ready for shaping and the second proof as per the recipe.
- As the dough will be cold from the fridge, the second proof may take slightly longer.
Brioche
Ingredients
For the Brioche
- 300 g (2 cups) white bread flour, (see Kitchen Notes below)
- 55 g (¼ cup) caster sugar, (superfine sugar)
- 7 g (2 teaspoons) instant dried yeast, (see Kitchen Notes below)
- 6 g (1 teaspoon) fine salt
- 90 ml (⅓ cup) milk, warmed to 37°C/98°F
- 3 eggs, at room temperature
- 100 g (1 stick) unsalted butter, softened
For the Eggwash
- 1 egg , beaten with a dash of milk
Instructions
Begin this recipe the night before.
Day One
- Measure the flour, sugar, yeast and salt in the bowl of an electric stand mixer.
- Attach the dough hook to the stand mixer and lightly mix the dry ingredients together.
- In a small measuring jug, whisk together the milk and eggs.
- Slowly add the milk and egg mixture to the dry ingredients, and keep mixing until a sticky dough forms. The dough should form together loosely around the dough hook. You may need to scrape down the sides of the bowl once or twice to make sure all of the ingredients are well-incorporated. This step should take about 5-10 minutes on medium speed.
- Add a tablespoon of butter and beat until it has been incorporated into the dough. Repeat with the remaining butter, adding one tablespoon at a time.
- Once all of the butter has been added, keep beating for about 10-20 minutes on medium-high speed.
- The dough is ready when it is soft, sticky and elastic in texture, and when it comes away from the sides of the bowl instead of sticking to the sides. I also recommend doing the “windowpane test“, which is to stretch a piece of dough from the dough hook, until it is thin enough that you can almost see through the “window” of dough, and without the dough breaking as you do this test.
- Lightly oil a large bowl. You will need a bowl that is large enough for the dough to at least triple in size.
- Use a dough scraper to scrape the brioche dough into the oiled bowl.
- Place the bowl somewhere warm for the dough to prove for about 1-2 hours, or until the dough has doubled in size.
- Do not touch the dough. Cover the bowl with the risen dough with some clingfilm, and place in the fridge to chill overnight (8 to 10 hours). The dough will continue to rise a bit more in the fridge.
Day Two
- The dough will have risen more overnight in the fridge.
- Punch down the dough to release the air from the dough.
- Gently knead the dough into a smooth ball.
- Generously butter a large brioche pan (or use a non-stick baking spray). I use a brioche pan which is 22.5 cm/9 inches wide.
- Separate the dough into two pieces, about 2/3 for the body and 1/3 for the head.
- Roll the larger piece of dough into a smooth ball. Use your thumbs to create an indent in the centre of the ball. Place this piece of dough into the brioche pan.
- Roll the smaller piece of dough into a smooth ball. Elongate the dough to create a fat log. Insert this piece of dough into the indent of the dough already in the brioche pan.
- Place the brioche pan (uncovered) somewhere warm for 1-3 hours, or until the dough has at least doubled in size. As the dough is quite cold at this stage, it will usually take longer than normal to prove. But much depends on how warm the room is.
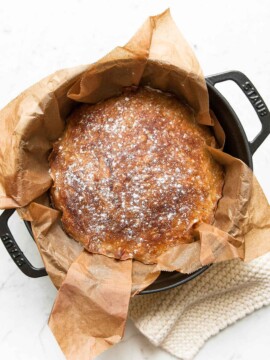
- Preheat the oven to 200°C (390°F).
- Place a metal baking sheet in the oven.
- Gently brush the top of the brioche with the eggwash.
- Place the brioche pan on the metal baking sheet (which has been preheating in the oven).
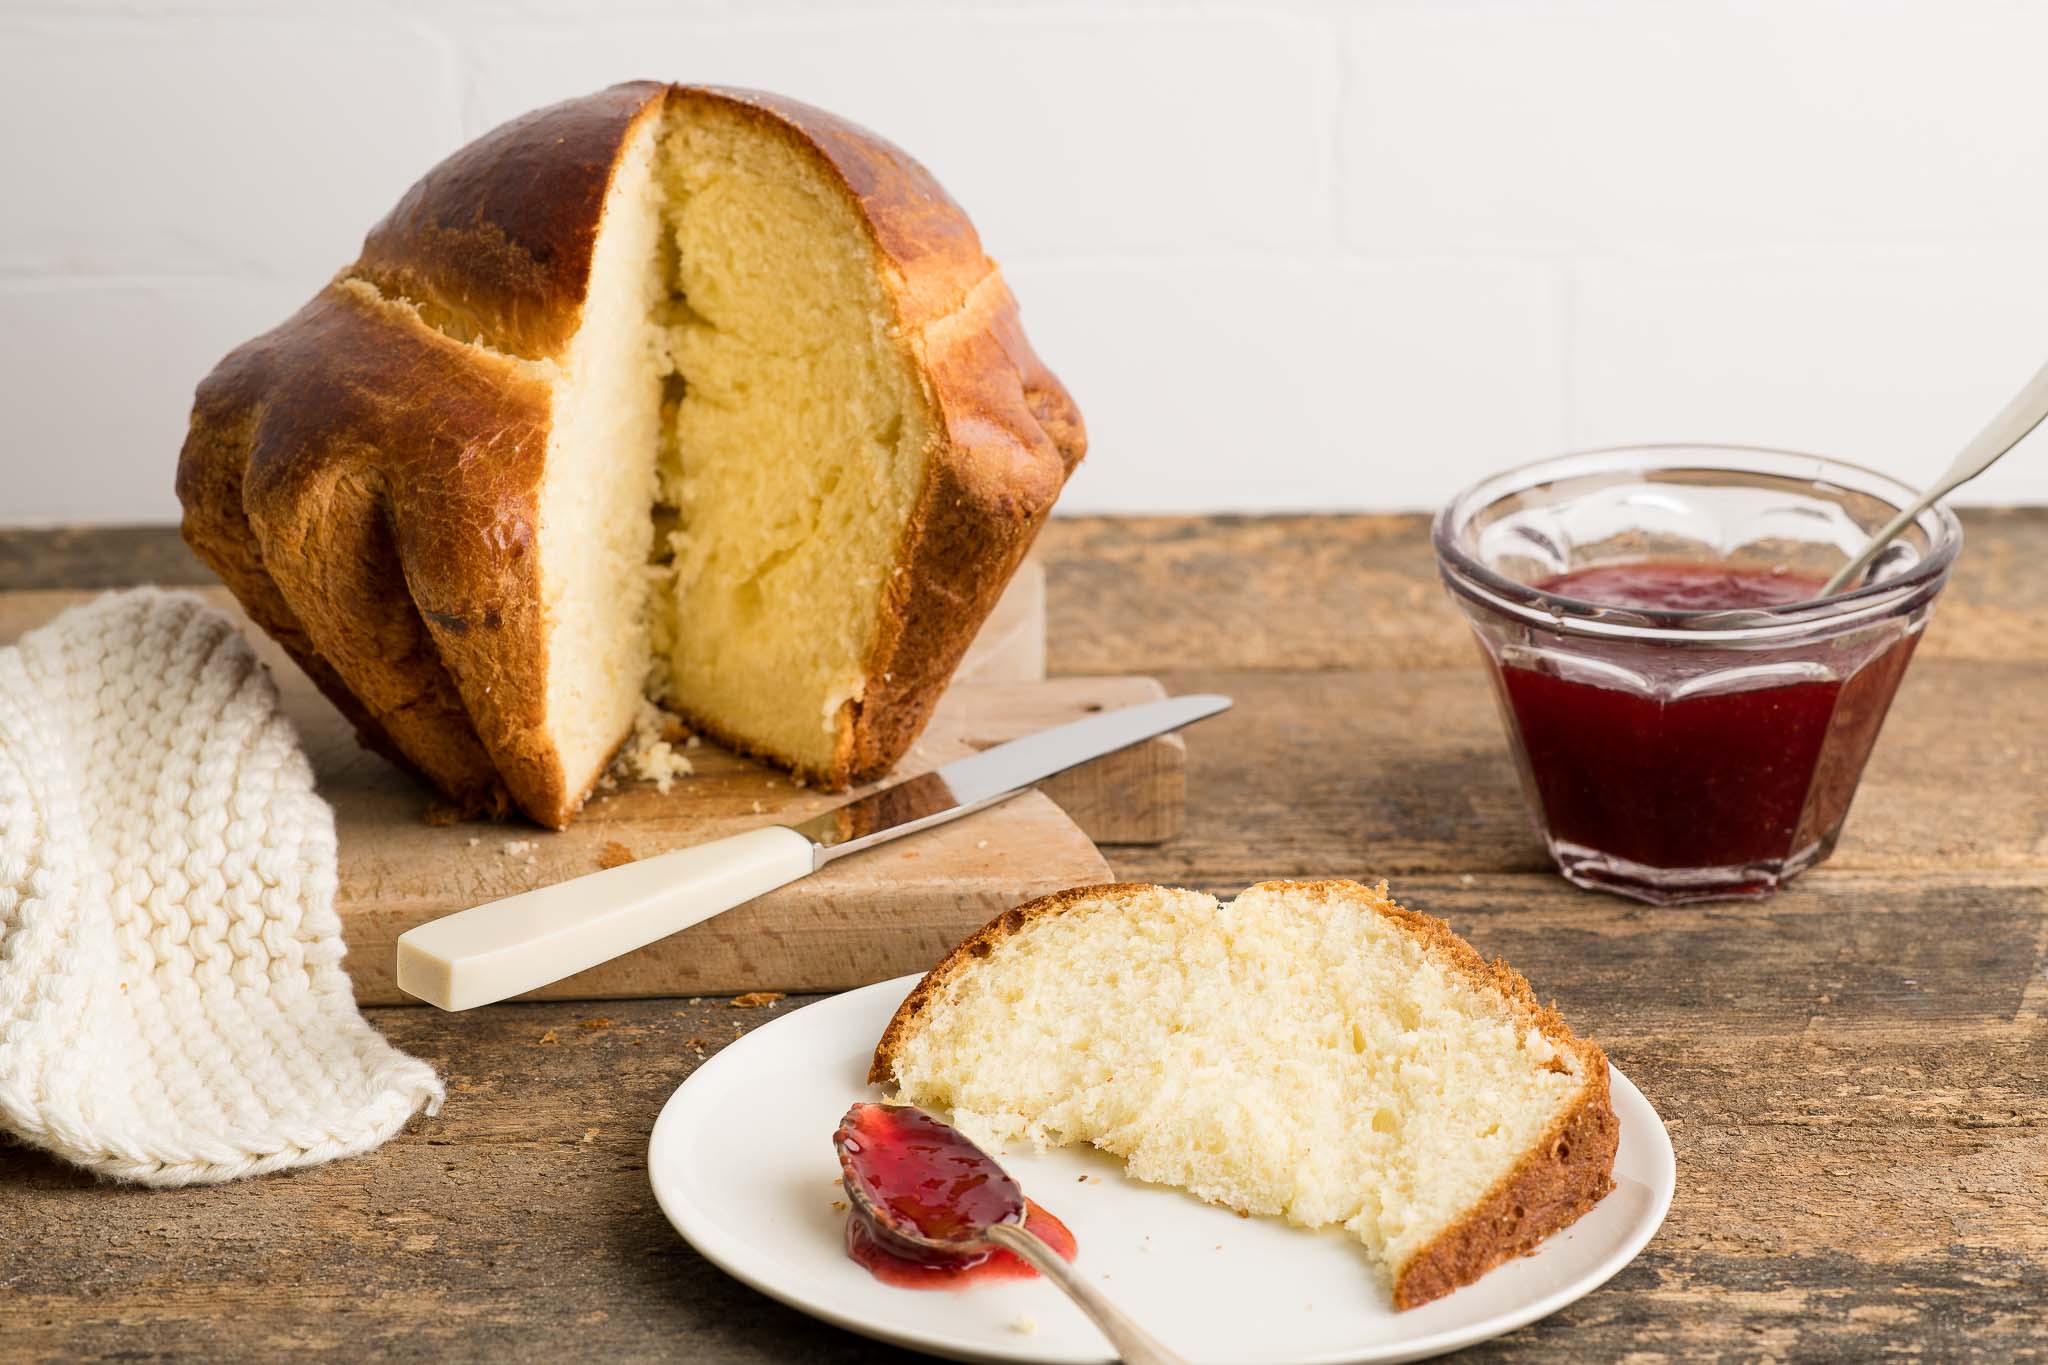
- Bake the brioche for 30-35 minutes, or until it is lightly golden. You might want to check your brioche at about 10-15 minutes to make sure it is not browning too quickly. If so, place a sheet of foil over the brioche to stop it from browning further.
- If you have a digital thermometer, the brioche is cooked if the internal reading is 85°C/185°F.
- Remove the brioche from the oven and let it settle in the pan for about 5-10 minutes before unmoulding.
- Let the brioche cool completely on a wire rack before serving.
Kitchen Notes
- CAKE PAN SIZE
I use a brioche pan which is 22.5 cm /9 inches wide. - DIFFERENT TYPES OF FLOUR
* I recommend using bread flour when making brioche or other types of enriched dough. Bread flour contains more protein than plain flour (all-purpose flour), so look for flour which has 11-13% protein content.
* For Swiss readers, I use Zopfmehl (or farine pour tresse) when making bread and brioche. - DIFFERENT TYPES OF YEAST
* Please note that there is a difference between instant yeast (also called instant dried yeast or fast-action dried yeast) and dried yeast (also called active dry yeast). If you are not sure what type of yeast you have, please check the packaging for instructions on how to use the yeast.
* With instant yeast, you can add it directly to the flour mixture without having to activate it first.
* With dried yeast, you will need to activate it first (usually in some warm liquid). - PROOFING THE DOUGH
Dough needs a warm environment for the yeast to activate and cause the dough to rise. If you don’t have a warm place in your home, try one of the following ideas:
* In the oven with the oven light switched on (works only for some ovens).
* In the oven with a tray of boiling water on the bottom shelf.
* In the oven at a low temperature of about 25-30°C (77-86°F). - ELECTRIC STAND MIXER
Given the high butter content, it is easiest to make this brioche using an electric stand mixer or a food processor fitted with a dough hook. However, you can, of course, make the dough by hand if you don’t mind a bit of an upper-body workout. - OVEN TEMPERATURES
All recipes on this website state temperatures for a regular oven (i.e. a conventional oven without fan). If you have a convection oven with a fan, please consult the manufacturer’s handbook on how to adjust the temperature and baking time accordingly. - CONVERSIONS
To convert from cups to grams, and vice-versa, please see this handy Conversion Chart for Basic Ingredients.
Did you make this recipe?
Please leave a comment below and share your photos by tagging @eatlittlebird on social media and using #eatlittlebirdUpdate
This recipe was first published on 21 February 2020. It has been updated with new photos and more comprehensive recipe notes.


My brioche turned out perfectly! I’ve been seeing all of your brioche photos on Instagram stories and thought now would be the perfect time to try as I have to work from home. I’ve made bread before, but not brioche. Your recipe and instructions were very helpful. My brioche tastes far better than any I have bought! I will be making brioche regularly from here on. Thank you so much for a wonderful recipe!
Wow! Great recipe. I’ve been experimenting with bread making these last few weeks and thought I would give your brioche recipe a try. My family loved it more than the sourdough bread I’ve been trying to make! Definitely making this again soon. Thanks for easy instructions.
Delicious! I bought a brioche tin like yours in Paris many years ago and only just got to use it after I saw your recipe. Thanks for sharing your recipe and tips!
Thanks for sharing this recipe. I made this today ! Very tender and delicious bread ! However, I added another 2 tablespoons of flour as dough seemed to wet before I added butter in. I’m baking from the tropics though; that could be the reason 🙂
Thanks for this recipe. My brioche turned out perfectly!
What size brioche pan please
Hi Ann,
I use a brioche pan which is 22.5 cm /9 inches wide. Hope you will enjoy this recipe!
Such a gorgeous brioche loaf! Mine was beautifully puffed and bronzed like yours and the texture was so soft and buttery. Would you have instructions on how to make small individual brioche buns?
Excellent recipe! This was my first time making brioche bread and it turned out fantastic! The taste was also amazing, very buttery and moreish. This will be on my next brunch menu 🙂
Delicious recipe! The brioche was soft and buttery. I’ve never tasted fresh brioche before and this was so beautiful.
Great recipe and instructions. My brioche turned out beautifully and the texture was soft and fluffy. Do you also have instructions for making this brioche shape but in a smaller size?
Great recipe!
I have made this brioche several times and it is perfect each time. My family want me to make this every weekend now!
I am not a bread baker but I thought I would give your recipe a try since you have so many helpful step by step photos. Can I say that this brioche recipe is foolproof? I mean, if I can make it (and I rarely bake), anyone can! I really enjoyed this recipe.
This brioche was amazing. The taste was better than anything I have bought before. Just yum!
Excellent recipe! I’ve made brioche before but I appreciated your step by step instructions. The texture of this brioche was amazing – definitely need a stand mixer for this recipe. Will make again!
Wonderful brioche with soft, flakey interior. Thank you for the step by step instructions too!
This is a fantastic brioche recipe. The texture was buttery and soft. I will make this again!
Beautiful brioche recipe. The texture was absolutely amazing. I can see you put a lot of effort into your recipes and your website.
Great brioche recipe. Fantastic taste and texture.
I love your blog and all of your recipes! The brioche had just the most amazing texture and it was so buttery and delicious. Thank you so much!
Your website is my go-to for bread recipes! I made your brioche the other day and it came out perfectly. I am definitely making this again soon. So yum!
Fantastic recipe! I will try to use this recipe to make brioche buns.
I have tried several brioche recipes, all which produced quite a dense loaf. But I really wanted to perfect this recipe and so I gave your recipe a try. Your photos are so helpful! And my brioche came out so light, buttery and fluffy – the stuff of my dreams! I can’t wait to try more of your recipes 🙂
You always make baking bread look so easy! Love all of your recipe and instructions. My brioche turned out perfectly – a bit lop-sided but still perfect!
How can I make this brioche the night before?
Hi Elaine,
My brioche recipe requires you to start the night before. Make the dough as per the recipe and let it prove until it has doubled in size. At this stage, you can cover the bowl with the dough and then place it into the fridge to continue proving overnight. Letting the dough prove in the fridge helps it to firm up so that it is easier to work with, but the overnight proof also helps with the taste and texture of the brioche. The next day, you can continue with the rest of the recipe. I hope this helps!
Excellent recipe and very clear instructions.
Can i double/triple this recipe if i have multiple pans to make? How log do you usually keep this bread after baked?
Hi Erica,
Yes, of course, you can double or triple this recipe – the same proofing time applies. Although, I would suggest making the dough in the same bowl (if your bowl is big enough), but to proof the dough individually for a better rise and flavour. A double batch of dough should be fine to proof together, but if you are making a triple batch, I would split the dough.
Once baked, the bread keeps well in a ziplock bag for several days. I hope you will enjoy this recipe!