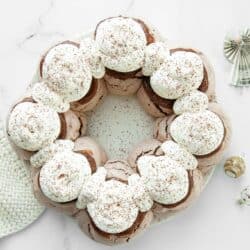
Chocolate Pavlova Wreath
It’s no secret that I love to make a pavlova whenever we are entertaining. They are incredibly easy to make (although practice makes perfect), they are perfect for making ahead of time (because they need at least a few hours or overnight to dry out), and the serving suggestions are endless (I make a different type of pavlova for each season!).
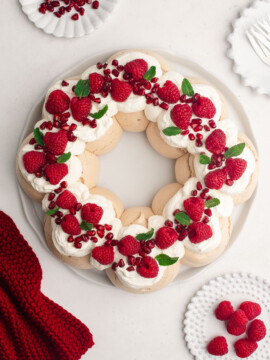
At Christmas time, I have fallen into the habit of making a wreath-shaped pavlova, and my Christmas Pavlova Wreath is a stress-free alternative to a traditional Christmas pudding.
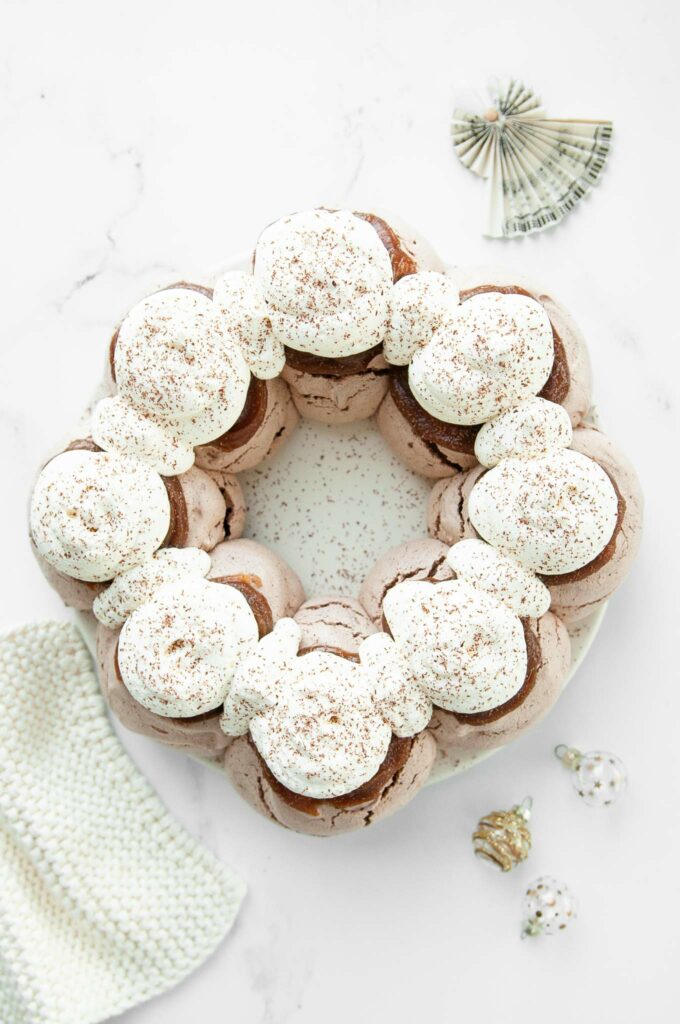
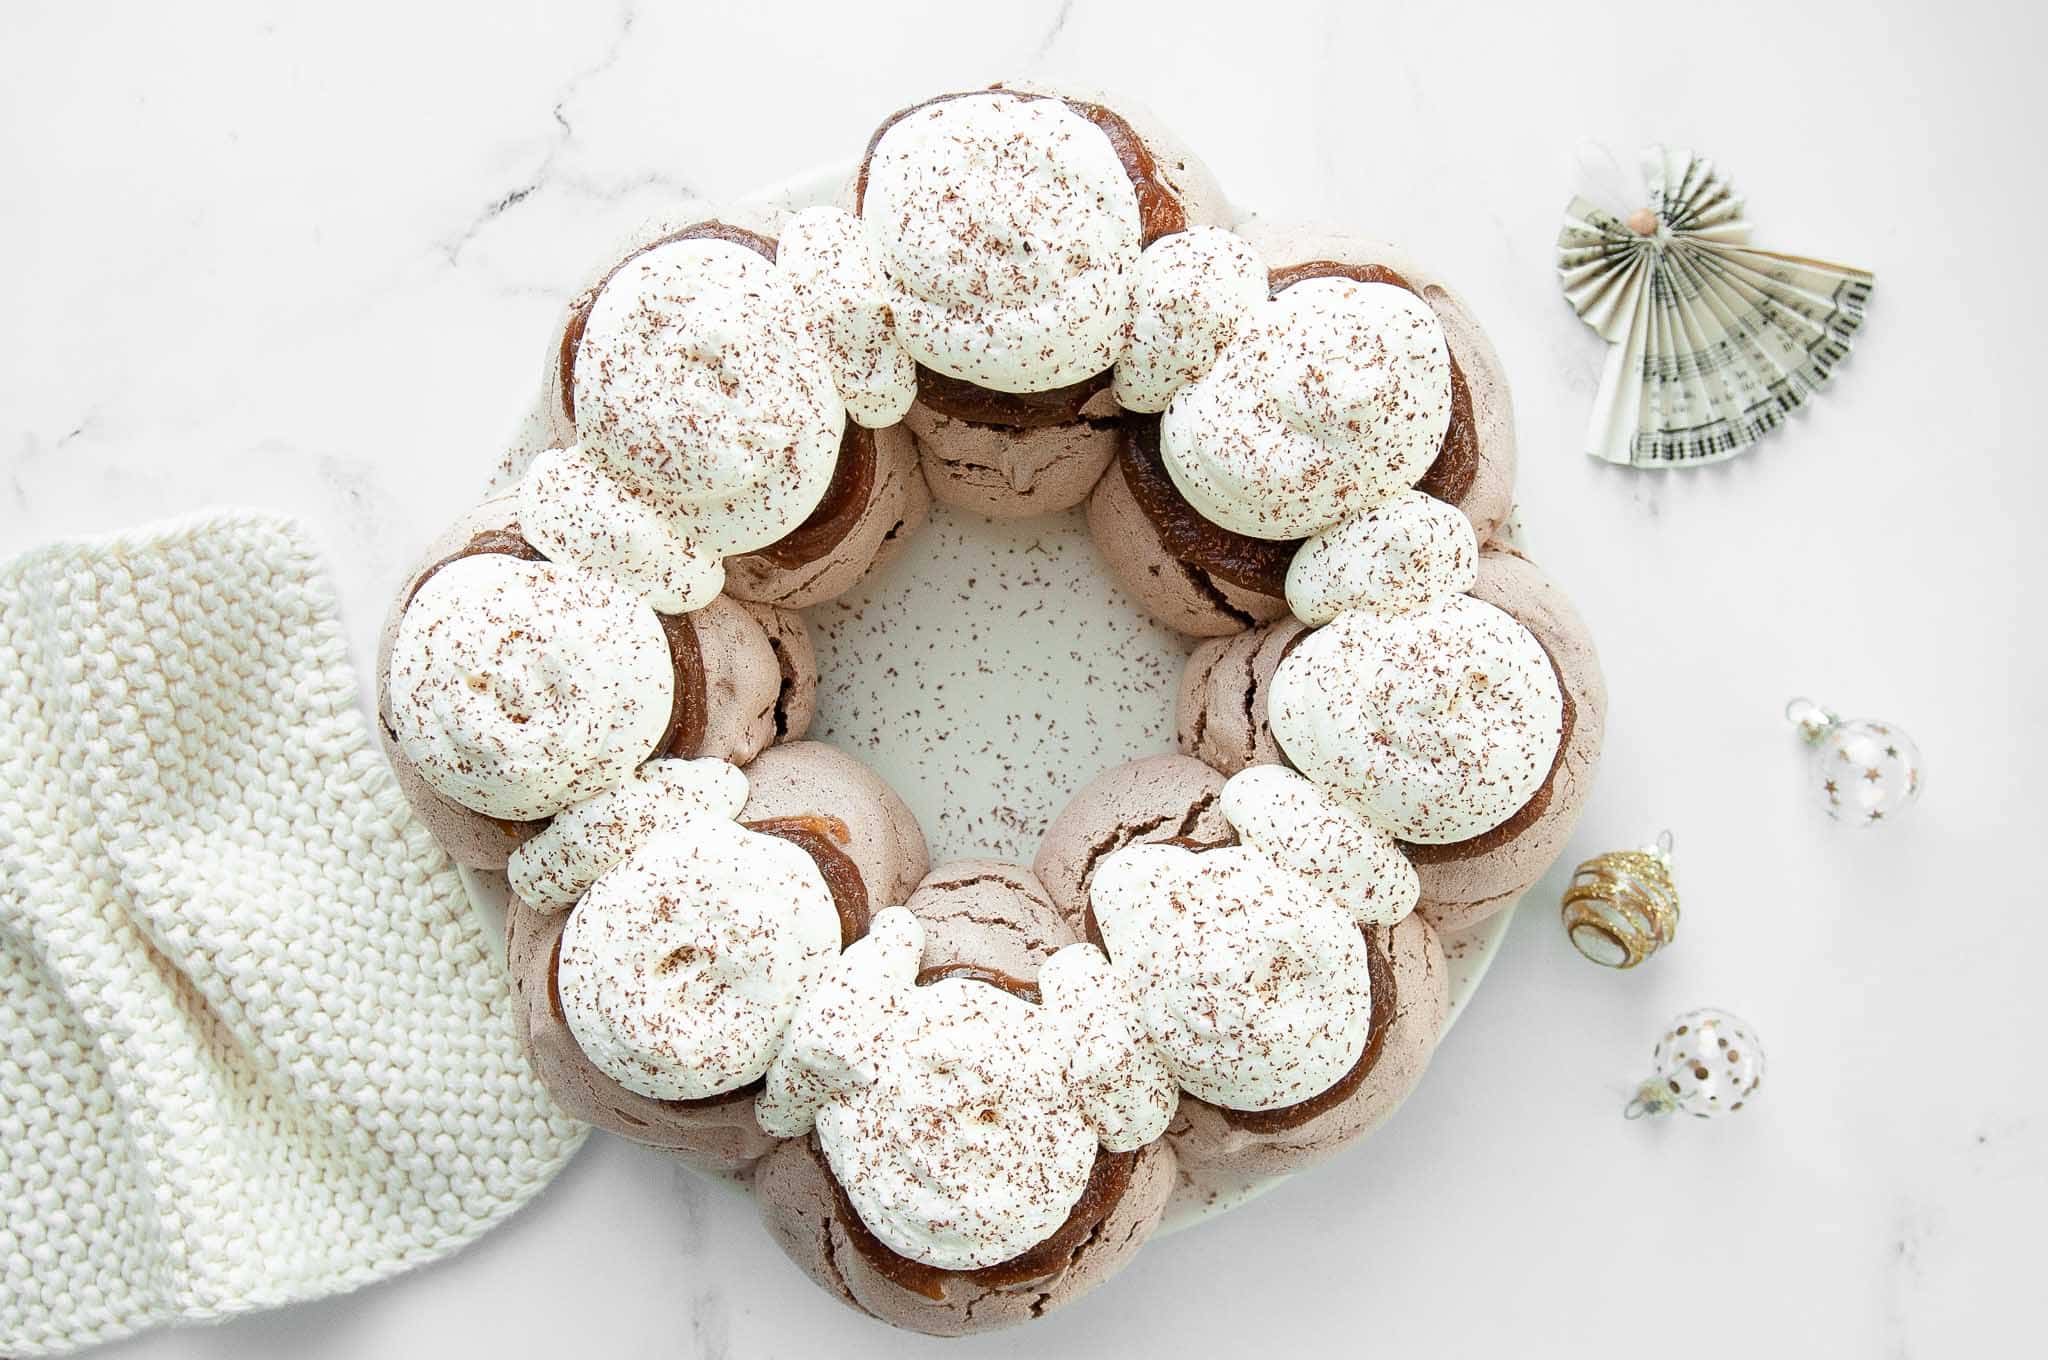
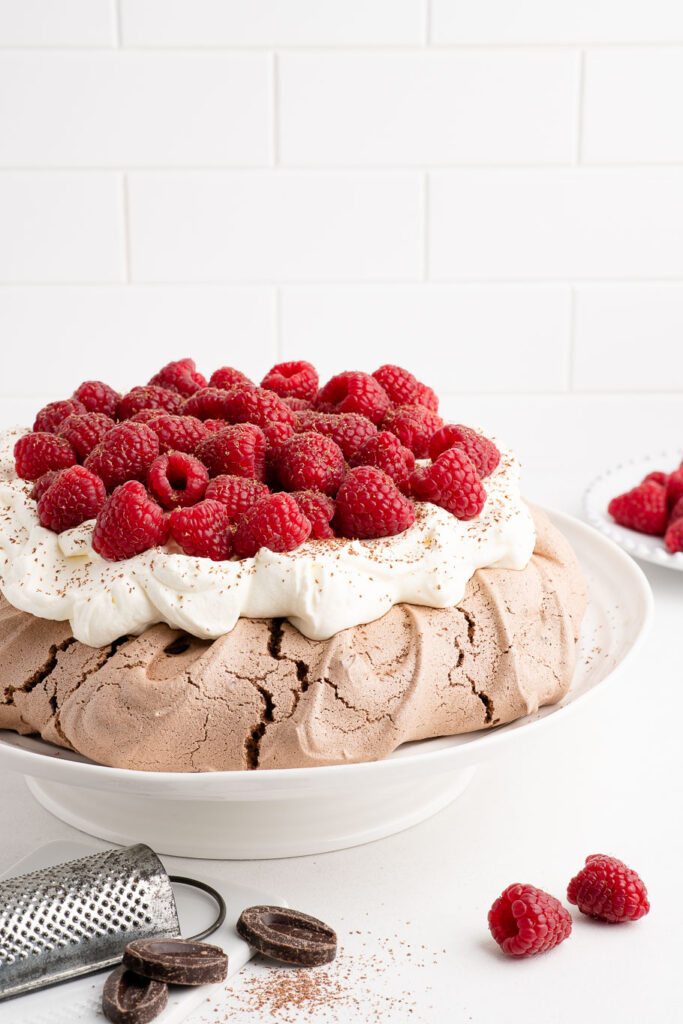
A Chocolate Pavlova Wreath is just as easy to make, and here I have decorated it with chestnut purée and whipped cream to recreate one of my favourite desserts, a Mont Blanc.
Mont Blanc Pavlova
A Mont Blanc is so called because it resembles the mountain of the same name. This dessert is popular in France and Switzerland, and it is comprised of meringue, chocolate, whipped cream and chestnut purée.
In Switzerland, this dessert is frequently called Vermicelles because the chestnut purée is pushed through a spaghetti piping tip to create long thin strands which resembles noodles (or worms, whichever you prefer).
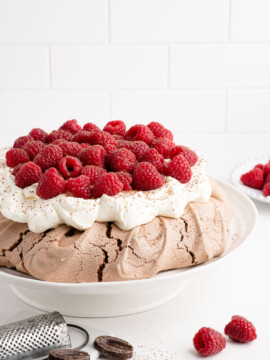
One year, I created a giant version of this dessert by transforming a large chocolate pavlova, thereby calling it a Mont Blanc Pavlova, and it has become our favourite pavlova version in the winter months.
For an even easier version using store-bought chestnut purée, please see my recipe for Chocolate Pavlova with Chestnut Purée.
How to Make a Pavlova Wreath
Step 1
Unless you really want to have a heavy duty upper arm workout, an electric stand mixer or an electric hand-held beater is an essential equipment when making a pavlova.
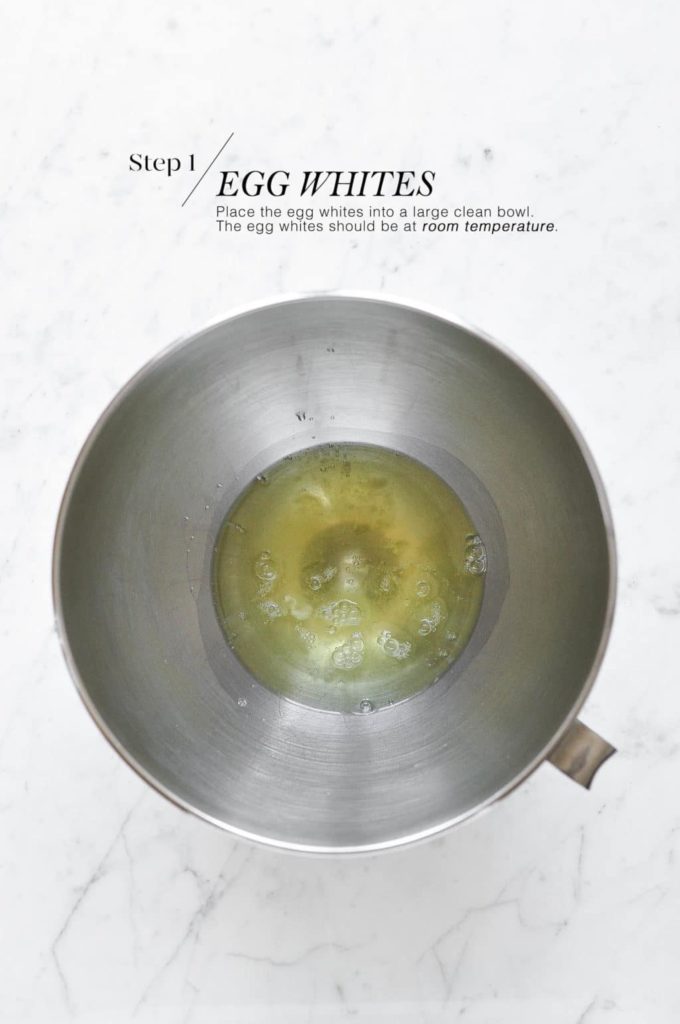
Place the egg whites into a large, clean bowl that is free from any grease.
To ensure that the egg whites whip up nicely, make sure that they are at room temperature.
Step 2
Whisk the egg whites until they have tripled in volume and form soft peaks when you lift the beaters.
Soft peaks mean that, when you lift the beaters, the mixture forms a peak which falls over or which does not stand.
At this stage, the beaten egg whites should look very soft and foamy.

Step 3
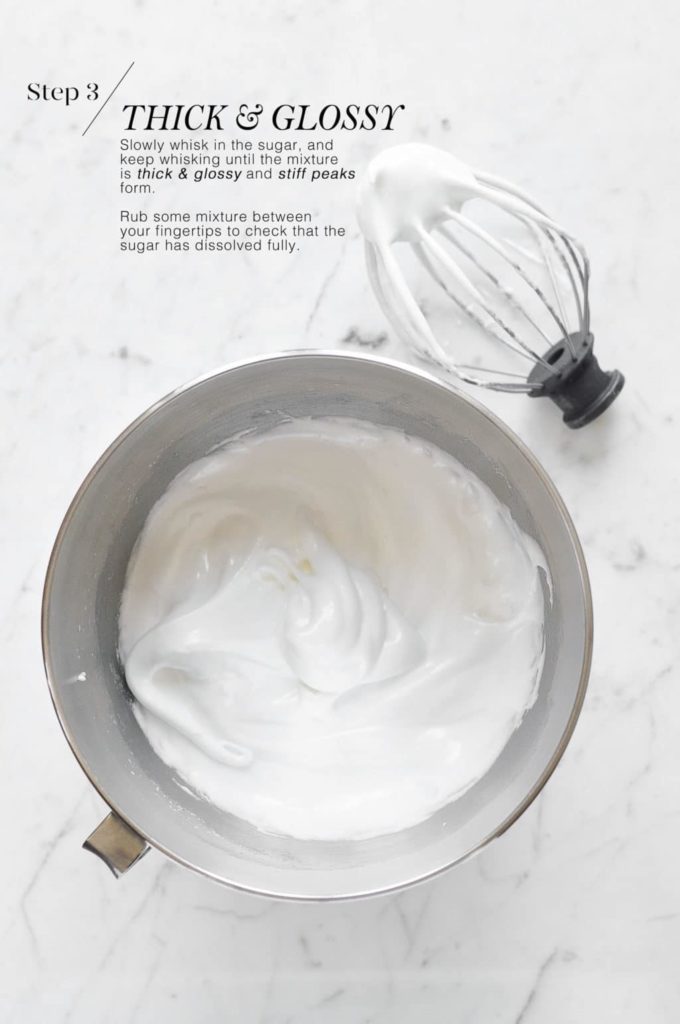
Next, add the sugar, one spoon at a time, until the egg whites transform into a thick and glossy mixture, and stiff peaks form when you lift the beaters.
Stiff peaks mean that, when you lift the beaters, the mixture forms a peak which holds its shape.
It is important to make sure that the sugar has been completely dissolved in the egg white mixture, but it is also important to not over-beat the mixture once you start adding the sugar.
To test that the sugar has been completely dissolved, simply rub a bit of mixture in between your finger tips.
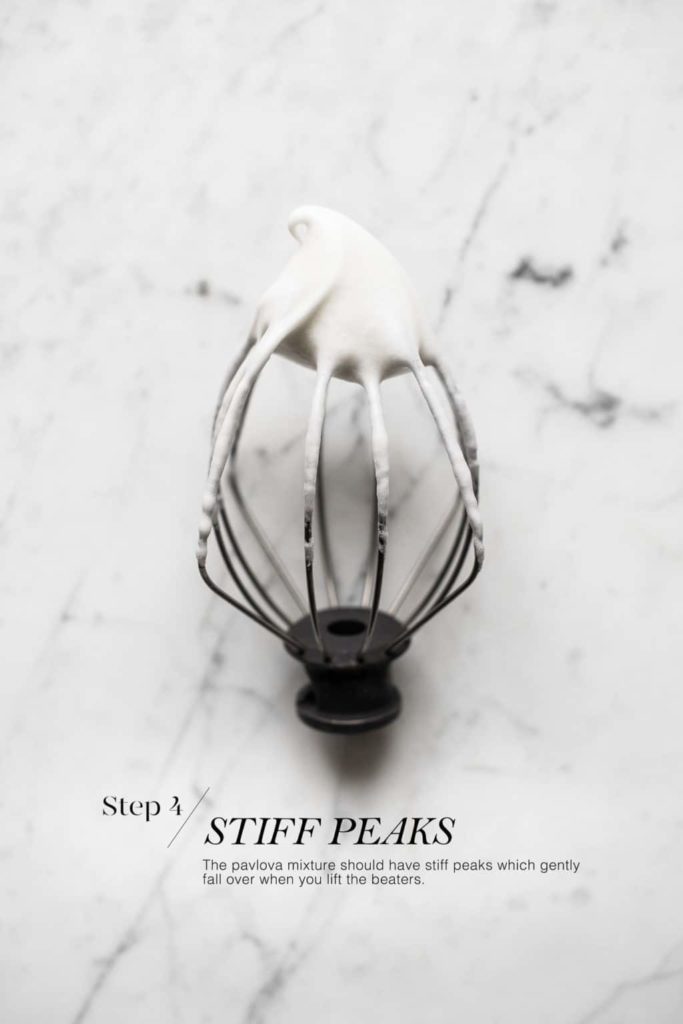
Step 4
Add the cornflour, vinegar, vanilla and cocoa powder. A few rotations of the stand mixer should be enough to mix in these ingredients. Last, fold through the chopped chocolate.
The resulting pavlova mixture should be thick and firm, and it should hold its shape when you start piling it on the baking tray.
If the pavlova mixture is soft and runny, and you are unable to shape it into a high pavlova because the mixture keeps sliding, it means that you may have overbeaten the eggwhites or that you added the sugar too soon. Please see the FAQs here.
Transfer the pavlova mixture to a large disposable piping bag and cut a tip about 1 cm/0.5 inch wide.
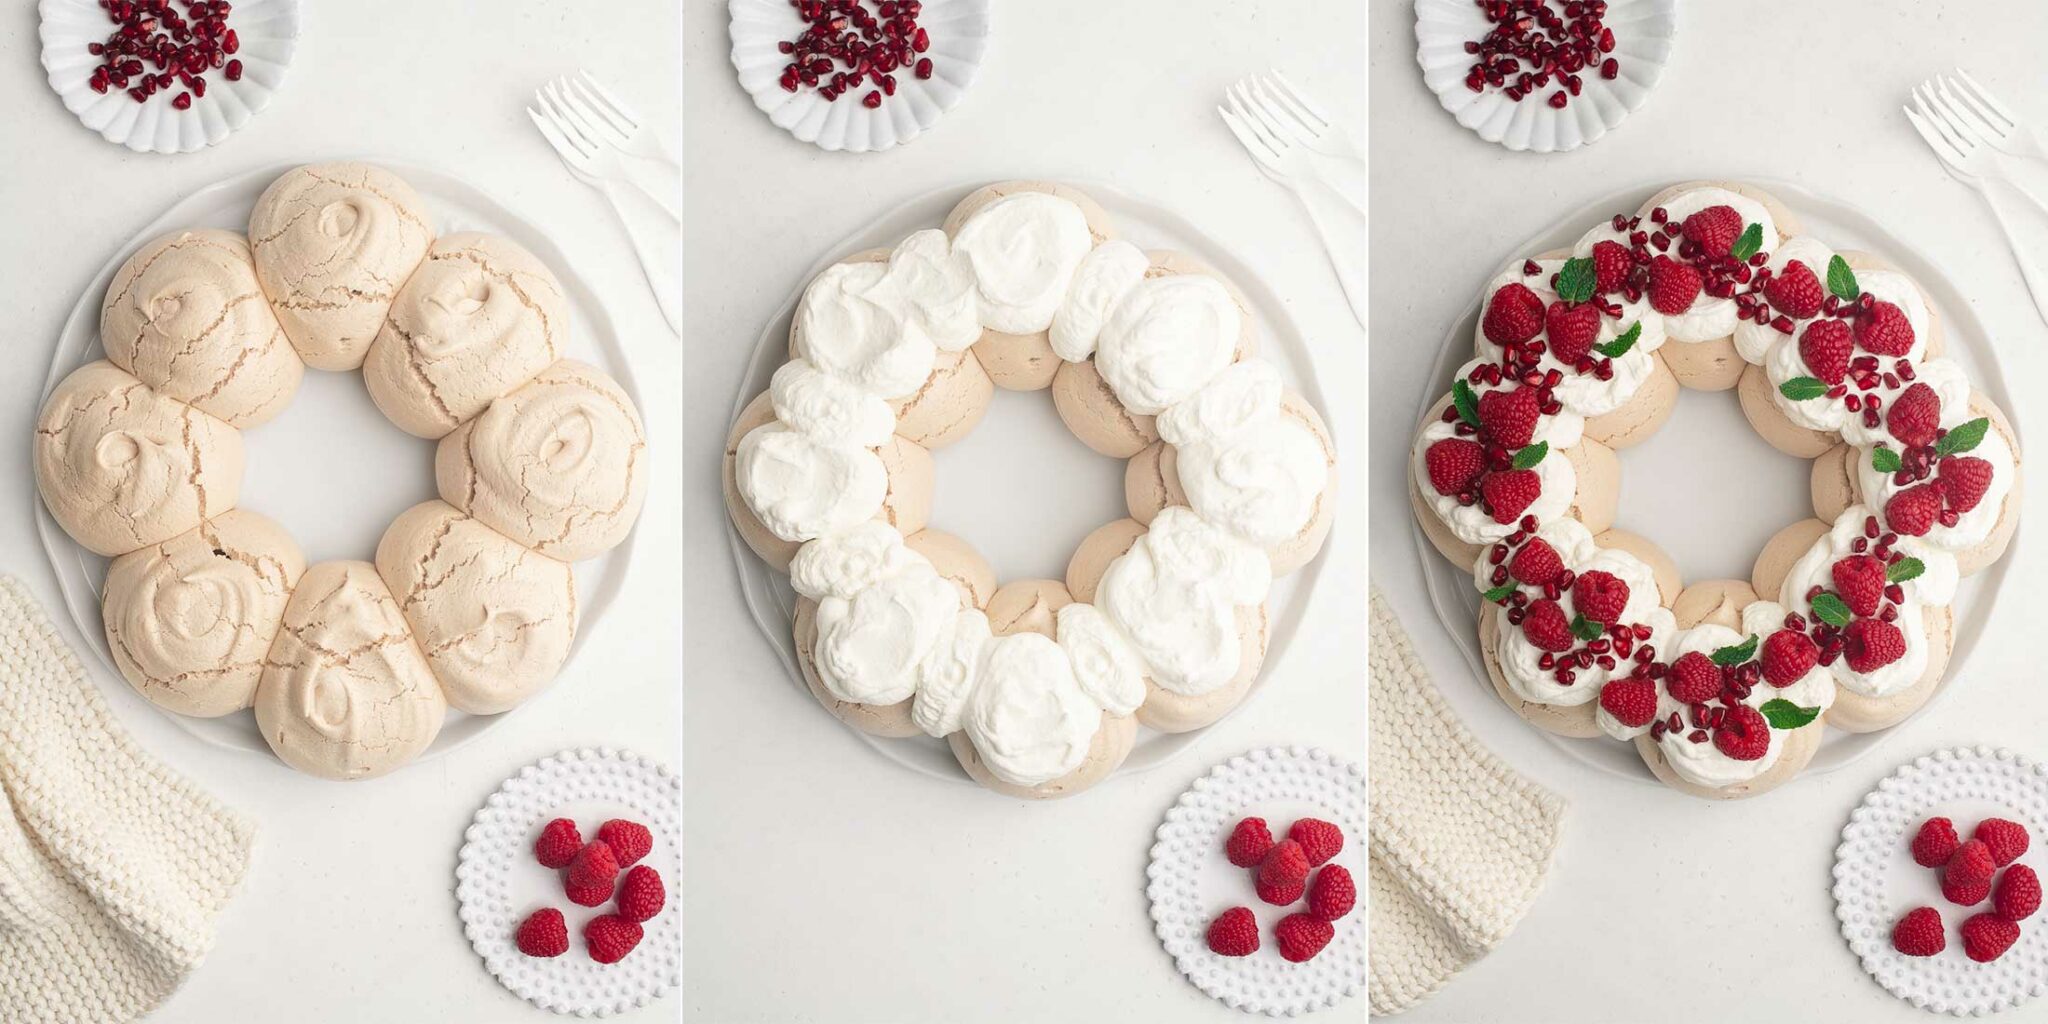
Step 5
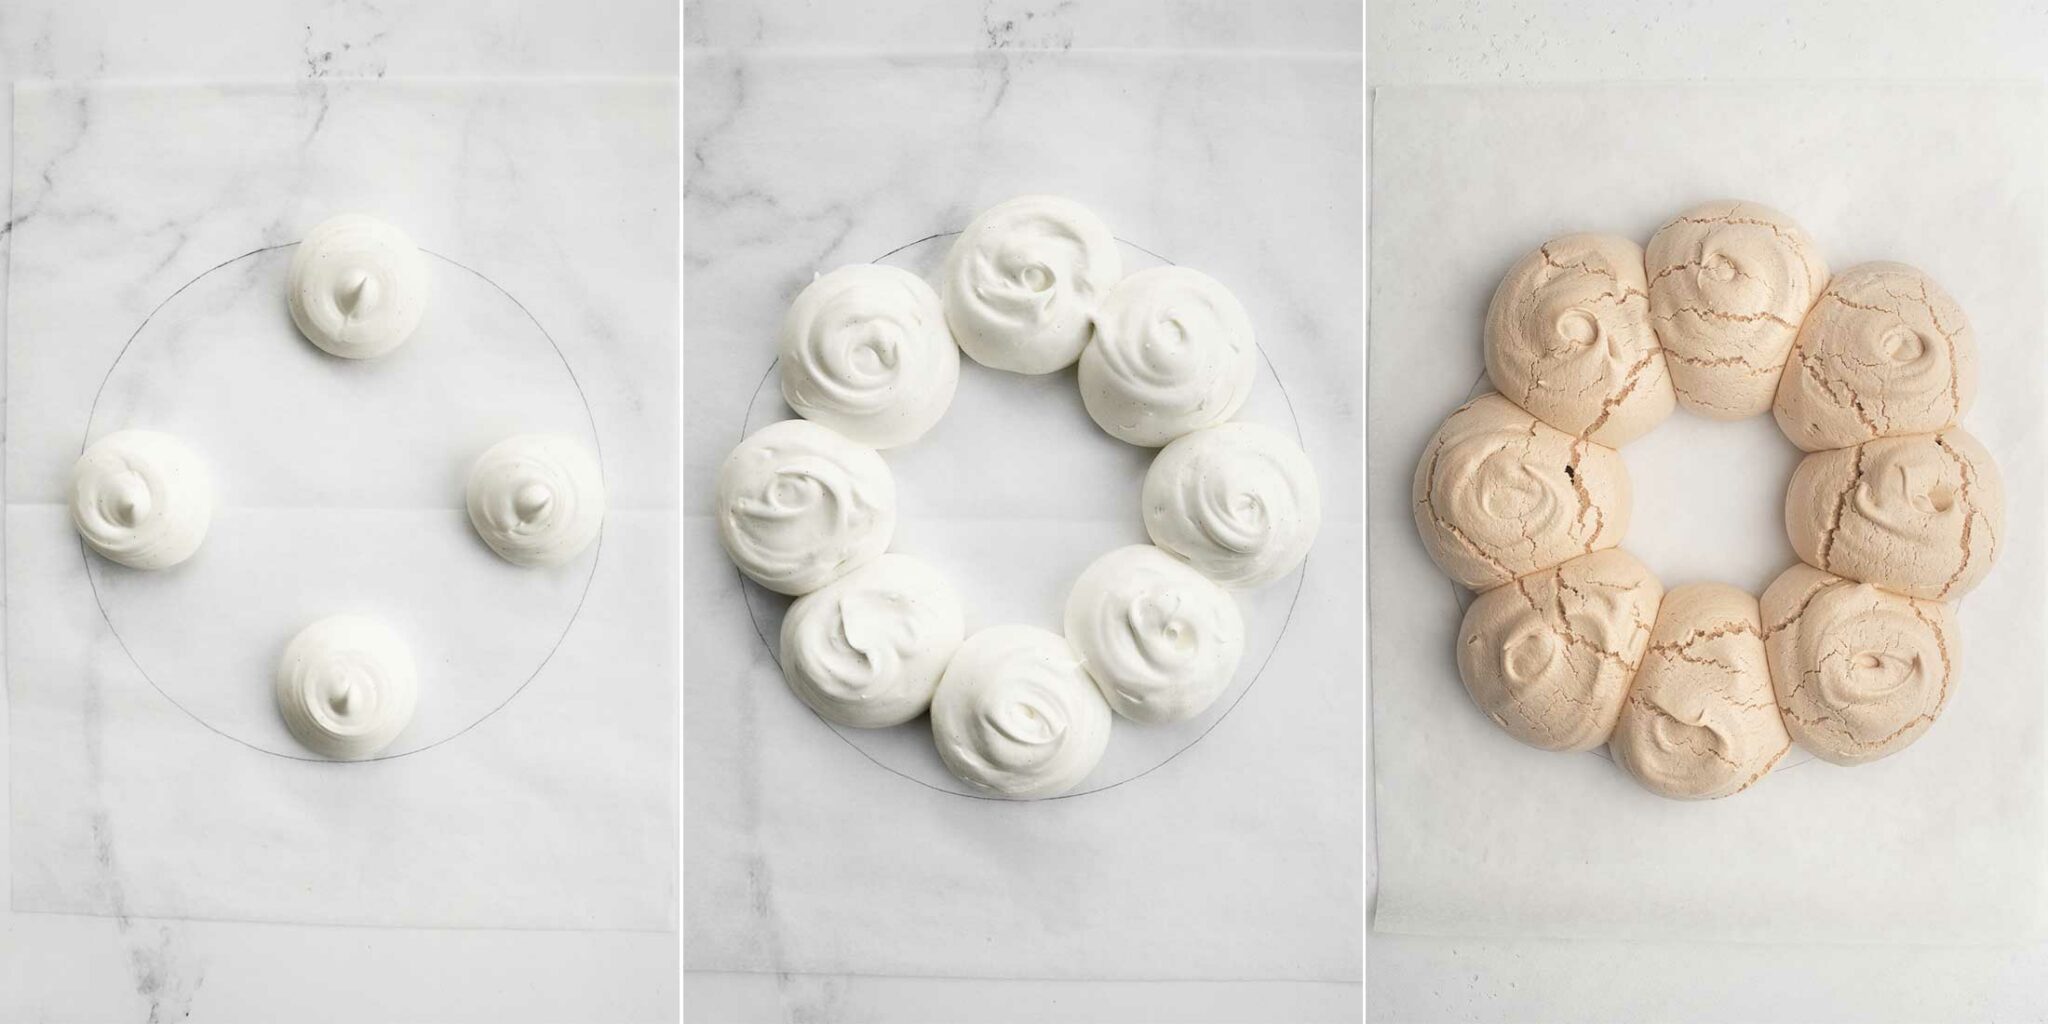
Draw a 25 cm/10 inch circle on a large sheet of baking paper. Turn the paper over so that the ink is not touching the pavlova.
Pipe 8 large rounds within the circle. I like to do this by imagining a clock and piping 4 rounds at 12:00, 3:00, 6:00 and 9:00. Then pipe the remaining 4 rounds in between.
Try to make each round roughly the same size by piping more mixture into the centre of any existing round.
If you don’t have a piping bag, simply use a large spoon (such as a serving spoon) to make large dollops.
Keep in mind that, as the pavlova bakes, it will expand slightly, so the resulting pavlova wreath will be slightly wider than 25 cm/10 inches.
Step 6
Place the pavlova wreath into the oven at 180°C/350°F.
Immediately turn down the temperature to 150°C/300°F.
Let the pavlova bake for 45 minutes, and do not open the oven door during this time.
After the baking time, turn off the oven, and leave the pavlova to cool inside the closed oven for at least 2-3 hours.
Step 7
Decorate the pavlova just before serving.
Whip the cream until it is thick with soft peaks. Dollop the cream on top of the pavlova, either using a large piping bag or with a large spoon. Decorate with fruit and berries of your choice.
Pavlova Wreath Toppings
Like for most pavlovas, you should use fruit and berries which are slightly tart to offset the sweetness of the pavlova and the richness of the cream.
For a chocolate pavlova, I think the options are a bit more limited because not all fruits work with chocolate. My suggestions include:
- Raspberries
- Redcurrants
- Pomegranate seeds
- Strawberries
- Passionfruit (if you like the chocolate-passionfruit combination)
As an exception to a traditional pavlova, I have not used any fruit in the accompanying photos, as a Mont Blanc dessert does not contain any fruit. Except, I have used chestnut purée and whipped cream.
Chocolate Pavlova Wreath
Ingredients
For the Chocolate Pavlova Wreath
- 4 egg whites
- 240 g (1 cup plus 1 tablespoon) caster sugar, (superfine sugar)
- 2 teaspoons cornflour, (US: cornstarch)
- 1 ¼ teaspoon white wine vinegar
- 1 ¼ teaspoon vanilla extract
- 10 g (2 tablespoons) cocoa powder, sifted
- 60 g (2 oz) dark chocolate, 70% cocoa, roughly chopped
For Topping
- 350 g (12 oz) canned sweetened chestnut purée, (such as this one by Clément Faugier) or more to taste
- 300 ml (1 cup plus 3 tablespoons) double cream, (heavy whipping cream)
- 1 small piece dark chocolate, for grating
Instructions
To make the pavlova wreath
- Preheat the oven to 180°C/350°F (without fan).
- Using a standmixer or electric beaters, whisk the egg whites in a large, clean bowl until they have tripled in volume and soft peaks form.
- Turn the speed down to low and slowly add the caster sugar, one spoon at a time until the sugar is well incorporated. As you add the sugar, the mixture will start to become thick and glossy, and stiff peaks will form when you lift the beaters.
- Remember to scrape down the sides of the bowl.
- Rub a bit of the mixture between your fingertips to test if the sugar has been fully dissolved; if you don’t feel any grains of sugar, move onto the next step.
- Add the cornflour, white wine vinegar, vanilla extract and cocoa powder. I do this on low speed with the stand mixer for only 2 to 3 rotations (about 1 second).
- Fold through the chopped chocolate.
To shape the pavlova wreath
- Line a baking tray with baking paper.
- Draw a circle on the baking paper measuring 25 cm/10 inches, and then turn the paper over so that the ink does not touch the pavlova.
- Transfer the pavlova mixture to a large piping bag with a large nozzle (or cut a 1 cm tip from a disposable piping bag). Alternatively, use a large spoon to dollop the mixture.
- Pipe 8 large rounds within the circle. I like to do this by imagining a clock and piping 4 rounds at 12:00, 3:00, 6:00 and 9:00. Then pipe the remaining 4 rounds in between.
- Ensure that each round is roughly the same size by squeezing additional mixture in the centre of each round as needed.
To bake the pavlova wreath
- Place the pavlova wreath in the oven and immediately turn the temperature down to 150°C/300°F (without fan).
- Bake for 45 minutes. Do not open the oven door during this time.
- After 45 minutes, turn off the oven and leave the oven door closed so the pavlova can cool down completely. You should leave the pavlova in the oven for at least 2-3 hours to dry out.
To decorate the pavlova wreath
- The pavlova should be decorated only just before serving.
- Spread a generous amount of chestnut purée over each segment of the pavlova wreath.
- Whip the cream until soft peaks form.
- Dollop the whipped cream on top of the chestnut purée.
- Coarsely grate the chocolate over the whipped cream.
- Serve immediately.
Kitchen Notes
- MAKE IT IN ADVANCE
I recommend making the pavlova the night before serving, or in the morning if you plan on serving it later in the evening. This will give the pavlova plenty of time to cool and dry in the oven for the perfect crisp meringue shell and slightly chewy centre. You could even make the pavlova 1-2 days in advance and keep it in an air-tight container. - DECORATE AT THE LAST MINUTE
Although I recommend baking the pavlova in advance, you should only decorate the pavlova at the last minute. Once the cream is placed on the pavlova, it will start to soften the pavlova and add weight, and your pavlova might collapse soon after. - OVEN TEMPERATURES All recipes on this website state temperatures for a regular oven (i.e. a conventional oven without fan). If you have a convection oven with a fan, please consult the manufacturer’s handbook on how to adjust the temperature and baking time accordingly.
- CONVERSIONS To convert from cups to grams, and vice-versa, please see this handy Conversion Chart for Basic Ingredients.