
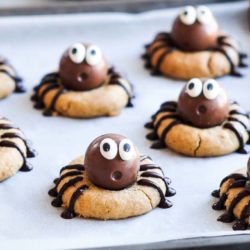
Peanut Butter Spider Cookies
I was scrolling through Pinterest one evening, looking for Halloween baking ideas, when I came across these awfully cute Peanut Butter Spider Cookies from A Spicy Perspective. Not only are they adorably sweet, but they combine two of my favourite loves – peanut butter cookies and Lindt Lindor chocolate truffles.
How to Make Spider Cookies
I have adapted the recipe slightly by using my favourite recipe for Peanut Butter Cookies, as well as changing the method a little.
Bake the peanut butter cookies as per normal, but take them out of the oven after 12 minutes or so in order to press an indent in the cookies. To do this, I use the end of a pestle, but any similar instrument would work.
You just want to create an indent which will be big enough for the Lindor chocolate truffles to sit inside.

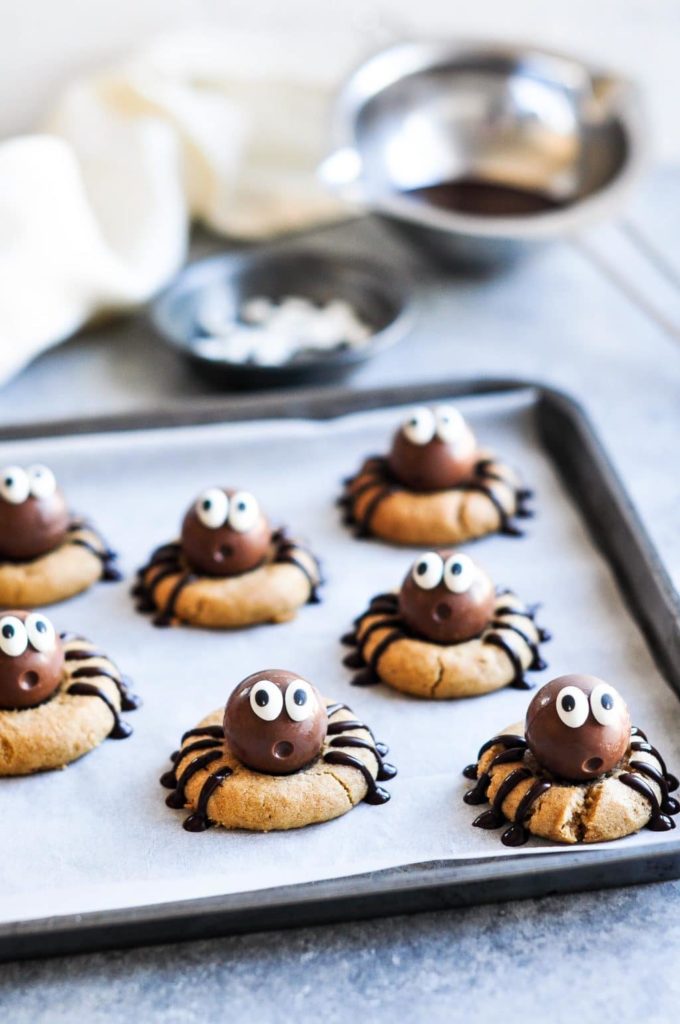
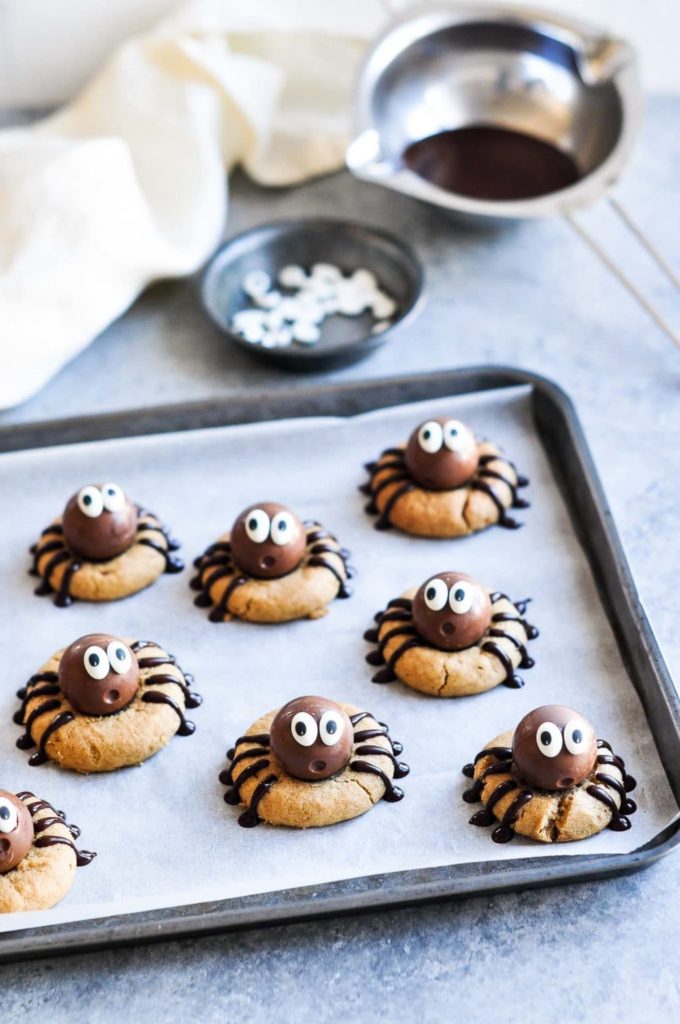
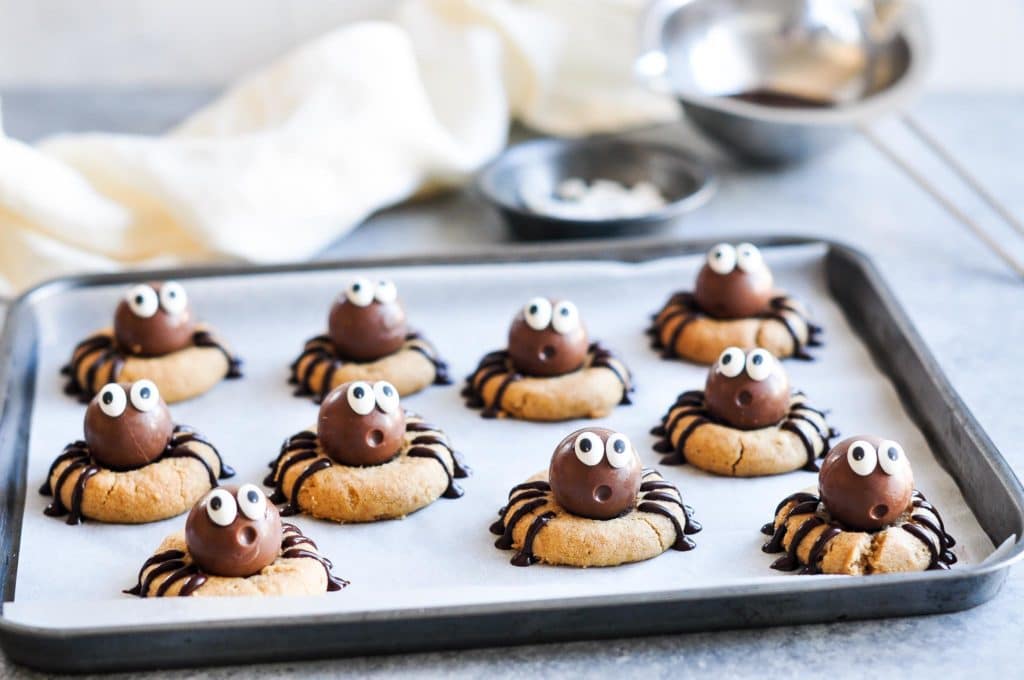
Once the cookies have cooled, simply stick the Lindor chocolate truffles onto the cookies by dotting a small amount of melted chocolate into the cavity of each cookie.
Use the same melted chocolate to also stick the candy eyes to the chocolate truffles, and to also draw the legs.
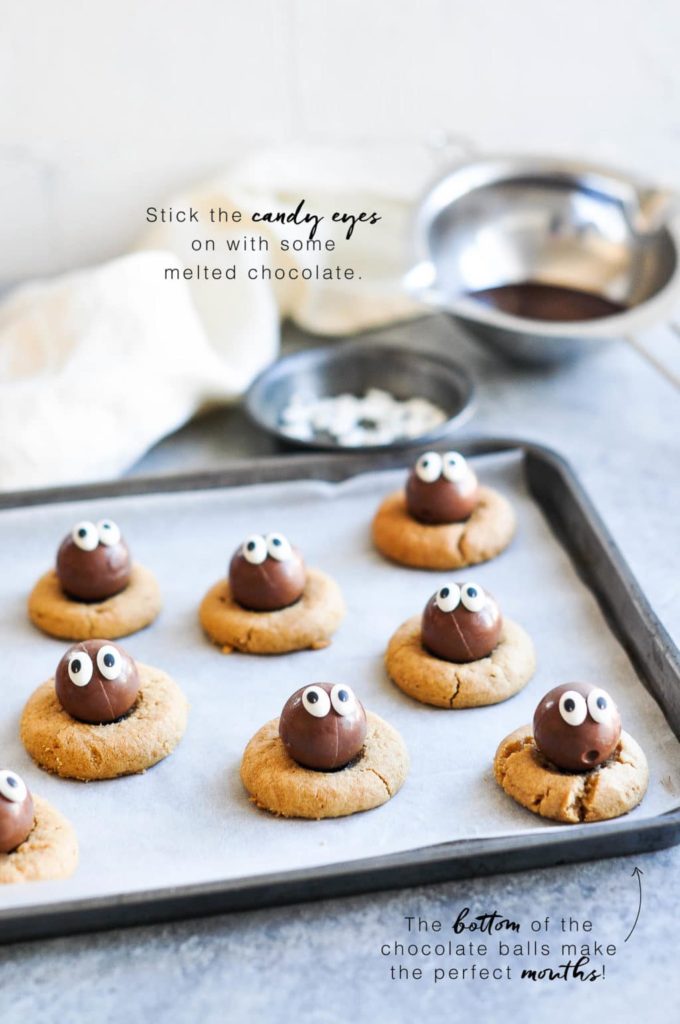
It was only once I was photographing the cookies that I noticed that there were little dimples at the bottom of the Lindor chocolate truffles; a randomly placed truffle revealed that these dimples could serve as mouths!
Thankfully, I had two tiny volunteers who were willing to eat my first batch of Lindor chocolate truffles (complete with googely eyes) so that I could prepare a second batch with the rearranged truffles 🙂
And I’m rather glad I did – these Peanut Butter Spider Cookies just look so darn cute!!
Halloween Cookies
Now that our children are a little older (especially my son), I am hoping that this year will be the first time we will have a proper Halloween celebration. Trick-or-treat is not a common event in Zurich, although I have heard that it is becoming popular in some neighbourhoods.
In recent years, our childrens’ daycare would go trick-or-treating during the morning, and only to nearby homes of families with whom they had pre-arranged the event. Despite it being a highly organised outing, the children still had a lot of fun dressing up and collecting candy and (Swiss!) chocolate.
I made these Peanut Butter Spider Cookies as a trial run, and based on the childrens’ reaction, I think these will be a permanent item on our Halloween menu! Now I need to work on the savoury dishes …
Peanut Butter Spider Cookies
Ingredients
For the Peanut Butter Cookies
- 150 g (⅔ cup) granulated sugar
- 80 g (½ cup) light muscovado sugar, or light brown sugar
- 125 g (⅔ cup) vegetable shortening
- 260 g (⅔ cup) smooth peanut butter
- 1 egg
- 1 teaspoon vanilla extract
- 190 g (1 ¼ cup) plain flour, (all-purpose flour)
- ⅛ teaspoon baking soda
- ⅛ teaspoon fine salt
To Decorate the Cookies
- 100 g (3 ½ oz) dark chocolate, melted and cooled slightly
- 24 Lindt Lindor chocolate truffles, milk, dark or caramel
- 48 candy eyes
Instructions
To Make the Peanut Butter Cookies
- Preheat the oven to 180°C (350°F) (without fan).
- Place the granulated sugar and brown sugar into the bowl of stand mixer.
- Using the flat paddle attachment, lightly mix the sugars together to remove any lumps.
- Add the vegetable shortening and peanut butter.
- Beat on medium speed until the mixture is light and smooth.
- Add the eggs and vanilla extract, and beat for about a minute until they are thoroughly combined.
- Sift the flour, baking soda, and salt into the bowl.
- Beat on low speed until everything is well incorporated.
- Line a baking tray with non-stick baking paper.
- Roll out small balls of dough and place them on the lined baking tray, about 2-3 inches apart.
- Use your fingers to gently flatten the dough.
- Bake the cookies for about 12 minutes.
- Remove the tray from the oven and, using the end of a pestle or similar instrument, make soft indents in the middle of each cookie. The indents should be large enough to hold the Lindor chocolate truffles later. Don’t worry too much if the cookies crack when you do this.
- Return the tray to the oven and bake the cookies for a further 6-8 minutes, or until they are lightly golden and the edges feel somewhat firm.
- Leave the cookies on the baking tray for about 5 minutes to firm up before carefully transferring them to a wire rack to cool completely.
To Decorate the Cookies
- Place the melted chocolate into a small piping bag.
- Dot a small amount of melted chocolate (about the size of a lentil) into the cavity of each cookie.
- Place a Lindor chocolate truffle into the cavity of each cookie, and position them so that the bottom of the chocolate truffles are displayed as mouths.
- Squeeze two tiny dots of melted chocolate onto each chocolate truffle and attach the candy eyes.
- Repeat Steps 2 to 4 for all of the cookies.
- Pipe 8 legs onto each cookie.
- Allow the chocolate on the cookies to set for at least 30 minutes before serving.
Kitchen Notes
- SUBSTITUTES FOR CANDY EYES
If candy eyes are not available where you live, one suggestion is to pipe some eyes onto the chocolate truffles. You could use the same chocolate as for the legs to make simple dark eyes, or perhaps use white chocolate for simple white eyes. Or you could go to the effort of piping white chocolate for the eyeballs, followed by dark chocolate for the pupils. - VEGETABLE SHORTENING
In Switzerland, the vegetable shortening I use is called Pflanzenfett in German, or graisse végétale in French. It is available from both Migros and Co-op and sold alongside the oil and olive oil. - OVEN TEMPERATURES
All recipes on this website state temperatures for a regular oven (i.e. a conventional oven without fan). If you have a convection oven with a fan, please consult the manufacturer’s handbook on how to adjust the temperature and baking time accordingly. - CONVERSIONS
To convert from cups to grams, and vice-versa, please see this handy Conversion Chart for Basic Ingredients.
Did you make this recipe?
Please leave a comment below and share your photos by tagging @eatlittlebird on social media and using #eatlittlebirdUpdate
This recipe was first published on 17 October 2017. It has been updated with new photos and more comprehensive recipe notes.


These spider cookies are sooo cute! Absolutely love the idea!
Thanks, Diana! I had as much fun making them as the kids had fun eating them 🙂
These are so cute! I need to make them for my nieces.
Thank you!
Black eyed Susans are simply the best!!!
I didn’t know what black-eyed Susans were – I had to look it up! 🙂
Wow these are absolutely adorable! Love how it all worked out with those little mouths on the chocolate! So fun! Hope Halloween festivities work out in Zurich!
Thanks, Vicky!
You won’t get me within 1km of a spider BUT, if you served me these, I might be tempted. And by tempted I mean can I eat the entire tray please? Such a cute and crafty post 🙂
Thanks, Chris! I grew up in Australia and the spiders I’ve seen there still make my skin crawl!!
These are adorable! I love the clever use of the simple there. Where do you get candy eyes in Switzerland? I think I will be making these for Halloween..our neighbourhood gets the kids together for Halloween and these would be fun to try!
Hi Shinta, lovely to hear from another blogger in Switzerland! I bought the candy eyes at Coop in their baking section. I was very surprised to find them here but glad I did!
These are just too cute to eat!
Almost! 😉 It’s funny watching the children eat them as they always try to bite the eyes off first!
These are absolutely adorable – and those little dimple mouths are perfect!
Thanks, Melissa! I love looking at these cookies 🙂
Oh die sind ja toll! 🙂 Ich finde Spinnen zwar echt ekelig, aber deine Cookies sehen viel zu lieb aus, um sie nicht super zu finden 😛
Danke für deine nette Wörte 🙂 Happy Halloween!
What an AMAZING idea! Beautiful presentation. One of my favs!
Hey I think these is the cutest halloween treat I have ever seen!!!!! I was on Tailwind and saw this!! And it’s so funny because earlier today I went to a lindt outlet to buy one hundred lindor truffles of different flavors to make Christmas cookies haha and then I came across this! Awesome!!!
Aww thank you! 100 Lindor truffles? I would be in heaven! Happy Christmas baking to you xx
I made these tonight for my sons Halloween party !! It’s perfect ? I love them ! I was having trouble finding something without peanut butter for my sons party a few are allergic so I just made sugar cookies instead..
So glad you like this recipe and could adapt it for the kids! I might do something similar and also try it with a shortbread-type biscuit. Happy Halloween!
These are so cute! Do you think I could use pretzels for the legs and if so can I place them into the cookie dough before baking?
Hi Melissa,
You could certainly try! Here is a recipe for Reindeer Cookies where I used pretzels for the antlers: https://eatlittlebird.com/reindeer-cookies/ This might give you some tips on how and when to add the pretzels for the legs. Please let me know how it goes!
These are adorable. Do you have a suggestion for substituting the egg? Thanks and Happy Halloween ?
These are too cute. What did you use as vegetable shortening that is available in Switzerland? Many thanks!
Hi Danielle,
I use Pflanzenfett which is available from both Migros and Coop. Hope this helps!
I made these! I am not a baker but I pulled this off! My only suggestion, which is something I did, is to refrigerate the truffles ahead of time so that when placing the eyes on, they stick quickly. And…. This look me like 3+ hours because I am a terrible baker. Love this so much!
Hi Erica,
I doubt you are a terrible baker, and you have proven it by making these spider cookies! Hope you all had a Happy Halloween!
Oh, I forgot, I also added little lips and smoky face candies to some.
These were a bit too sweet for me and too short. I used the correct quantities but they were just really crumbly and broke too easily. Any tips?
Hi Charlie,
It sounds like you may have underbaked the cookies slightly, hence they are too crumbly. The cookies should be somewhat soft and crumbly, but they should still hold their structure. I recommend baking them for an extra few minutes for firmer cookies. Hope this helps.
Hi! Can I use butter instead of shortening? How would I adapt? Thanks
Hi Victoria,
Yes, you can substitute the shortening for butter, but the cookies will not have the same soft and tender texture. But they will still taste great 🙂
Love this recipe and want to try for this Halloween. Would another type of cookie work if there are peanut allergies?
Hi Marylynn,
Yes, I think any other type of cookie would definitely work, for example, a sugar cookie or shortbread cookie. You would have to play with the other recipe to see how you can make an indent in the cookie towards the end of the baking time. But an alternative would be to simply attach the Lindt chocolate truffle to the cookie with some melted chocolate (the same which you are using to attach the candy eyes). Hope this helps!
Great recipe! I make this recipe for every Halloween now and both the kids and adults always enjoy them. I’ve made easier peanut butter cookie recipes, but this one is particularly tasty and moreish.
These are so cute! I made them last year for Halloween and they were a hit. I will be making them again this year!
Really cute and delicious cookies. I wish I could find the same candy eyes but they still looked really cute!
My kids loved these cookies! I will be making another batch this weekend for our Halloween party 🙂
I’ve tried easier peanut butter cookie recipes but this one is actually very tasty! Very soft and moreish. Great tips for making the spider cookies. Thanks!
This will be my second year making these cookies! My family love them.
I have made these spider cookies every Halloween the last few years an they are always a hit with both kids and adults. Happy Halloween!
Just wanted to say thank you so much for your recipe – I stumbled across it 5 years ago and we have made them every Halloween since. The cookies are especially delicious. Sometimes I’ve been too tired to make them (we do a lot of Halloween baking) and have cheated with shop bought ones but they aren’t a patch on your cookies. Yum! I’ve just eaten the last one from this year (just before the kids get back from school, ha ha!).
Hi Jen,
Oh that’s so lovely of you! I’m so glad you enjoy this recipe and that it has been a favourite in your family. I didn’t get around to making the spider cookies this year (I was making Brioche Mummies instead) but my kids still insist on these cookies, so I will make a batch this weekend 🙂 I have a soft spot for these peanut butter cookies too!