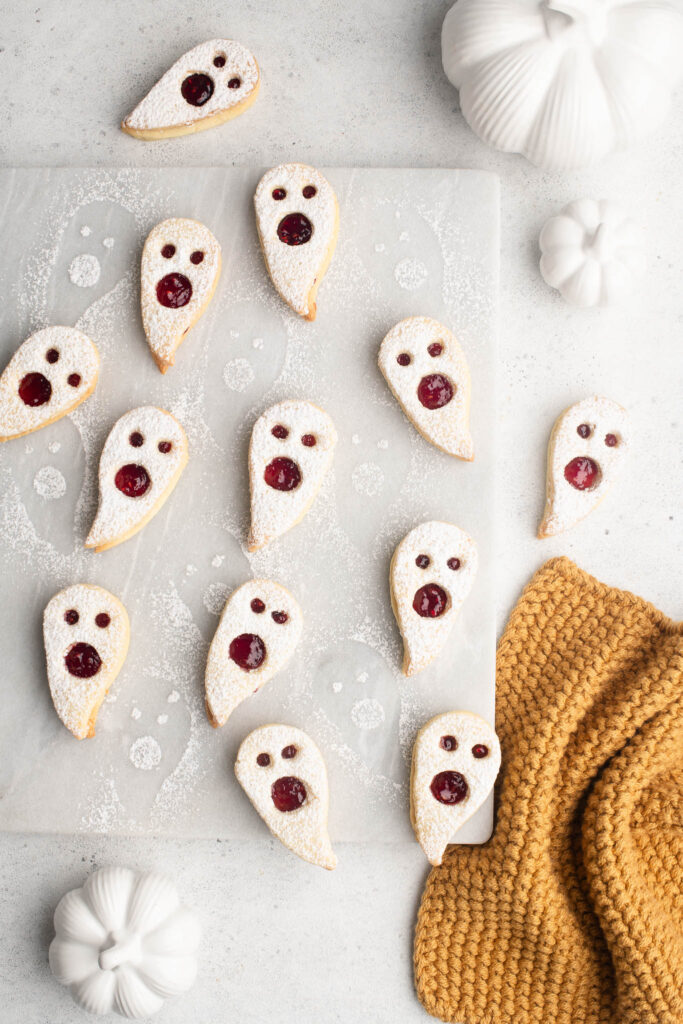
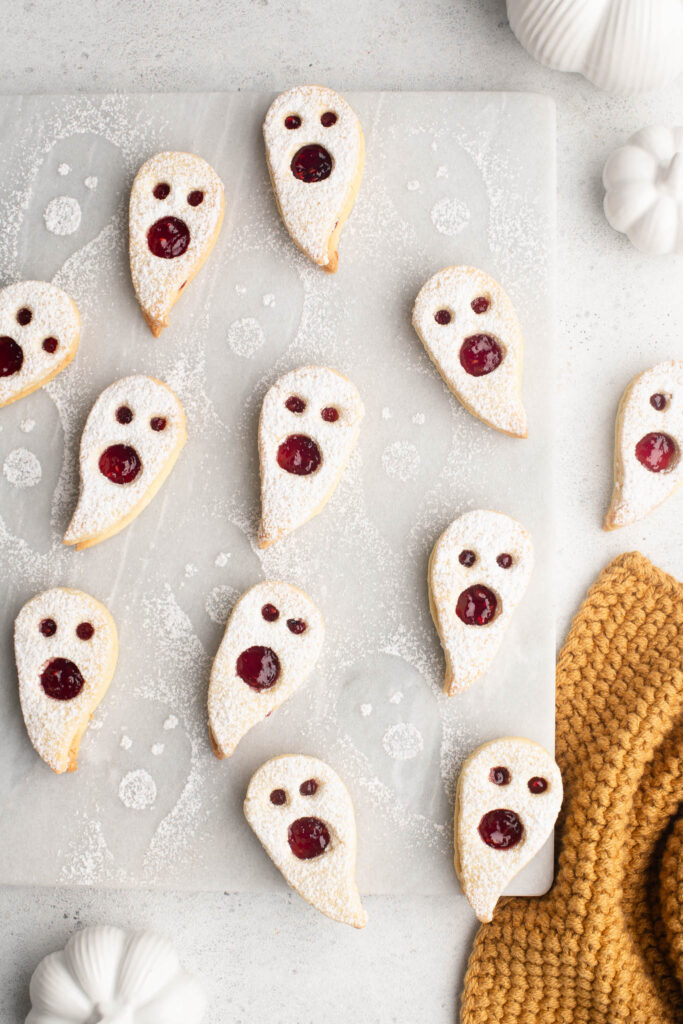
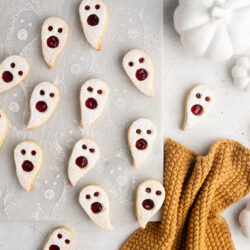
Halloween Ghost Linzer Cookies
With Halloween around the corner, I wanted to make a spooky version of my children’s favourite Linzer Cookies. I saw these ghost Linzer cookies on Instagram from @joyfulhomecooking and I knew that I wanted to recreate them right away!
These ghost Linzer cookies have actually been on social media for a few years, but this particular reel made them seem so easy peasy to make, and what won me over was the fact that you can make them simply with a heart cookie cutter, plus a small piping nozzle. No need to buy a special cookie cutter for this recipe!
What are Linzer Cookies?
Linzer Cookies originate from Austria and are buttery sandwich cookies with a jam filling.
The more traditional Linzer Cookies are lightly spiced with cinnamon and cloves, but many variations exist. The most popular version is probably a buttery, shortbread-like cookie sandwiched with jam, as this appeals to the most palates (and especially children).
Linzer Cookies are so popular where we live that they are available all year round. Here in Switzerland, Linzer Cookies are called Spitzbüben, which means “cheeky boy” and which is a reference to the cut-out smiley face commonly used.

Linzer Cookie Recipe
My recipe for Linzer Cookies is a “kid-friendly” version, namely that it omits the spice which is more often found in a traditional Linzer Cookie. In fact, many European Christmas cookies are spiced cookies – they are often heady with cinnamon, cardamom, cloves or a combination of these three spices and more.
Here in Europe, Linzer Cookies traditionally contain ground cinnamon and maybe even ground cloves, and both spices happen to work really well with a sweet jam filling. However, if you are making these cookies with mostly children in mind, it is not uncommon to find many recipes for Linzer Cookies without any spice added.
As my family love cinnamon in all cakes and bakes, I typically add about 1/2 teaspoon of ground cinnamon to the dough. But if we are giving the cookies as gifts, I often omit the spice. You can do as you please!
Linzer Cookie Cutters
For these Halloween Linzer Cookies, you will need a heart cookie cutter, plus a small piping nozzle to create the eyes and mouth.
The heart-shaped cookies are sliced in half to produce two “ghosts”, which you will need to lightly re-shape to form a rounded head and angled tail. The size of your heart-shaped cookie cutter will determine the size of your ghost cookies.
You may need to use a few different small piping nozzles to produce the right-sized eyes and mouths for the heart-shaped cookie that you are using.
I’m not going to lie – making these ghost Linzer cookies is a bit fiddly and time consuming and NOT an instant process like most TikTok reels would make you believe. While I consider it to be an advantage to not have to buy a specially-made cookie cutter for this recipe, the disadvantage is that you will need to spend some time to individually cut out the eyes and mouth. That said, I love that each cookie looks slightly different to each other.
How to Make Halloween Linzer Cookies
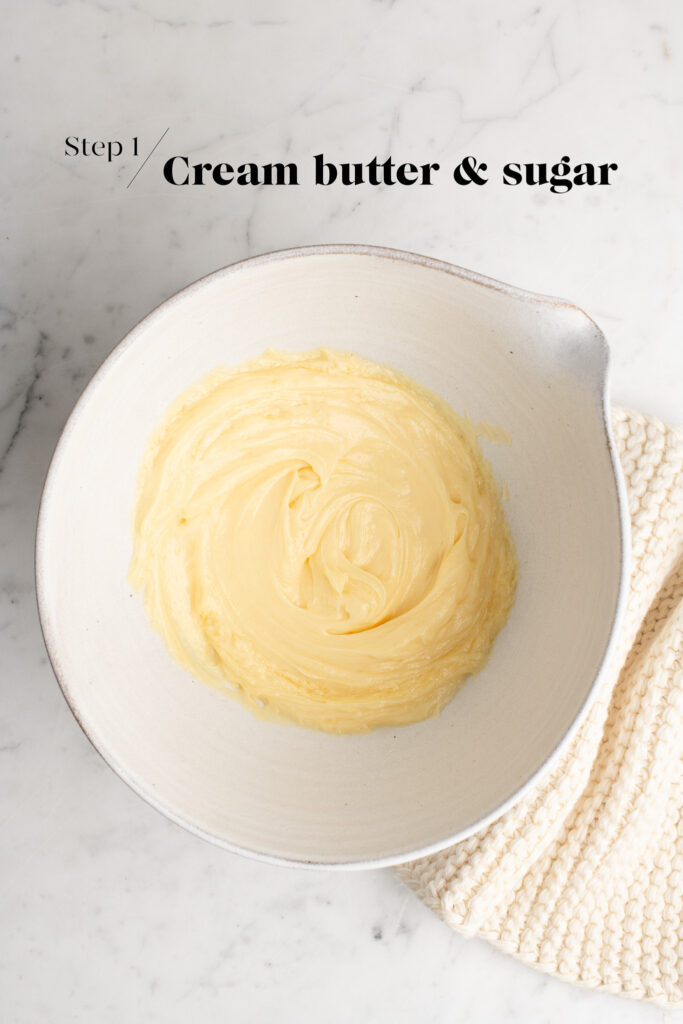
Step 1
Cream the butter and sugar until the mixture is pale and fluffy. I like to use my electric stand mixer with the flat paddle attachment.
Then lightly beat through the egg yolks and vanilla.
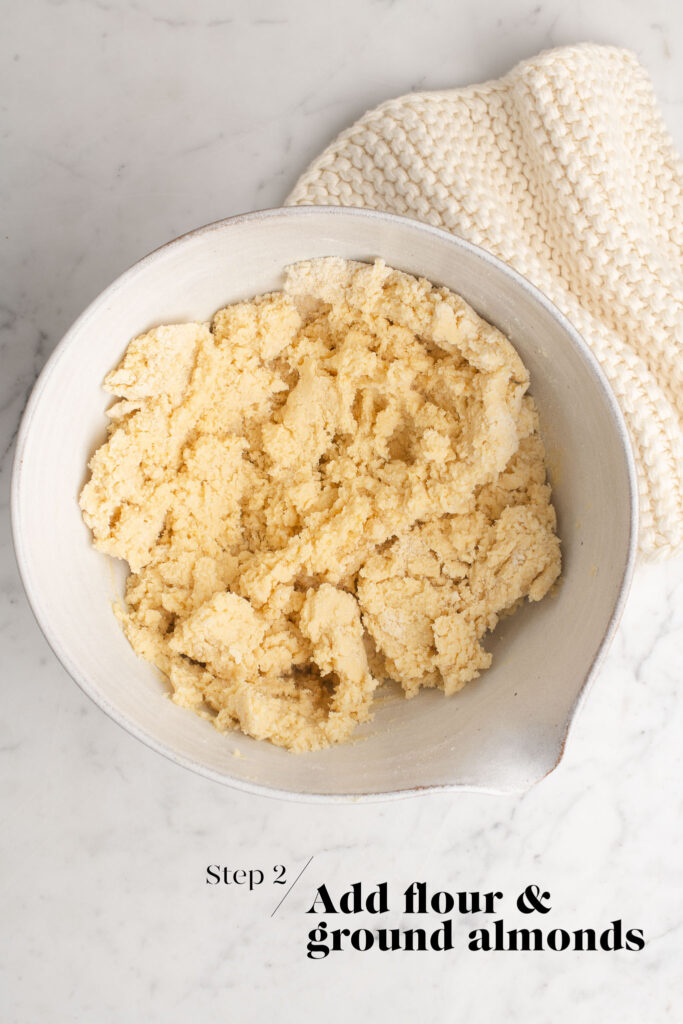
Step 2
Measure the flour, almond meal (ground almonds) and salt into a large bowl.
Gradually beat in the flour mixture, one tablespoon at a time. Once all of the flour has been added, the mixture should form into a soft dough.
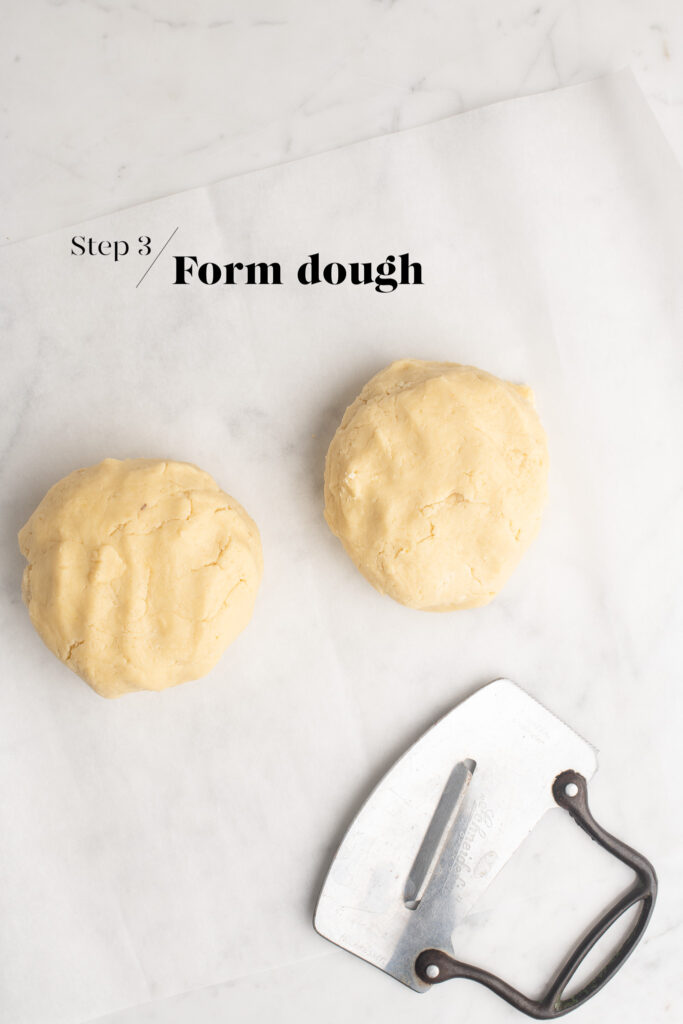
Step 3
Gently knead the dough into a soft ball, and then divide the dough into two pieces.
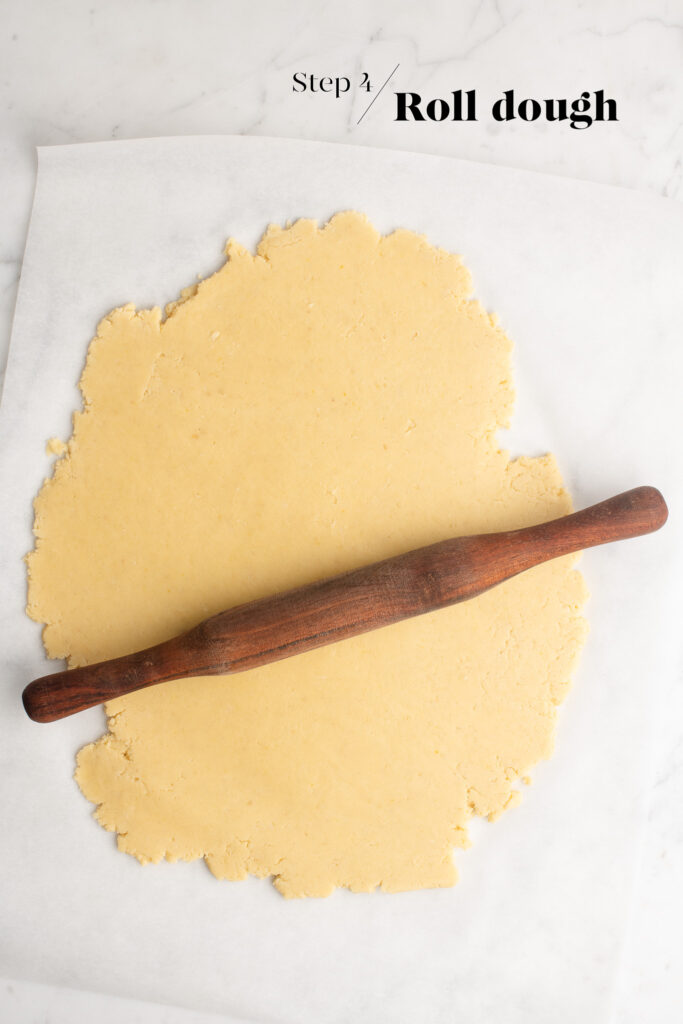
Step 4
Place one piece of dough between two sheets of baking paper. Roll out the dough until it is 2-3 mm thick. Repeat with the other piece of dough.
Place both sheets of dough on a large baking tray, and place them into the fridge to chill for at least 1 hour. At this stage, you can keep the dough in the fridge for 2-3 days.
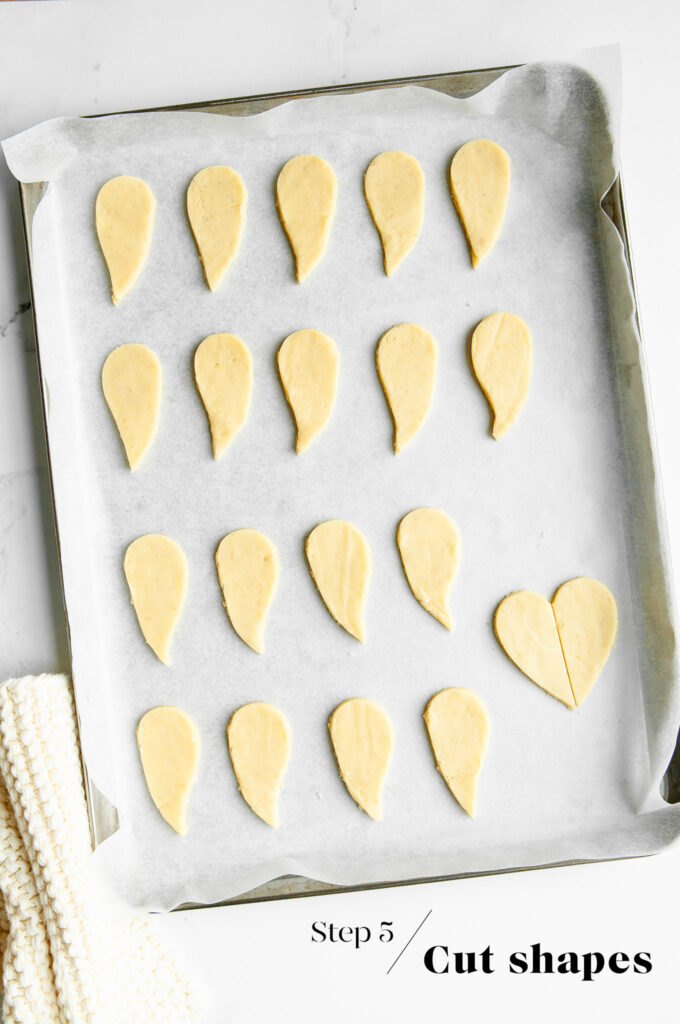
Step 5
Use a heart cookie cutter to cut out shapes from the dough. Then use a sharp knife to cut the heart down the middle to form to two halves.
Gently shape the two halves into ghost shapes by rounding the head and pinching the tail. Some of the ghosts will squiggle to the right, some to the left.
You will need an even number of both cookies – half of the cookies will be plain to form the “cookie bottoms”, and the other half will have a decorative shape cut out to form the top of the cookies.
Place the cut out cookies onto a large baking tray lined with baking paper.
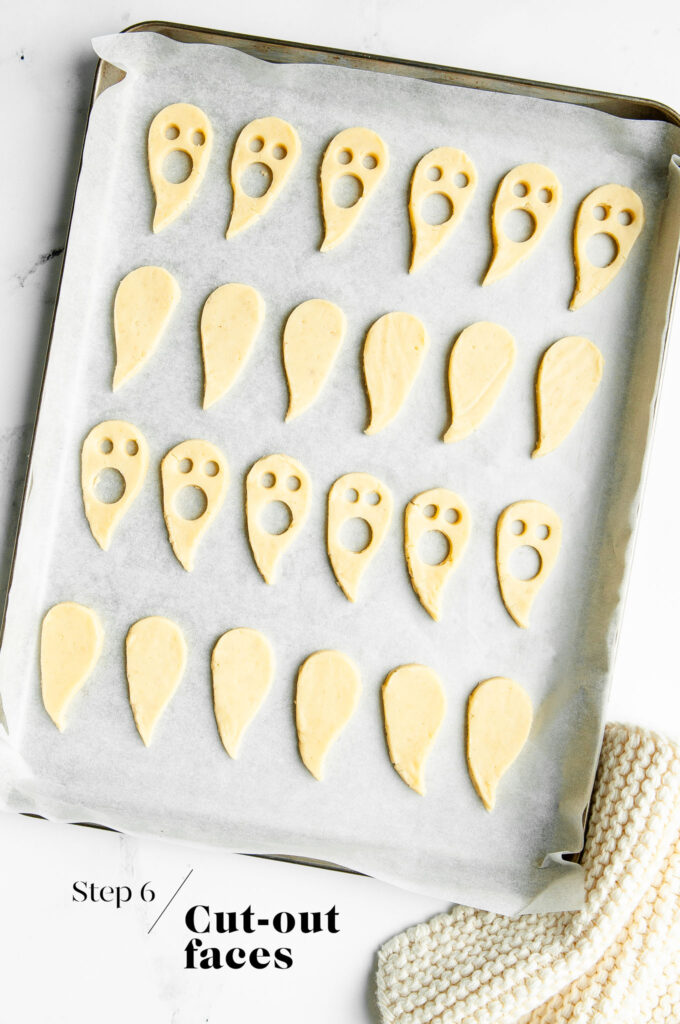
Step 6
To cut out the eyes for the ghosts, I use the tip of a small round piping nozzle. And for the mouth, I use the larger end of a small round piping nozzle. One of my nozzles was slightly oval-shaped, so I used it to create the mouths.
Place the tray in the fridge for at least 1 hour for the dough to chill. It is best to bake the cookies when the dough is very firm and cold, so as to ensure that the cookies will keep their shape upon baking. Otherwise, if you bake the cookies when the dough is soft and warm, you may end up with some cookies which are larger than others, which will be obvious when you later sandwich them together.
Step 7
Preheat the oven to 180°C/356°F (without fan). Place a metal tray on the middle shelf of the oven.
Bake the cookies for 8-10 minutes, or until the edges of the cookies just start to colour. You want these cookies to be quite pale in colour. The baking time will depend on the size of your cookies, as well as your oven. If you prefer to have more crisp or crunchy cookies, you can bake them for a touch longer until they are lightly golden.
Leave the cookies to rest on the hot baking tray for about 5 minutes, before removing them to a wire rack to cool completely.
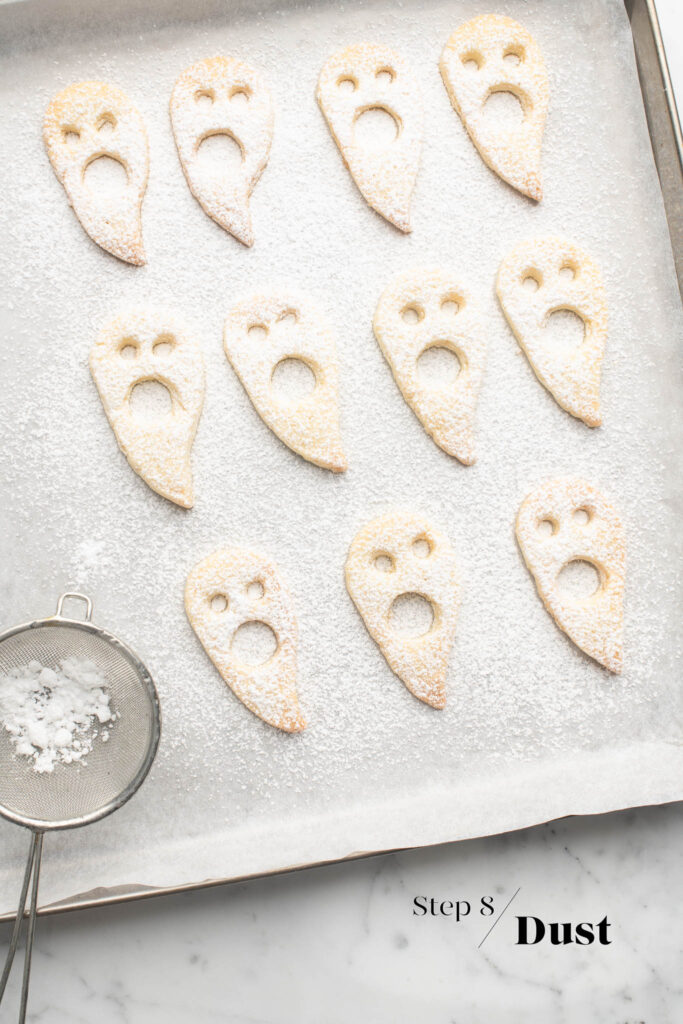
Step 8
Place the ghost cookies with holes on a large sheet of baking paper. Dust them with icing sugar (powdered sugar), as little or as much as you like.
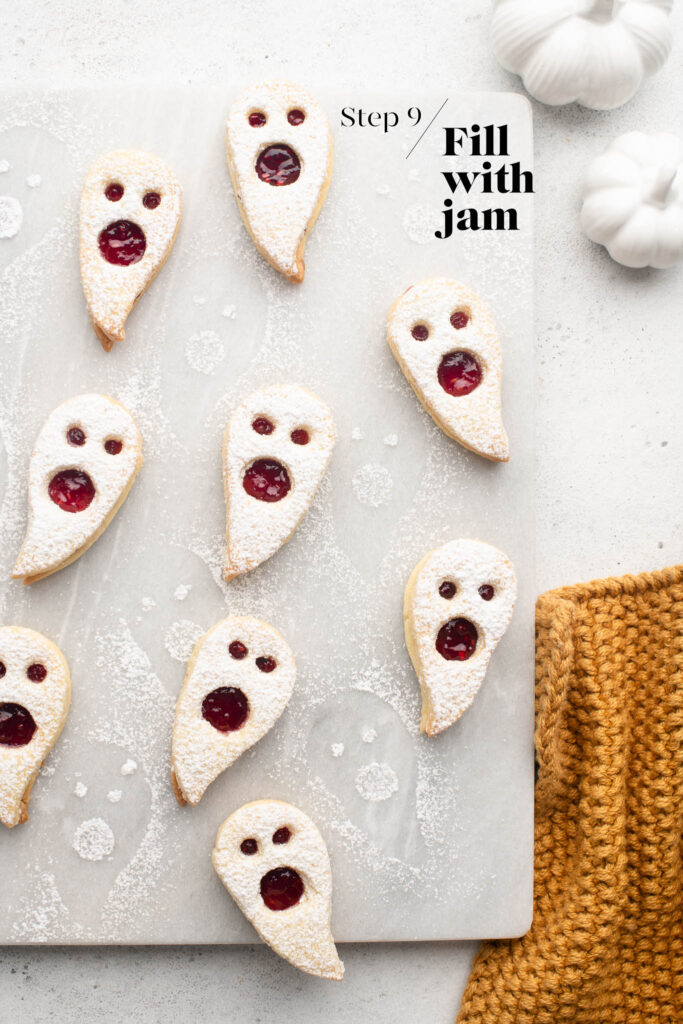
Step 9
Place a scant teaspoon of jam in the centre of the cookie bottoms. You can fill a small piping bag with jam to make this task easier, but using a teaspoon is also fine.
You need enough jam to spread to the edges of the cookies when sandwiched together, as well as enough to push through the holes of the ghost cookies.
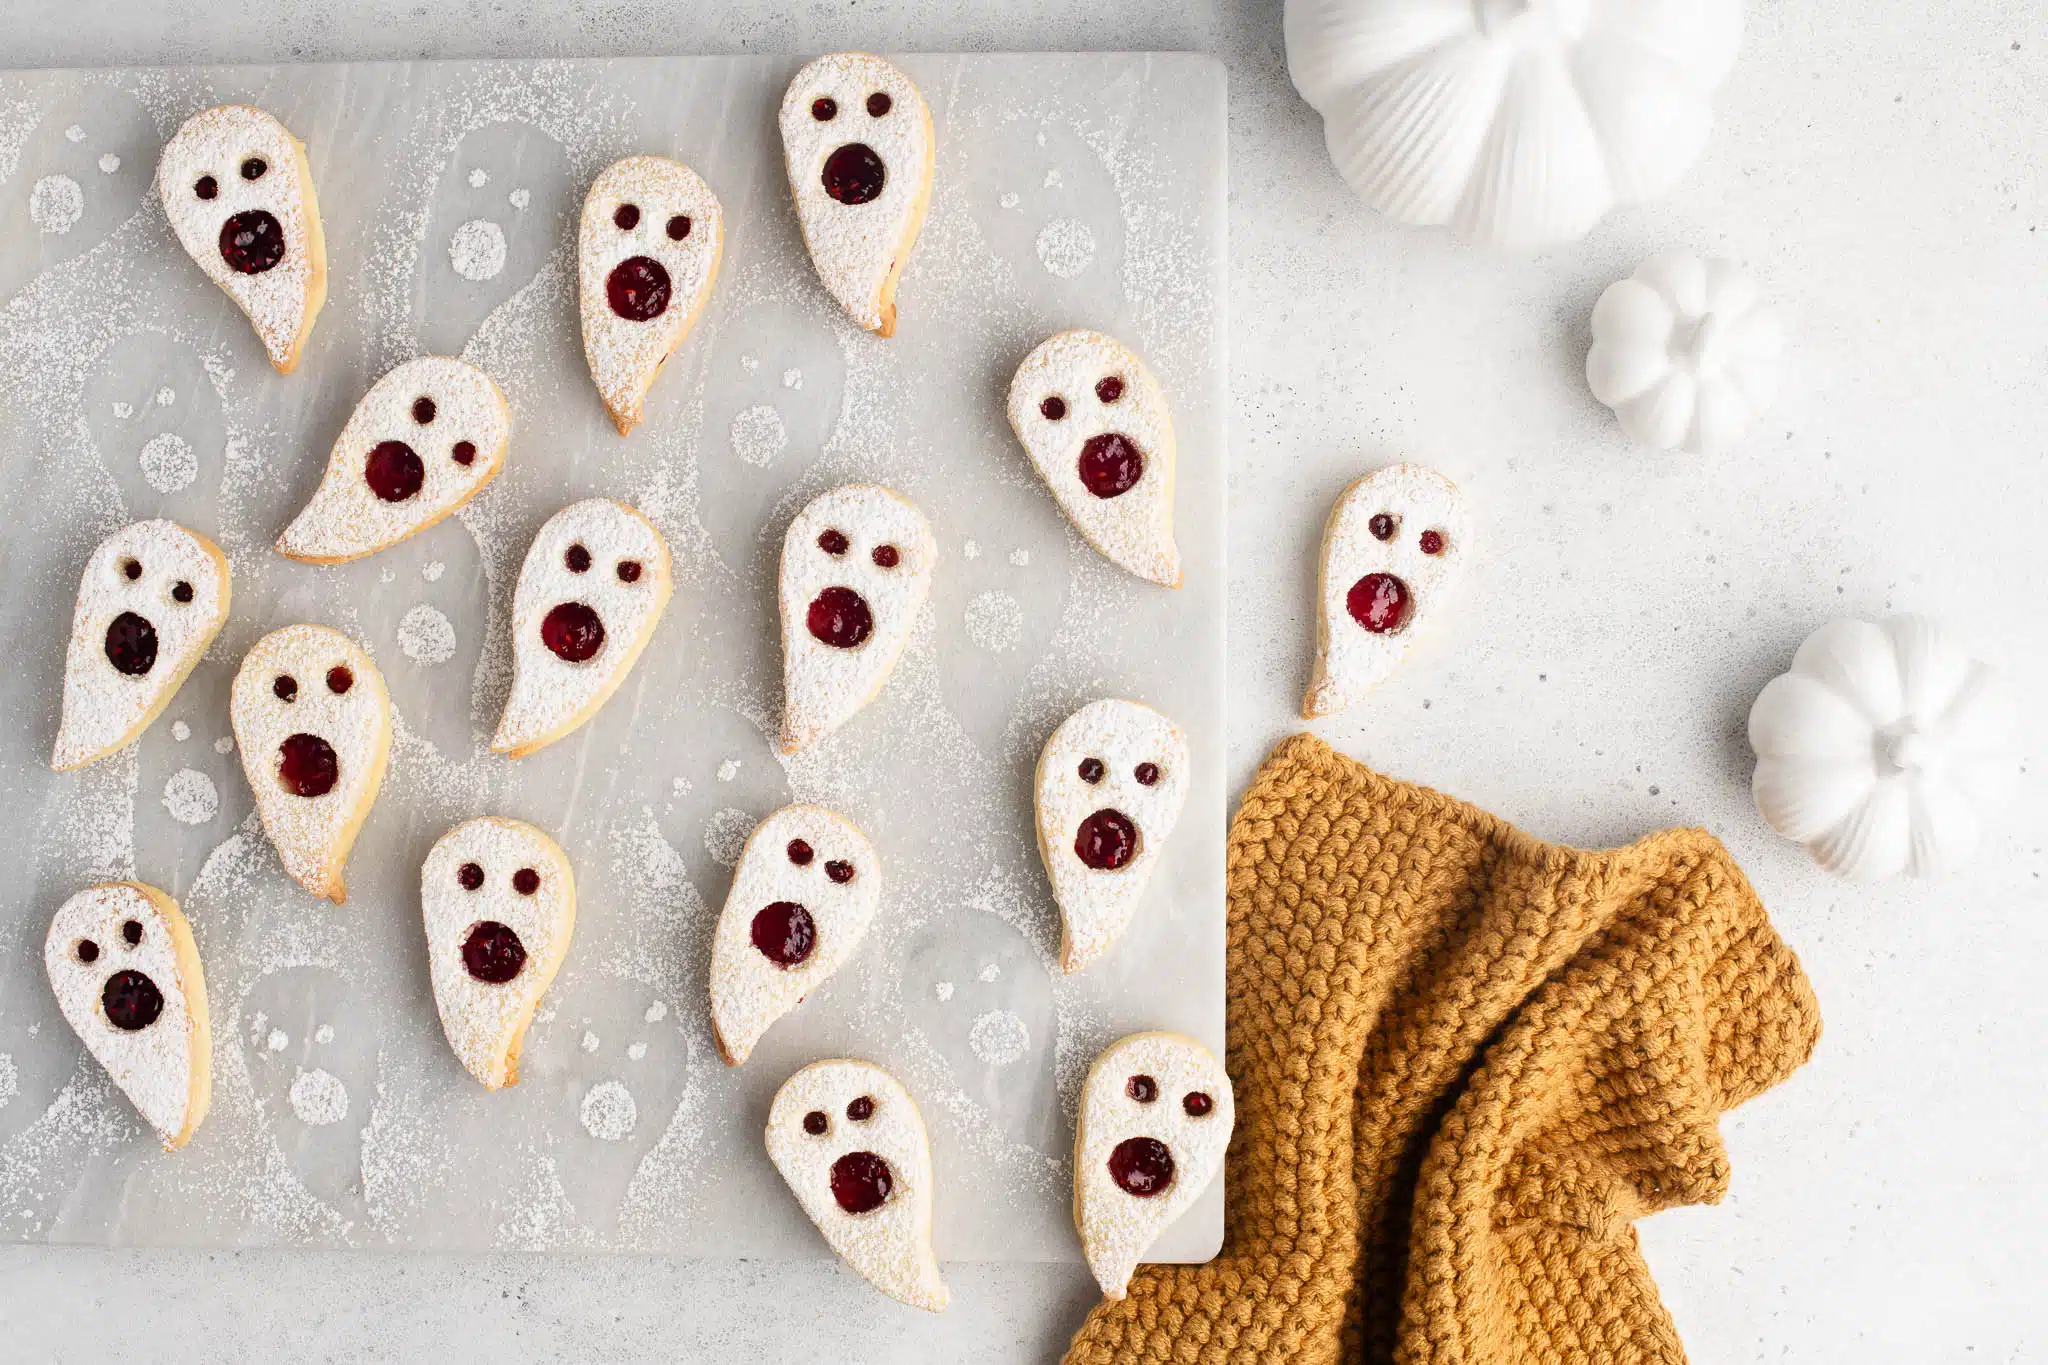
Sandwich the cookies together gently.
Tips For Making Linzer Cookies
- Chill the dough. The dough needs to be chilled so that it is easy to handle. If you have a warm kitchen, work with a fan or the air-conditioning turned on.
- Re-roll. Any dough scraps can be re-rolled and re-chilled.
- Make time. Making sandwich cookies takes time, so set aside a good 2-3 hours to make them (especially if your kids are “helping”). You can get a head start by making and rolling the dough the night before.
- Use your favourite jam. My favourite jam for Linzer Cookies is apricot jam or quince jelly, but raspberry jam or strawberry jam looks very festive. The jam doesn’t need to be homemade, but it’s worth using a good-quality jam.
- Crisp vs soft cookies. I like to eat Linzer Cookies on the day they are made when the cookies are a little crisp. But they also taste great after a few days when the cookies have softened and the jam has dried out and become chewy. Yum!
Halloween Ghost Linzer Cookies
Ingredients
For the Cookies
- 200 g (2 sticks) unsalted butter, softened
- 150 g (1 cup plus 1 tablespoon) icing sugar, (powdered sugar)
- 2 egg yolks
- 1 teaspoon vanilla extract
- 300 g (2 cups) plain flour, (all-purpose flour)
- 100 g (¾ cup) almond meal, (ground almonds)
- 3 g (½ teaspoon) fine salt
To Decorate
- Raspberry Jam, Apricot Jam, or any jam of your choice
- icing sugar, (powdered sugar) for dusting
Instructions
To Make the Cookie Dough
- Cream the butter and icing sugar (powdered sugar) until the mixture is light and fluffy.
- Add the egg yolks and vanilla.
- Beat lightly until the egg yolks are incorporated.
- Measure the flour, almond meal and salt into a large bowl.
- Add the flour mixture, one tablespoon at a time, to the egg mixture.
- Keep beating the mixture as you add the flour.
- Once all of the ingredients have been added, the mixture should form a soft dough.
- Gently knead the dough together on the kitchen bench until if forms a soft ball.
- Divide the ball of dough into two.
- Place one ball of dough between two sheets of baking paper.
- Roll until the dough is about 2-3 mm thick.
- Repeat with the other ball of dough.
- Place both rolled out sheets of dough onto a large baking tray.
- Place the tray into the fridge and leave the dough to chill for 1-2 hours. At this stage, the dough can be kept in the fridge for 2-3 days.
To Cut Out the Cookies
- Use a heart cookie cutter to cut out shapes from the dough.
- Use a sharp knife to cut the heart-shapes in half.
- Gently shape the head and pinch the tail to the side.
- You should have an even number of ghost cookies with tails to the left and tails to the right.
- Transfer the cut out cookies to a large baking tray lined with baking paper.
- Use the tip of a small piping nozzle to cut out the eyes.
- Then use the larger end of the small piping nozzle to cut out the mouths.
- Any unused dough can be re-rolled. As the dough will be quite soft, I recommend re-rolling the dough between two sheets of baking paper, and chilling the dough in the fridge again if necessary.
- Place the tray of cut out cookies in the fridge for the dough to chill. It is best to bake the cookies when the dough is very firm and cold, so as to ensure that the cookies will keep their shape upon baking. I recommend chilling the cut out cookies for at least 1 hour.
To Bake the Cookies
- Preheat the oven to 180°C/356°F (without fan).
- Place a metal tray on the middle shelf of the oven.
- Place the tray of cut out cookies on the pre-heated metal tray.
- Bake the cookies for about 8-10 minutes, or until the cookies are just starting to turn golden at the edges. The cookies should otherwise be quite pale. The baking time will depend on the size of your cookies, as well as your oven. If you prefer your cookies more crisp or crunchy, bake them for slightly longer until they are lightly golden.
- Once the cookies are baked, leave them to rest on the hot baking tray for 5 minutes before removing them to a wire rack to cool completely.
To Decorate the Cookies
- Place the cookies with holes cut out on a large sheet of baking paper.
- Dust these cookies with icing sugar (powdered sugar), as little or as much as you like.
- For the cookie bottoms, dollop a small teaspoon of jam in the centre.
- Sandwich the cookies together gently with the dusted cookie on top.
Kitchen Notes
- VARIATION
For a lightly spiced cookie, I recommend adding 1/4 to 1/2 teaspoon of ground cinnamon to the dry ingredients. - OVEN & STOVE TEMPERATURES
All recipes on this website have been tested on an induction stove and/or with a conventional oven (i.e. an oven without fan). All recipes on this website use temperatures for a conventional oven, unless otherwise mentioned. Convection ovens (i.e. fan-forced ovens) are typically 20°C/70°F hotter than conventional ovens, but please check your manufacturer’s handbook. - CONVERSIONS
To convert from cups to grams, and vice-versa, please see this handy Conversion Chart for Basic Ingredients.


Such cute cookies and so easy to make. Great recipe!
Hi Angie,
So glad you enjoyed these cookies! Happy Halloween!
These are the cutest linzer cookies! My kids and I had a lot of fun making these and the taste was excellent.
Wonderful tasting cookies.
These linzer cookies are very delicious and also fun to make