
Crispy Pork Belly
Crispy Pork Belly is a favourite in many Vietnamese households, and my mother regularly made Chinese-style roast pork belly to serve with a vermicelli noodle salad (like that used in my recipe for Vietnamese Lemongrass Chicken with Vermicelli Noodle Salad) or wrapped in rice paper with noodles and an assortment of fresh herbs.
Crispy Pork Belly used to be a special occasion dish in my home because it required quite a bit of advance planning and preparation, but ever since I bought an air fryer, we now often have Crispy Pork Belly for a mid-week dinner 😊
Why This Recipe Works
When cooking pork belly in the air fryer, you can have roast pork with crispy crackling in about 1 hour! When using the air fryer, you don’t need to blanch the meat first, nor dry out the skin overnight in the fridge. Which means you can skip several steps, typically done the day before, and achieve the same or better results with the air fryer.
Air Fryer Pork Belly
I have to admit that I was very late to the air fryer trend. When you live in a typical European apartment, space is very limited, so we own as few kitchen appliances as possible, especially those which occupy permanent counter space.
But after a recent trip to Australia where I noticed that ALL of my friends owned an air fryer which they used more frequently than their actual oven, I started to think differently of this appliance. And when they all sung praises about how great the air fryer was for cooking pork belly, I was quickly converted.
So I researched different sizes and models of air fryers, and my main criteria was buying one which could fit a 1 kg/2 lb piece of pork belly comfortably. This is generally how much pork belly I like to roast at one time, which is enough for a family of 4 with some leftovers. (My other criteria was that it also had to fit a whole chicken because I make roast chicken every week.)
As I could already glean from social media, my first attempt at making pork belly in the air fryer was an instant success. Although I have been roasting pork belly in the oven for years with good results, I was impressed by how the air fryer could deliver more consistent results, even better crackling, and in much less time than the traditional method.
I can say that, since owning an air fryer, each time I have cooked pork belly, the results have looked exactly like what you see in these photos.
Traditional Roast Pork Belly Recipe
Traditionally, making roast pork belly requires you to blanch the meat, and then rest the meat uncovered in the fridge overnight to dry out the skin. I used to follow Stephanie Alexander’s method for preparing pork belly, which can be found in her book, The Cook’s Companion, in her recipe for Chinese Crisp-Roasted Pork.
For me, the result was always succulent meat with delightfully crunchy crackling. However, her method required some stove-side attention in the final minutes as the crackling is then cooked under a hot grill for a few minutes to puff up and crackle; a second too long and dinner could be a burnt mess.
How to Get Crispy Pork Belly Skin
Regardless of whether you are cooking pork belly in a traditional oven or an air fryer, the main tips for getting crispy pork belly or crispy crackling include:
- Dry the skin. Moisture is the enemy of crispy crackling, so not only do you want to pat the skin dry with kitchen paper, ideally, you should also leave the pork in the fridge overnight – uncovered – to thoroughly dry out. An alternative to this overnight process is to cook the pork in a salt bake, as per the recipe below, to draw out the moisture in the skin.
- Score the skin. Use a sharp knife to score through the skin just to the layer of fat beneath (but not right through to the meat), in thin intervals about 0.5 cm thick, which will help to create crispy crackling as it allows the fat in the skin to rise to the surface during roasting and “cook” the skin. Alternatively, instead of scoring the skin, you can also poke holes in the skin with a sharp metal skewer (or similar object). This method is generally faster, but both methods essentially allow the fat to rise to the surface during roasting.
- High heat at the end of cooking time. Pork belly (and other cuts of pork with skin) should be cooked first on a low heat so that the meat can cook through, and the fat in the pork can render. Once the meat is mostly cooked through, you can then turn up the heat, which is what will make the skin go golden and crispy.
Using the Air Fryer for Crispy Pork Belly
This Air Fryer Crispy Pork Belly recipe is less fraught with danger than the traditional oven method, but uses a slightly different technique to help achieve the much desired crispy crackling.
- To draw out moisture from the skin, the skin is first covered in salt and baked at a low temperature, during which time the salt will absorb any liquid in the rind. The salt does not make the meat taste salty; it is there to mostly prepare the skin for crackling later.
- After you have removed the salt crust, the pork can be roasted at a higher temperature to finish cooking throughout, and for the rind to become golden and crispy. Due to the compact oven size, the meat cooks more consistently and browns more evenly. It also cooks in less time than a regular oven.
Crispy Pork Belly Recipe
For the seasoning, my recipe is similar to what my mother used to use, except she regularly bought a ready-made mix from the Asian grocer. As this was a product I couldn’t ever find in Zurich, I eventually came up with my own concoction using the ingredient list on the packaging.
Vietnamese and Chinese roast pork belly is one and the same, so the flavours in this recipe are similar to what you will find in Chinatown restaurants serving crispy pork belly.
How to Make Air Fryer Crispy Pork Belly
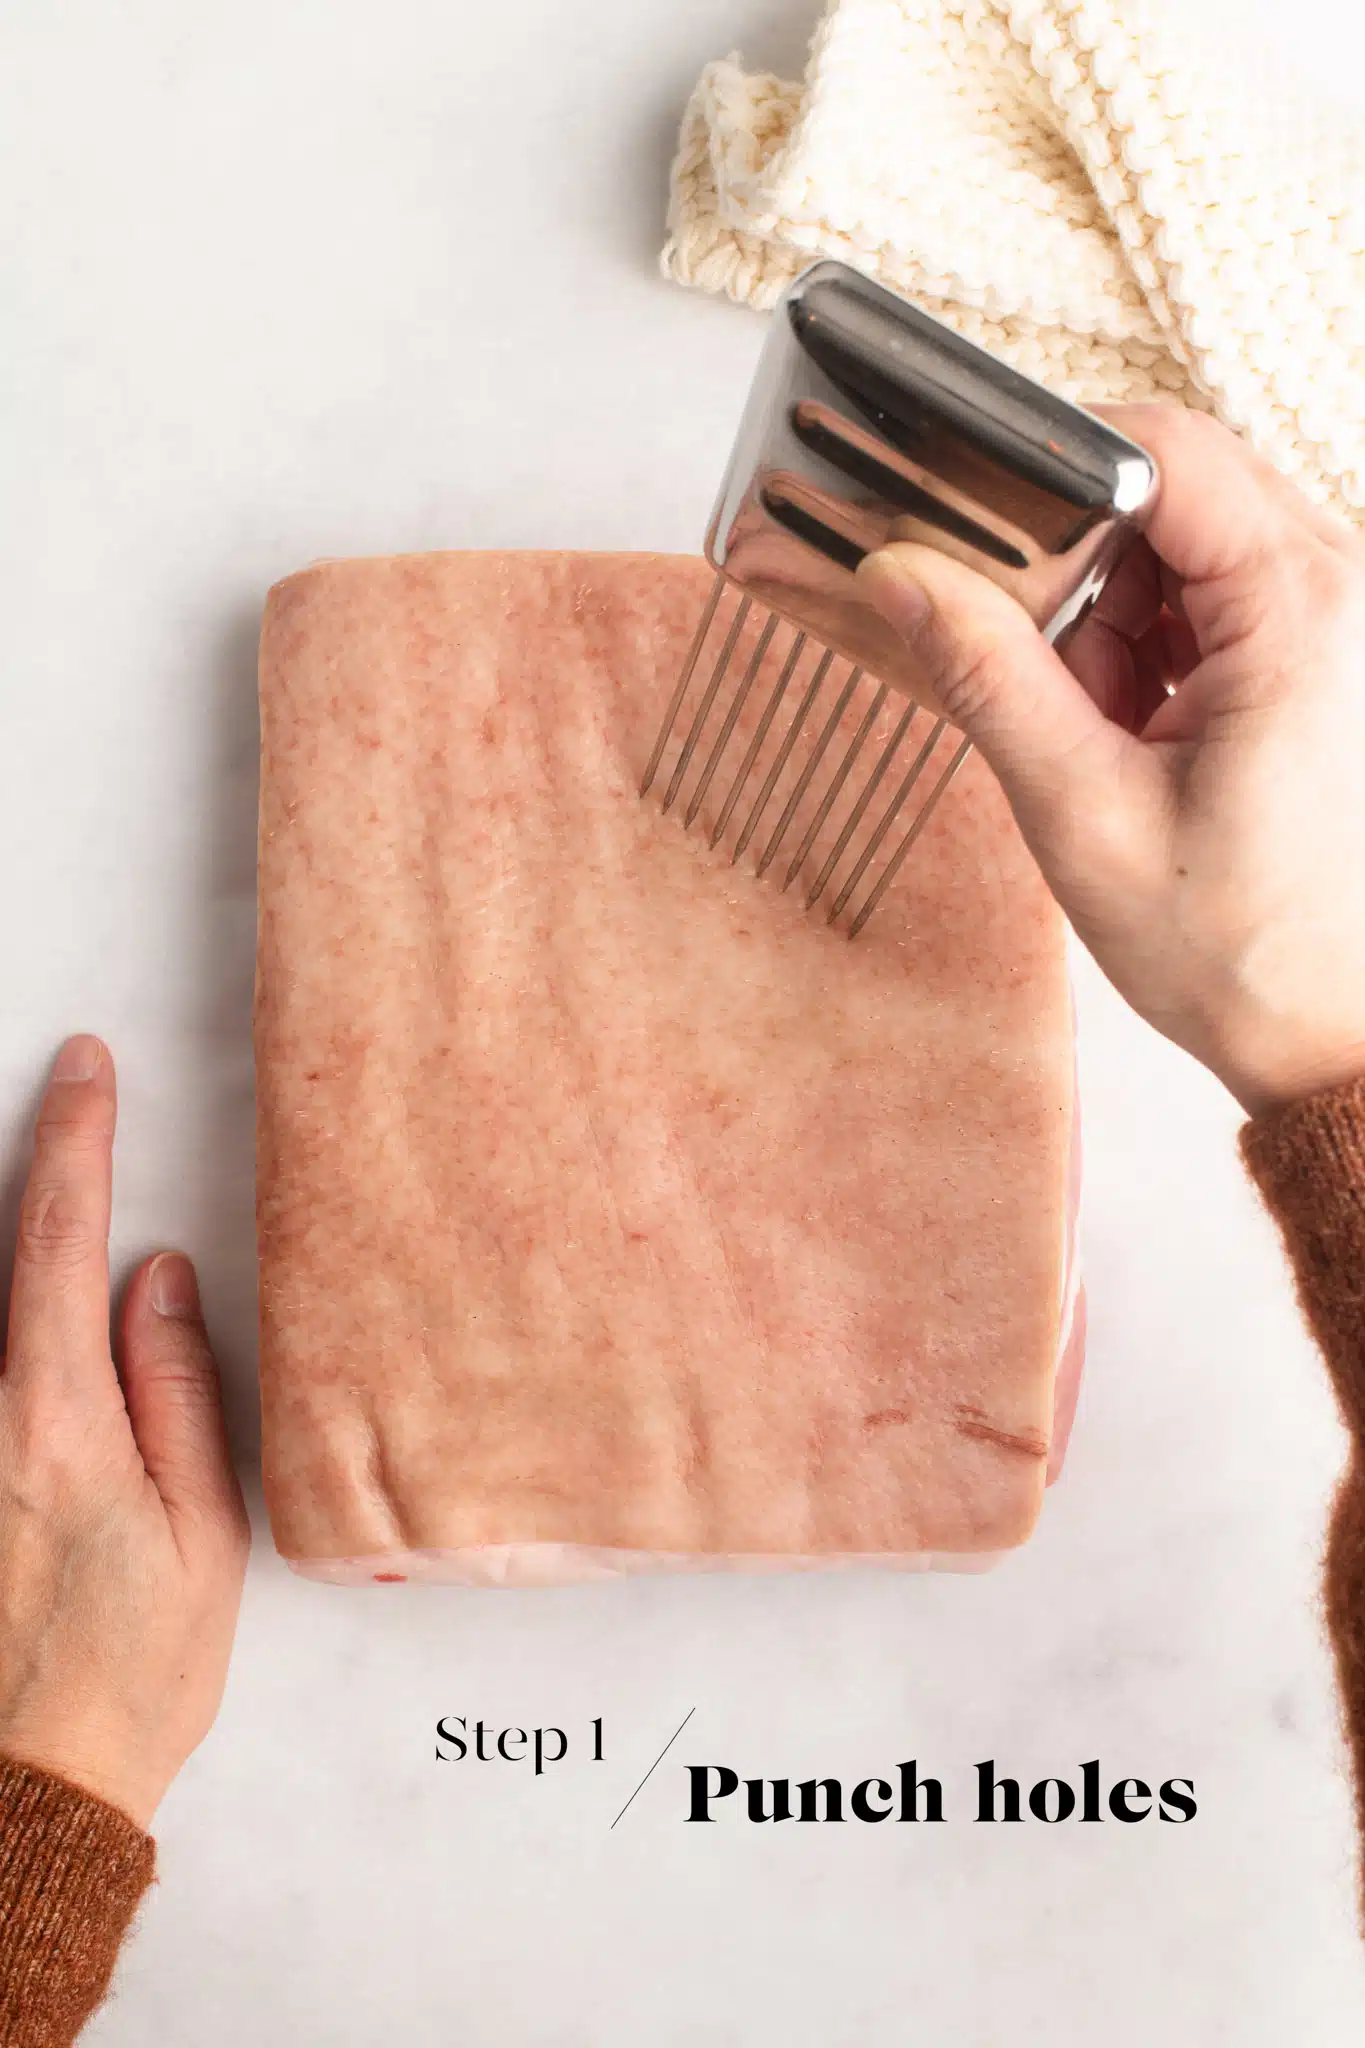
Step 1
Punch holes all over the rind of the pork belly – the more holes, the better! There exists meat tenderisers for this task, but the pointy end of a metal skewer would work similarly.
This step is important because, during roasting, the fat under the skin will ooze out of these holes to cook the skin and make it crispy and crackled.
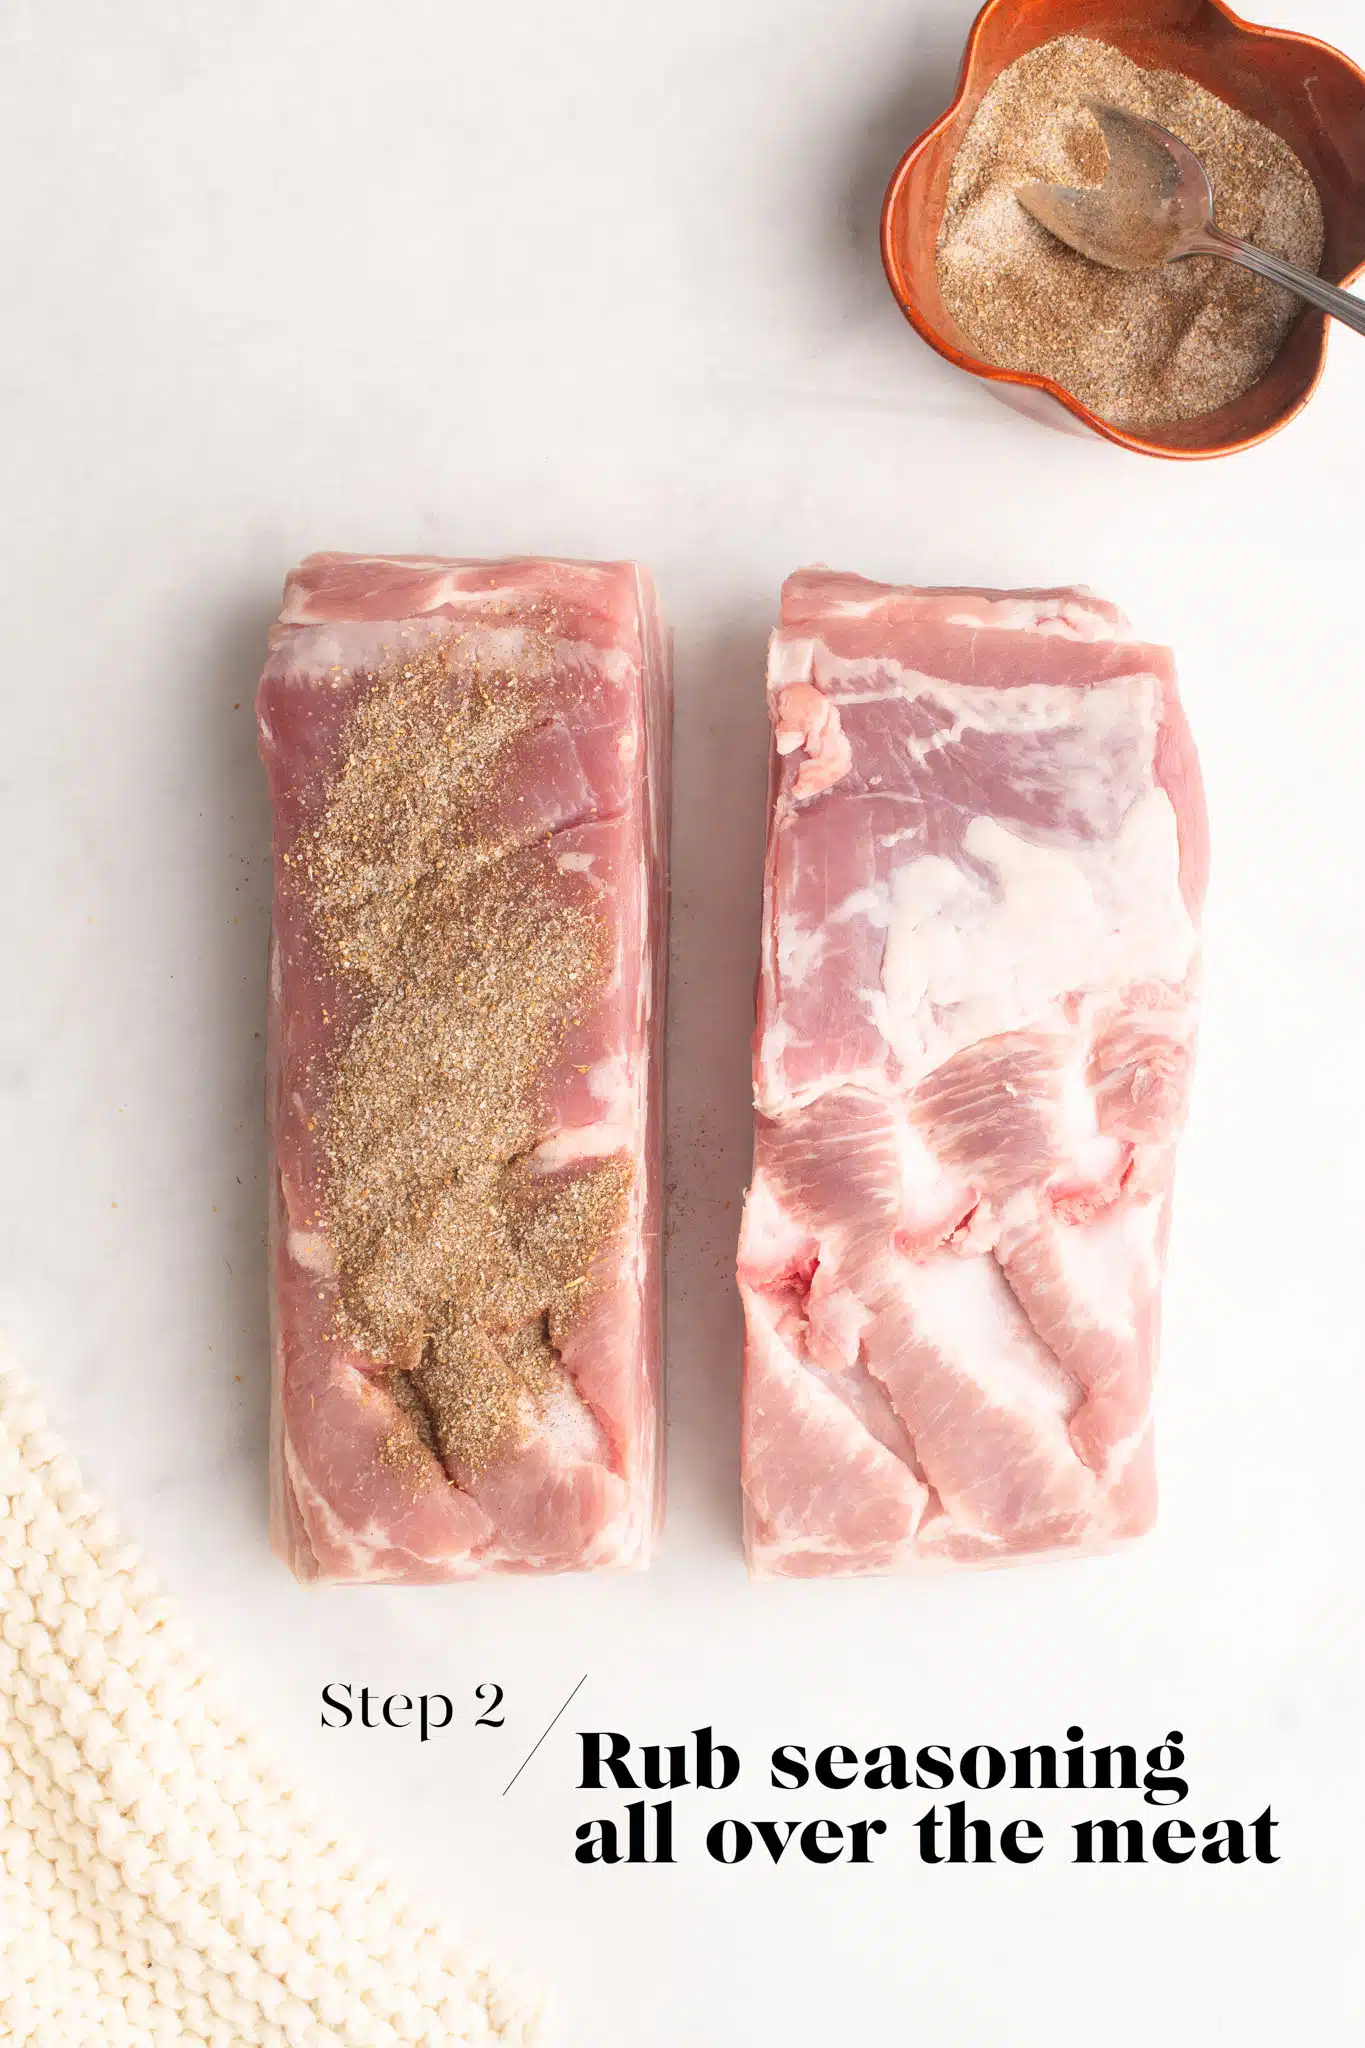
Step 2
You can choose to leave the piece of pork belly whole, or cut it in half like I have done. I like to have caramelised edges on my pork belly pieces, and a smaller piece of meat means more surface area for the seasoning.
Rub the dry seasoning all over the surface of the meat, on all sides, except for the rind.
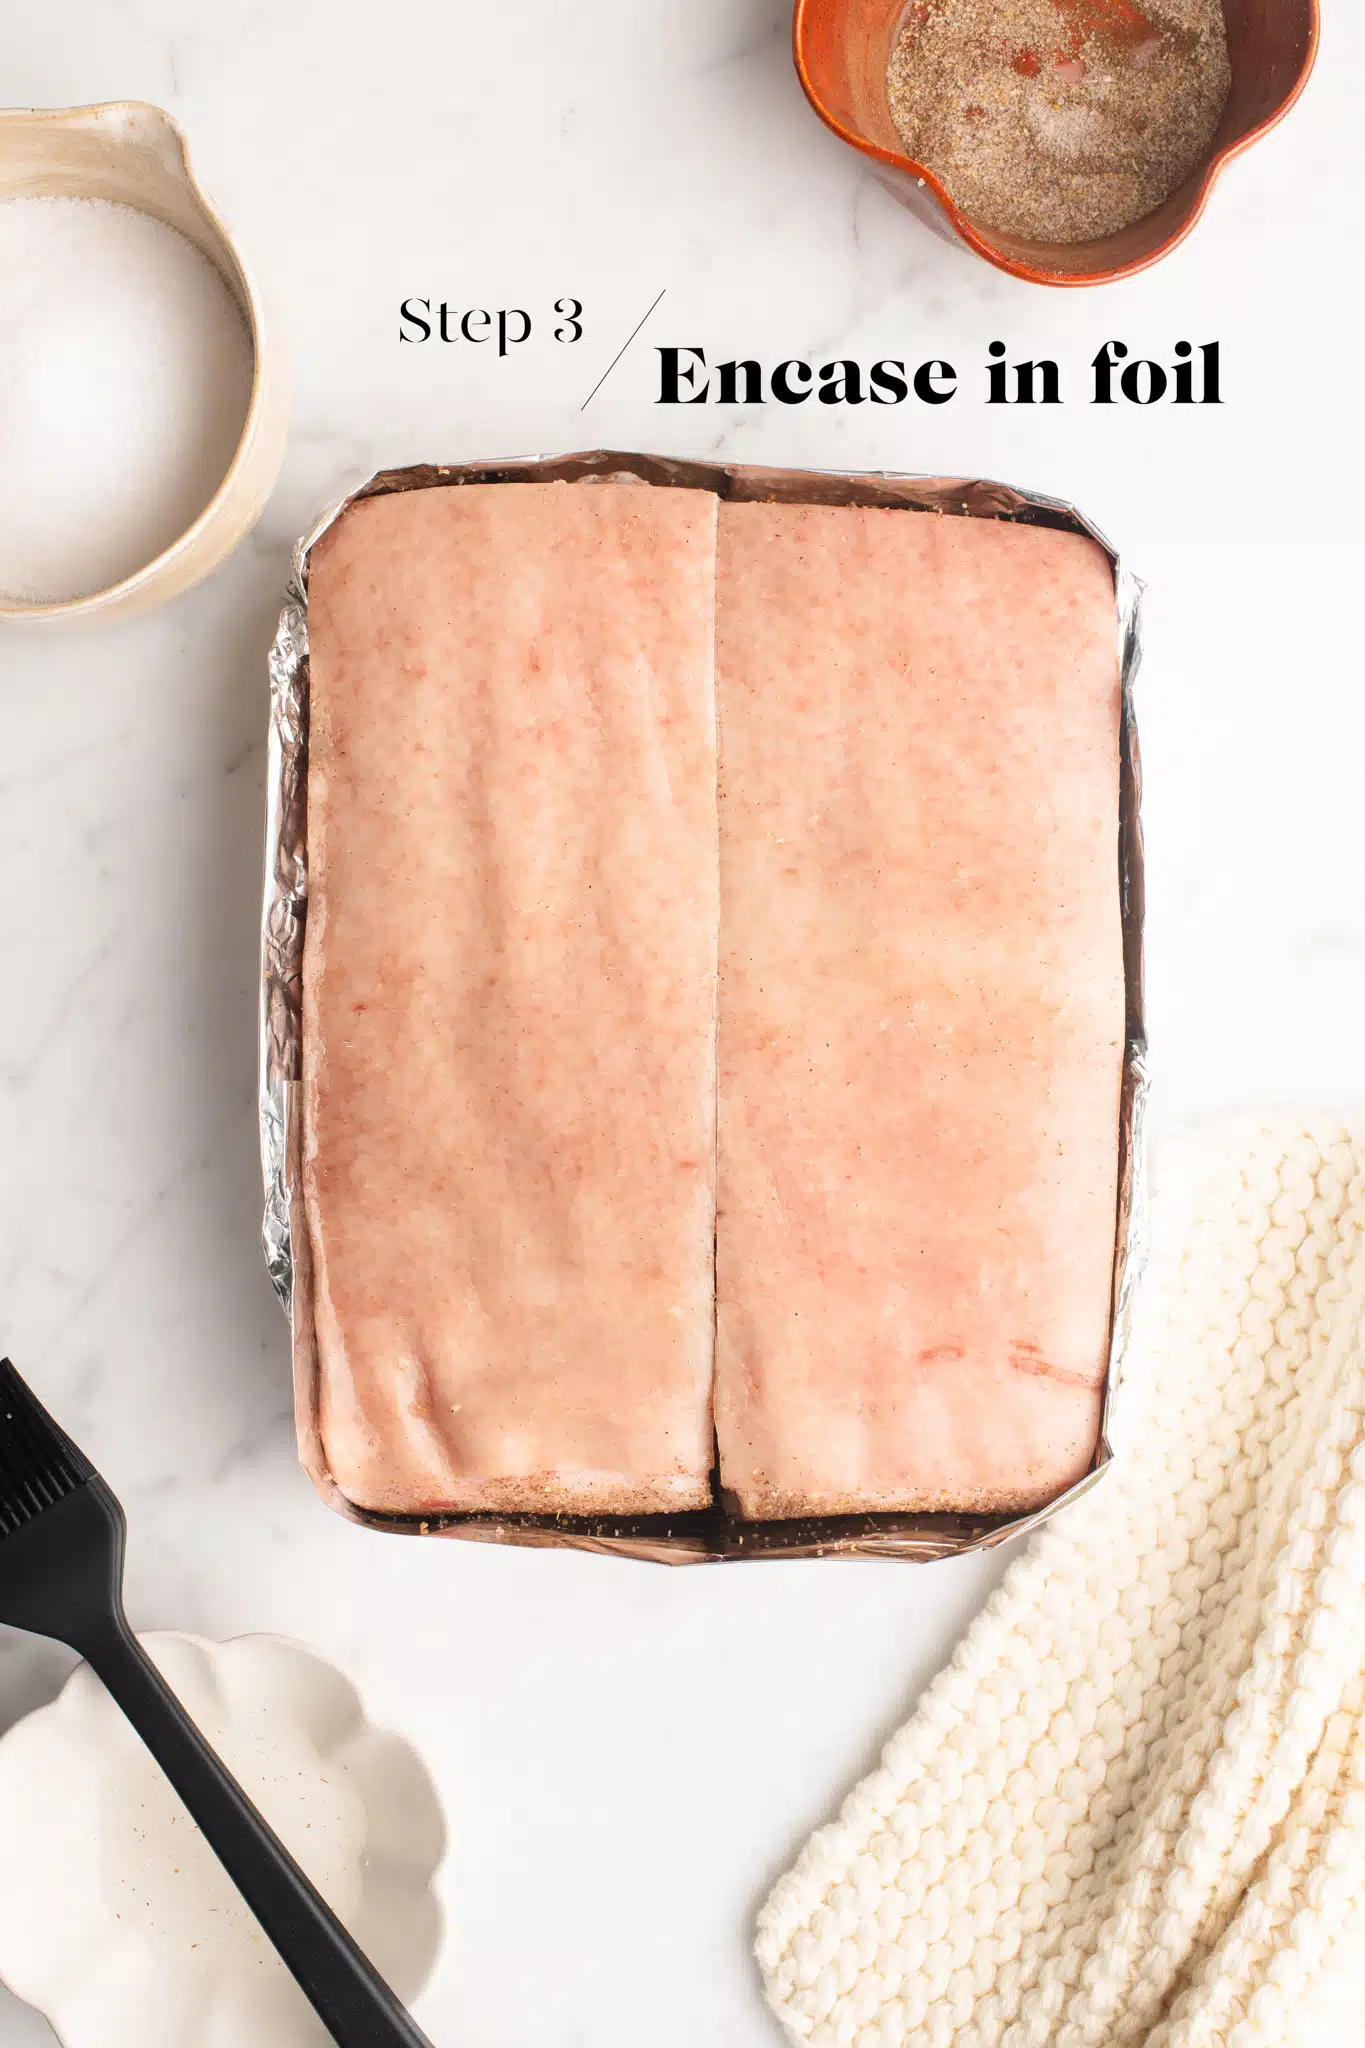
Step 3
Turn the pork belly over with the rind-side up, and encase it in a large sheet of foil by folding up the sides until it sits slightly higher than the piece of pork. The foil will help to contain the salt, which you will add in the next step. If you have cut the pork belly in half like I have done, piece it back together in the original formation.
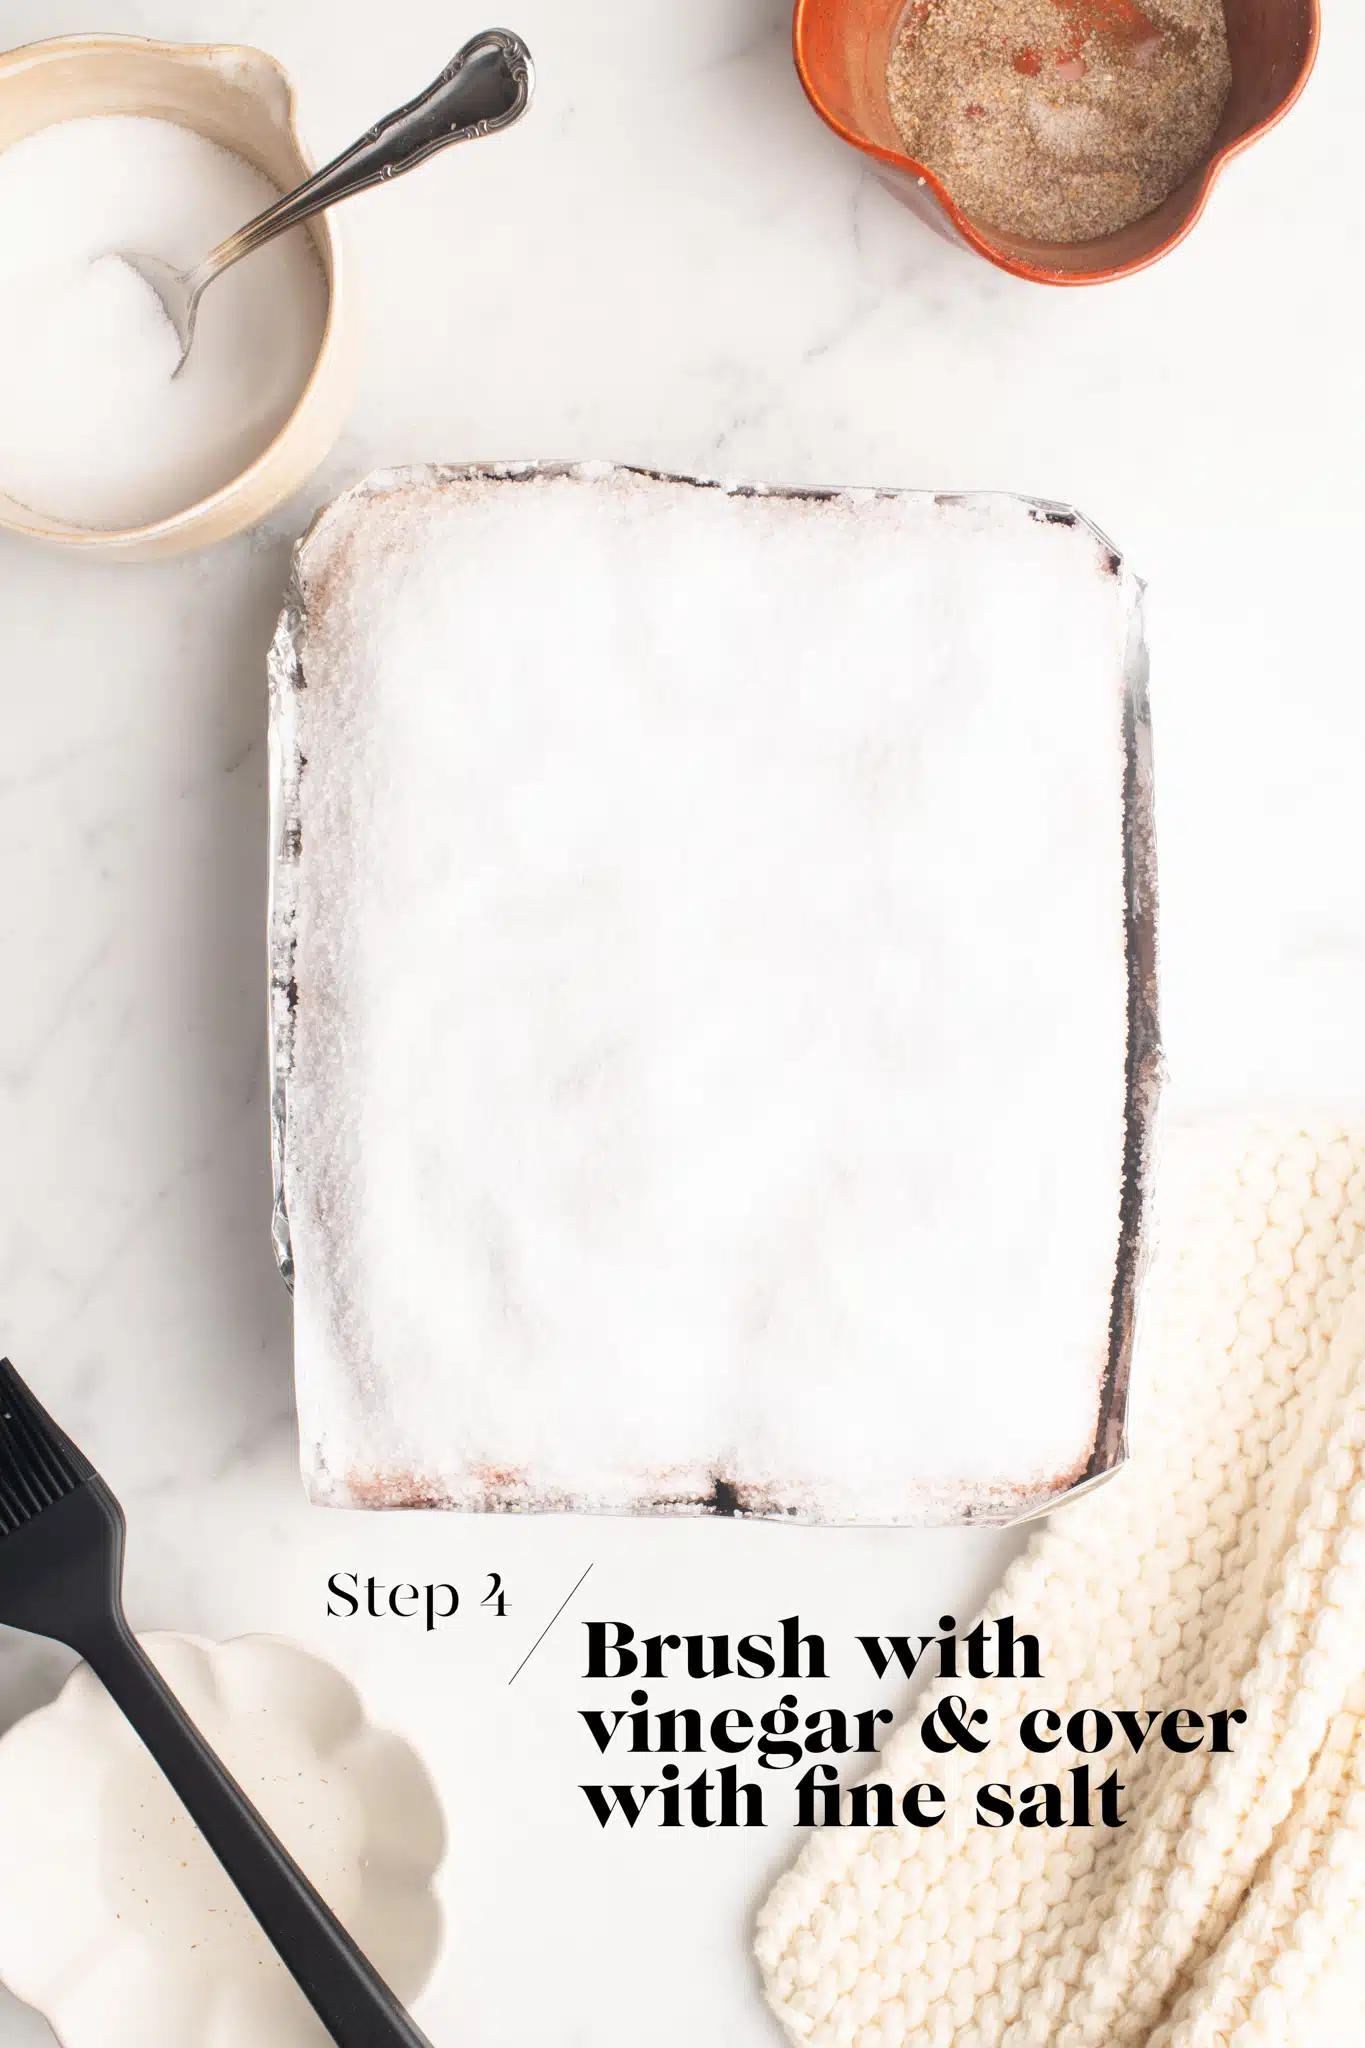
Step 4
Brush the rind with some vinegar, and then sprinkle over a generous layer of fine salt. Make sure every part of the rind is covered, and aim to have an even layer of salt.
Let the pork rest for about 5 minutes, during which time the salt will start to absorb the moisture from the rind.
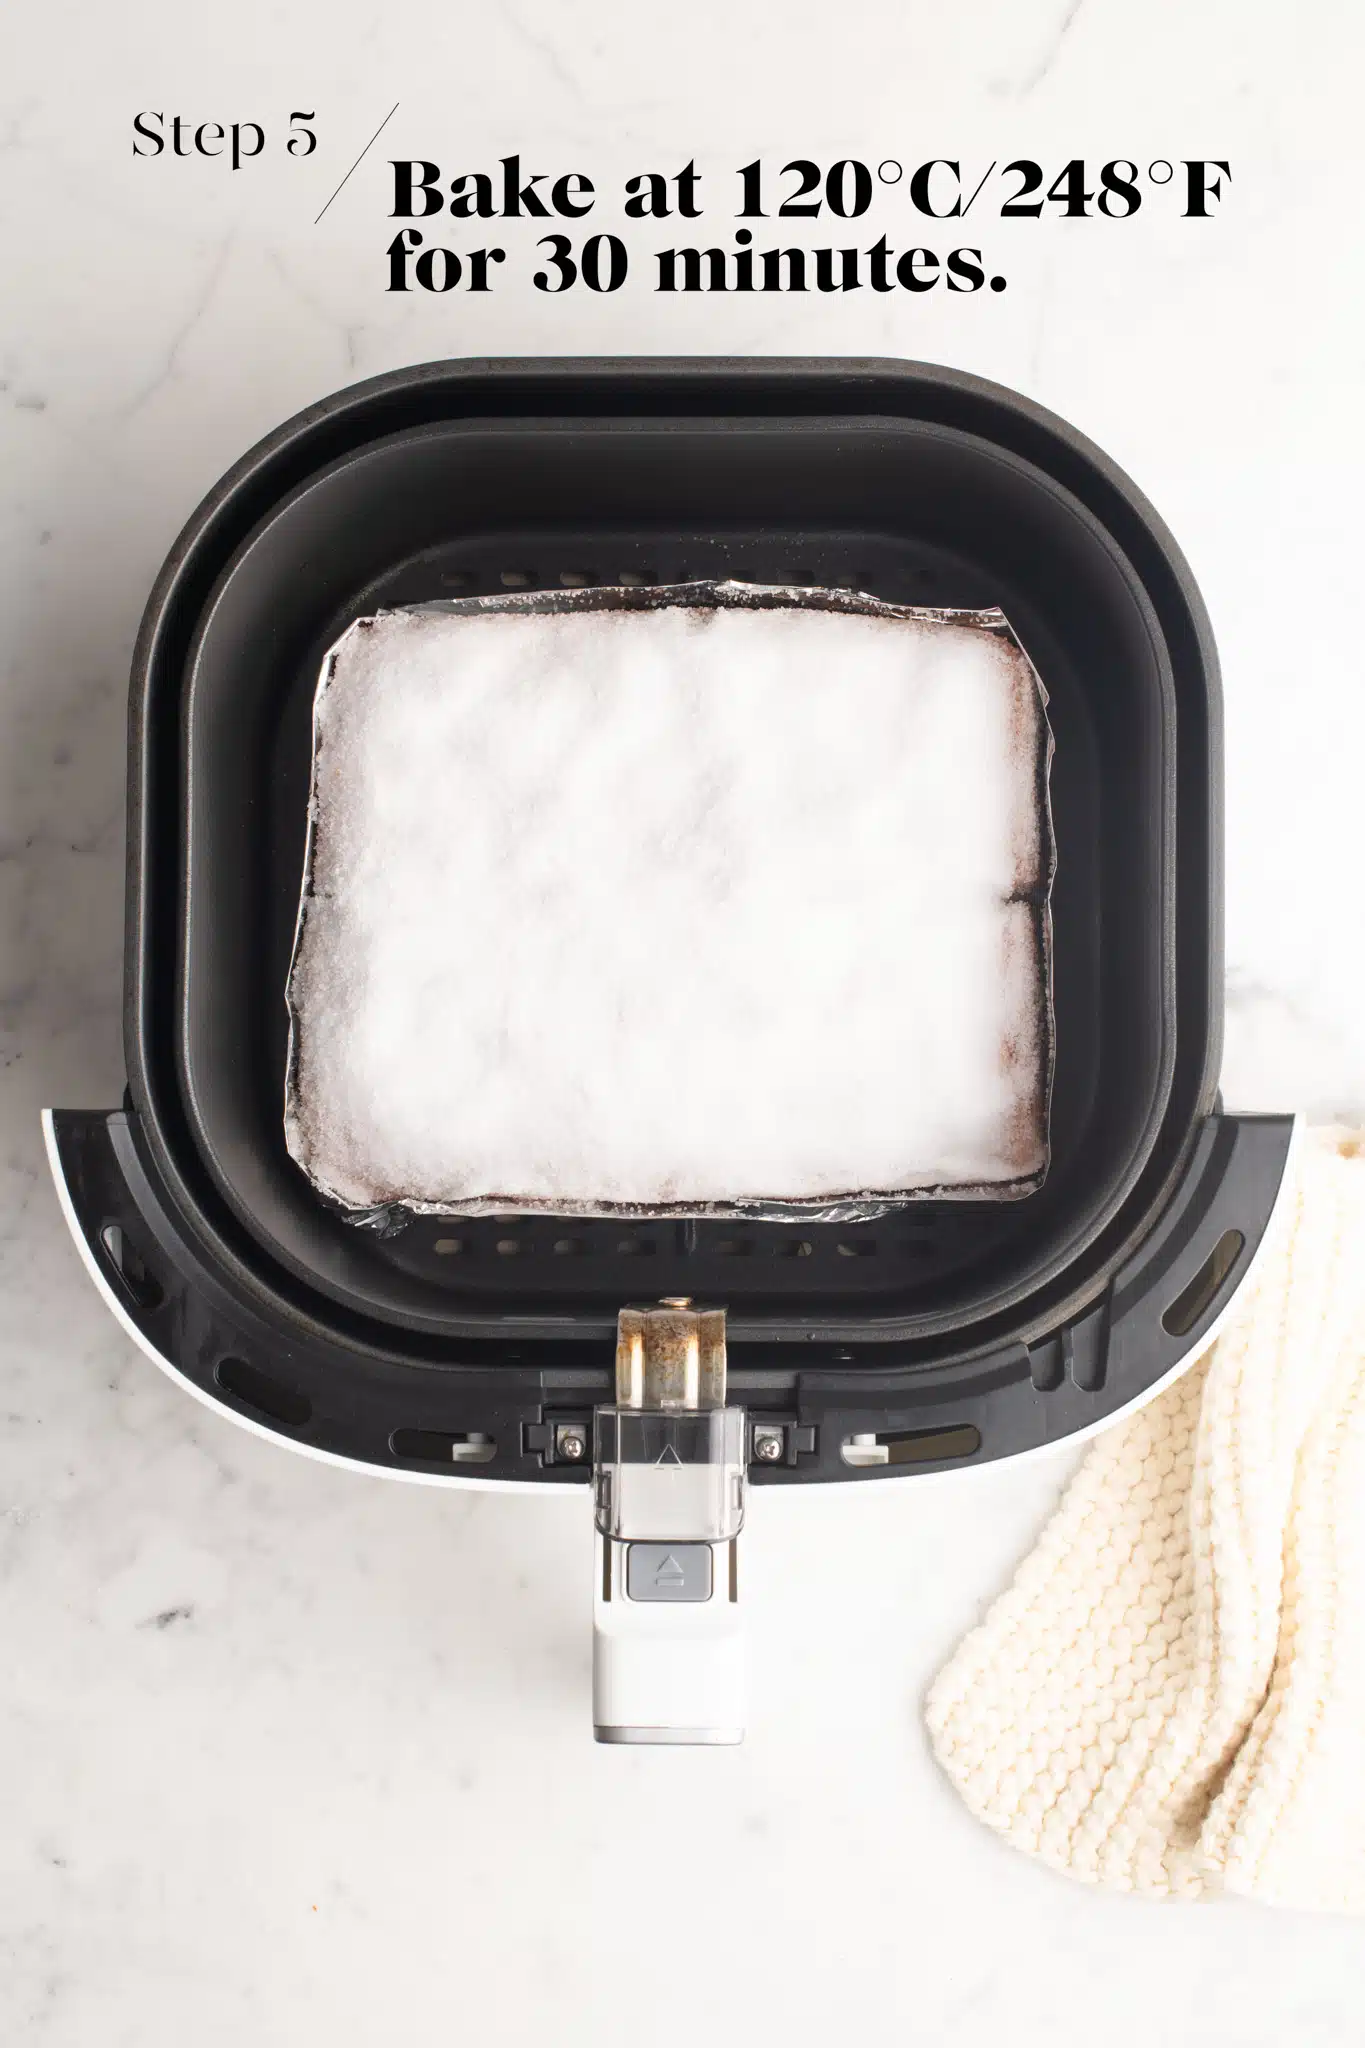
Step 5
I like to place a baking paper insert under the air fryer basket (not in the air fryer basket itself), which will make cleaning up later much easier.
Transfer the salt-covered pork belly to the air fryer basket.
Bake at 120°C/248°F in the air fryer (or 120°C/248°F with fan in a regular oven) for 30 minutes, or until the salt has hardened into a thick crust all over.
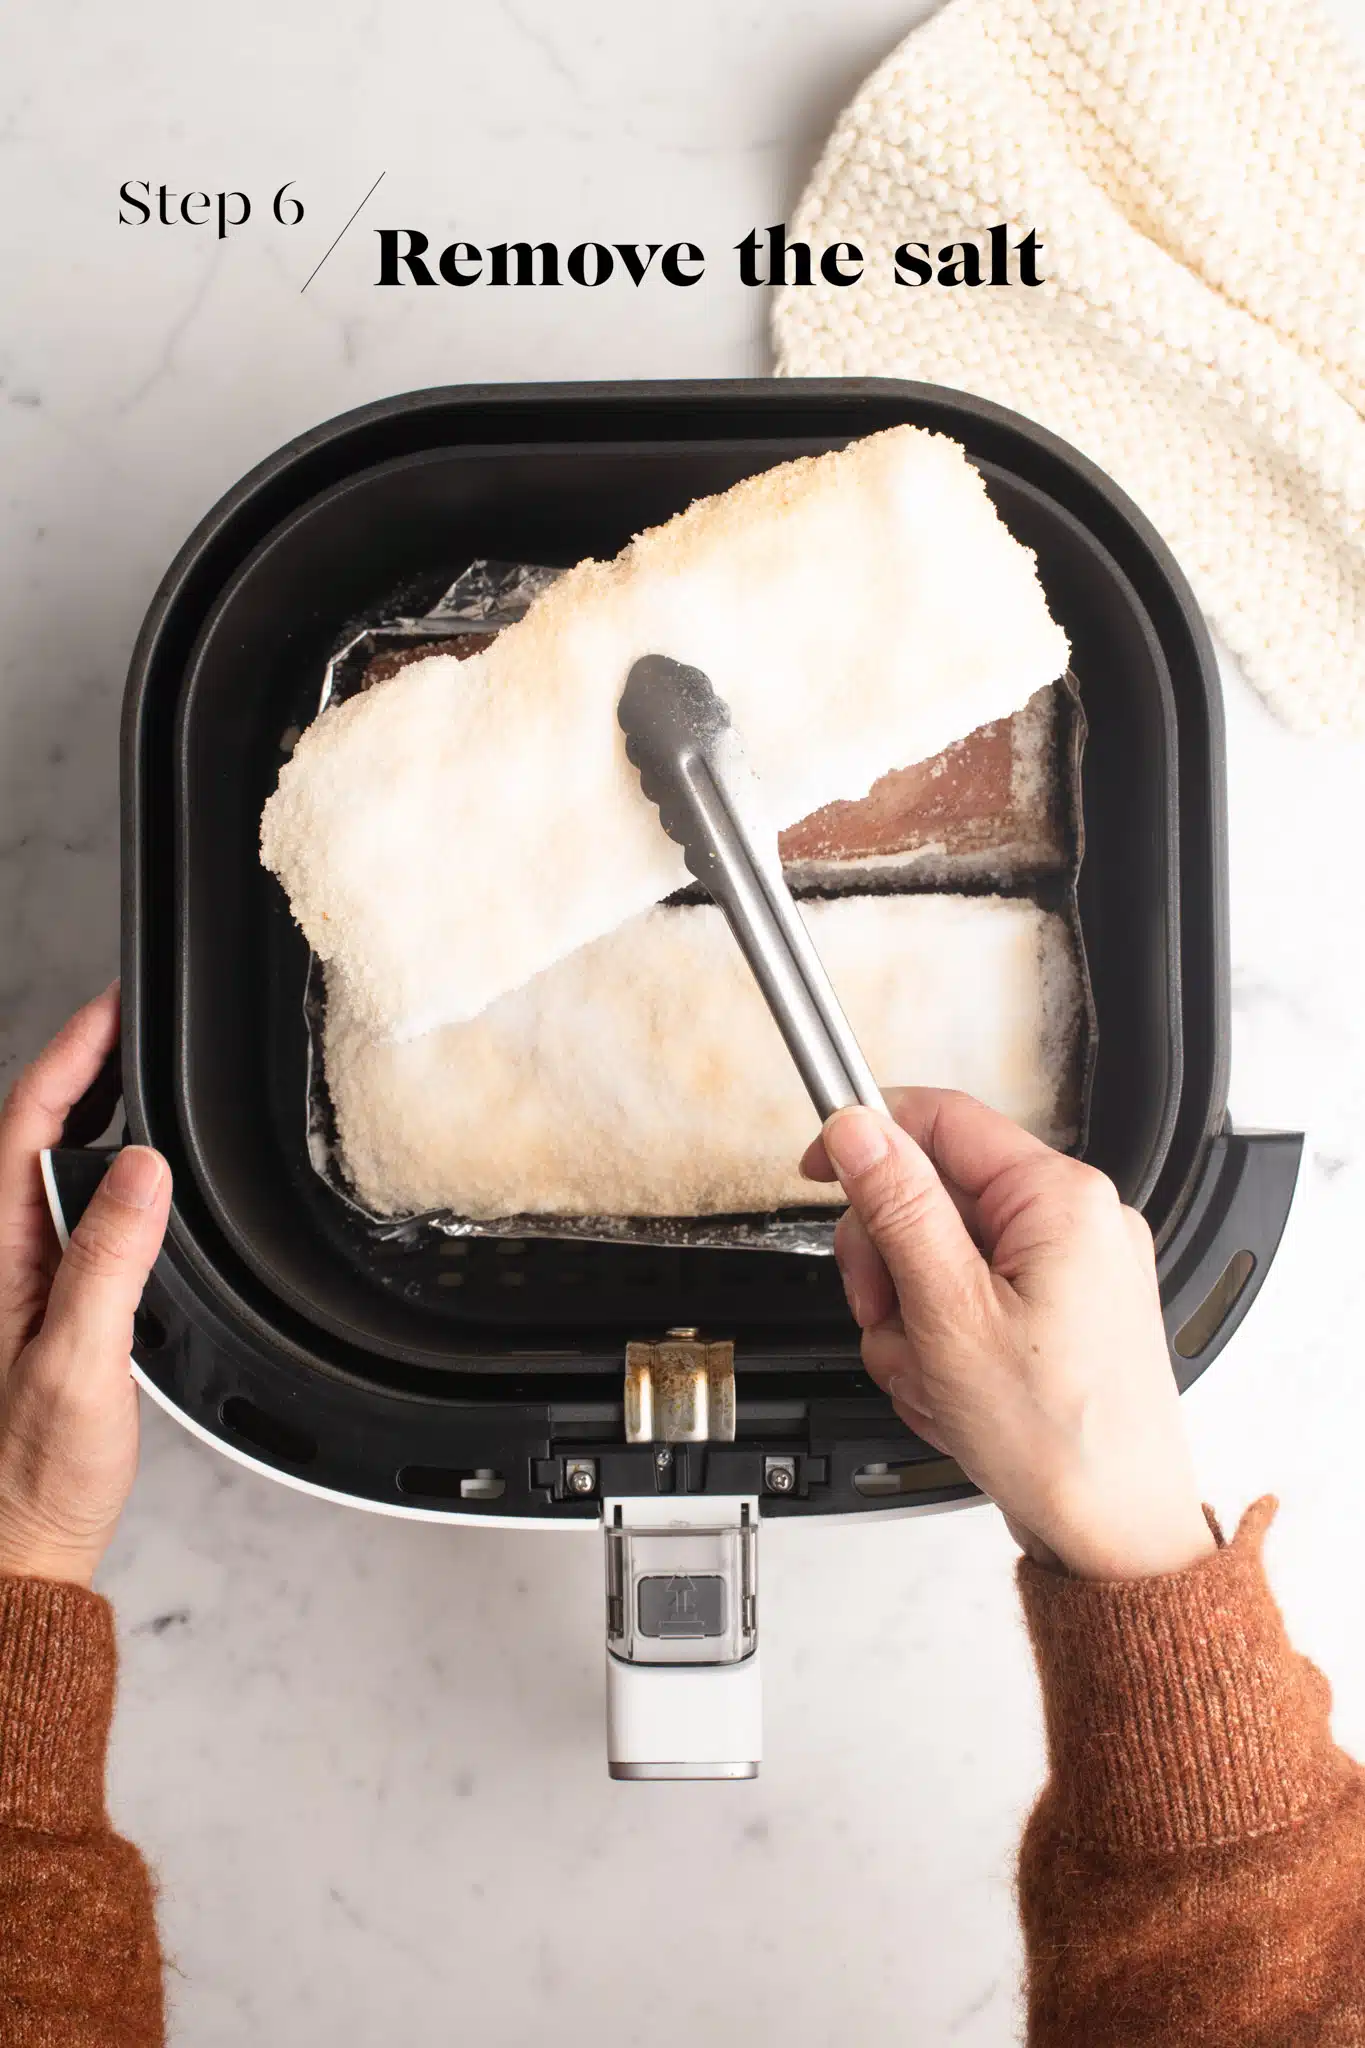
Step 6
At this stage, you should be able to remove the salt crust in one piece, or several large pieces. If you see that there are still lots of grains of salt on the rind, continue cooking in 5 minute intervals.
Otherwise, remove and discard the salt crust. Use some kitchen paper to wipe the rind, as well as the sides of the meat, to remove any excess salt.
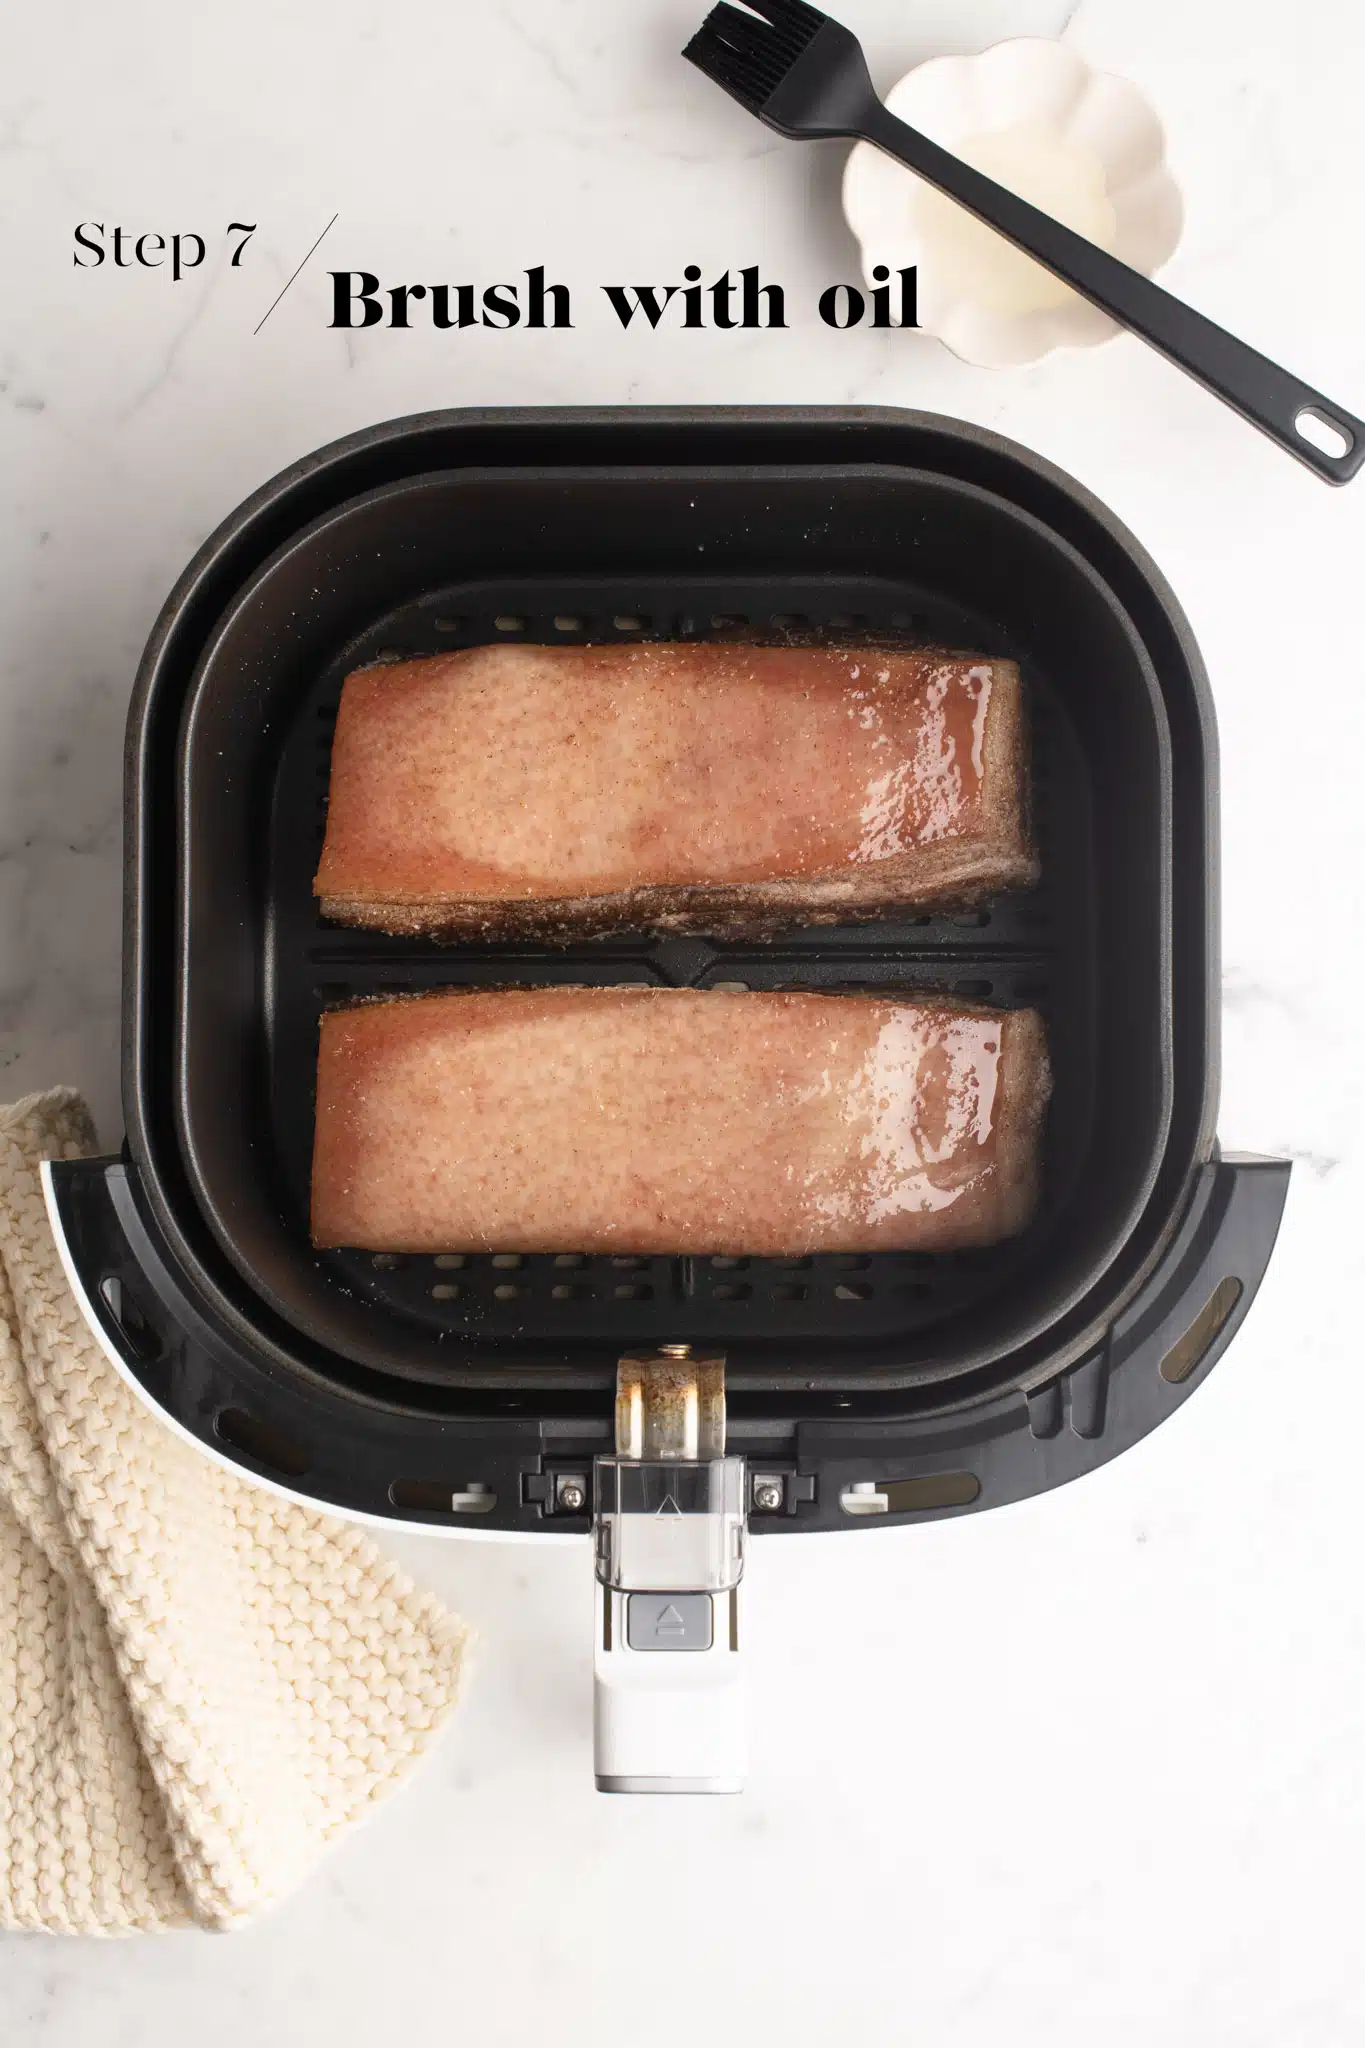
Step 7
Remove and discard the the foil lining, and return the pork belly to the air fryer basket. Brush the rind with some oil.
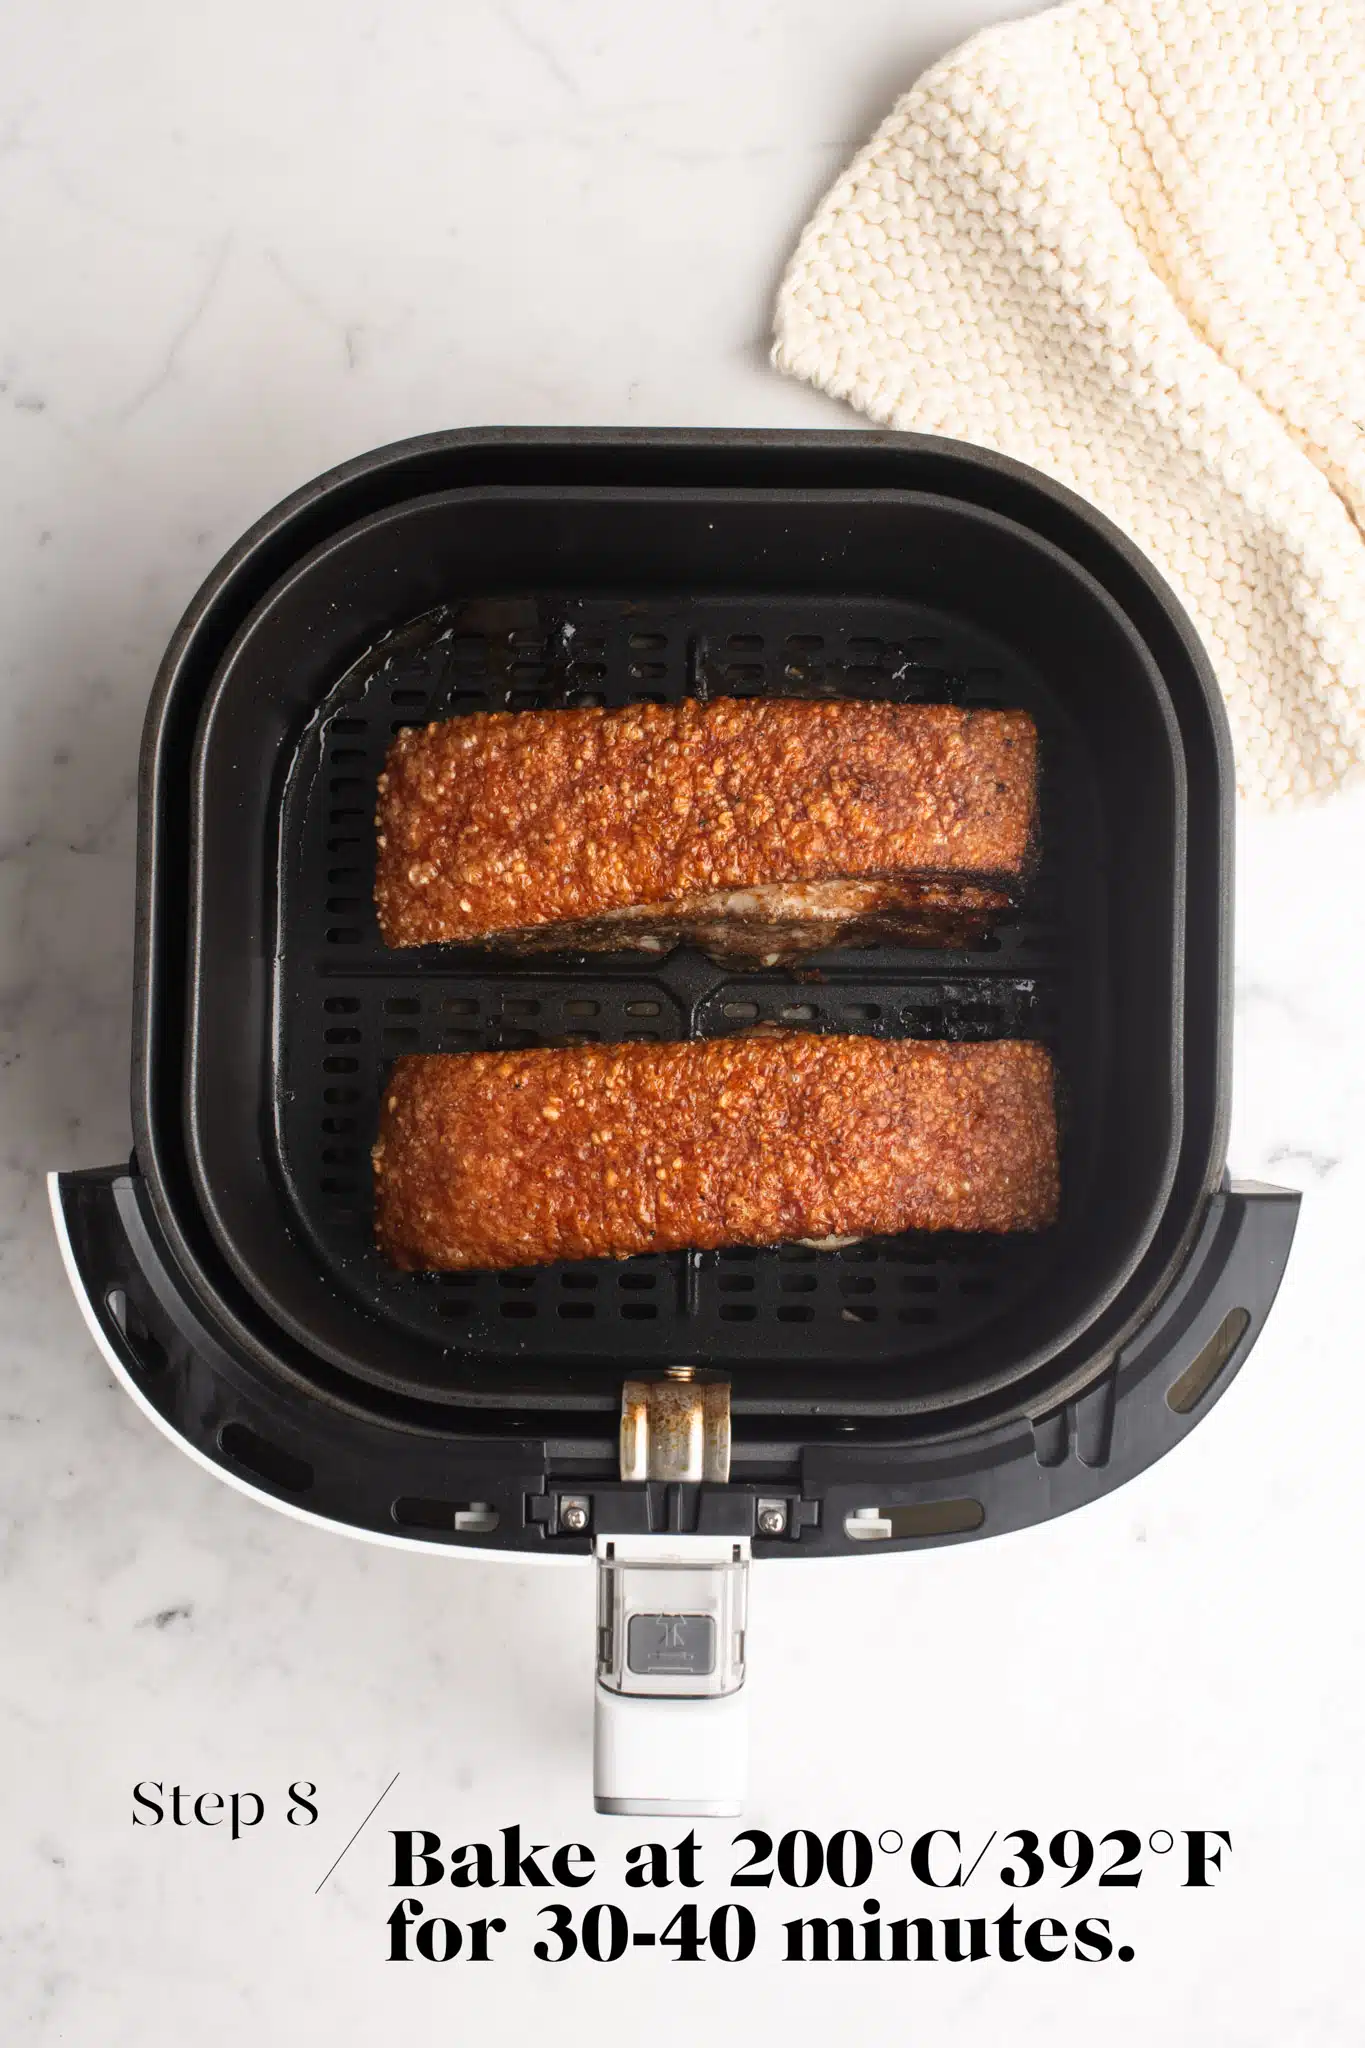
Step 8
Bake the pork belly at 200°C/392°F in the air fryer (or 200°C/392°F with fan in a regular oven) for 30-40 minutes, or until the rind is crispy and crackling, and golden to your liking.
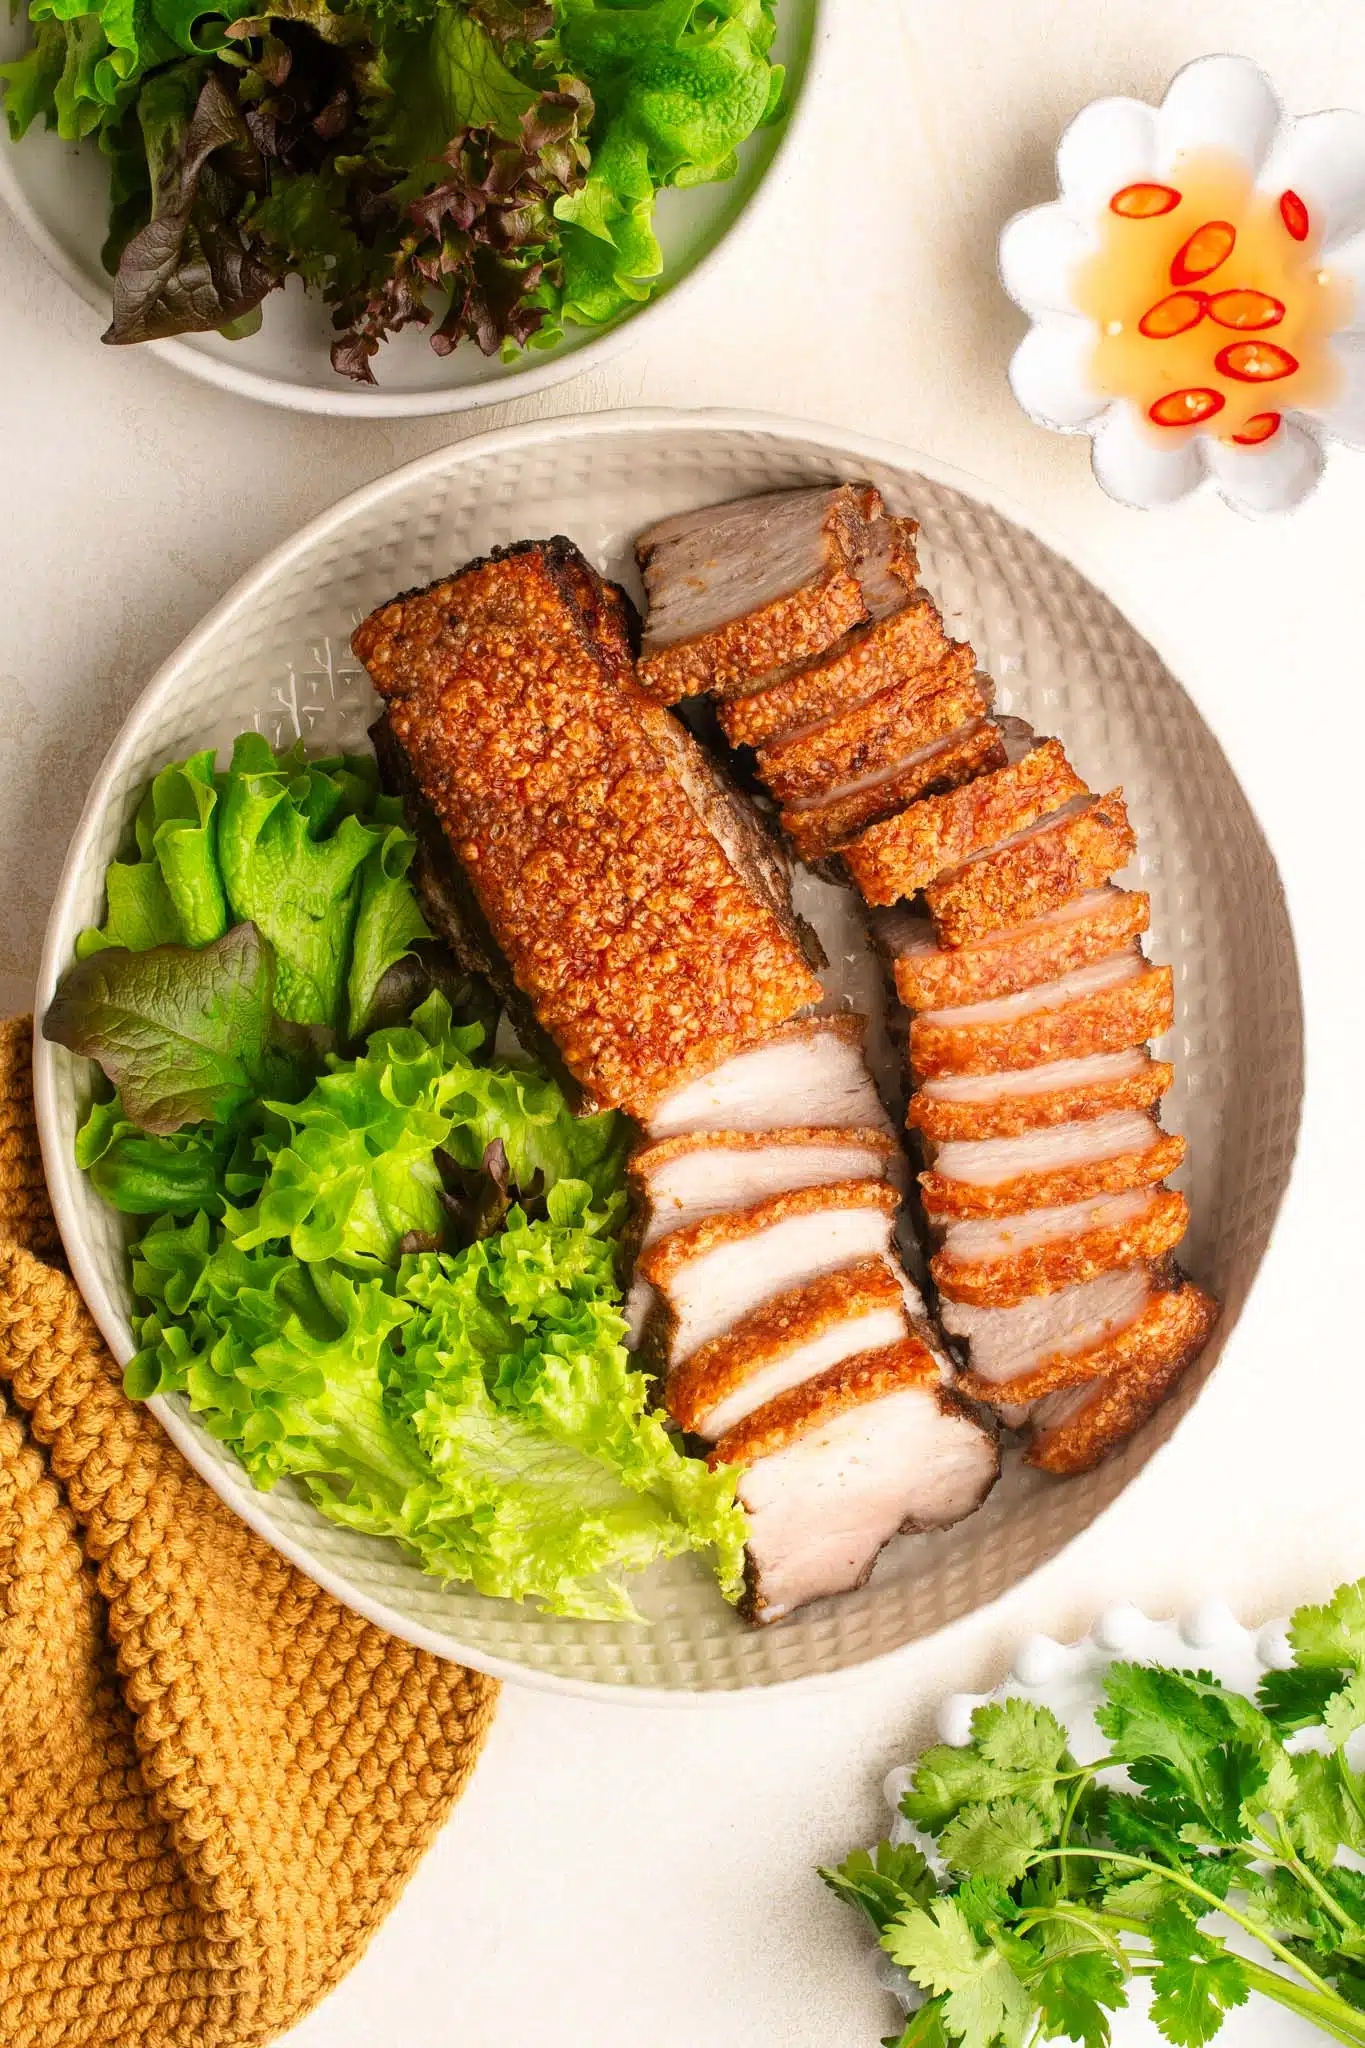
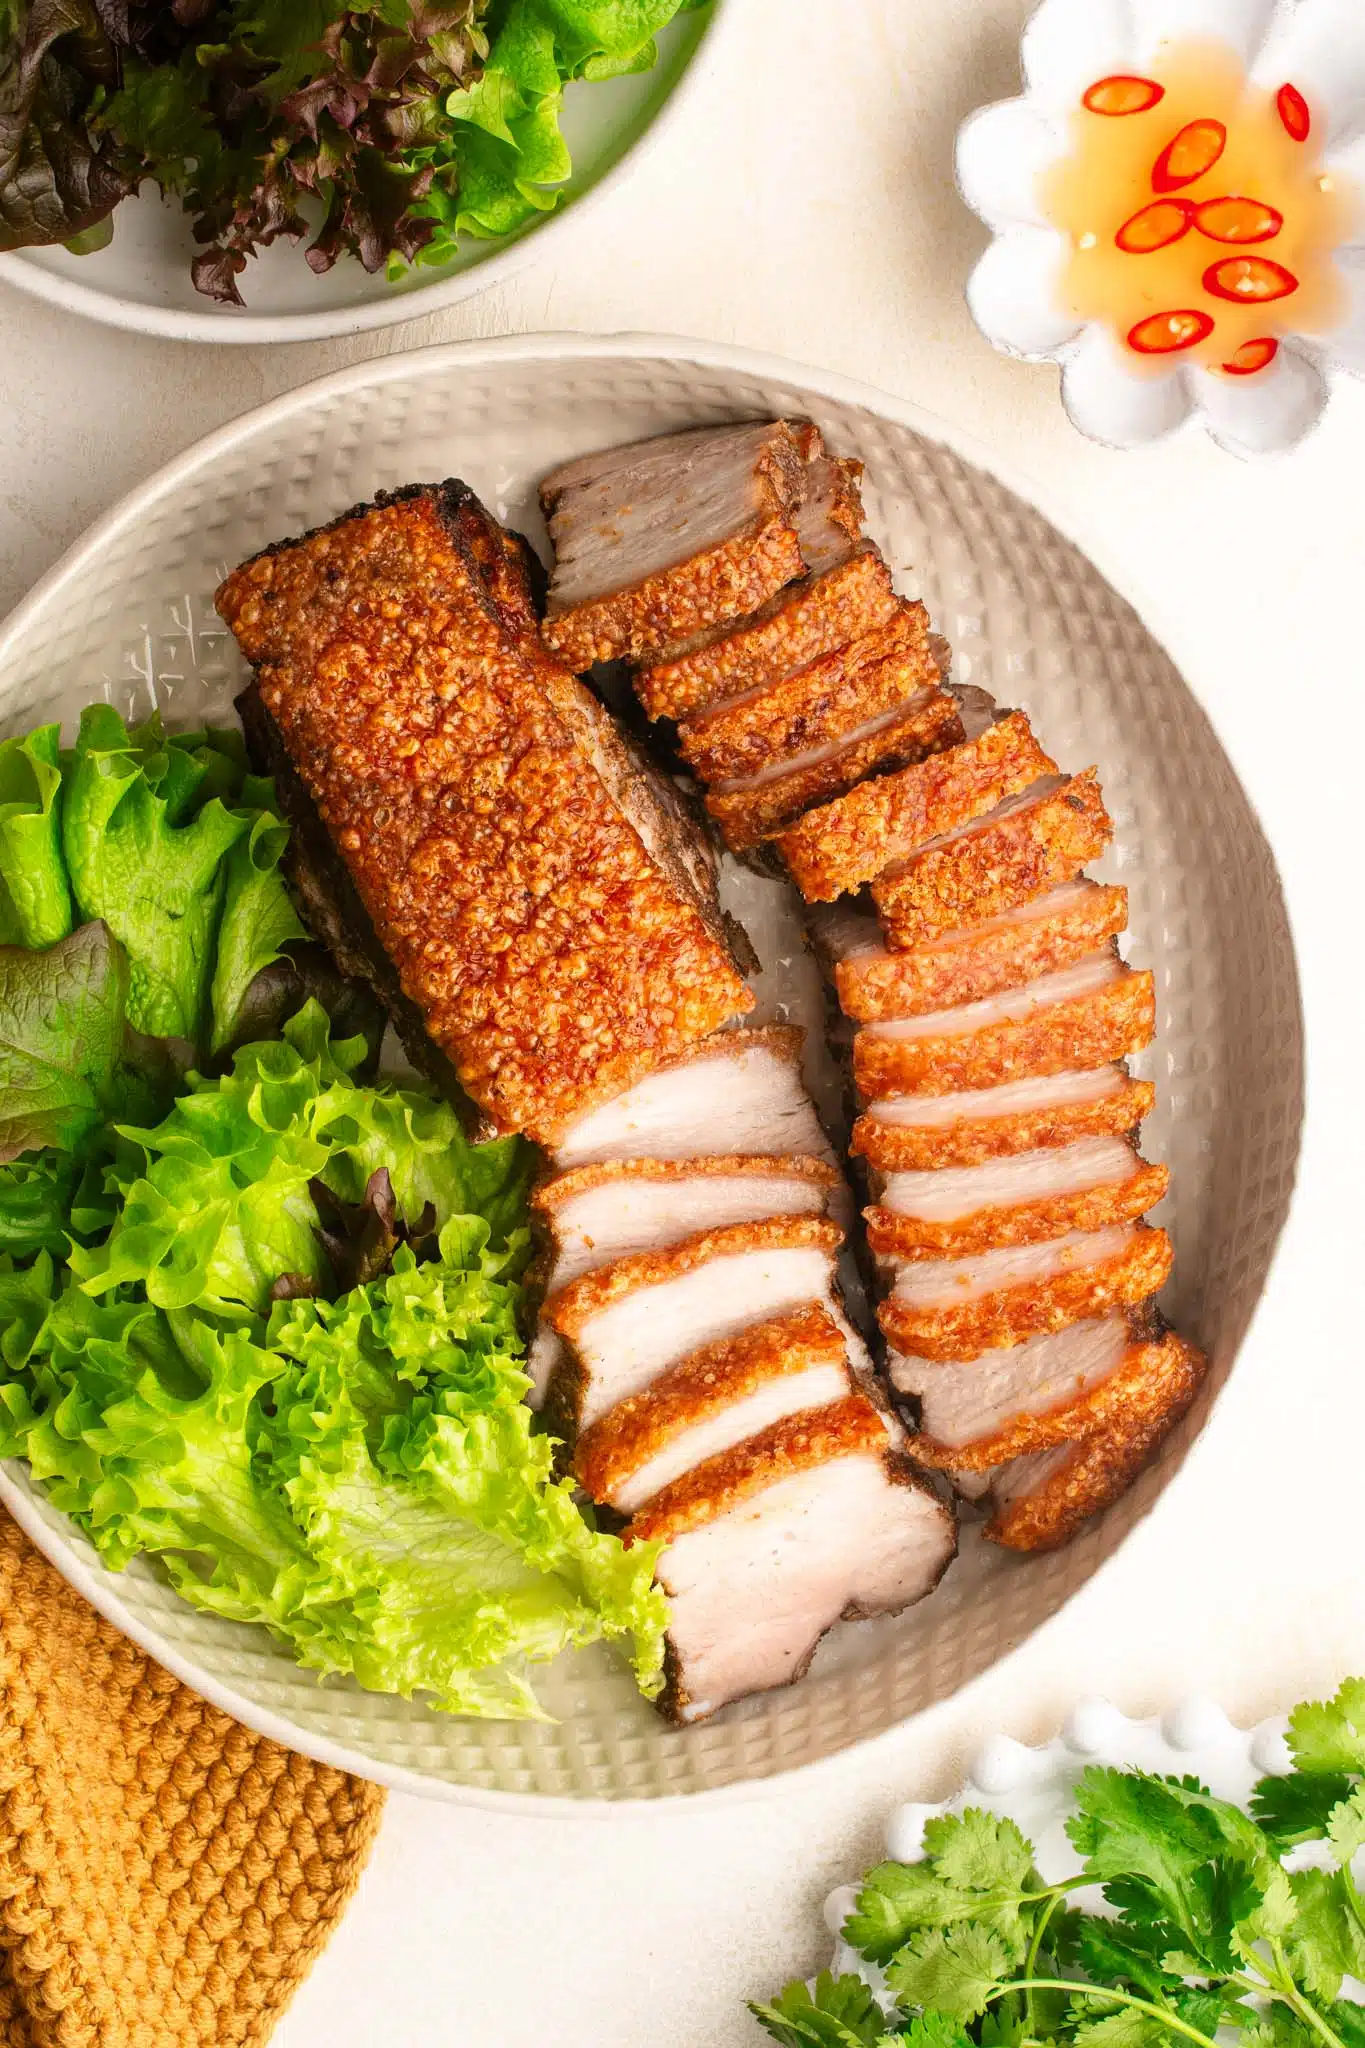
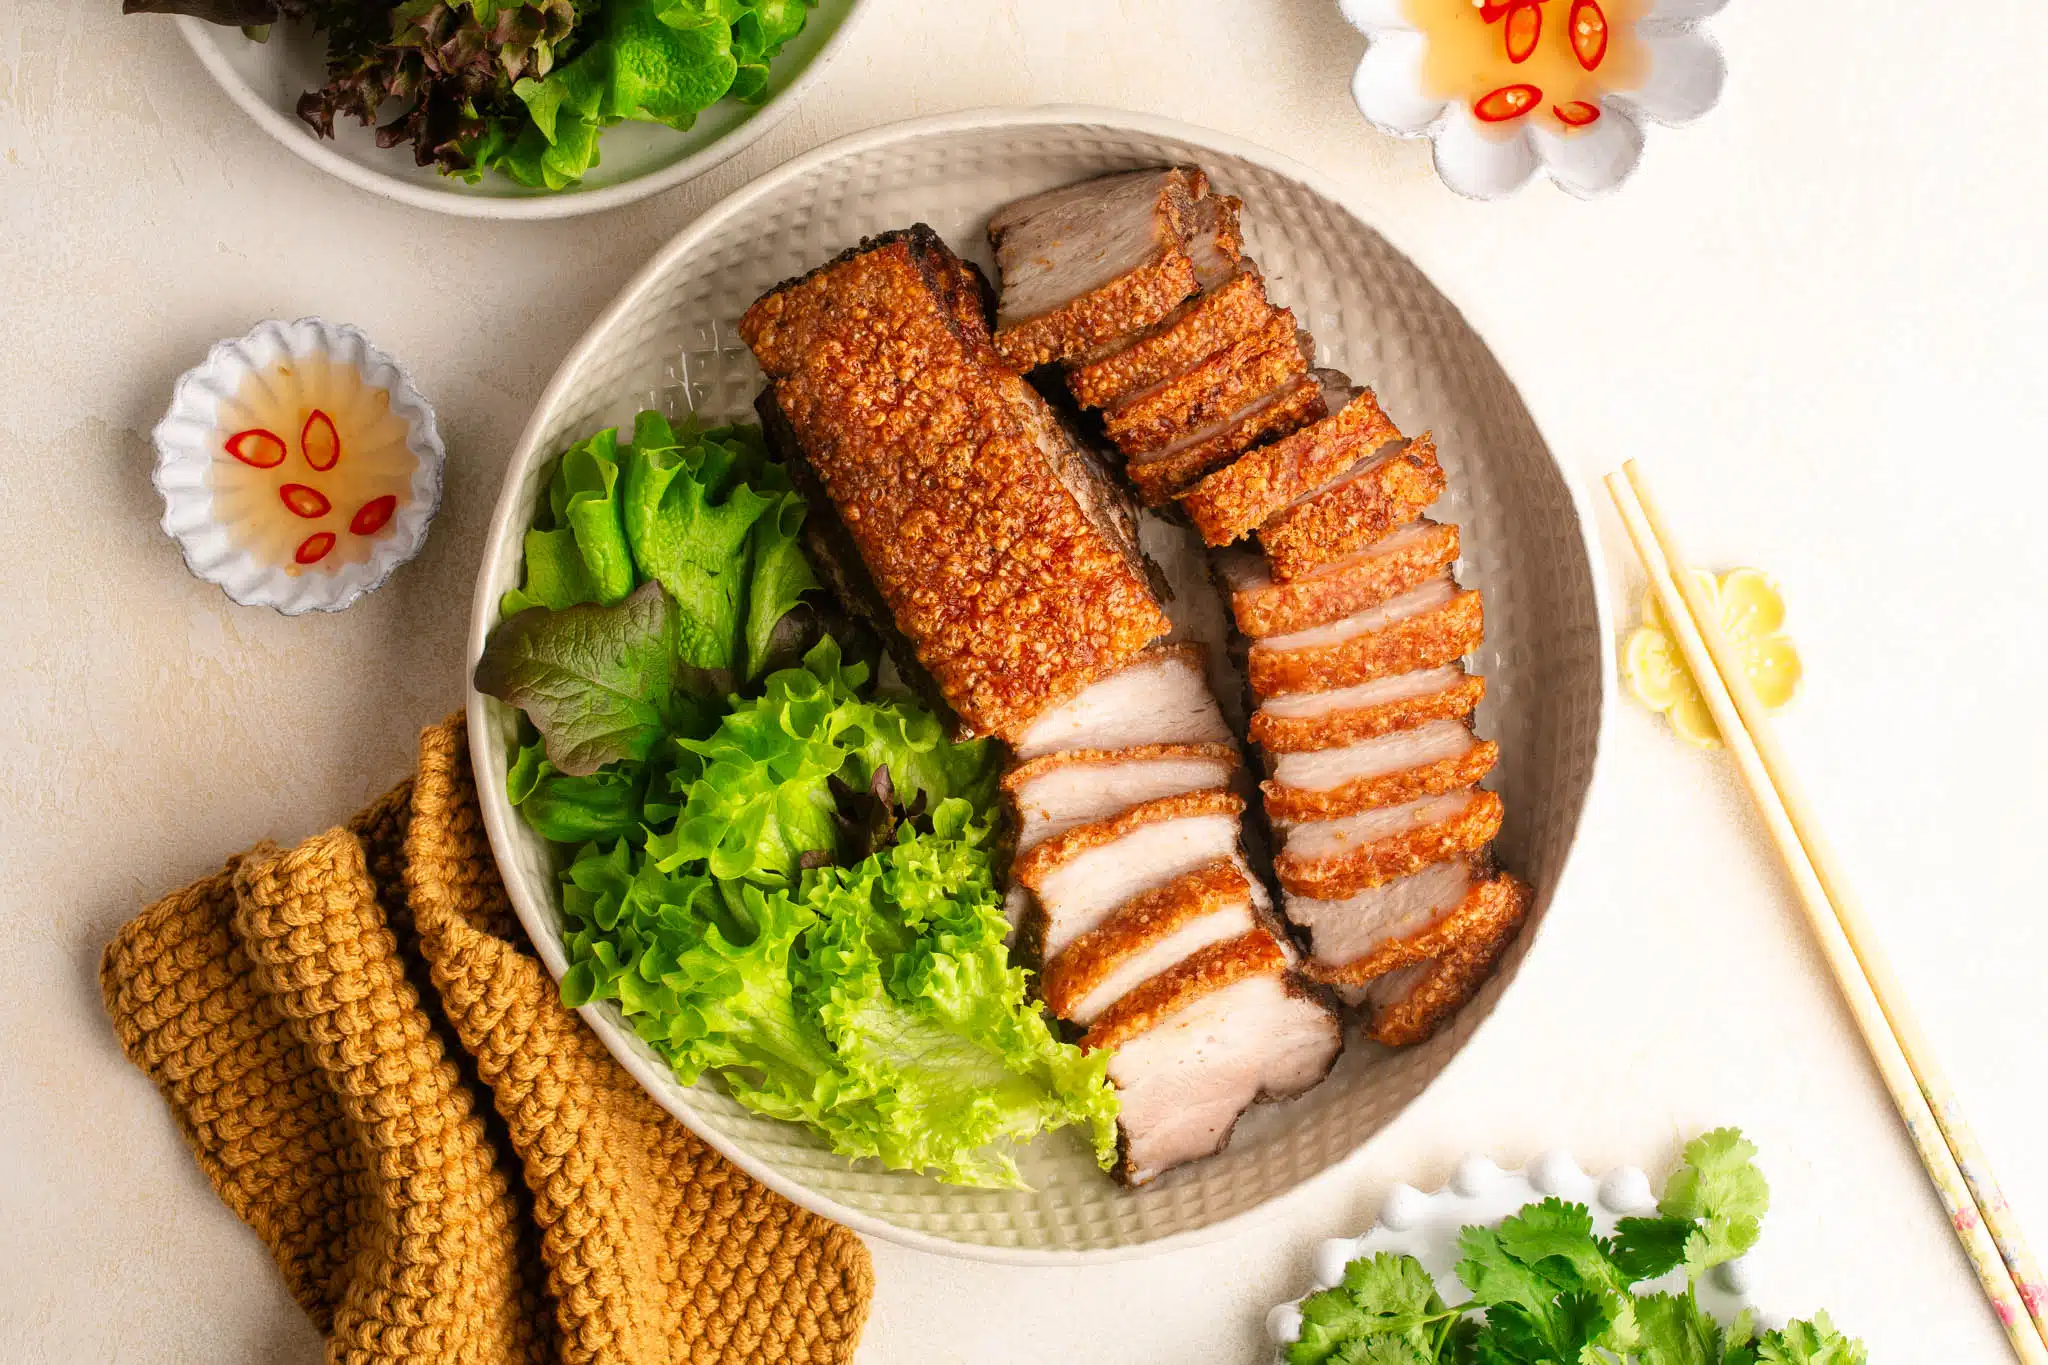
Remove the pork belly to a wooden board and allow it to rest for about 15 minutes before slicing.
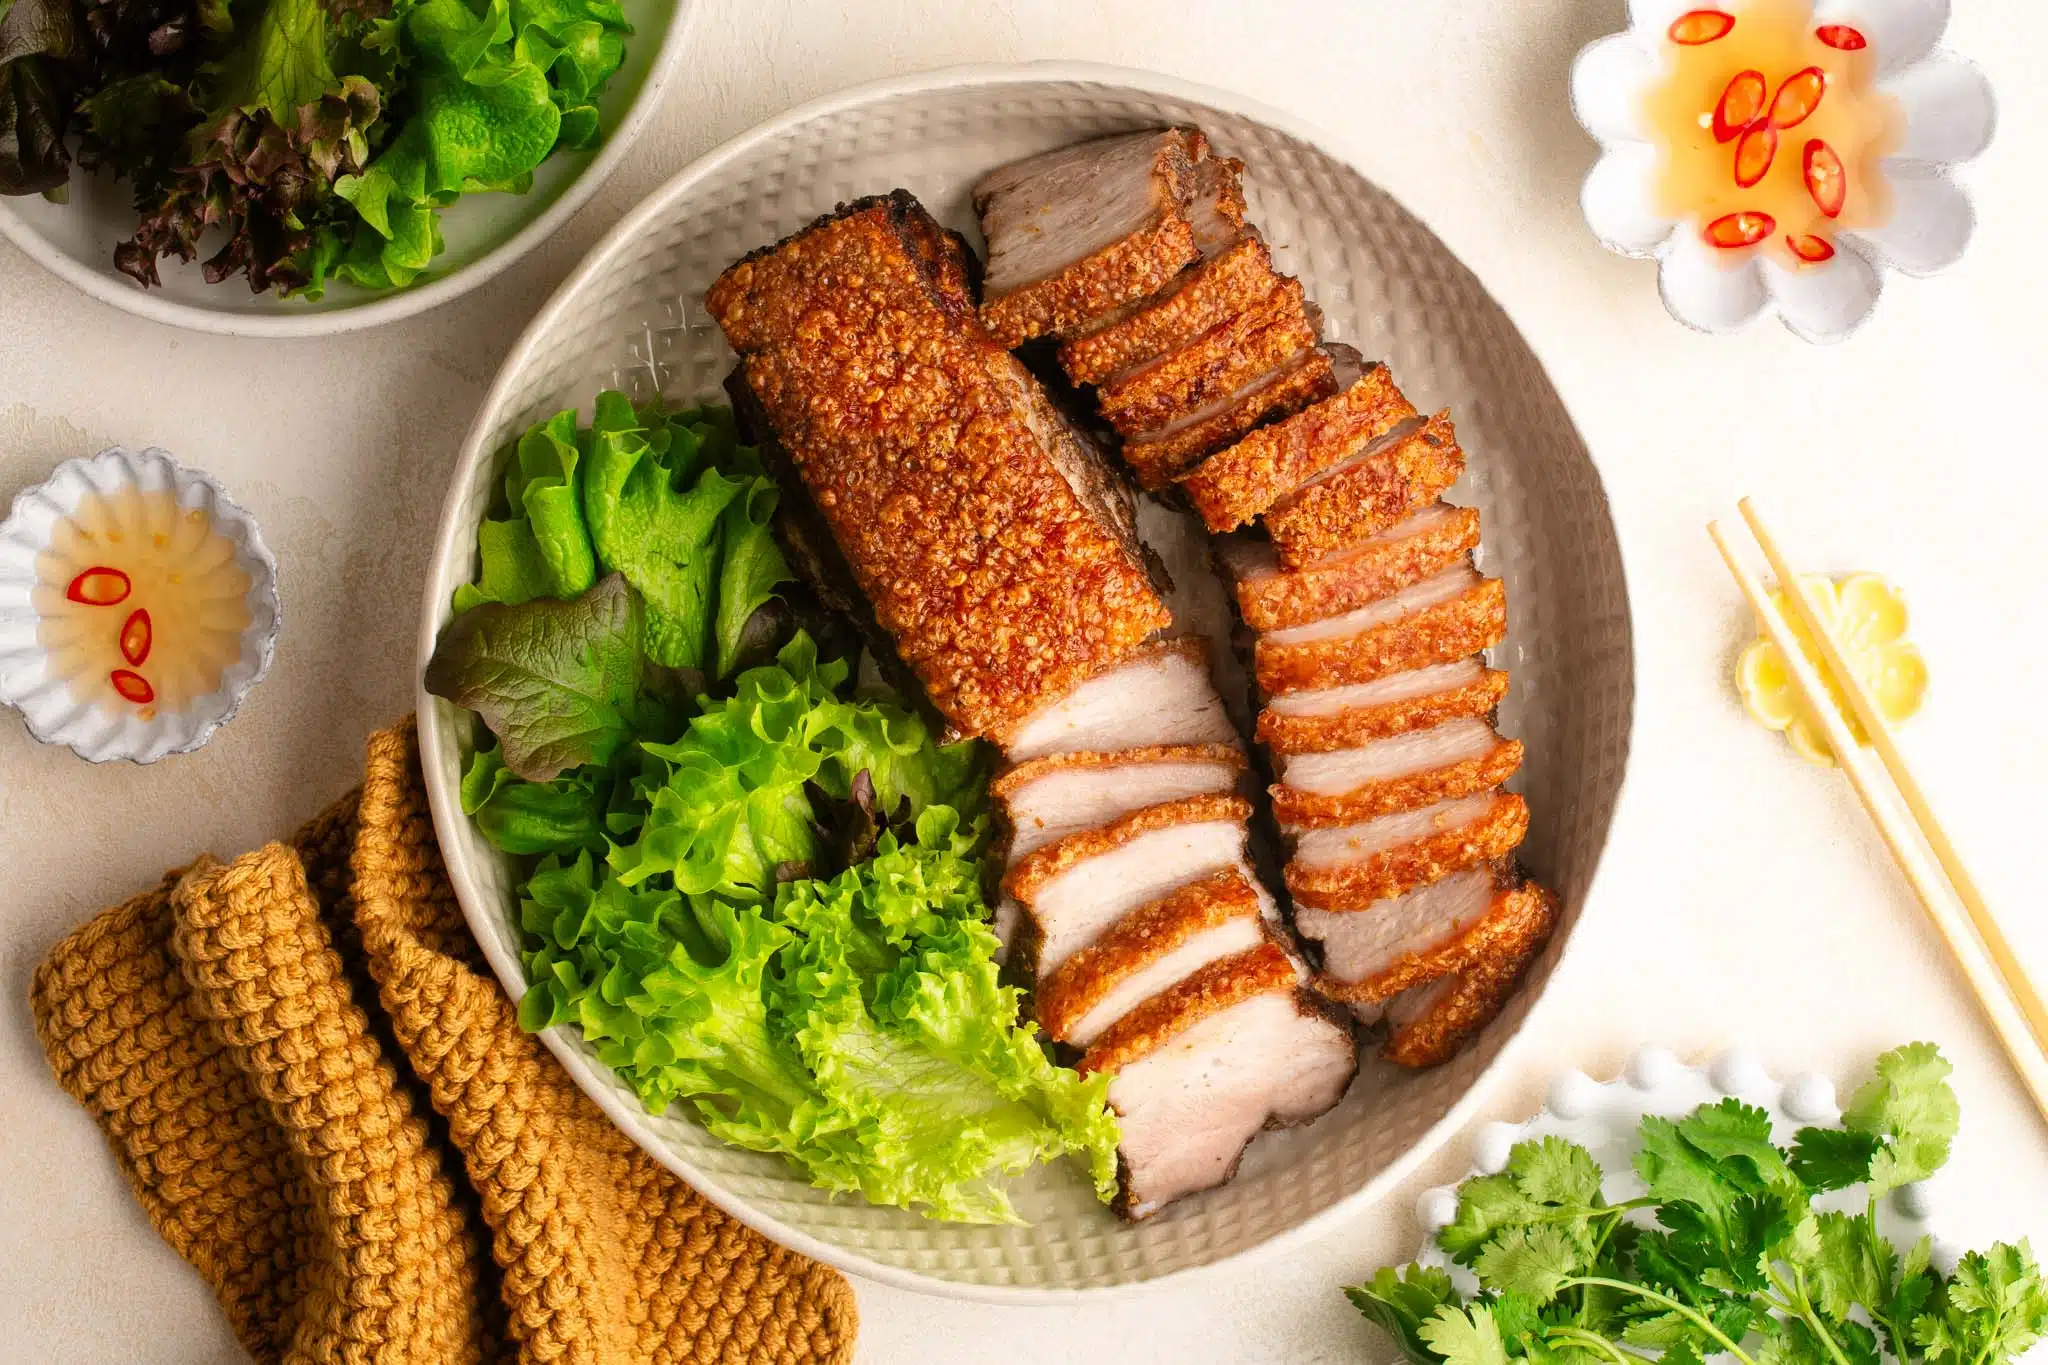
I find it easiest to slice the pork belly by turning it over, so that the crackling is on the board. Use a very sharp knife to slice through the meat, and once you reach the crackling, use both hands to push the knife through the crackling in one move.
Tips For Making Crispy Pork Belly
- Size of pork belly. Choose a piece of pork belly which will fit in your air fryer basket. Also look for a good meat-to-fat ratio.
- Even piece of meat. Choose a piece of pork belly which is evenly sized, so that the meat can cook evenly, and also crackle evenly. If you have a piece of meat where one side is thinner than the other, scrunch up a large piece of foil into a shape which you can sit under the smaller side of meat to lift it up, making the surface as level as possible.
- Use a paper liner. When roasting pork belly, a lot of fat will collect at the bottom of the air fryer container. A paper liner is helpful as it will collect most, if not all, of the fat, which will make cleaning up much quicker and easier. Make sure you use the paper liner under the air fryer basket, not inside the basket itself.
- Resting the meat. The general rule is to rest any roasted meat for half of the cooking time, which will ensure that your meat will remain juicy and succulent. It is also easier to carve meat when it has had a chance to cool a bit.
- Start the night before. Although the premise of this recipe is that you can have crispy pork belly in about 1 hour, for an extra flavour boost, I recommend pricking the rind and seasoning the meat the night before. This allows the skin to dry out overnight in the fridge for a guaranteed crunchy crackling, as well as allowing the meat to marinate in the dry rub. These are also the minimum steps I would do if I plan to make this recipe for guests so that you can have a head start.

Air Fryer Crispy Pork Belly
Ingredients
For the Crispy Pork Belly
- 1 kg (2.2 lb) pork belly, with rind
For the Seasoning
- 1 teaspoon fine salt
- 1 teaspoon sugar
- 1 teaspoon garlic powder
- 1 teaspoon Chinese five spice powder
For the Salt Bake
- 15 ml (1 tablespoon) white vinegar
- 180 g (½ cup) fine salt
For the Final Roast
- 15 ml (1 tablespoon) vegetable oil
Instructions
To Prepare the Rind
- Place the pork belly on a cutting board.
- Prick the rind to make small holes all over – the more, the better. A meat tenderiser with lots of small blades or needles is easiest for this job, but you can also use a sharp metal skewer.
To Season the Pork Belly
- Turn the pork belly over so that the meat is facing up.
- If you wish to cook the pork belly in two pieces, use a sharp knife to cut the pork belly in half lengthwise. Otherwise, you can leave the pork belly piece whole.
- In a small bowl, mix together all of the ingredients for the seasoning.
- Rub the seasoning all over the meat side of the pork belly, i.e. do not rub any seasoning onto the skin/rind.
To Prepare the Salt Bake
- Turn the pork belly over so that the skin is facing up again. If you have sliced the pork belly in half, re-arrange it so that it is in the original formation.
- Place the pork belly onto a large sheet of foil.
- Fold up the sides of the foil so that it forms a "box" around the pork belly, with the sides just slightly higher than the meat.
- Brush the skin with some vinegar.
- Generously sprinkle an even layer of salt all over the skin.
- Allow the pork belly to rest for about 5 minutes.
- Place a paper liner in the air fryer under the basket (optional).
- Carefully place the pork belly into the air fryer basket.
- Bake the pork belly at 120°C/248°F for 30 minutes. If you are using a regular oven, bake at 120°C/248°F with fan.
- After 30 minutes, the salt should have hardened into a thick crust. If there still remains a lot of grains of salt on the skin, continue baking at 5 minute intervals.
- You should be able to remove the salt crust in one large piece, or several large pieces.
- Use some kitchen paper to brush off any excess salt from the skin, as well as the sides of the meat.
- Remove and discard the foil lining.
To Roast the Pork Belly
- Return the pork belly to the air fryer basket.
- Brush the skin with some oil.
- Bake at 200°C/392°F for 30-40 minutes, or until the crackling is golden to your liking. If you are using a regular oven, bake at 200°C/392°F with fan.
- Allow the pork belly to rest for about 15 minutes before slicing.
To Serve
- Turn the pork belly over so that the meat is facing up.
- Use a sharp knife to slice the meat. Once you reach the crackling, use both hands to push the knife down in one strong movement.
Kitchen Notes
- OVEN & STOVE TEMPERATURES
All recipes on this website have been tested on an induction stove and/or with a conventional oven (i.e. an oven without fan). All recipes on this website use temperatures for a conventional oven, unless otherwise mentioned. Convection ovens (i.e. fan-forced ovens) are typically 20°C/70°F hotter than conventional ovens, but please check your manufacturer’s handbook. - CONVERSIONS
To convert from cups to grams, and vice-versa, please see this handy Conversion Chart for Basic Ingredients.


Whoa! Made this recipe last night and the pork belly turned out perfect the first time!! 10/10!!! Your photos were very helpful.
Hi Ben,
So glad you enjoyed this recipe!
Do you buy the pork belly already cut like that or do you trim it to size yourself?
Hi Christine,
Yes, I usually buy pork belly pre-cut as shown in the photos, or I ask the butcher to cut it to size. Hope this helps!
Wow! This recipe is amazing! I’ve been seeing so many recipes for pork belly on IG but your recipe was the most helpful. I can’t believe you can make crispy pork belly in so little time??
Hi Monica,
Thank you! I couldn’t believe it either when I first started using this method. Now I make pork belly regularly ☺️
This recipe was great 10/10
Hi Pete,
Thank you! So glad you enjoyed this recipe.
Awesome recipe! Thanks for your tips and great photos. I will be making this again and again.
Hi Cindy,
That’s great to hear!
Hi, do I use the same cooking time if I use a larger piece of pork belly?
Hi Stella,
It depends on how large the piece of meat is but, generally, you can use these cooking times as a guide. That is, do the first salt bake until the salt dries out in one or more large pieces. And do the second bake until the skin is golden and crispy to your liking. Enjoy!
Haven’t tried yet but eager to do so. I have a question first. Are you using the bake setting rather than the air fry setting? Also, does the fat smoke alot? Absolutely hate when the smoke alarm goes off.
Hi Karolyn,
My air fryer does not have a “bake” setting. It’s just a simple air fryer with temperature and timing controls. If your air fryer has more functions, I would recommend using the setting for “air fry” (which would be equivalent to a convection oven setting).
For this recipe, and for me, it does not smoke a lot, although you should use the air fryer in a location with good ventilation. It might depend on the type of pork belly which you are using, i.e. how much fat it renders, which would determine how smoky it gets. But it shouldn’t smoke so much that the smoke alarm will go off 😉
I’ve made this recipe more than 5 times and it works out perfectly each time. Great tips and photos, solid recipe. The seasoning for this roast pork is absolutely delicious.
Hi Joel,
I’m so glad you enjoyed this recipe 🙂 I make it almost weekly now!