Finnish Bakery Treats
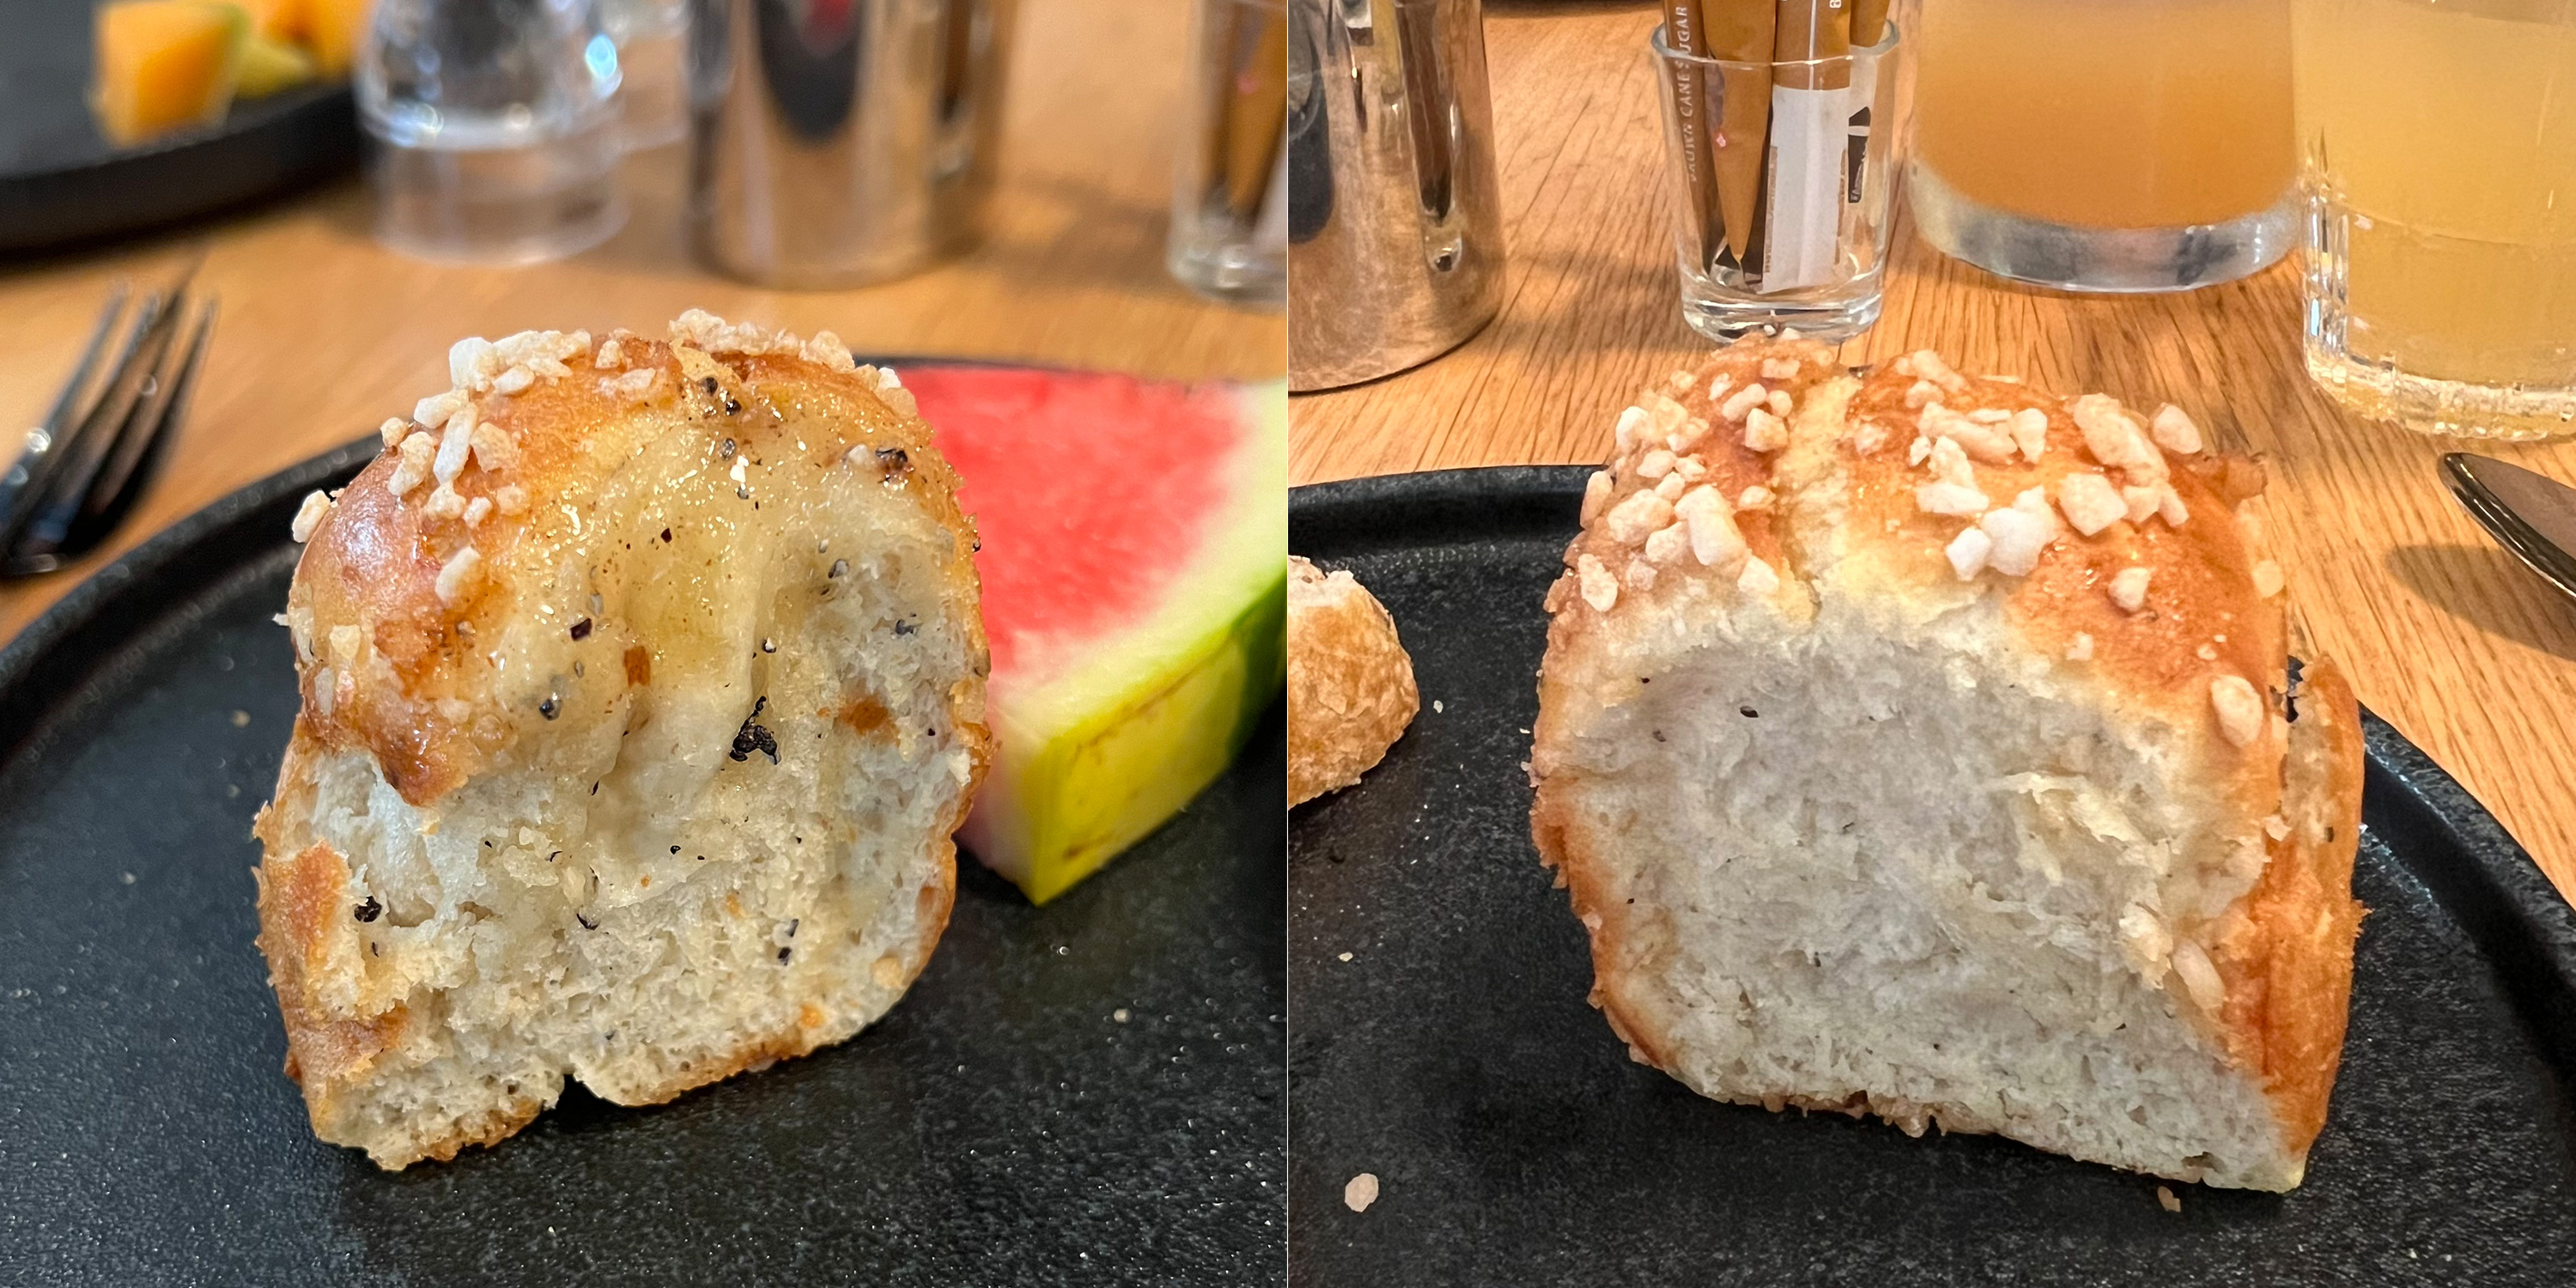
On a trip to Helsinki a few years ago, I ate the most delicious mini cardamom buns from the breakfast buffet at our hotel. I thought it was so clever to make a mini version of the classic Cardamom Buns which are so popular throughout the Scandinavian countries, because it meant I could also help myself to the other delicious foods on offer.
Once home, I wasted no time in recreating my own version of the mini cardamom buns which I ate each morning in Helsinki. And you know what? They are so much easier to make than the traditional Cardamom Buns 🙂
Mini Cardamom Buns
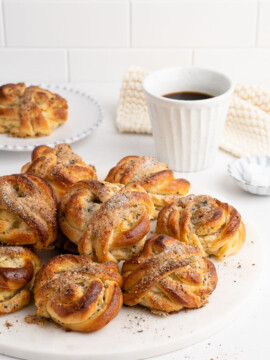
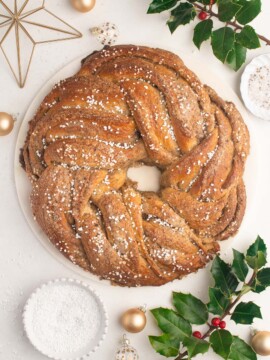
Traditional Cardamom Buns require you to fill the dough with a cardamom-sugar filling, before rolling the dough into long strips and then tying them into a distinct knotted shape. Once you get the hang of the method, it is actually not that difficult, plus the knotted buns are so beautiful to look at.
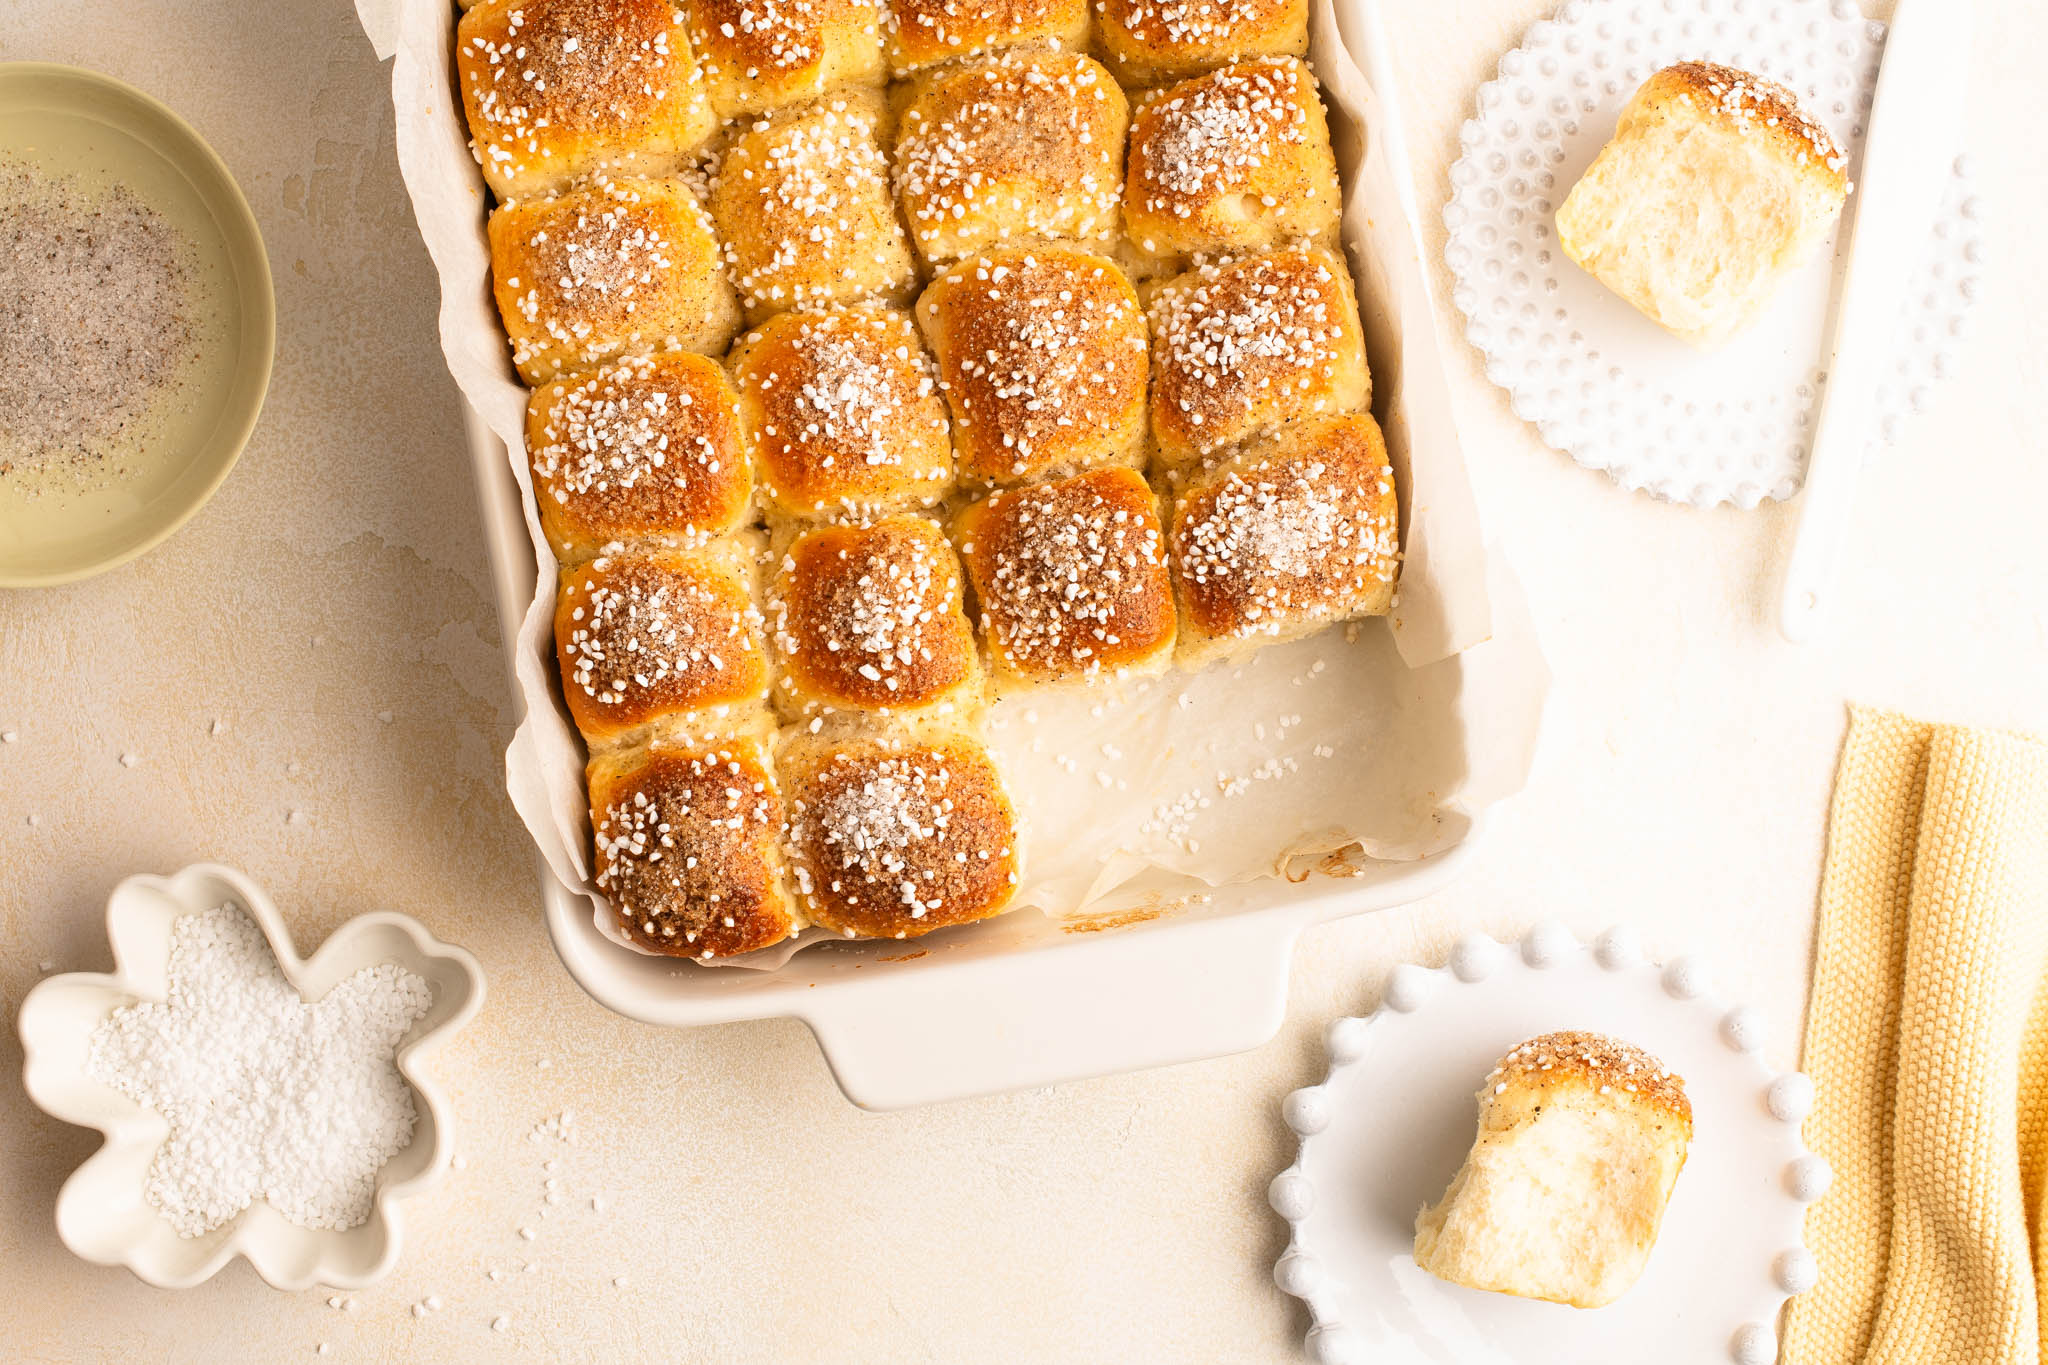
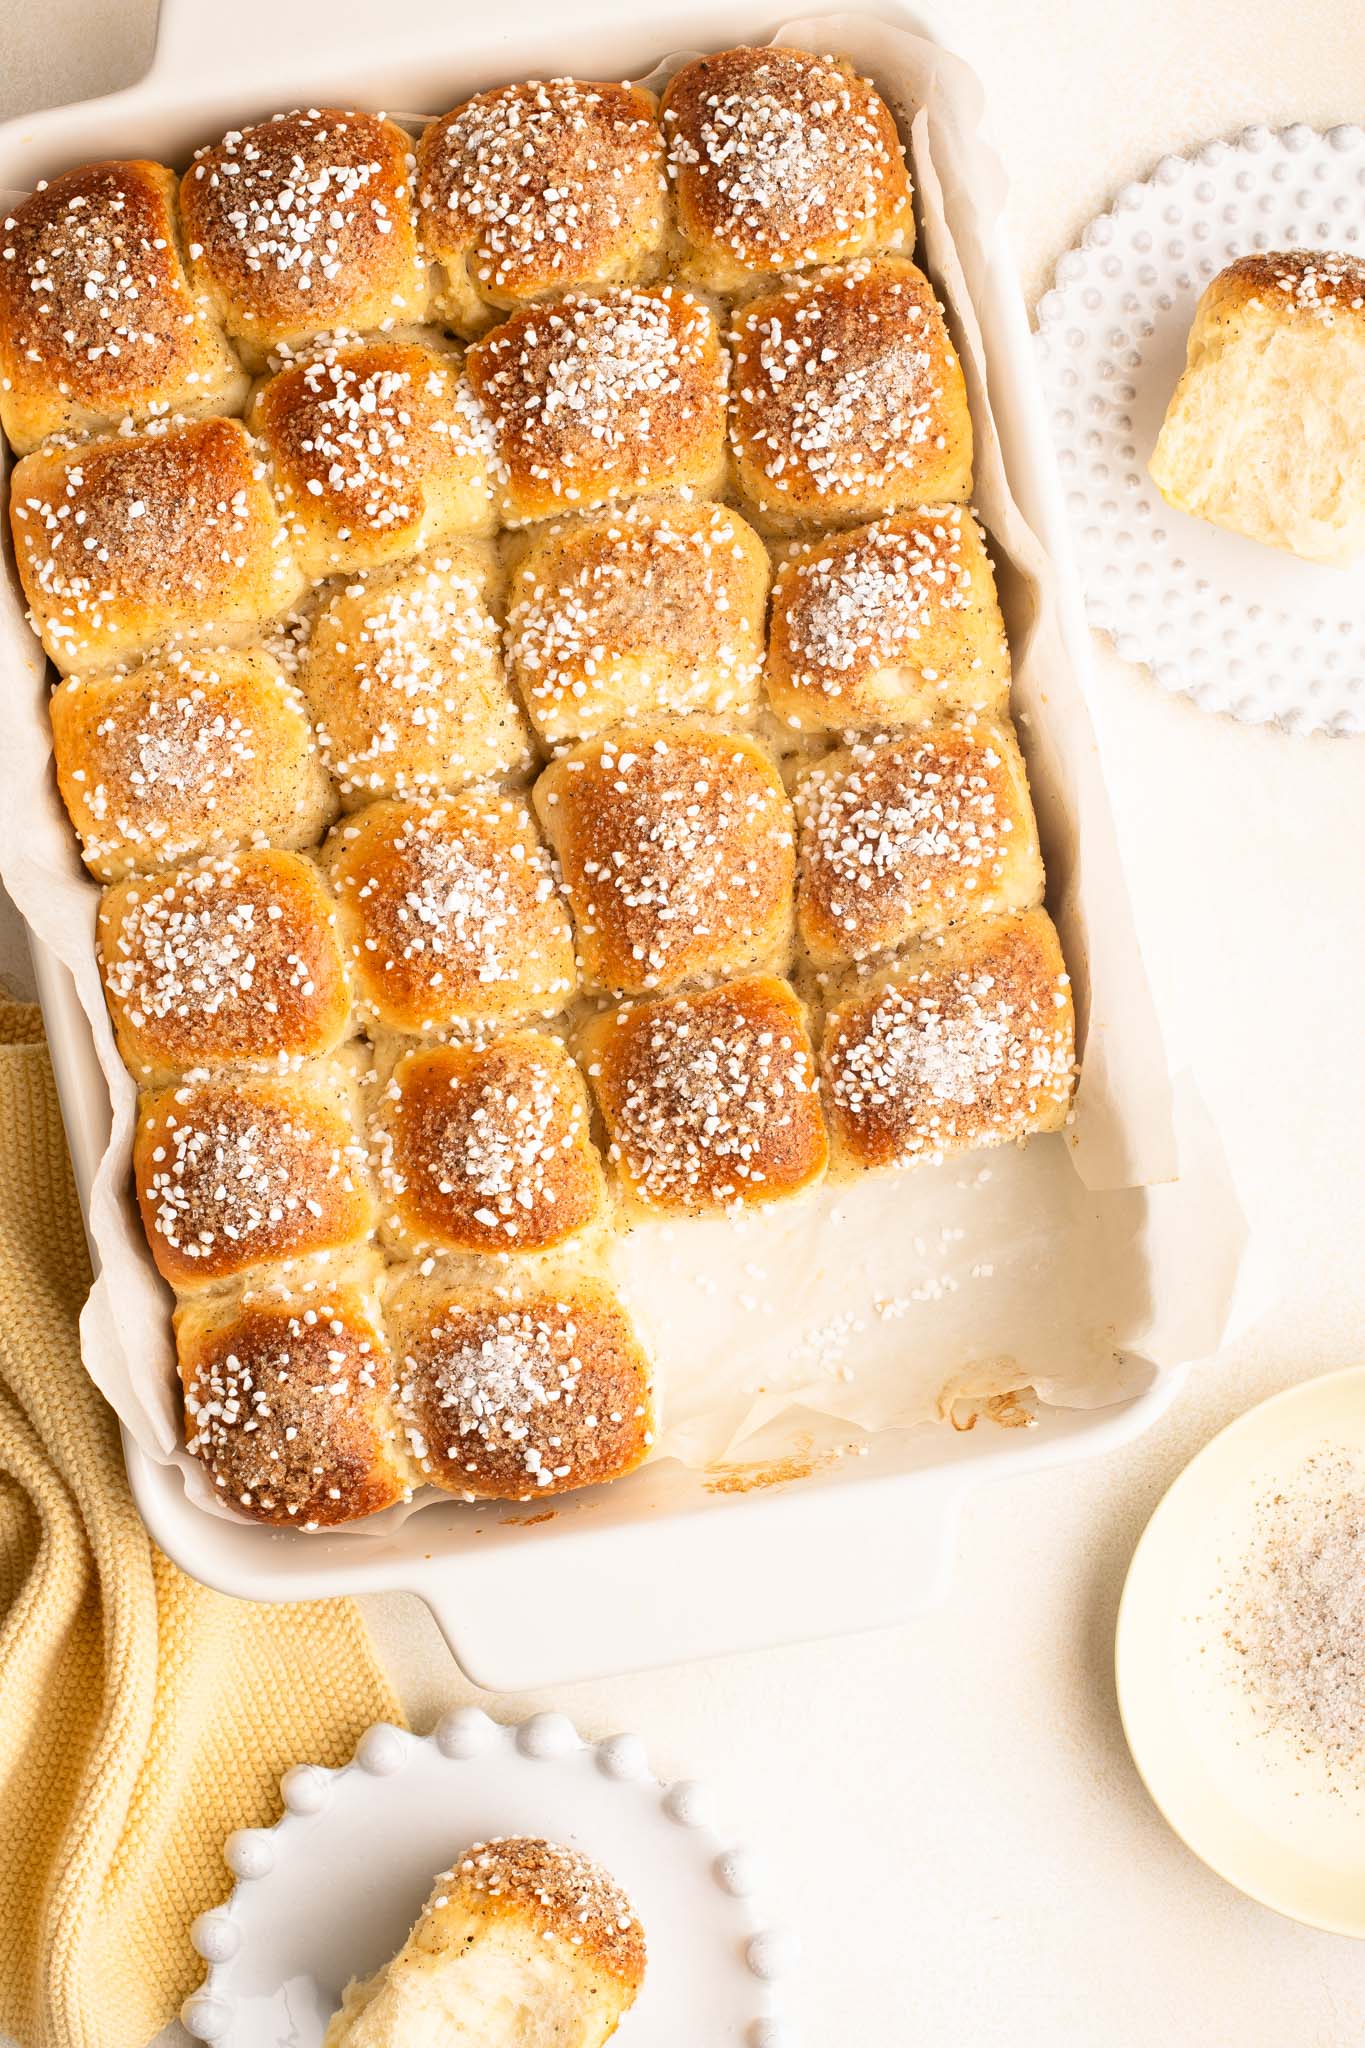
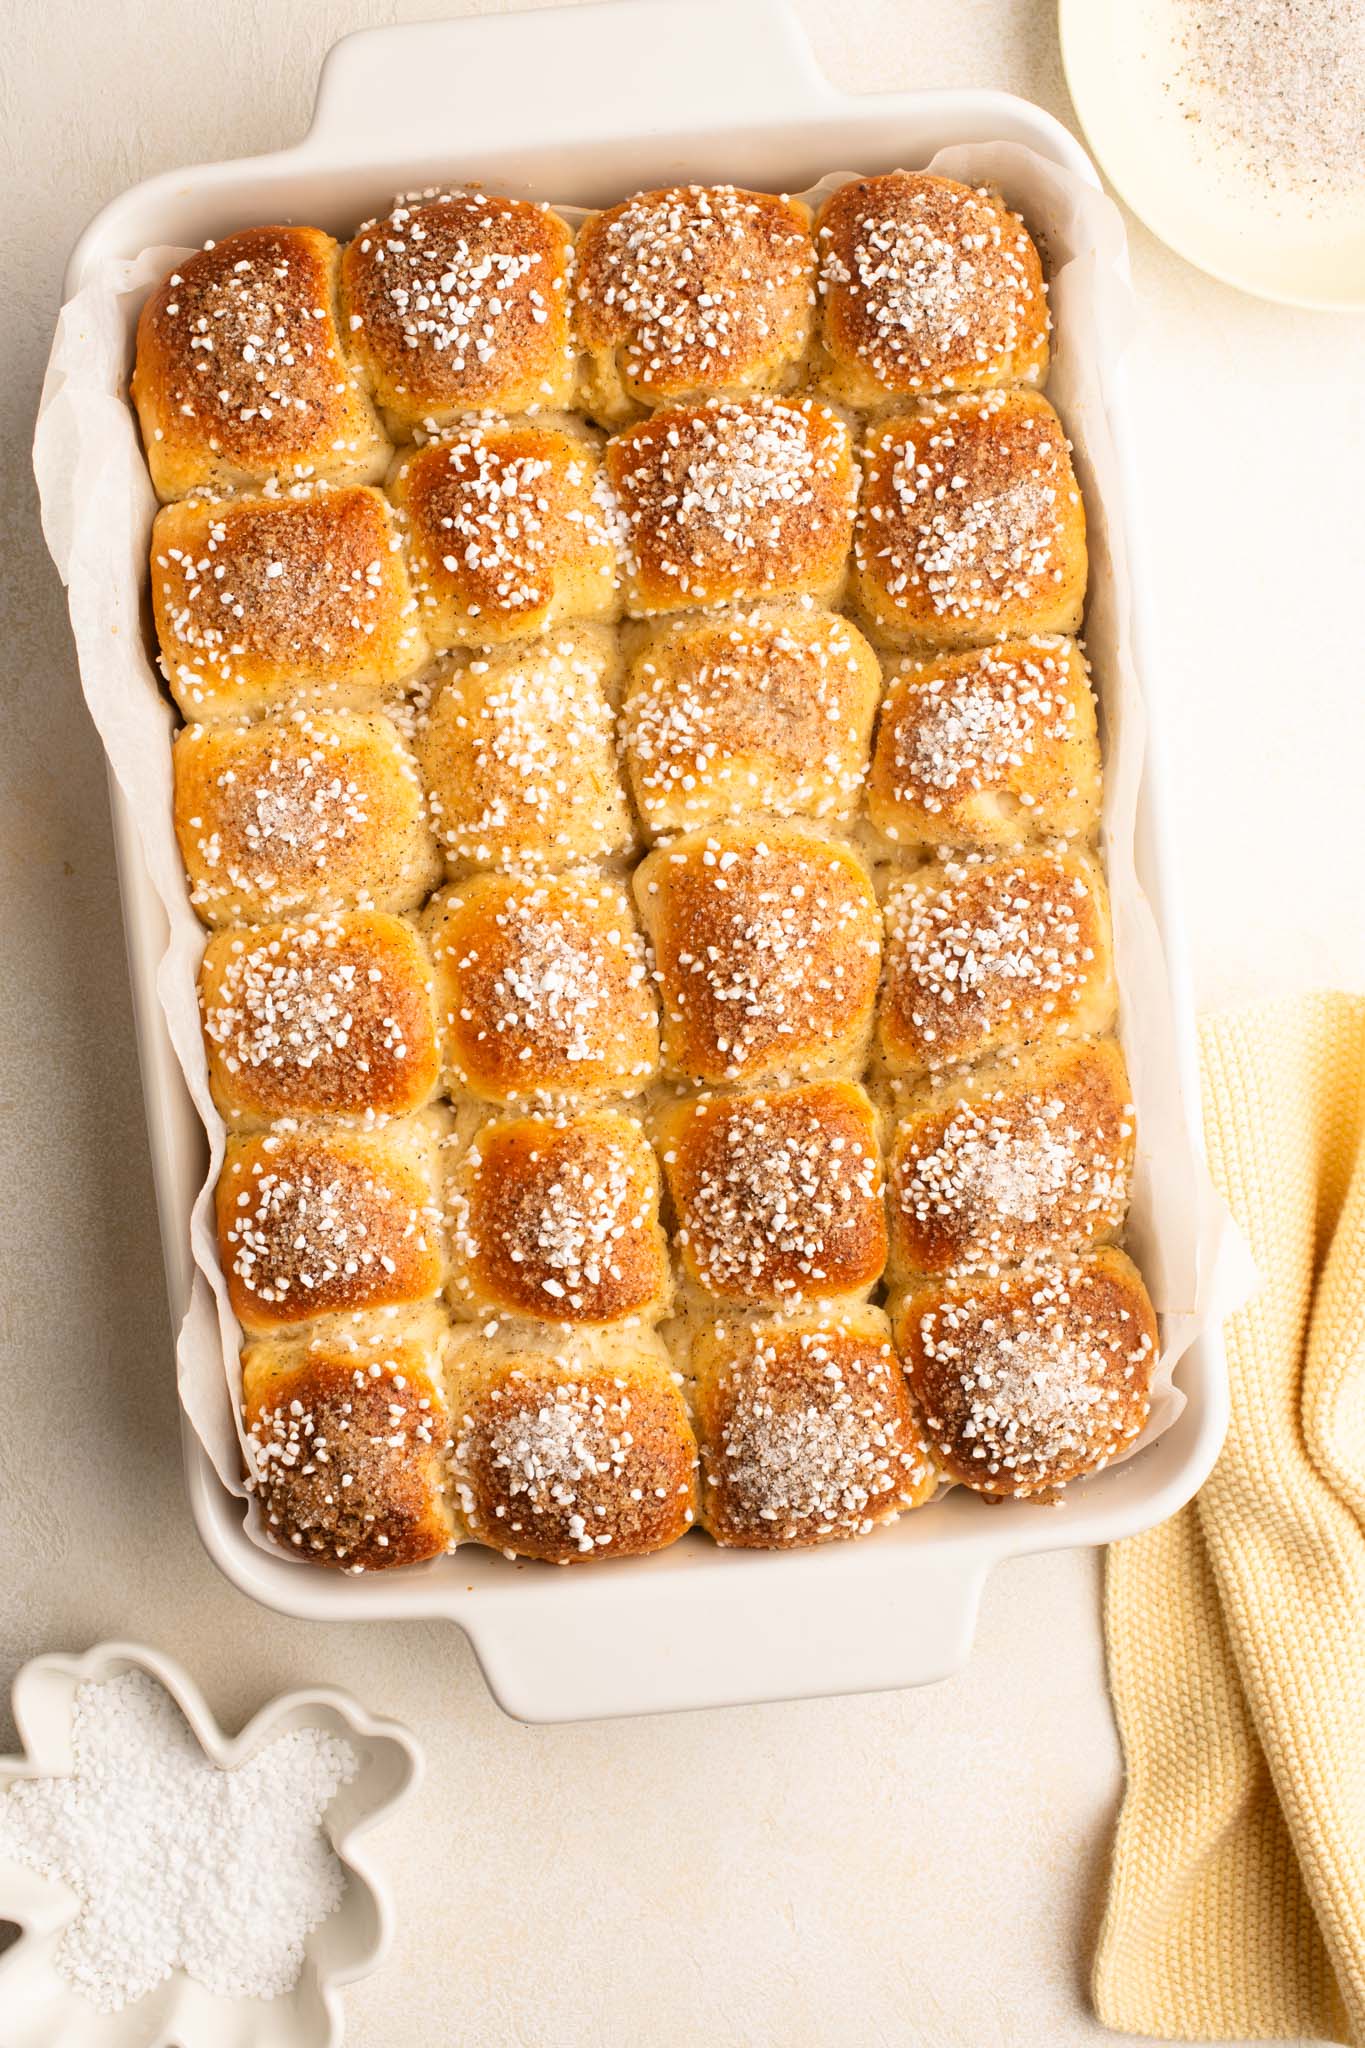
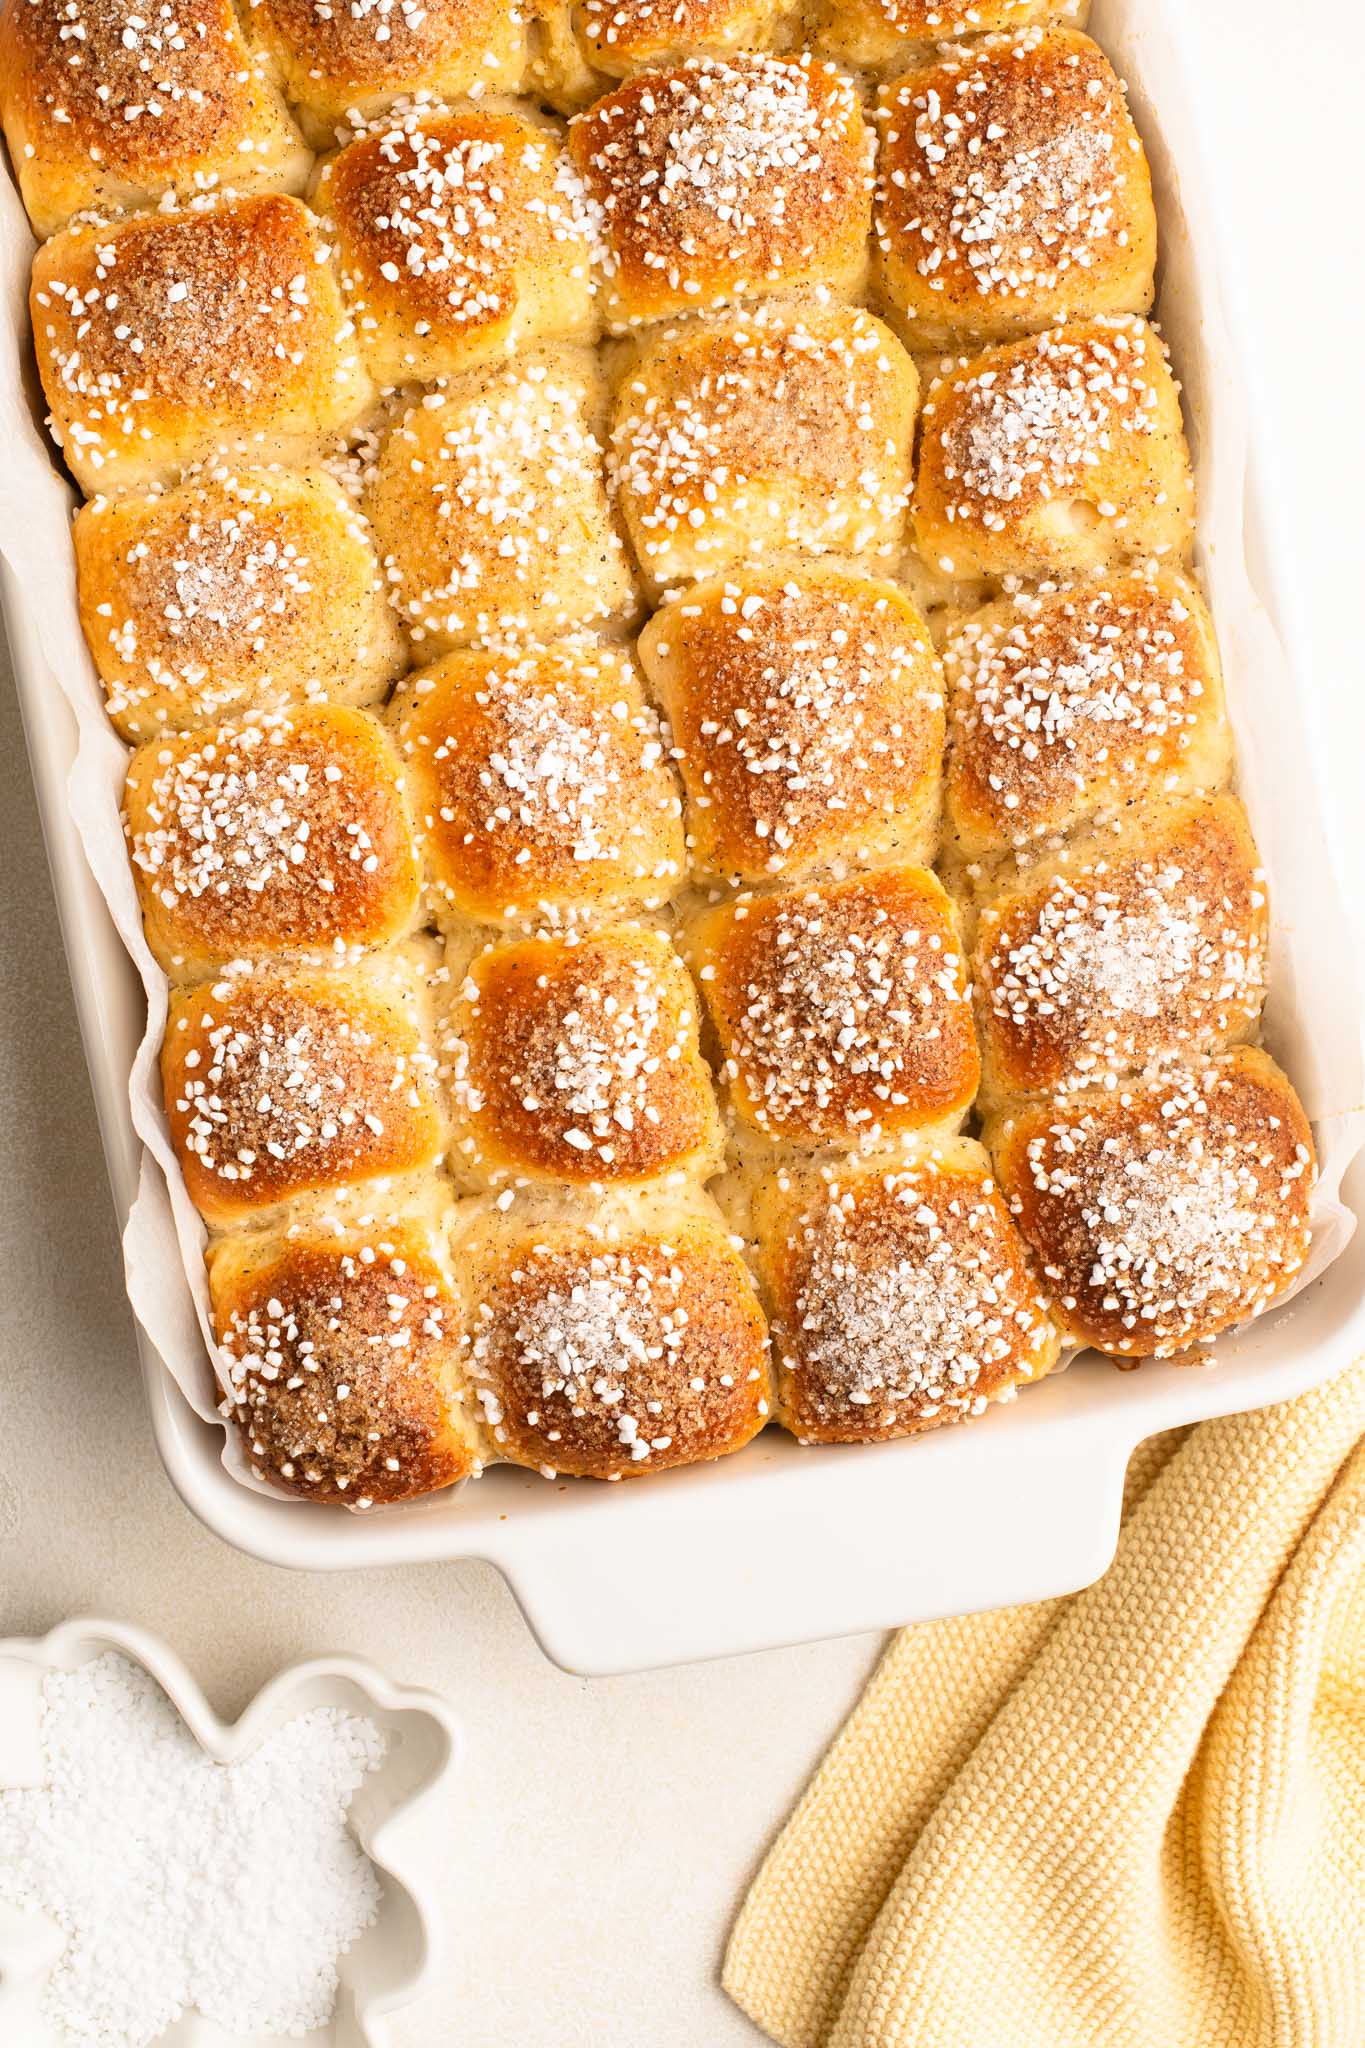
But a short-cut method is to make the cardamom buns like mini bread rolls, and to top them generously with a sprinkle of cardamom-sugar and pearl sugar. They have all the flavours of a traditional Cardamom Bun, albeit a bit lighter on the spices, and because the buns are baked together in one large pan, they are softer and fluffier in texture.
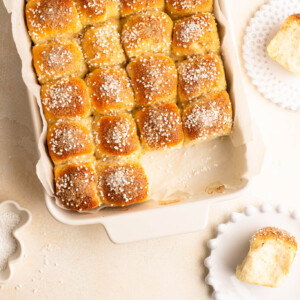
You can eat the buns as they are, or spread them with butter and/or jam. The cardamom spices somehow go really well with an apricot jam or cherry jam.
And it goes without saying that these Mini Cardamom Buns are perfect for a brunch spread.
Mini Cardamom Buns Recipe
To make these Mini Cardamom Buns, I use my trusty sweet dough recipe, which is what I use in many bun recipes where I want a slightly sweet, soft and fluffy interior, such as:
To up the cardamom content, I have added a few teaspoons of freshly ground cardamom seeds to the dough.
Cardamom Pods vs Cardamom Seeds
If you have ever tasted a fresh cardamom bun from a bakery in Sweden or Denmark, you will usually notice the distinct fragrance of cardamom right away, evidenced by the flecks of freshly-ground cardamom on top of the buns. They look like coarsely ground black pepper, but they are in fact ground cardamom seeds.
When making cardamom buns, I recommend using whole cardamom seeds which have already been extracted from the cardamom pods (also called decorticated cardamom seeds). If you can’t find cardamom seeds, you can remove the seeds from the cardamom pods themselves by pounding them open with a pestle and mortar. However, this process can be quite fiddly and time-consuming.
The cardamom seeds themselves are too large and coarse to use right away, so you will need to grind them coarsely, either with a pestle and mortar or an electric spice grinder. Some Danish households even have a dedicated spice grinder for cardamom seeds, a tip which I have adopted since I use freshly-ground cardamom seeds quite regularly.
In Scandinavian countries, you can buy tubes or packets of coarsely ground cardamom seeds, which will save you the effort of having to grind the seeds yourself.
If you are out of luck and can find neither cardamom pods nor cardamom seeds, you can use ground cardamom which is more readily available; this is the finely ground variety found in most supermarkets. However, store-bought ground cardamom is nowhere near as fragrant and punchy as freshly ground cardamom – you will smell and taste the difference right away.
If you opt to use store-bought ground cardamom in this recipe, I recommend adding an extra 1-2 teaspoons to increase the cardamom flavour.

How to Make Mini Cardamom Buns
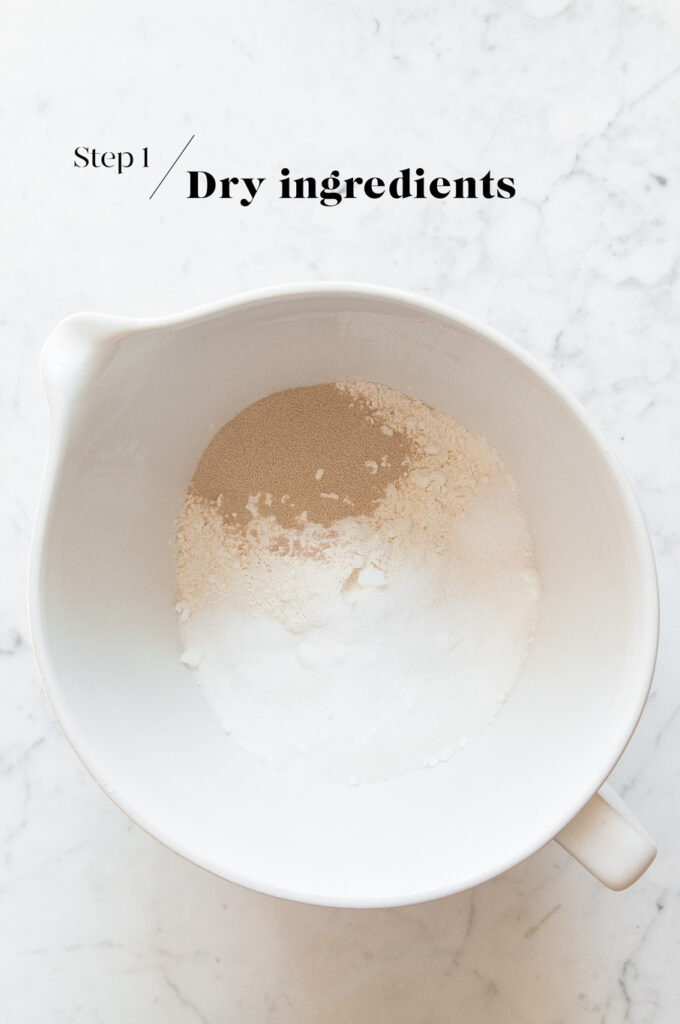
Step 1
Measure the flour, sugar, yeast, salt and freshly ground cardamom seeds into the bowl of an electric stand mixer. Lightly mix the ingredients together.
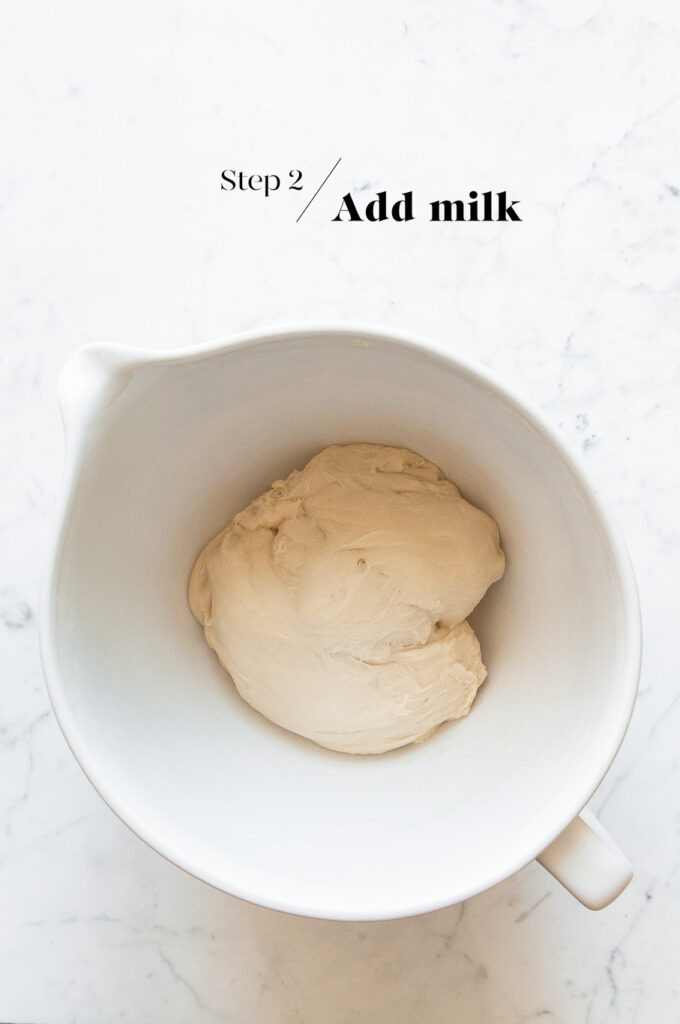
Step 2
Slowly add the warm milk (you may not need all of it), and lightly beat everything with the dough hook until it comes together into a large ball of dough. Only add as much milk as you need to bring the ingredients together into a dough.
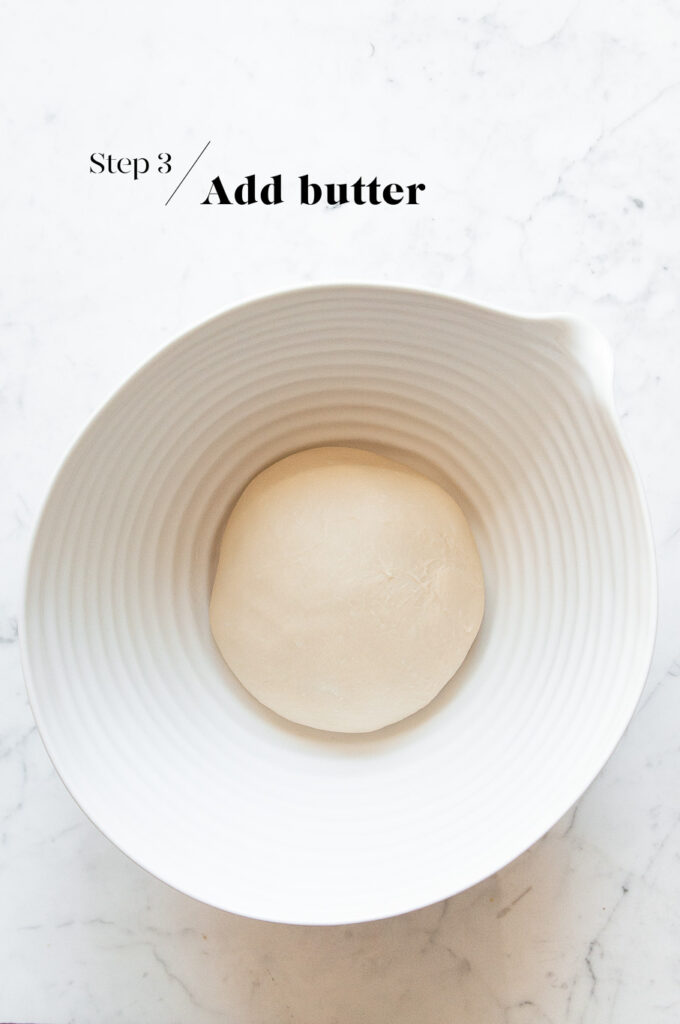
Step 3
Slowly incorporate the butter, one tablespoon at a time, until all of the butter has been used.
Then increase the speed to medium and continue kneading with the dough hook for 15 to 20 minutes, or until the dough is smooth and elastic.
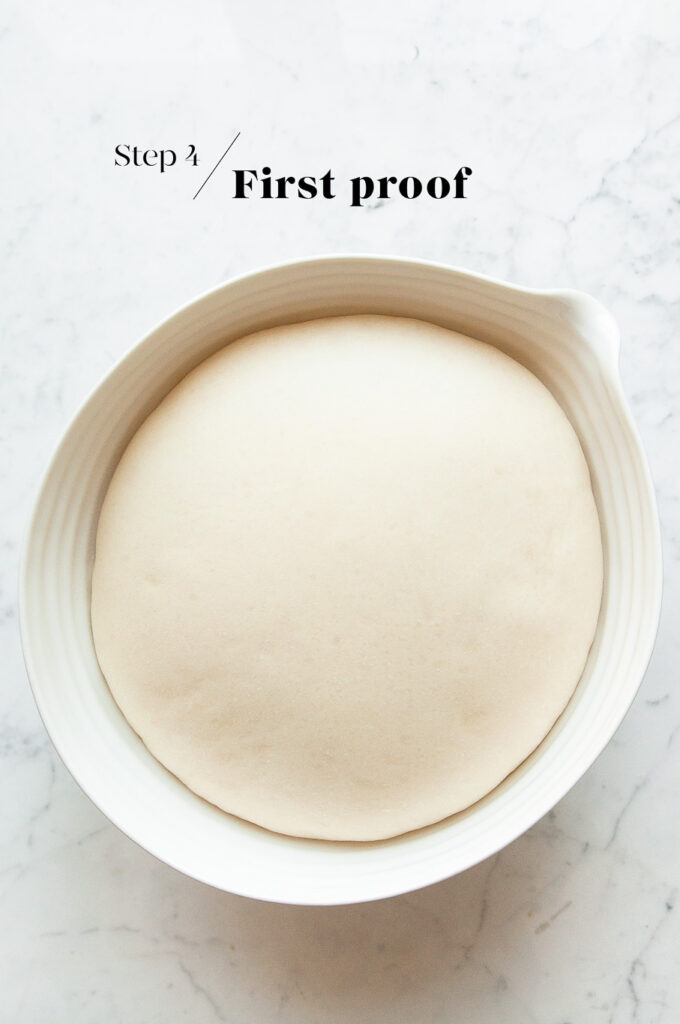
Step 4
Lightly oil a large mixing bowl, and place the dough into the bowl. Cover the bowl with a clean tea towel and leave it somewhere warm for 1 to 1.5 hours, or until the dough has doubled in size.
Step 5
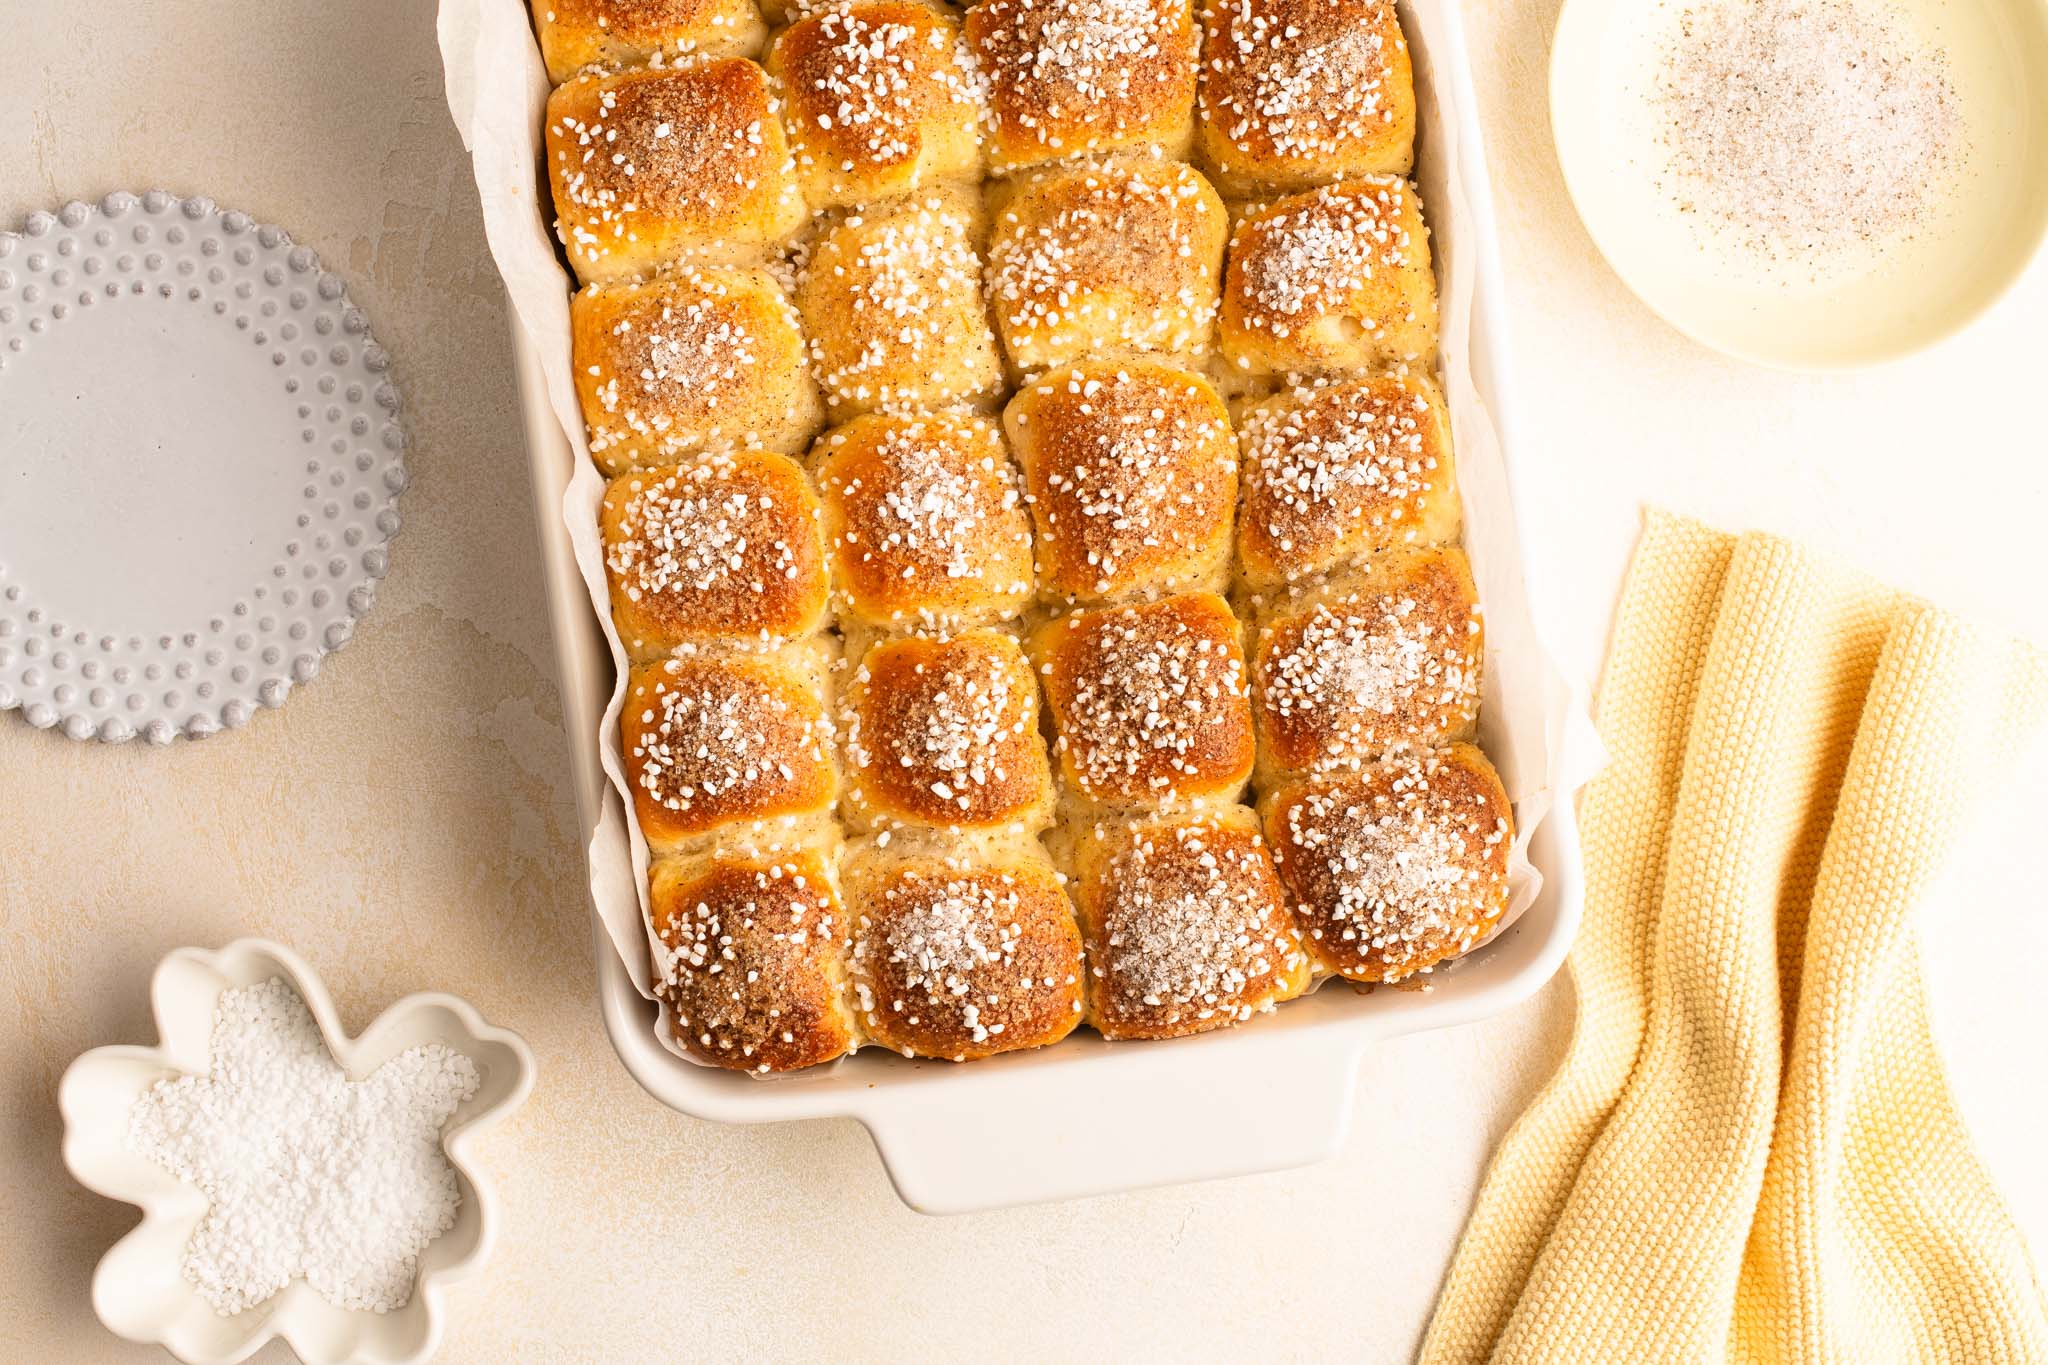
Line a baking dish measuring approximately 30 x 21 cm/12 x 8 inches with baking paper. Scrunch up the baking paper first to make it easier to sit inside the dish.
Gently remove the dough from the bowl. Portion the dough into 24 pieces. If you want to create even sized pieces, weigh the dough first, and then divide this number by 24.
Roll each piece of dough into a smooth ball by gathering the edges of the dough together, and pinching the ends to help them keep their shape.
Arrange the balls of dough in the baking dish with the seam side facing down. The balls of dough should fit snugly in the dish, with a tiny bit of room between each. In my photo below, you will see that the balls of dough were starting to rise as I was forming them, so you need to work fairly quickly.

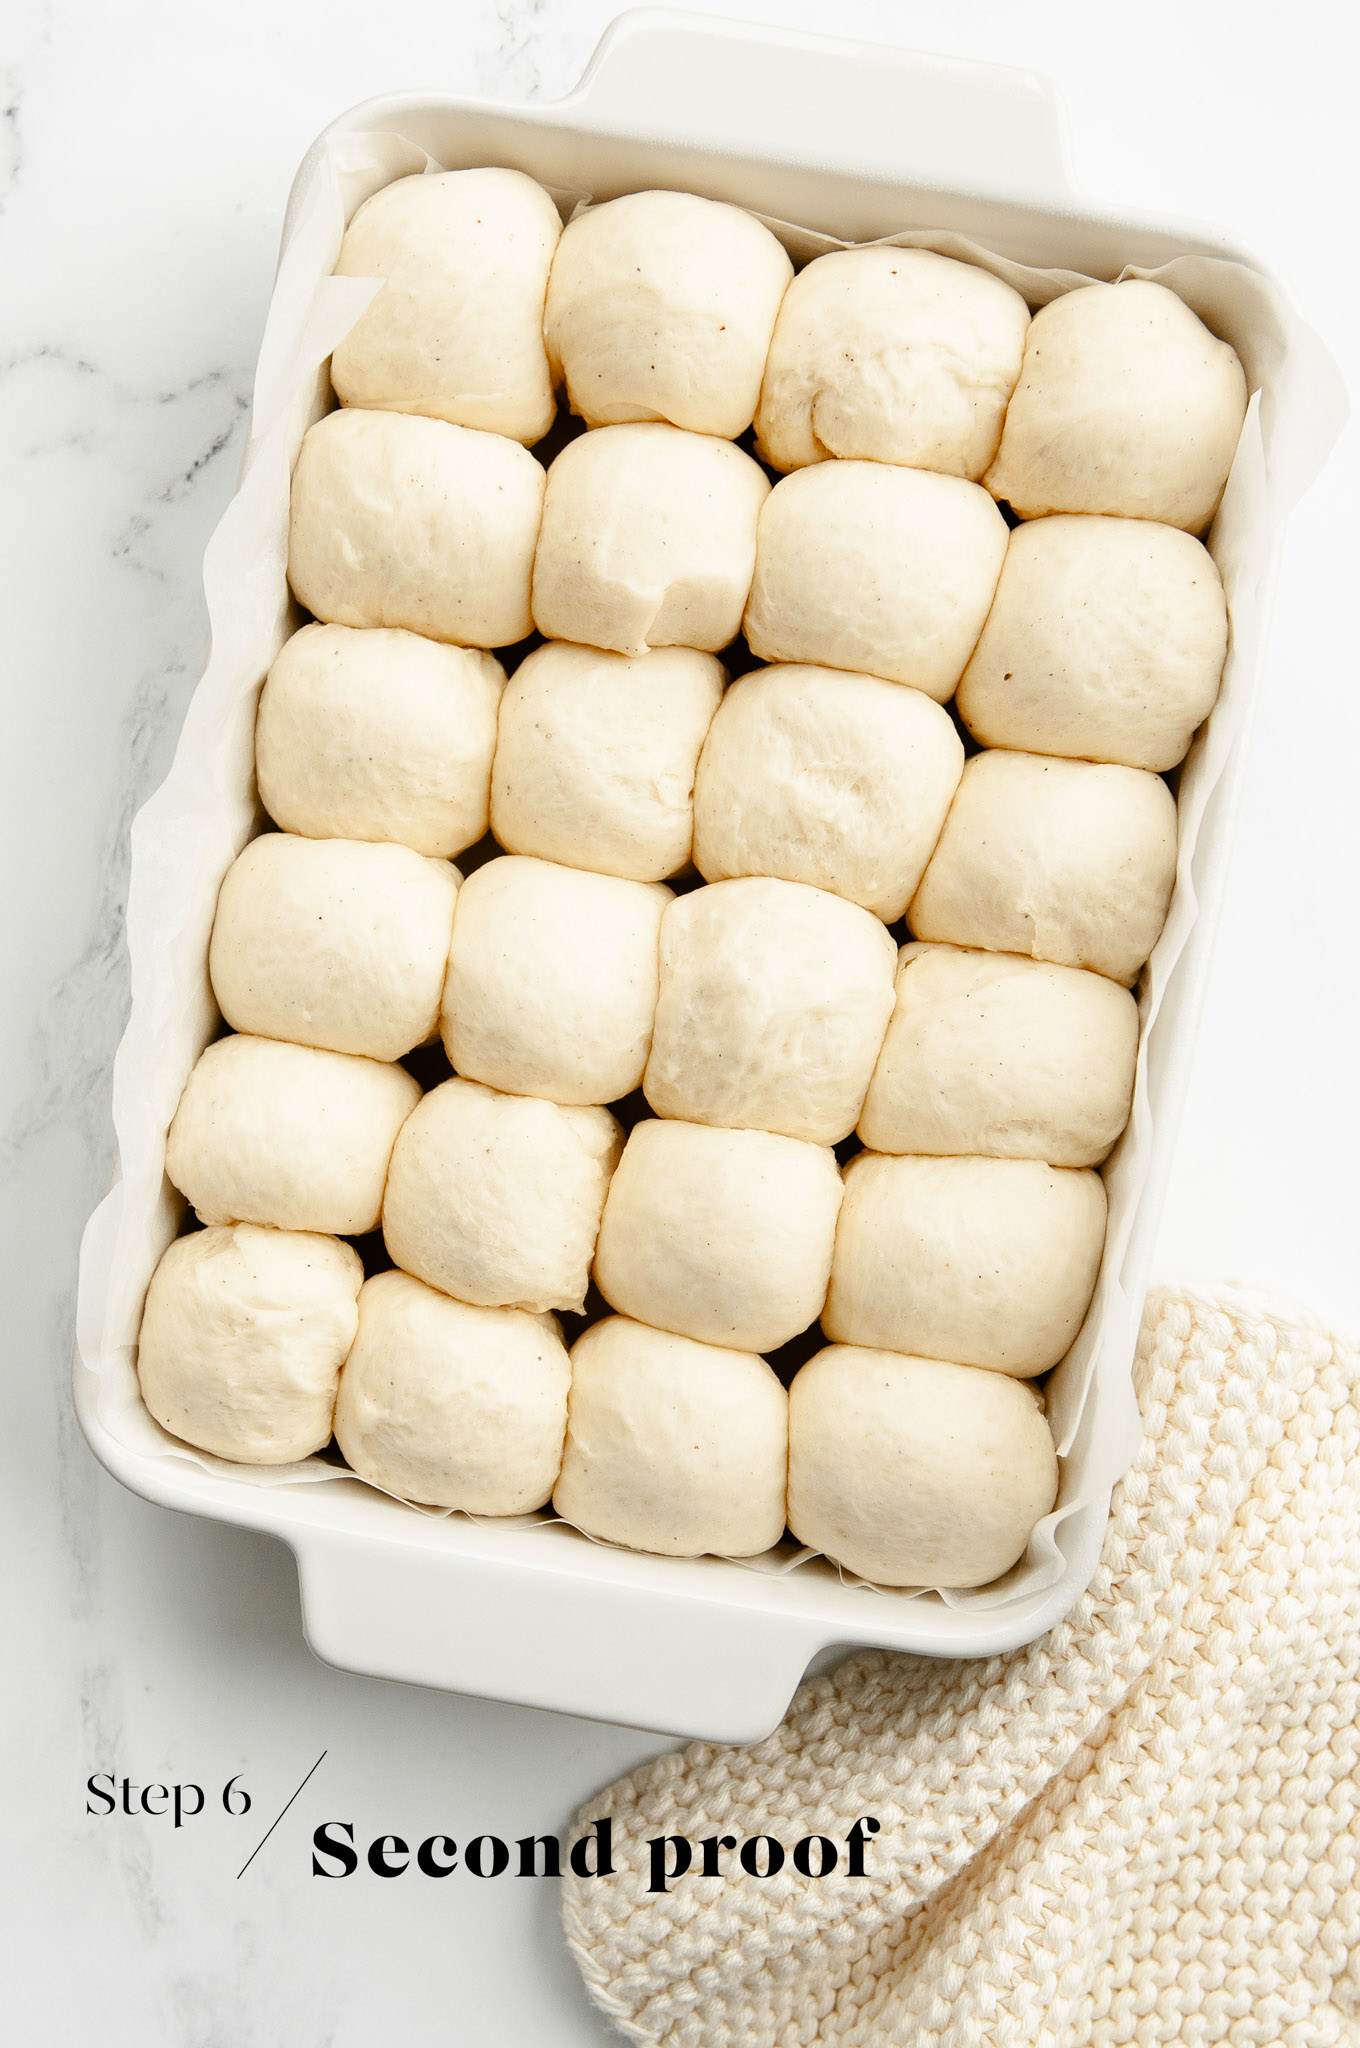
Step 6
Place the dish somewhere warm for about 15-20 minutes, or until the buns have puffed up slightly. By now, the buns should be touching each other.
Meanwhile, preheat the oven to 200°C/390°F with a metal baking tray on the middle shelf.
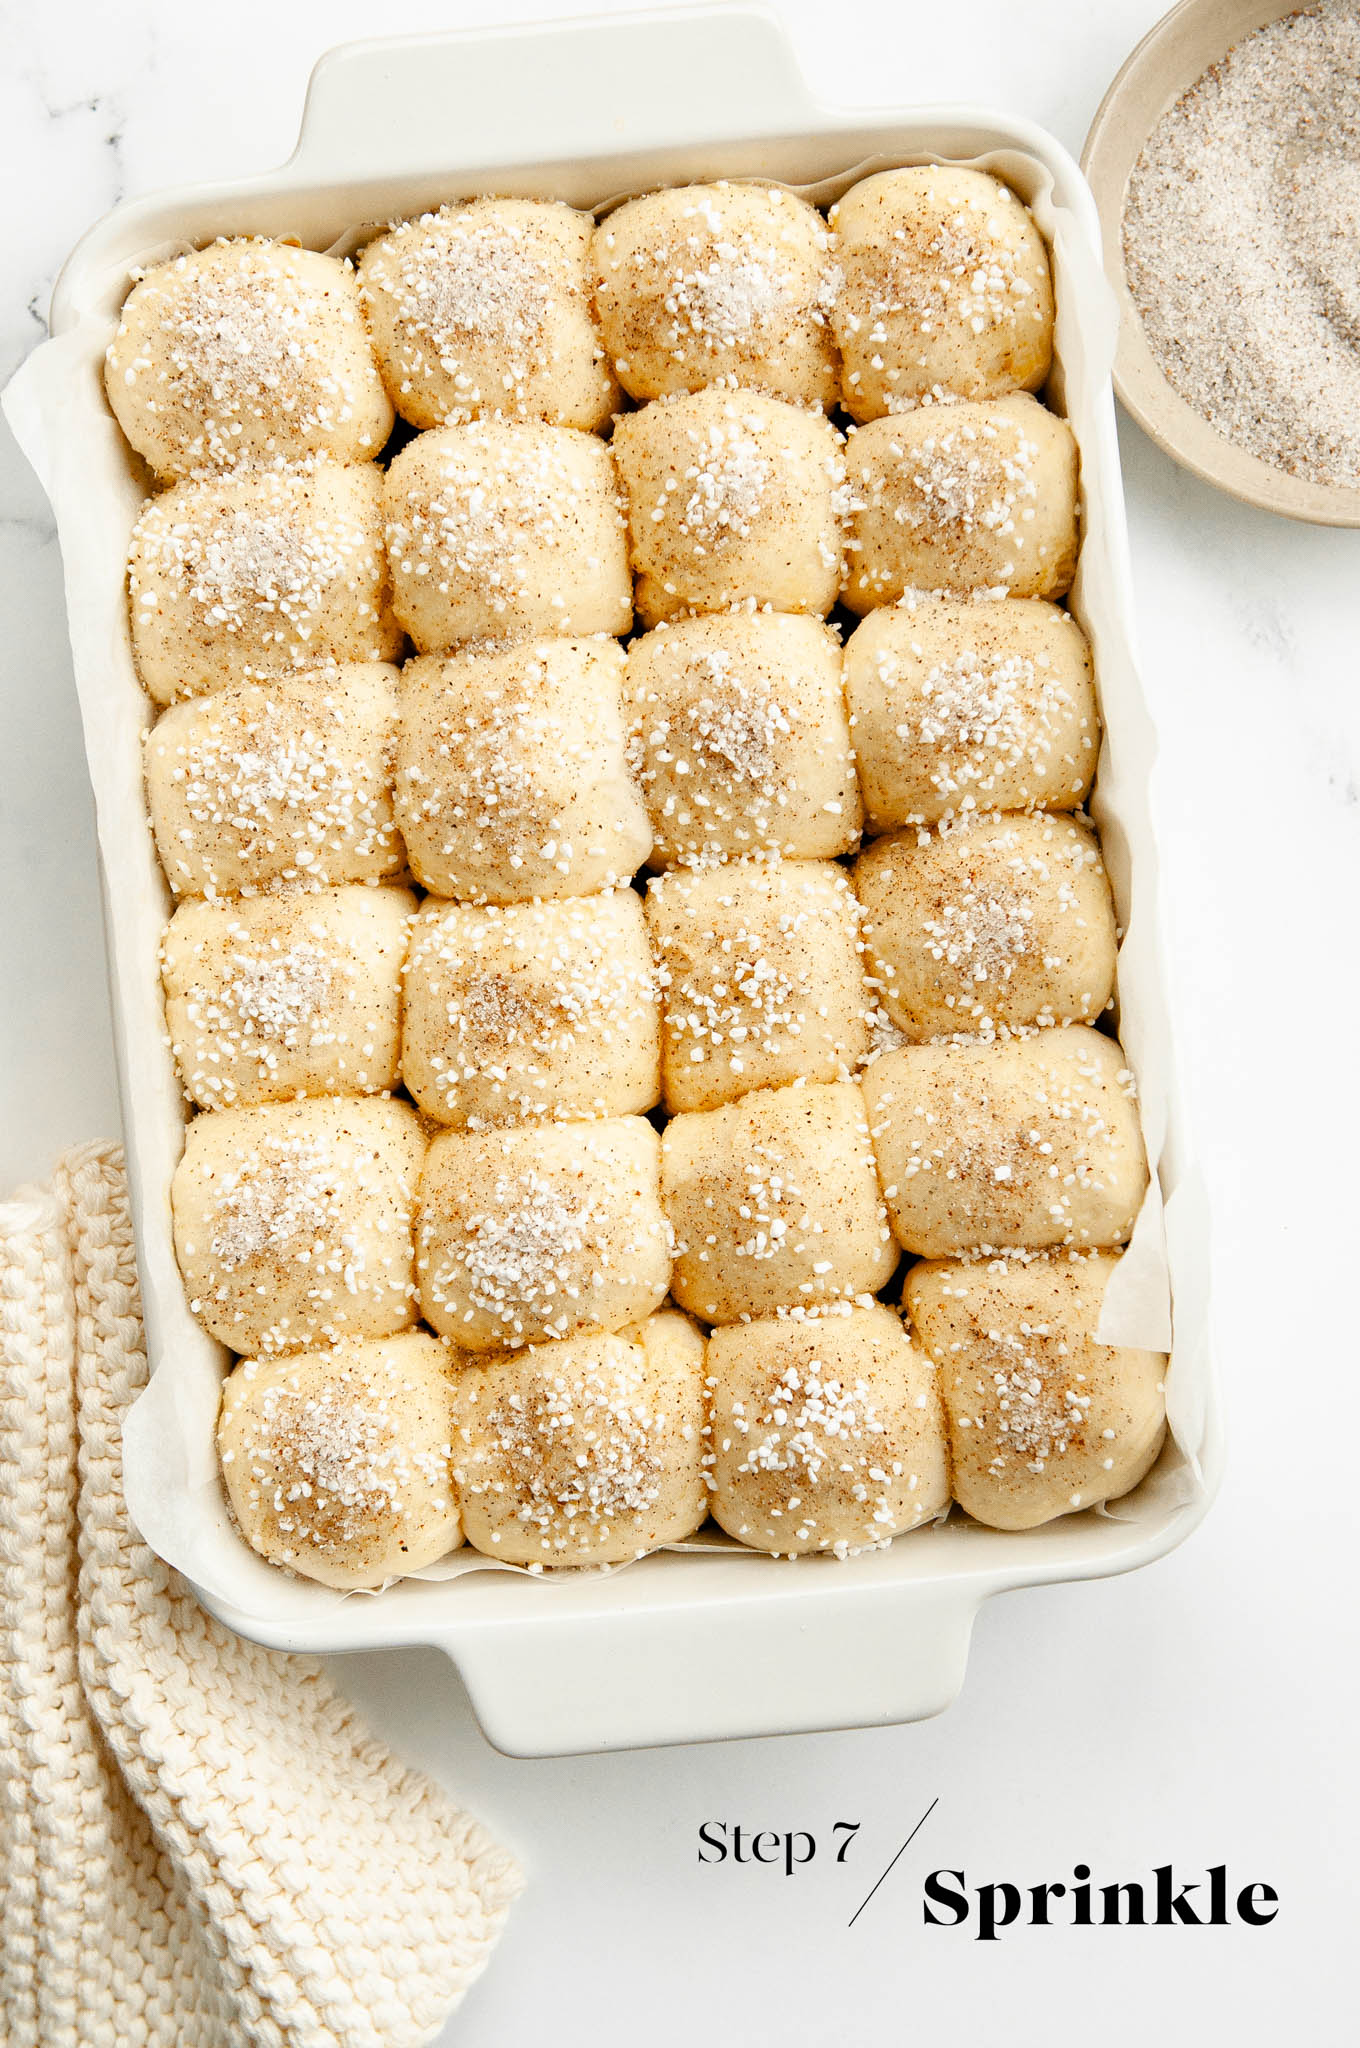
Step 7
Brush the buns with some egg wash.
Generously sprinkle pearl sugar over all of the buns, followed by an equally generous sprinkle of cardamom sugar.
Step 8
Bake the buns for about 25 minutes, or until the buns are lightly golden. Check the buns at about 10 minutes, and if they are browning too quickly, cover them with a loose sheet of foil for the rest of the baking time.
The buns are cooked if an internal thermometer reads 85°C (185°F). Gently remove the buns (intact) to a wire rack, and leave them to cool completely.
Tips for Making Bread Dough Ahead of Time
I love baking bread, but I don’t love getting up extra early to get started on the dough. So I typically make the dough the night before and allow it to rise slowly in the fridge overnight. The longer proofing time has the added benefit of allowing the dough to develop more flavour and a better texture. Come the morning, the dough will have at least doubled in size, and it will be ready for shaping as per the recipe.
To make the dough the night before:
- Make the dough as per the recipe.
- Place the dough into a large oiled bowl.
- Cover the bowl with plastic wrap or a reusable bowl cover.
- Place the bowl into the fridge.
- Let the dough rise overnight, or for at least 8-10 hours.
- The next morning, the dough should have at least doubled in size.
- Gently remove the dough from the bowl.
- The dough is ready for shaping and the second proof as per the recipe.
- As the dough will be cold from the fridge, the second proof may take slightly longer.
Mini Cardamom Buns
Ingredients
For the Dough
- 600 g (4 cups) white bread flour
- 110 g (½ cup) caster sugar, (superfine sugar)
- 6 g (1 teaspoon) fine salt
- 14 g (4 teaspoons) instant dried yeast, see Kitchen Notes
- 1-2 teaspoons cardamom seeds, freshly ground, see Kitchen Notes
- 375 ml (1 ½ cup) milk, warmed to 37°C/98°F
- 60 g (4 tablespoons) unsalted butter , softened
For the Topping
- 1 egg, lightly beaten with a splash of water
- 1-2 tablespoons pearl sugar
For the Cardamom Sugar
- 1 tablespoon (3 tablespoons) granulated sugar
- 1-2 teaspoons cardamom seeds, freshly ground, see Kitchen Notes
Instructions
To Make the Dough
- Measure the flour, sugar, salt, yeast and ground cardamom seeds into the bowl of an electric stand mixer.
- Lightly mix the ingredients together using the dough hook.
- Slowly pour in the warm milk, and continue mixing until everything comes together into a rough dough.
- Add the butter, one tablespoon at a time. Once the butter has been fully incorporated into the dough, add the next tablespoon of butter.
- Once all of the butter has been added, continue kneading the dough on medium speed for about 15 to 20 minutes.
- The dough is ready when it is soft and smooth, and no longer sticks to the side of the bowl. The dough will be somewhat sticky from the butter.
First Proofing Period
- Lightly oil a large mixing bowl.
- Place the dough inside the bowl.
- Cover the dough with a clean tea towel, plastic wrap, or a reusable bowl cover.
- Leave the dough somewhere warm for 1 to 1.5 hours, or until the dough has doubled in size (see Kitchen Notes below).
To Shape the Mini Cardamom Buns
- Line a baking dish measuring approximately 30 x 21 cm/12 x 8 inches with baking paper. Scrunch up the baking paper first to make it easier to sit inside the dish.
- Gently remove the dough from the bowl.
- Portion the dough into 24 pieces. If you wish to have even-sized buns, weigh the dough first, and then divide this number by 24.
- Roll each piece of dough into a small ball. I do this by gathering the edges of the dough together, and pinching the ends to help them keep their shape.
- Arrange the balls of dough in the baking dish. The balls of dough should fit snugly in the dish, with a tiny bit of room between each.
Second Proofing Period
- Place the pan somewhere warm for about 15-20 minutes, or until the buns have risen and puffed up slightly.
- During this time, preheat the oven to 200°C/390°F (without fan) with a metal baking tray on the middle shelf.
Bake the Mini Cardamom Buns
- Gently brush each bun with some egg wash.
- Sprinkle the buns generously with pearl sugar.
- Mix together the sugar and freshly ground cardamom.
- Sprinkle each bun with some of the cardamom sugar.
- Place the pan of buns on the preheated baking tray.
- Bake the buns for about 25 minutes, or until the buns are lightly golden. Check the buns at about 10 minutes, and if they are browning too quickly, cover them with a loose sheet of foil for the rest of the baking time.
- The buns are cooked if an internal thermometer reads 85°C/185°F.
- Gently remove the buns to a wire rack, and leave them to cool completely.
Kitchen Notes
- WHAT TYPE OF CARDAMOM TO USE
* For the best (and most authentic) results, use freshly-ground cardamom seeds (also called decorticated cardamom seeds). Simply grind them to a fine powder to use in the dough and filling. Use a more coarse grind for sprinkling on top of the wreath.
* Alternatively, use the same quantity of regular ground cardamom, or add more to taste. - MAKE AHEAD TIPS
To start the dough the night before:
* Make the dough as per the recipe.
* Place the bowl of dough (covered) in the fridge to proof overnight, or for at least 8 to 10 hours. During this time, it should have at least doubled in size.
* The next day, proceed with the rest of the recipe. As the dough will be cold, it may require a bit more time for the second proofing period. - DIFFERENT TYPES OF FLOUR
For Swiss readers: I use Zopfmehl (or farine pour tresse) when making bread and enriched dough. - DIFFERENT TYPES OF YEAST
Please note that there is a difference between instant yeast (also called instant dried yeast or fast-action dried yeast) and dried yeast (also called active dry yeast). If you are not sure what type of yeast you have, please check the packaging for instructions on how to use the yeast.
* With instant yeast, you can add it directly to the flour mixture without having to activate it first.
* With dried yeast, you will need to activate it first (usually in some warm liquid).
* If you are using fresh yeast, you will need about 1 block (40 g fresh yeast = 14 g instant dried yeast). Crumble the fresh yeast into the warm milk, and stir to dissolve the yeast. - PROOFING THE DOUGH
Dough needs a warm environment for the yeast to activate and cause the dough to rise. If you don’t have an oven with a setting to proof dough, or a warm place in your home, try one of the following ideas:
* In the oven with the oven light switched on (works only for some ovens).
* In the oven with a tray of boiling water on the bottom shelf.
* In the oven or a steamer oven at a low temperature of about 25-40°C (77-104°F). - OVEN & STOVE TEMPERATURES
All recipes on this website have been tested on an induction stove and/or with a conventional oven (i.e. an oven without fan). All recipes on this website use temperatures for a conventional oven, unless otherwise mentioned. Convection ovens (i.e. fan-forced ovens) are typically 20°C/70°F hotter than conventional ovens, but please check your manufacturer’s handbook. - CONVERSIONS
To convert from cups to grams, and vice-versa, please see this handy Conversion Chart for Basic Ingredients.