
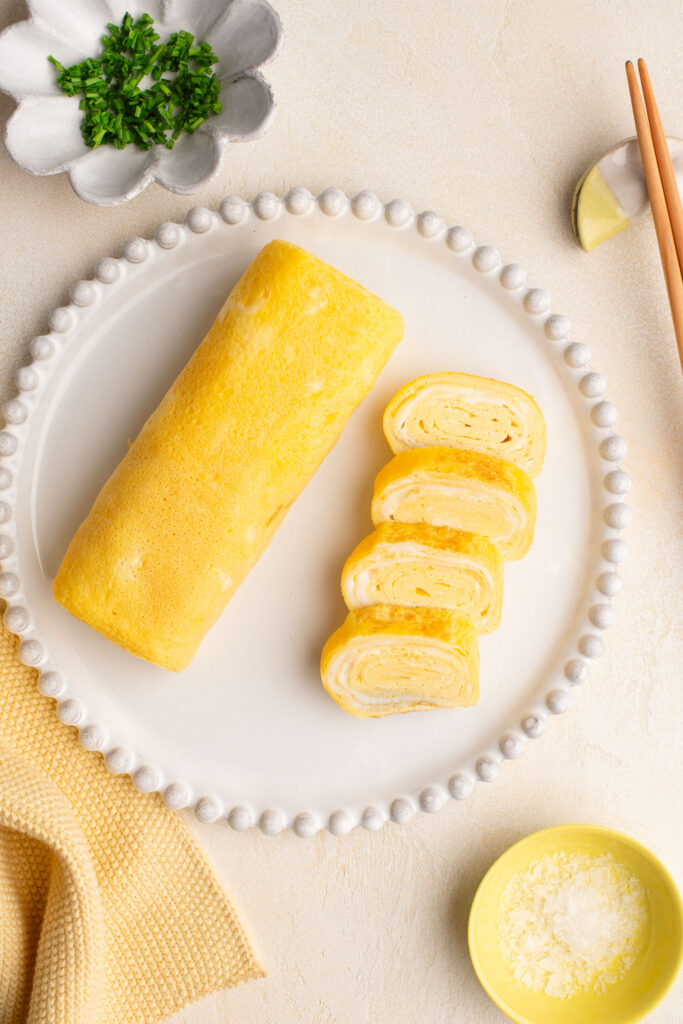
Japanese Omelette
If you like Japanese cuisine, chances are that you have tried Japanese Omelette, also called Tamagoyaki. You will often find a slice of Tamagoyaki in a bento box, rolled up in sushi, or served as part of a Japanese breakfast or dinner. My kids love omelettes cooked in any style (French, Vietnamese), but their favourite “shape” is definitely the Japanese-style omelette. And, to be fair, Japanese Omelettes are really fun to make 🙂
What is Tamagoyaki?
- Tamagoyaki is the Japanese name for a rolled omelette which is cooked in a special rectangular pan to give it its unique shape.
- Tamagoyaki can be found as part of a bento box, formed into a nigiri sushi, or served as part of a Japanese breakfast or dinner.
In Japan, it is also common to find street food stands selling Tamagoyaki on a stick as a hot snack, which happens to be a great vegetarian option. When we were in Kyoto, we stopped at a stand at the Nishiki Markets which sold various types of tempura, and I was instantly drawn to the tempura omelette, which I had never seen or heard of up until that point. All I can say is, omelette deep-fried in batter is simply heavenly!

Japanese Omelette Recipe
There are many variations of recipes for Japanese Omelette, but the more traditional recipes contain dashi, which is a Japanese stock for savoury depth, plus sugar and/or mirin for a slightly sweetened flavour.
If you happen to always have dashi ready-made in your fridge, then it would take no effort to add this to your omelette. But if you don’t have any dashi handy, I simply substitute with hondashi, which are instant dashi granules (the Japanese version of stock cubes).
More importantly, the Tamagoyaki recipe I have given below should be used mostly as a blueprint. If you want to serve the omelette as part of a Japanese meal, then by all means follow the recipe exactly. But everyone likes their omelette cooked a certain way, so feel free to adjust the recipe to your liking.
For a totally minimalist and pure omelette, you could use just eggs with a pinch of salt, which is what I do quite often, and especially when I plan to serve the omelette as part of a sandwich.
If I am making an omelette for the kids for an easy dinner, I often add very finely chopped vegetables between the layers (e.g. capsicums (bell peppers), carrots, broccoli, etc). They don’t seem to mind, so it’s a great way to sneak in some vegetables.
And – dare I say it – but I often make Japanese-style omelettes with Vietnamese flavours. My family love Vietnamese omelettes which are seasoned with fish sauce, white pepper and coriander (cilantro), but we also love rolled omelettes, so I often combine the two ideas, especially if I plan to serve the omelettes as part of a Vietnamese meal.

How to Make Japanese Omelette
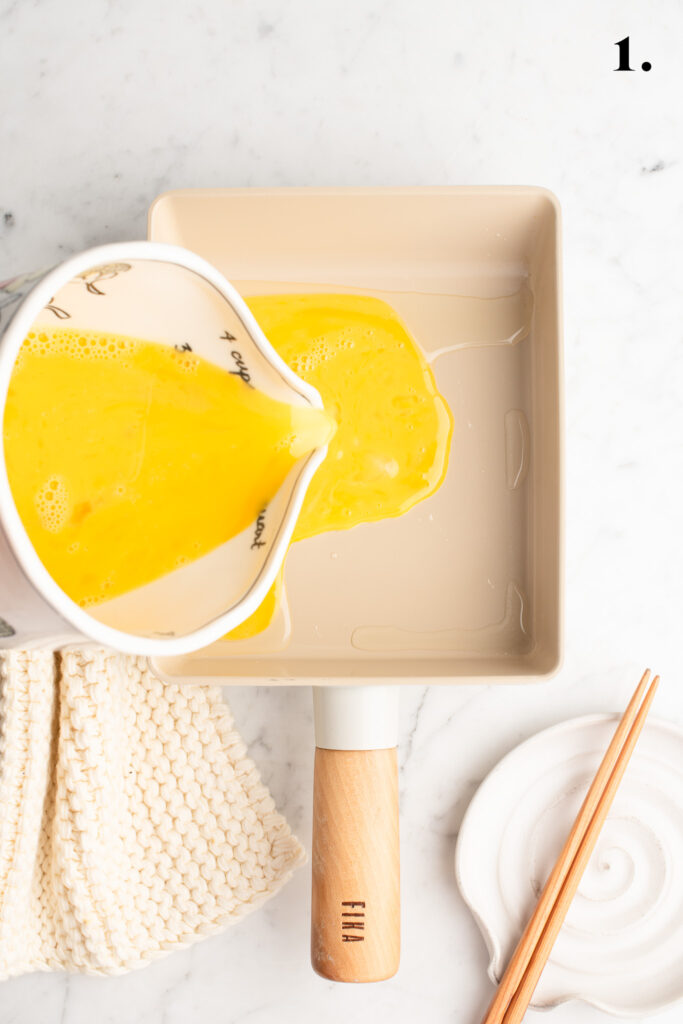
- Heat 1 tablespoon of vegetable oil in a non-stick pan over medium heat.
- Pour a thin layer of the egg mixture into the pan, and swirl the pan so that the eggs cover the pan.
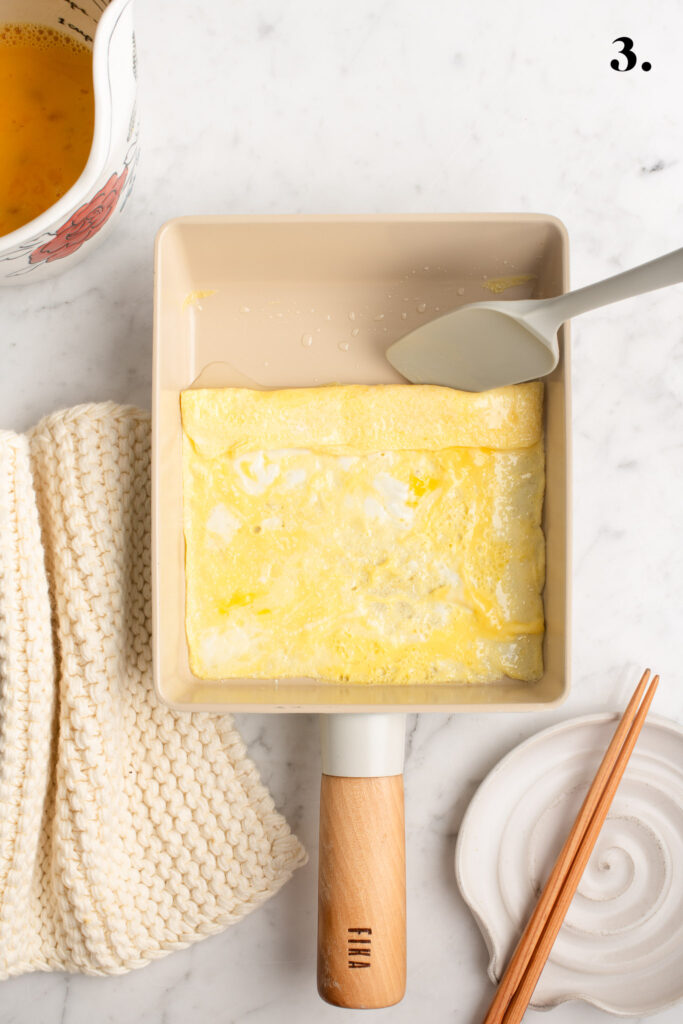
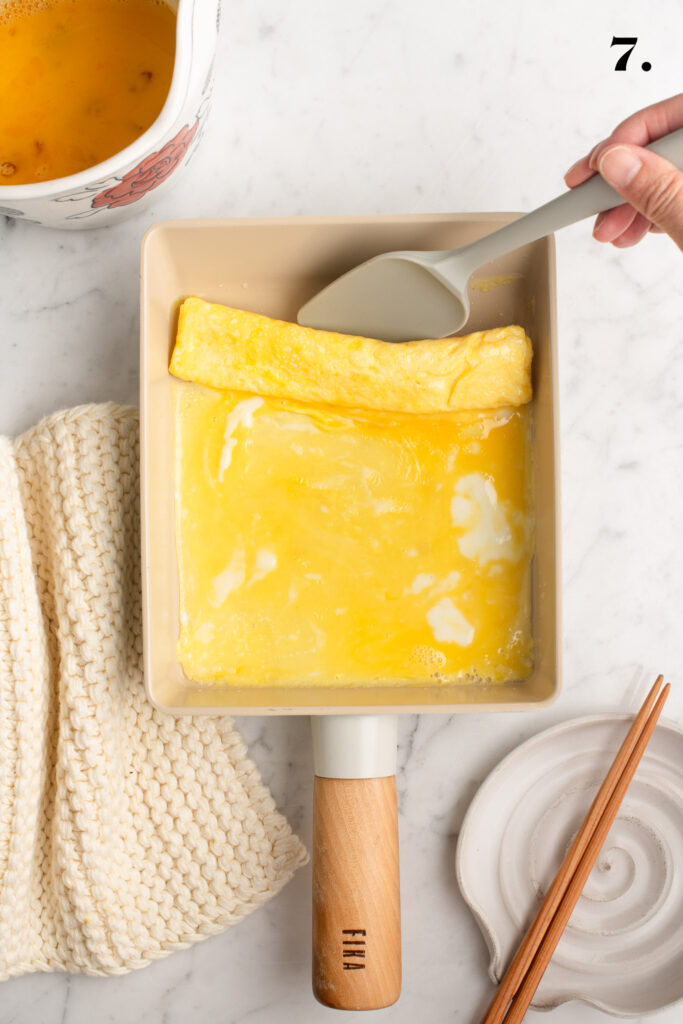
- When the eggs are starting to set but still wet, start rolling the omelette. I like to use either a pair of chopsticks or a small spatula (or both), and start rolling from the top of the pan towards yourself. Alternatively, you may find it easier to rotate the pan and roll the omelette from right to left (or left to right).
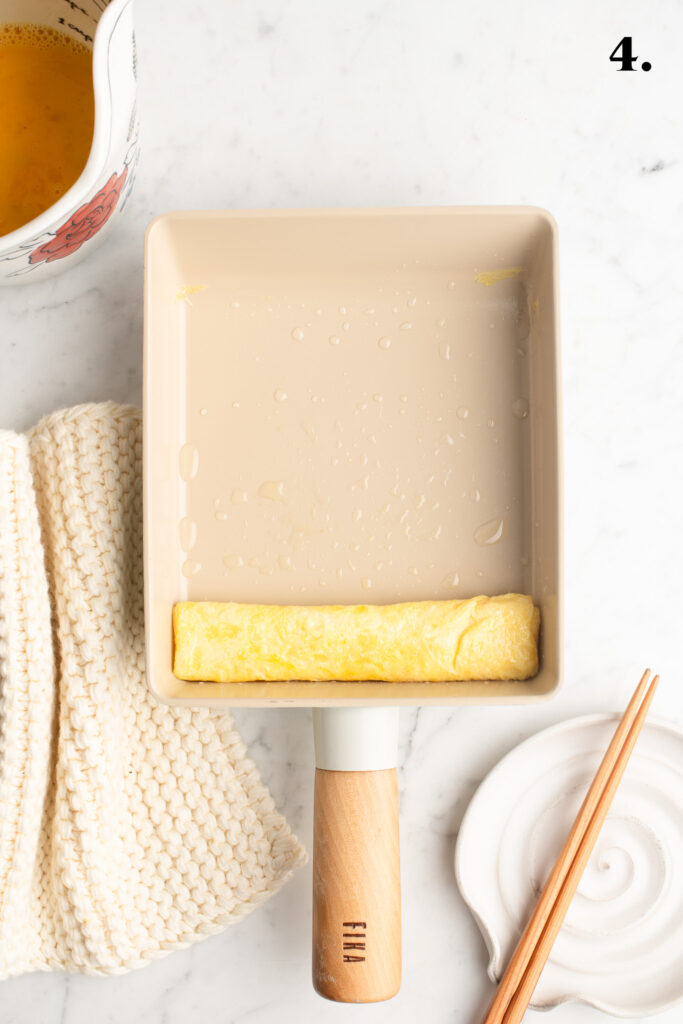
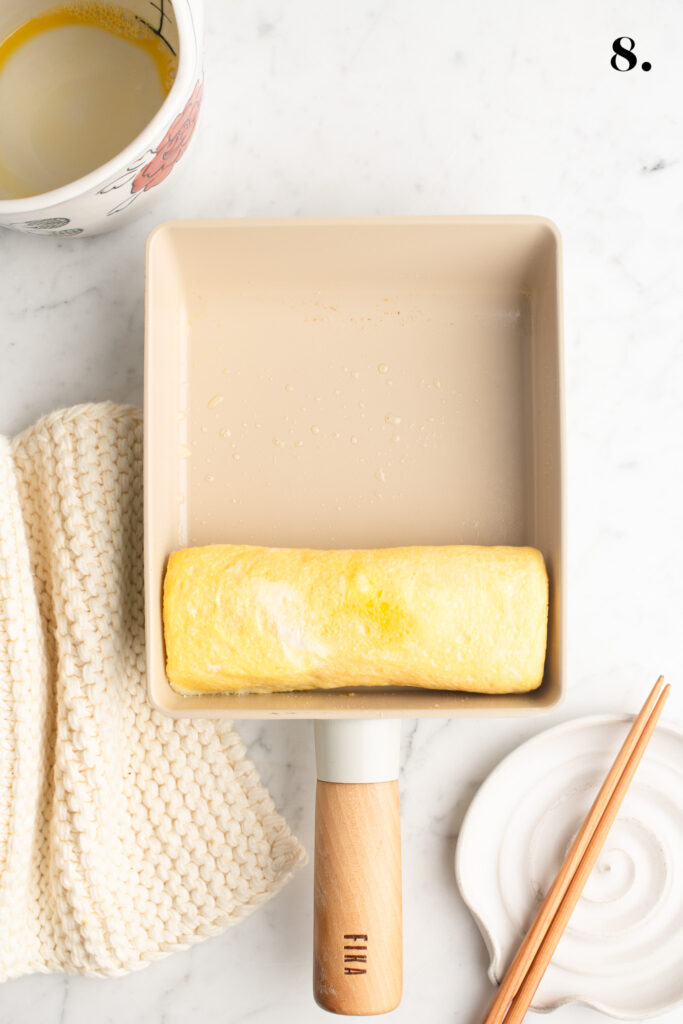
- Once you have rolled the omelette all the way to the bottom of the pan, return it to the top of the pan.
- If you are using a cast iron pan, you may want to brush some oil onto the pan. For a non-stick pan, you may not need any additional oil.
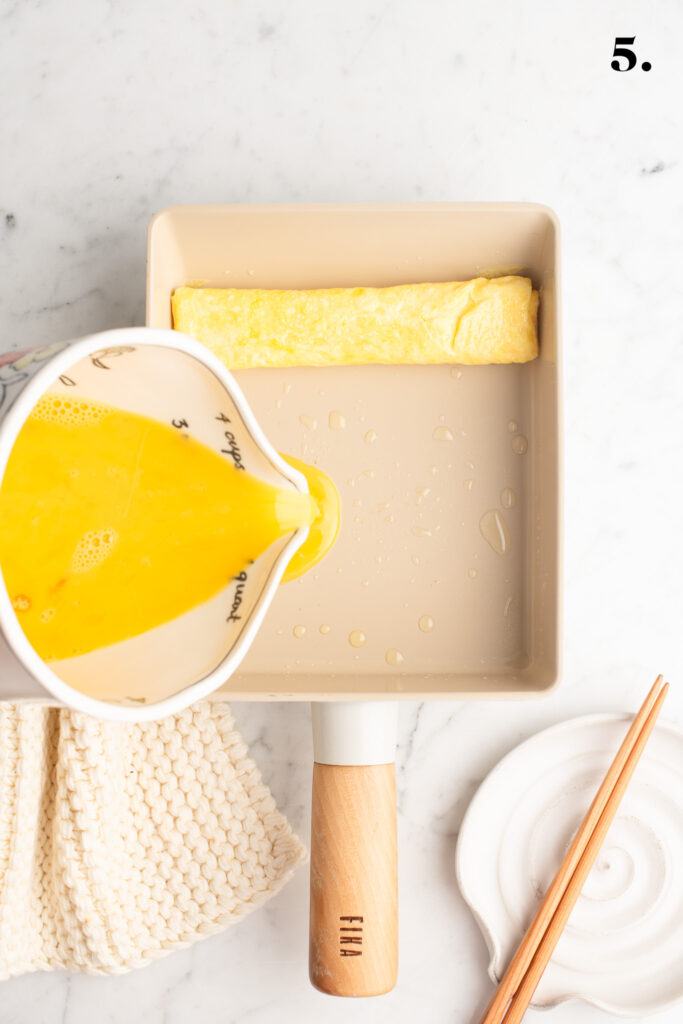
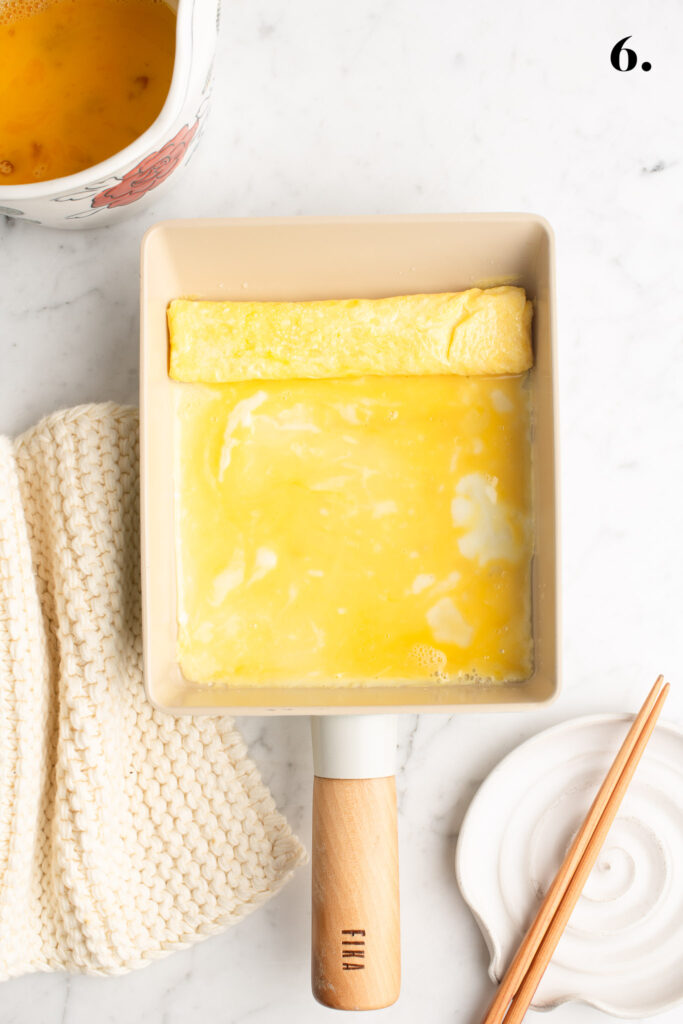
- Pour another thin layer of the egg mixture in the pan.
- Repeat the above steps until you have used all of the egg mixture.
- If you wish, continue cooking the finished omelette in the pan until it has browned to your liking.
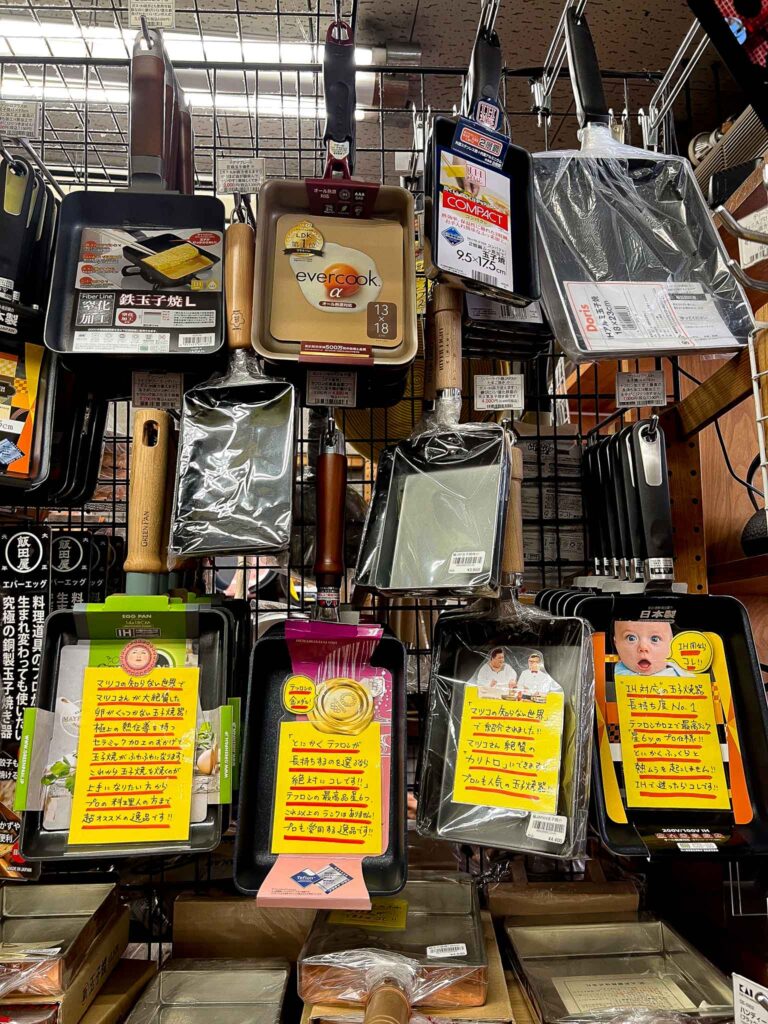
What Type of Pan to Use for Making Japanese Omelette
What is important when making omelette is that the pan is non-stick. In Japan, a rectangular pan, called a makiyakinabe, is used to make Tamagoyaki. They come in various sizes, usually in cast iron or with a non-stick coating.
Cast iron pans tend to be more expensive, and you need to season the pan first to create a non-stick surface. However, cast iron pans last forever and are generally better for cooking.
On the other hand, non-stick pans are more affordable than cast iron, and they are also much lighter to use. However, you need to be careful to not scratch the non-stick coating, otherwise the chemicals in the coating can be harmful to your health.
If you don’t want to add another pan to your kitchen equipment, you can also use a normal round pan, but the ends of your omelette will be slightly tapered.
If you happen to make Japanese Omelette quite frequently (like I do), I think it is worth investing in a special rectangular pan, especially since you can also use it to cook other things, not just omelette.
On a recent trip to Japan, I was determined to bring home a mini rectangular pan as a souvenir (to make omelettes for the kids). I visited the many kitchenware stores on Kappabashi Street in Tokyo and found a small cast iron pan to add to my collection 🙂 If you look carefully, you might be able to spot which one I bought.
When making Japanese Omelette to serve 4 people as part of a shared meal, I use a pan which measures 15 x 18 cm/6 x 7 inches.
If I am making a rolled omelette just for my kids at lunch (or just for myself), I halve the recipe below and use a pan which measures 10 x 15 cm/4 x 6 inches.
Tips for Making Japanese Omelette
- Use a non-stick pan. When making any type of omelette, it is important that your pan is non-stick, whether it is made of cast iron or another non-stick coating.
- Cook on medium heat. The omelette layers need to cook slowly so that the layers are just set when you start rolling, which will help the layers to stick together. This generally means that the omelette layers should be pale yellow and not golden.
- Don’t brown the layers. Although browning the omelette is great for flavour, it means cooking the omelette layers completely, which means the omelette layers will not stick together and, therefore, separate upon slicing. If you like, brown just the final layer once you have finished forming the omelette.
- Experiment with flavours. A traditional Japanese Omelette is slightly sweet in flavour, which works well as part of a Japanese meal. Feel free to season your eggs with just salt and pepper, or add other ingredients like you would for a western-style omelette, such as spinach, ham, finely chopped vegetables … the choice is yours!
Japanese Omelette (Tamagoyaki)
Instructions
- In a large jug or bowl with a spout, beat the eggs together with the seasoning ingredients. You can use a whisk, a fork or a pair of chopsticks to beat the eggs.
- Heat about 1 tablespoon of vegetable oil in the pan over medium heat. I use a non-stick rectangular pan which measures 15 x 18 cm/6 x 7 inches.
- Pour a thin layer of the egg mixture into the pan, and give the pan a swirl until the mixture fills the pan.
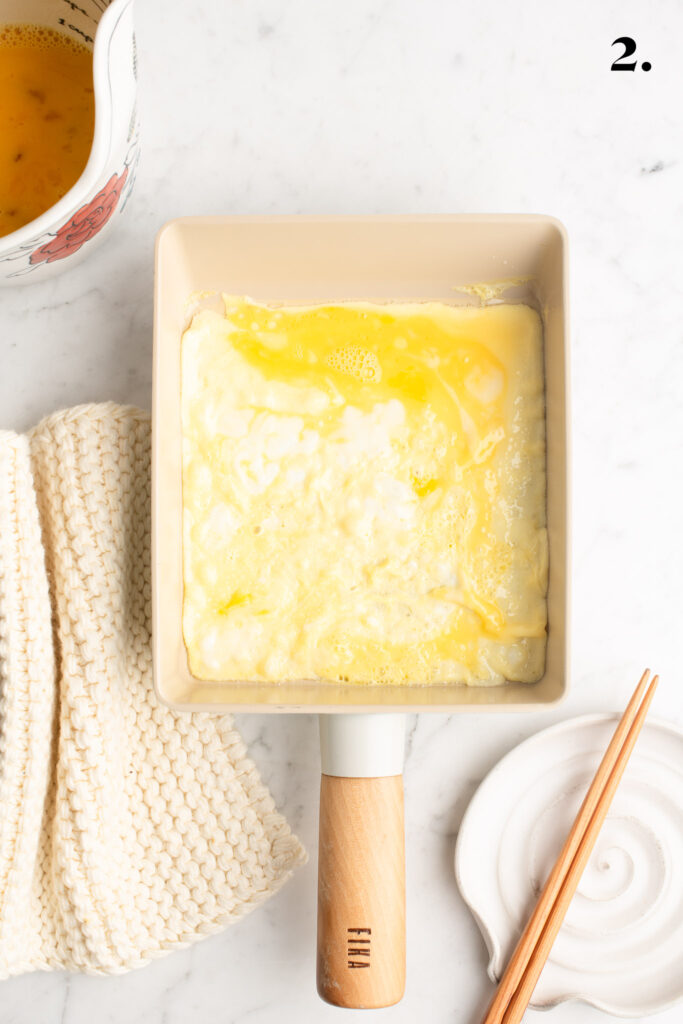
- Cook the first layer until it just starts to set but is still wet. This will ensure each layer will stick together.
- Use a pair of chopsticks or a small spatula – or both – to start rolling up the omelette towards you. Alternatively, you may find it easier to rotate the pan and roll the omelette from right to left (or left to right) – you can experiment and find out which method works best for you.
- Once the omelette is rolled up completely, push it back to the top of the pan.
- If you are using a cast iron pan, you may want to lightly oil the pan with a brush in between layers. If you are using a non-stick pan, you might find that there is no need to add anymore oil.
- Pour another thin layer of egg mixture into the pan, and give the pan a swirl for the mixture to fill the pan.
- Once again, wait until the eggs have just set before starting to roll up the omelette towards you.
- Repeat the above steps until all of the egg mixture has been used.
- Each time, try to make the layers as thin as possible. Also try to keep the heat at medium, or low-medium, so that the omelette does not brown too much on the inside layers (which would prevent the layers from sticking together).
- Once you have finished, gently nudge the omelette against the bottom of the pan to form the rectangular shape. If you wish, you can also leave the finished omelette in the pan for longer and brown it on all sides.
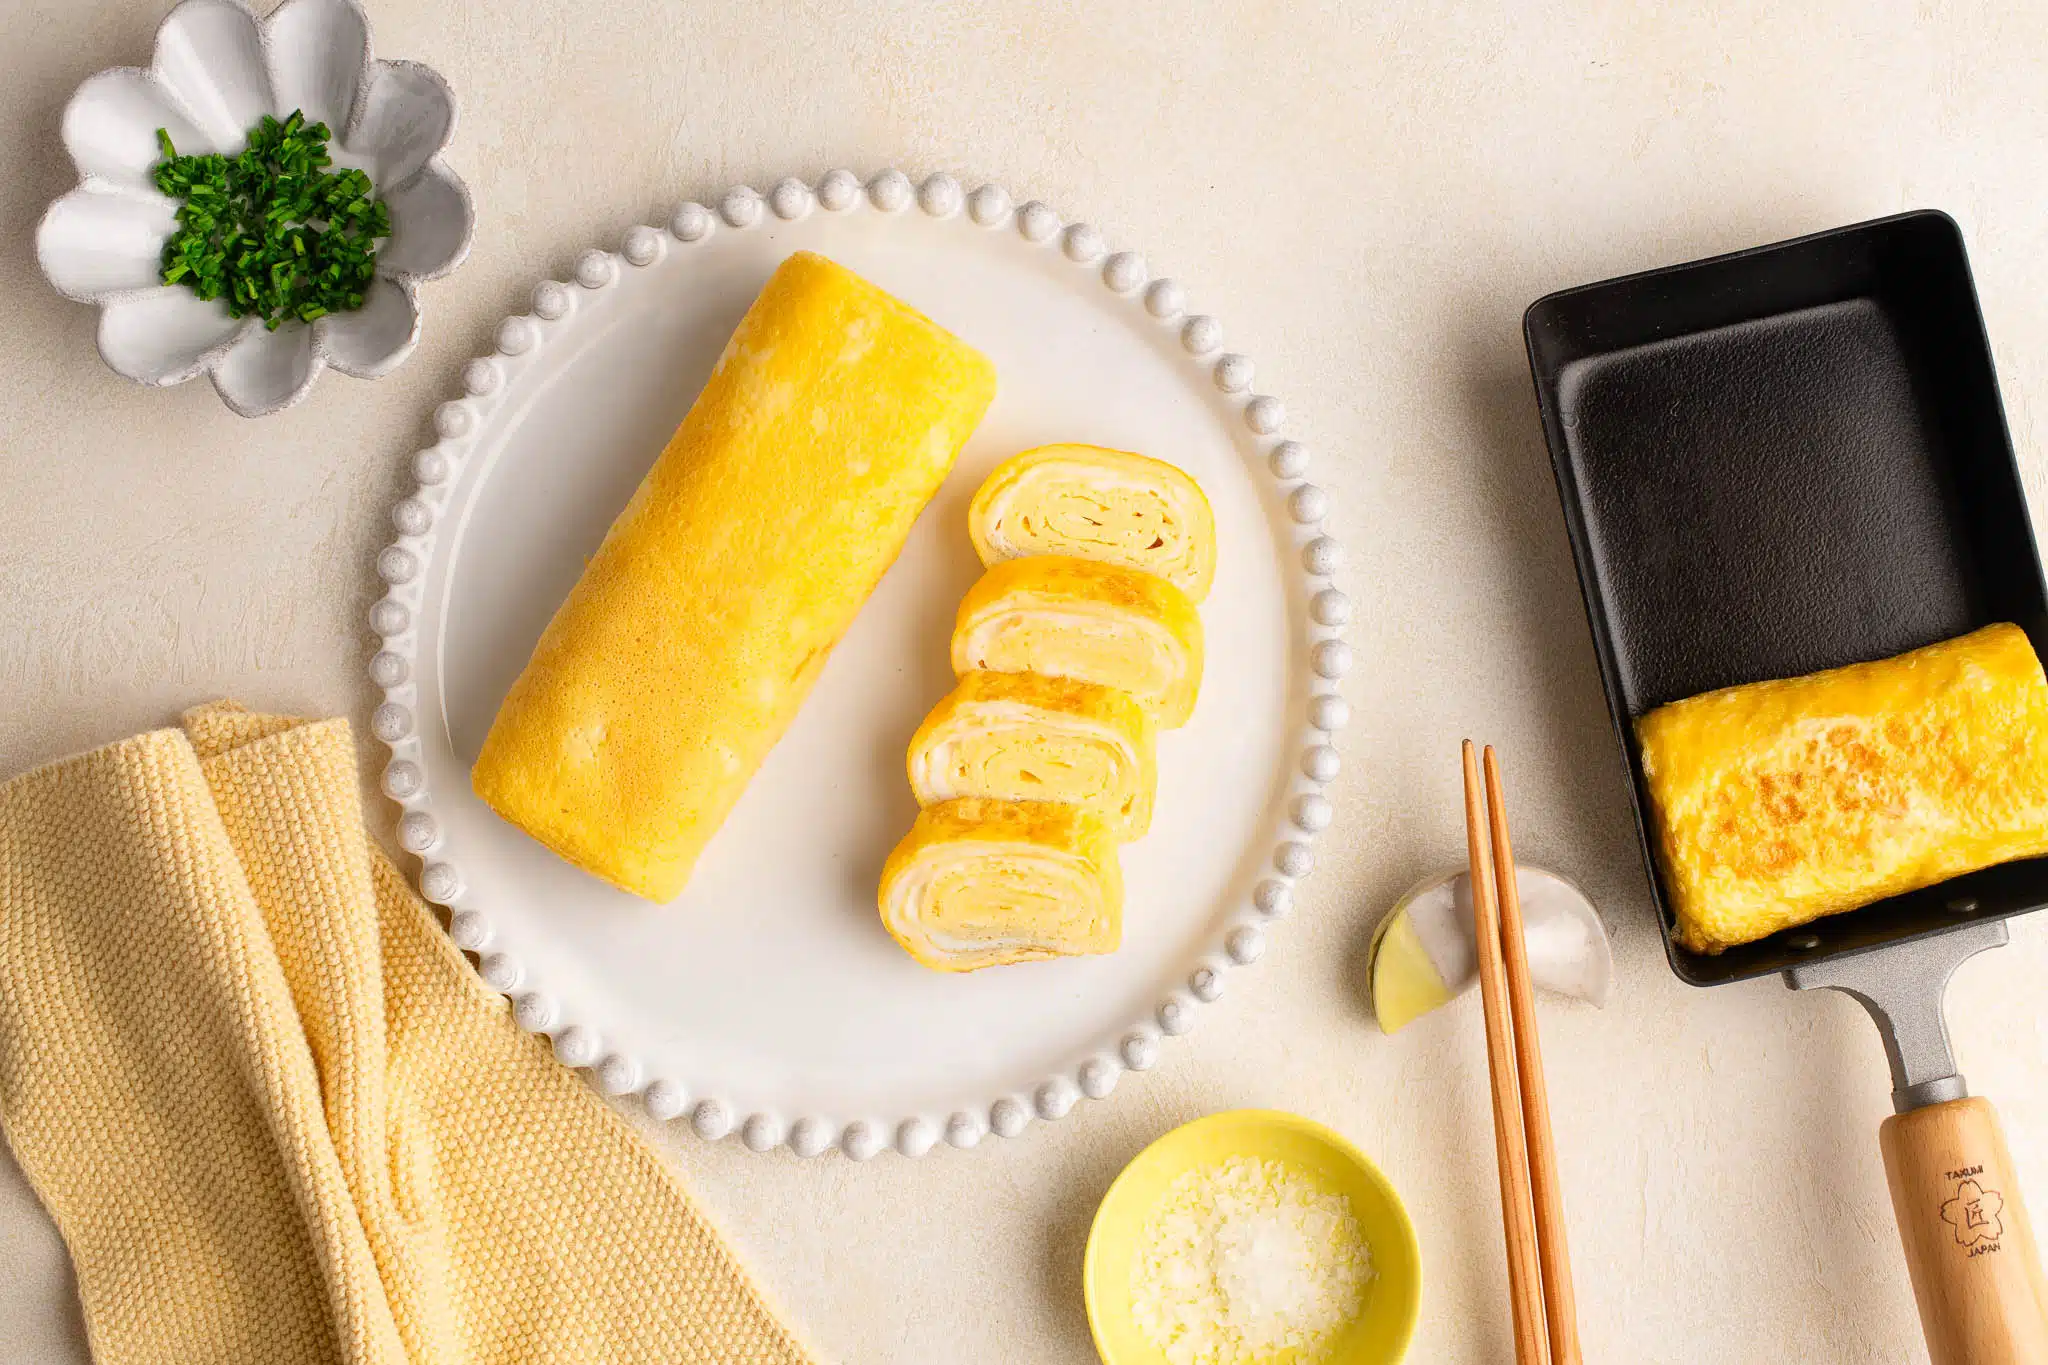
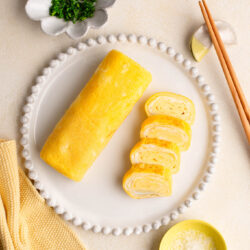
- Carefully remove the omelette to a cutting board.
- Use a sharp knife to cut thick slices.
- Serve warm or cool.
Kitchen Notes
- VARIATIONS
Like for any omelette, you can add other ingredients between the layers, such as:
* Finely chopped ham or bacon
* Very finely chopped capsicums (bell peppers)
* Very finely chopped carrots
* Very finely chopped broccoli
* Baby spinach leaves
* Sliced mushrooms - VIETNAMESE STYLE OMELETTE
I hope no Japanese person will take offence, but I also love to use Vietnamese flavourings in this omelette, especially if I am serving the omelette as part of a Vietnamese meal. For 4 eggs, add 1/2-1 teaspoon of fish sauce, freshly cracked white pepper, and finely chopped spring onions and/or coriander (cilantro). - OVEN & STOVE TEMPERATURES
All recipes on this website have been tested on an induction stove and/or with a conventional oven (i.e. an oven without fan). All recipes on this website use temperatures for a conventional oven, unless otherwise mentioned. Convection ovens (i.e. fan-forced ovens) are typically 20°C/70°F hotter than conventional ovens, but please check your manufacturer’s handbook. - CONVERSIONS
To convert from cups to grams, and vice-versa, please see this handy Conversion Chart for Basic Ingredients.

Thanks for the helpful photos! I’ve used your recipe many times now – we just love Japanese omelettes.
Hi Pete,
Glad you found this recipe helpful😊