Pie Maker
I have jumped on the pie maker bandwagon. I never intended to. Our kitchen is 9 square metres in size with minimal storage, and I already felt that owning two (yes, two!) waffle machines was a bit excessive.
But this unusual period of isolation to avoid a certain virus has resulted in many (many) late night online shopping sprees. Granted, I do most of my shopping online anyway, and almost always late at night after the kids have gone to bed.
But having so far endured 8 weeks of working from home, plus homeschooling two children, plus cooking two meals a day, I felt I could use some help in the kitchen. Hence, the pie maker.
Why This Recipe Works
- Make mouth-watering meat pies in a pie maker with super crispy pastry all over!
- These pies take only 10 minutes to cook in a pie maker.
- No need to blind bake the pastry, which means you can make and serve the pies more quickly.
- Mini pies have a greater pastry to filling ratio, which means more delicious pastry!
Easy as Pie
I love to make my Aussie Meat Pies or Classic Meat Pies when the craving calls.
But anyone who makes pies regularly will know that it can be a time-consuming task. A good meat pie always has a crispy bottom, which is best achieved by blind-baking the pastry first, which means a good 15-30 minutes just for this step.
With a pie maker, you can skip the blind-baking! Omitting this task means that making pies has never been easier! In fact, now that I own a pie maker, I’m not sure I will return to making pies the old-fashioned way again …
Meat Pie Recipe
As an Australian, I like to stick to the classics – beef and mushroom, steak and pepper, chicken and vegetable. I also have a soft spot for a curry pie!
A beef meat pie filling is typically a beef stew of some sort, but with a thicker sauce so that the filling doesn’t run everywhere, particularly since meat pies are usually eaten on-the-go with the hands.
It goes without saying that almost any stew can be turned into a meat pie. In fact, what I often do in winter is turn leftover beef stews into meat pies; my Beef Bourguignon meat pies are very popular in my family!
The pie maker recipe below uses the same beef and Guinness filling as that for my Classic Meat Pies. It’s a classic and comforting beef stew which uses stout to give that familiar bakery flavour.
Pie Maker Recipe
For pie maker recipes, I like to use puff pastry for both the bottom and lid. I find it more practical and economical to use just one type of pastry when making mini pies.
But you could, of course, go the traditional route and use shortcrust pastry for the bottom and puff pastry for the lid.
How to Use a Pie Maker
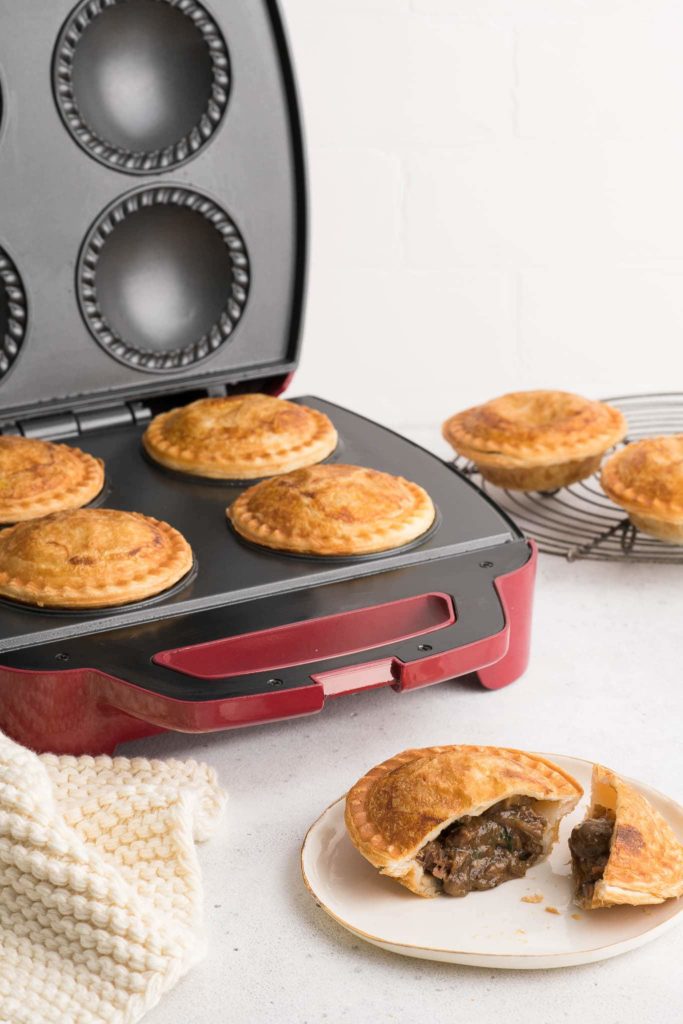
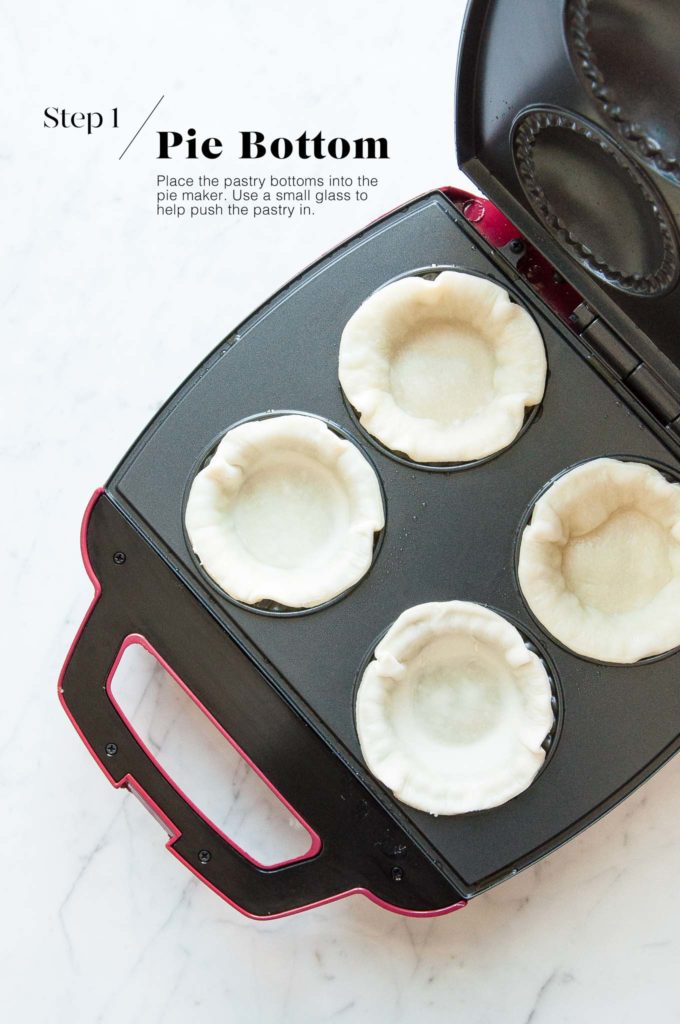
Step 1
Preheat the pie maker.
While the pie maker is heating up, cut out the pastry for the pie bottoms and lids.
I recommend only cutting out as many as you need to fit the pie maker, and to cut any additional pastry whilst you are waiting for the pies to cook. Pastry works best when it is cold from the fridge – it is easier to handle, and there is less shrinkage with cold pastry.
Refer to the manufacturer’s instructions to find out the dimensions you need to cut for the pie bottoms and lids.
For my pie maker, the bottoms are 11 cm and the lids are 9.5 cm.
Place the pie bottoms, one at a time, into the pie slots.
As the pie machine is very hot, use a small glass or similar to gently push the pastry into the slot. Repeat with the remaining pie bottoms.
As the machine is hot, it will start to cook the pastry right away. So try to work quickly so that each pie will cook for the same amount of time.
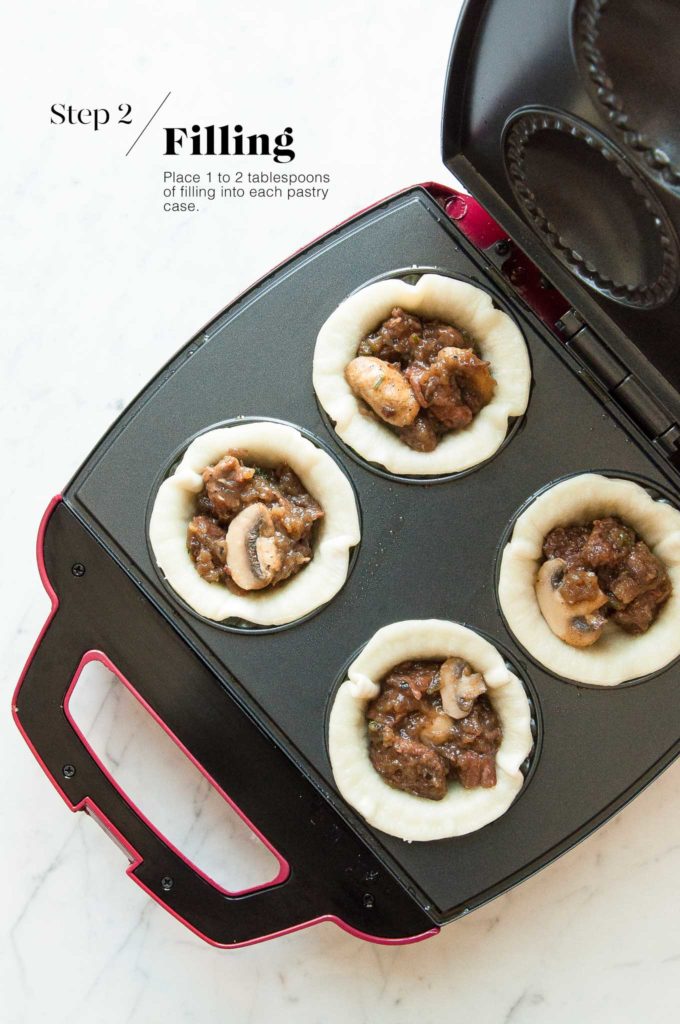
Step 2
Quickly fill each pie bottom with some filling, taking care to not over-fill.
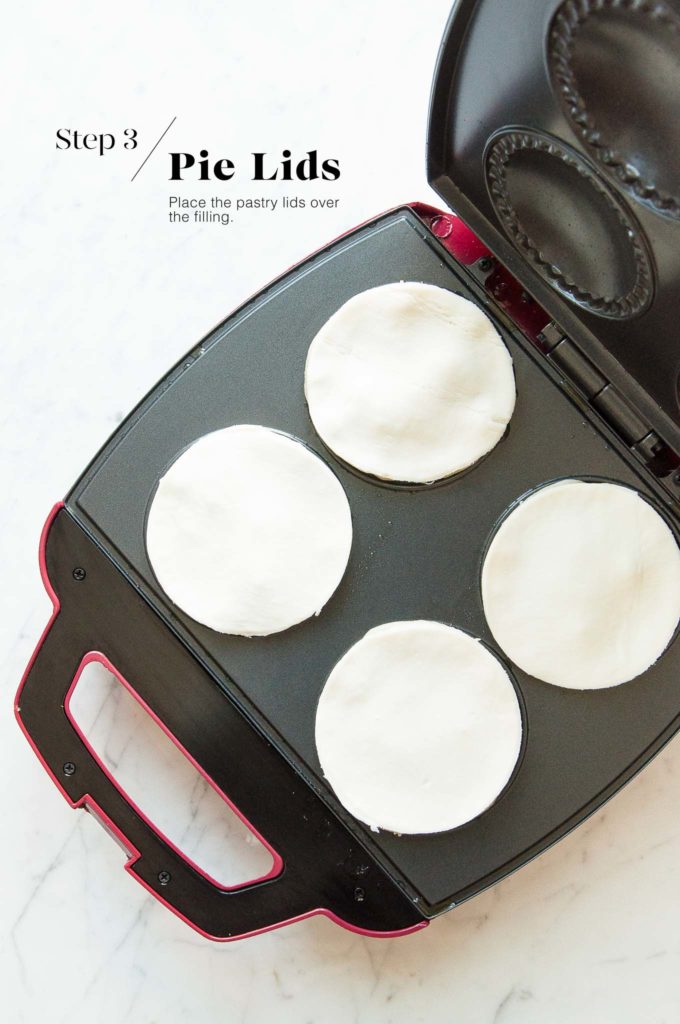
Step 3
Place the pastry lids on top of the filling.
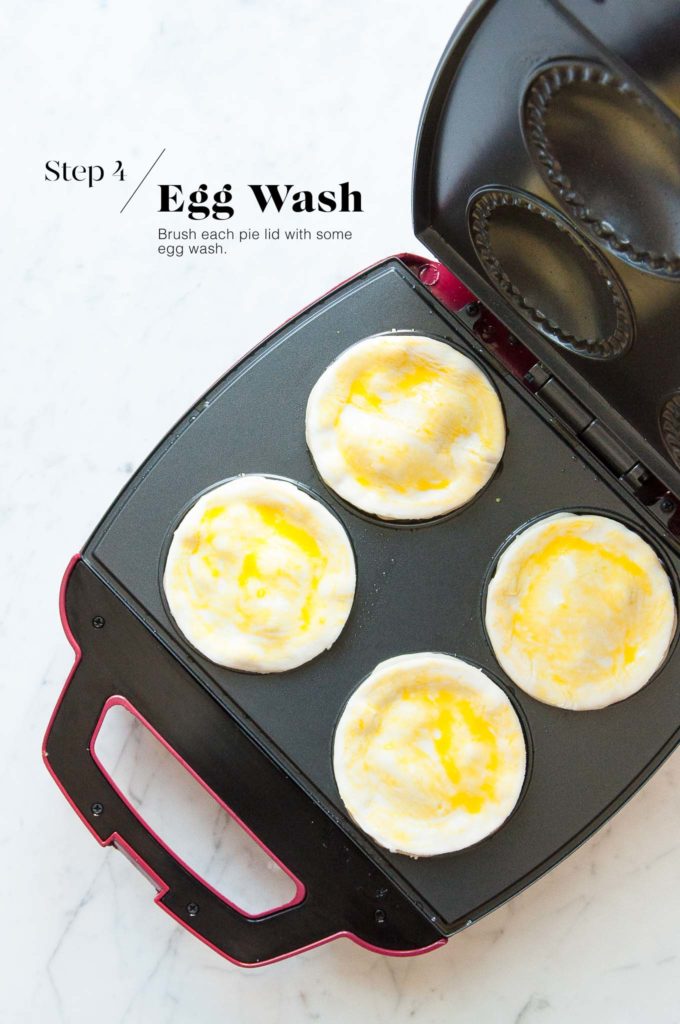
Step 4
Quickly brush each pie with some egg wash.
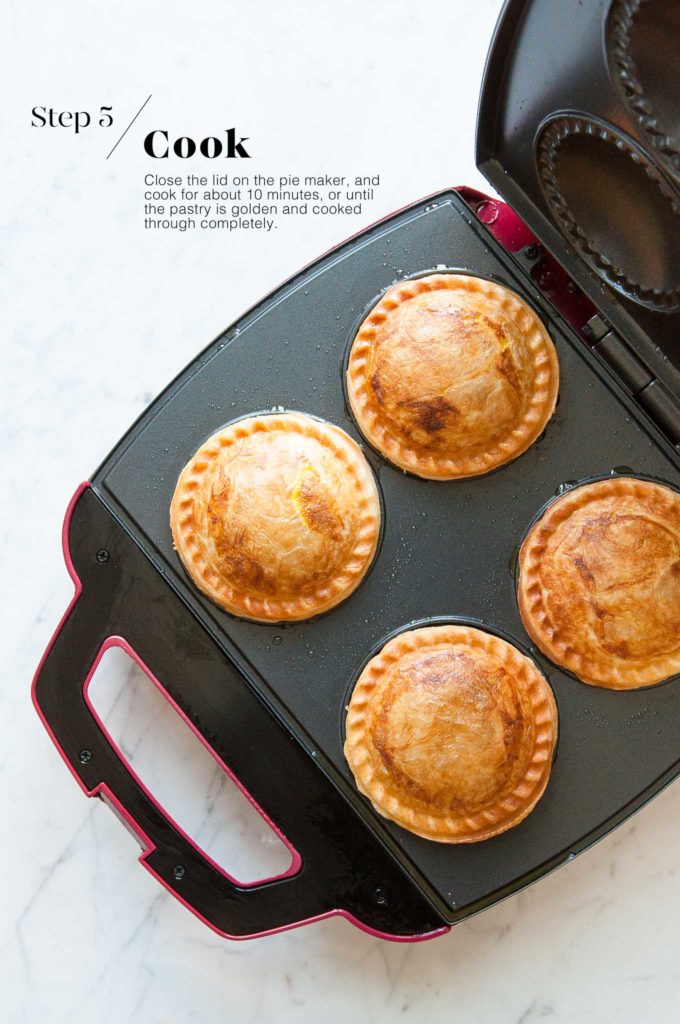
Step 5
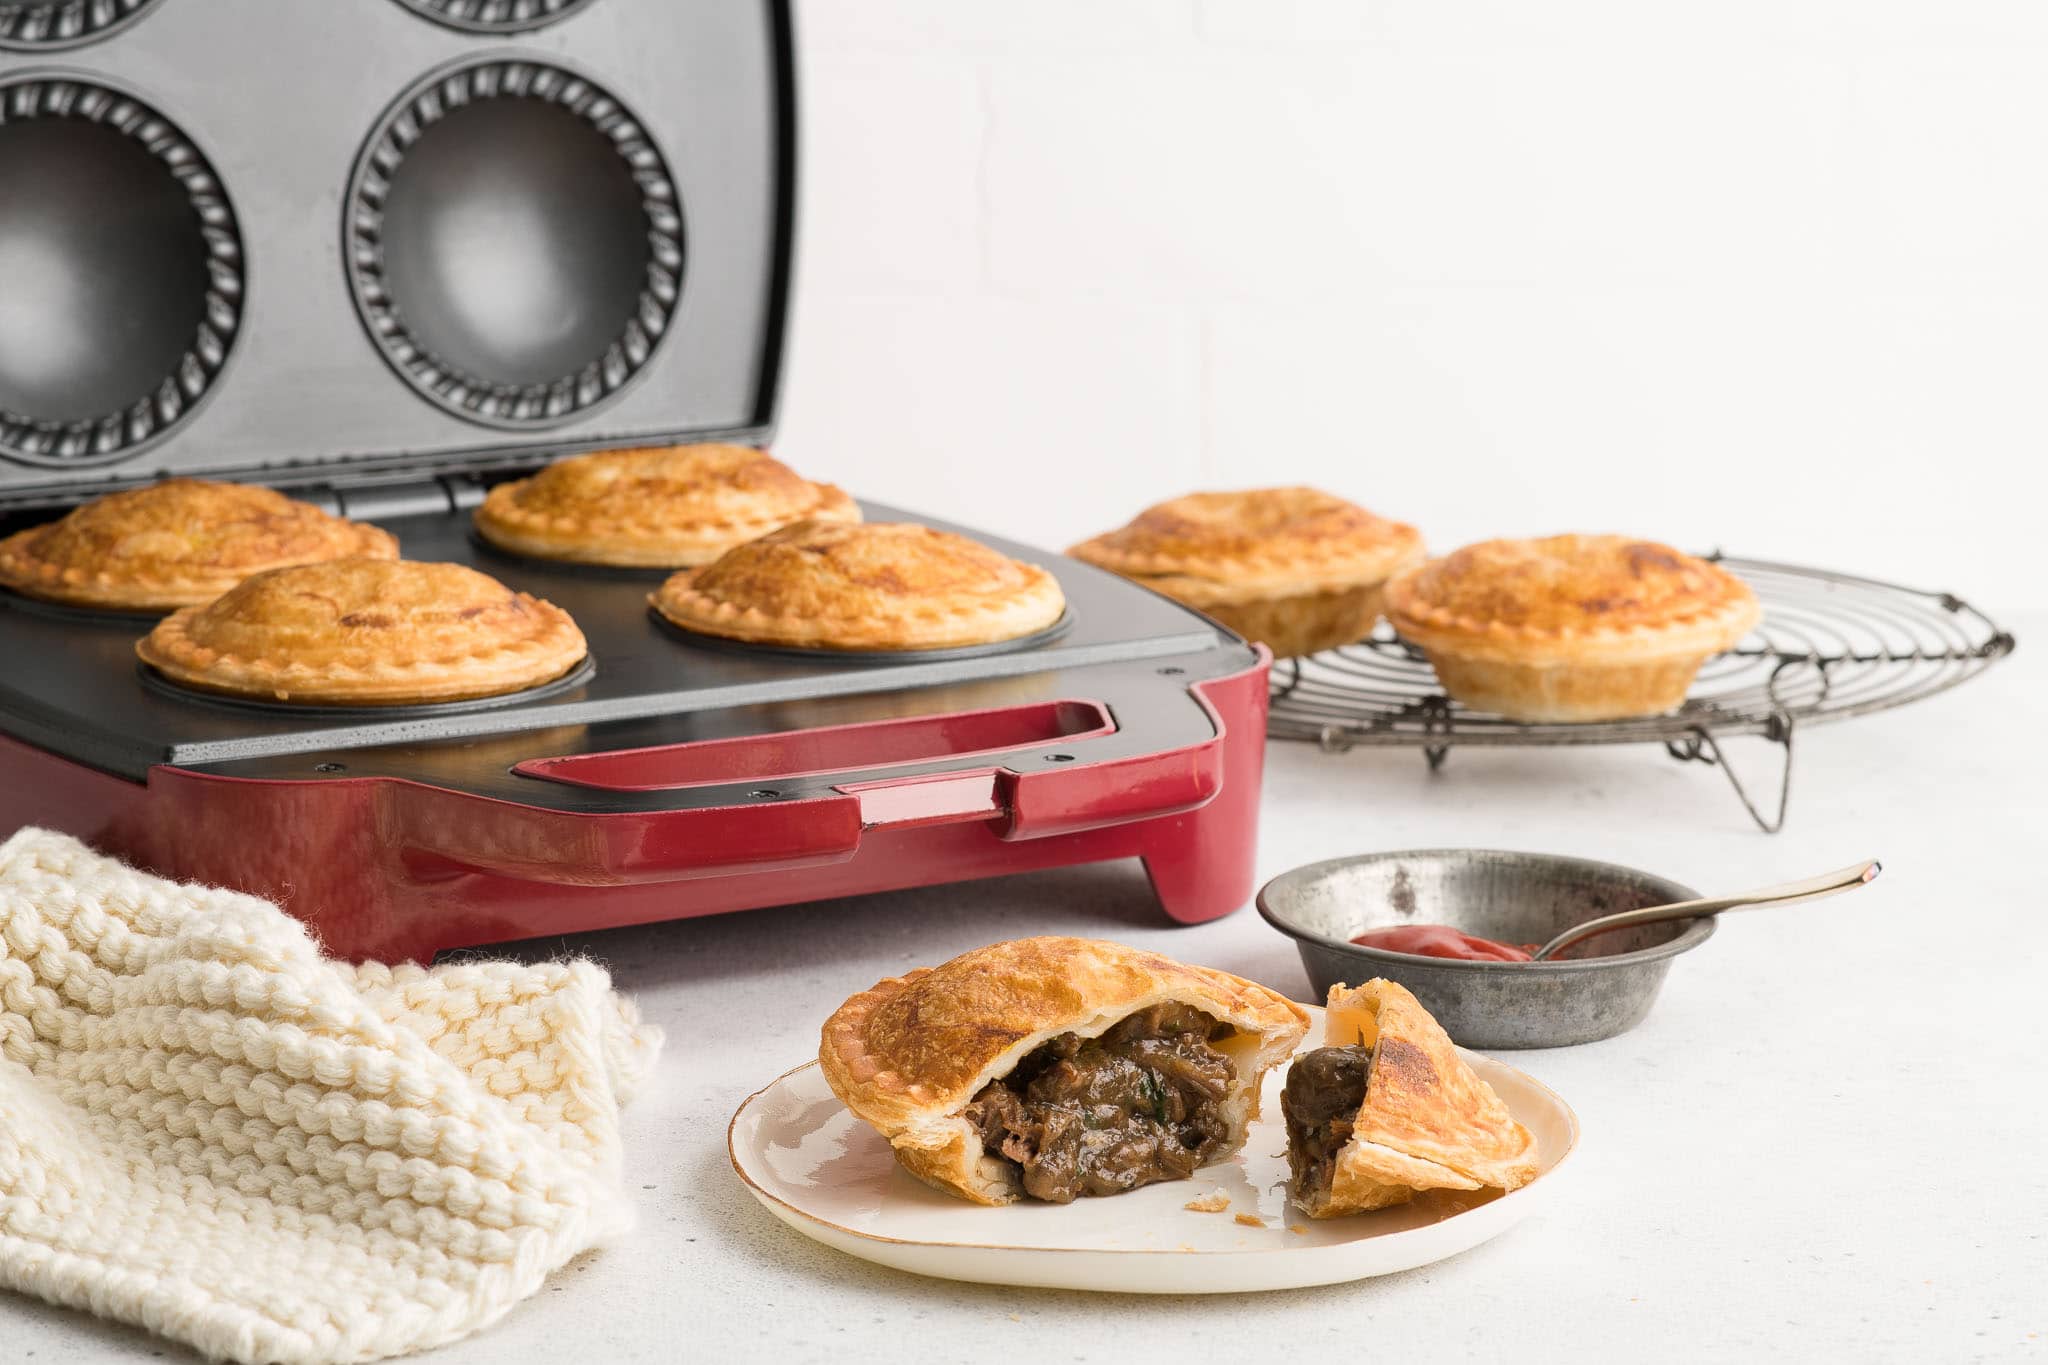
Close the lid of the pie maker, and cook for about 10 minutes, or until the pastry is golden brown and cooked through.
Sometimes the pastry might appear nicely golden, but it hasn’t fully cooked through yet. Much depends on the type of pastry you have used, as well as the thickness of the pastry.
You might need to experiment with a batch or two to know what timing works best for your machine.
Advantages of Using a Pie Maker
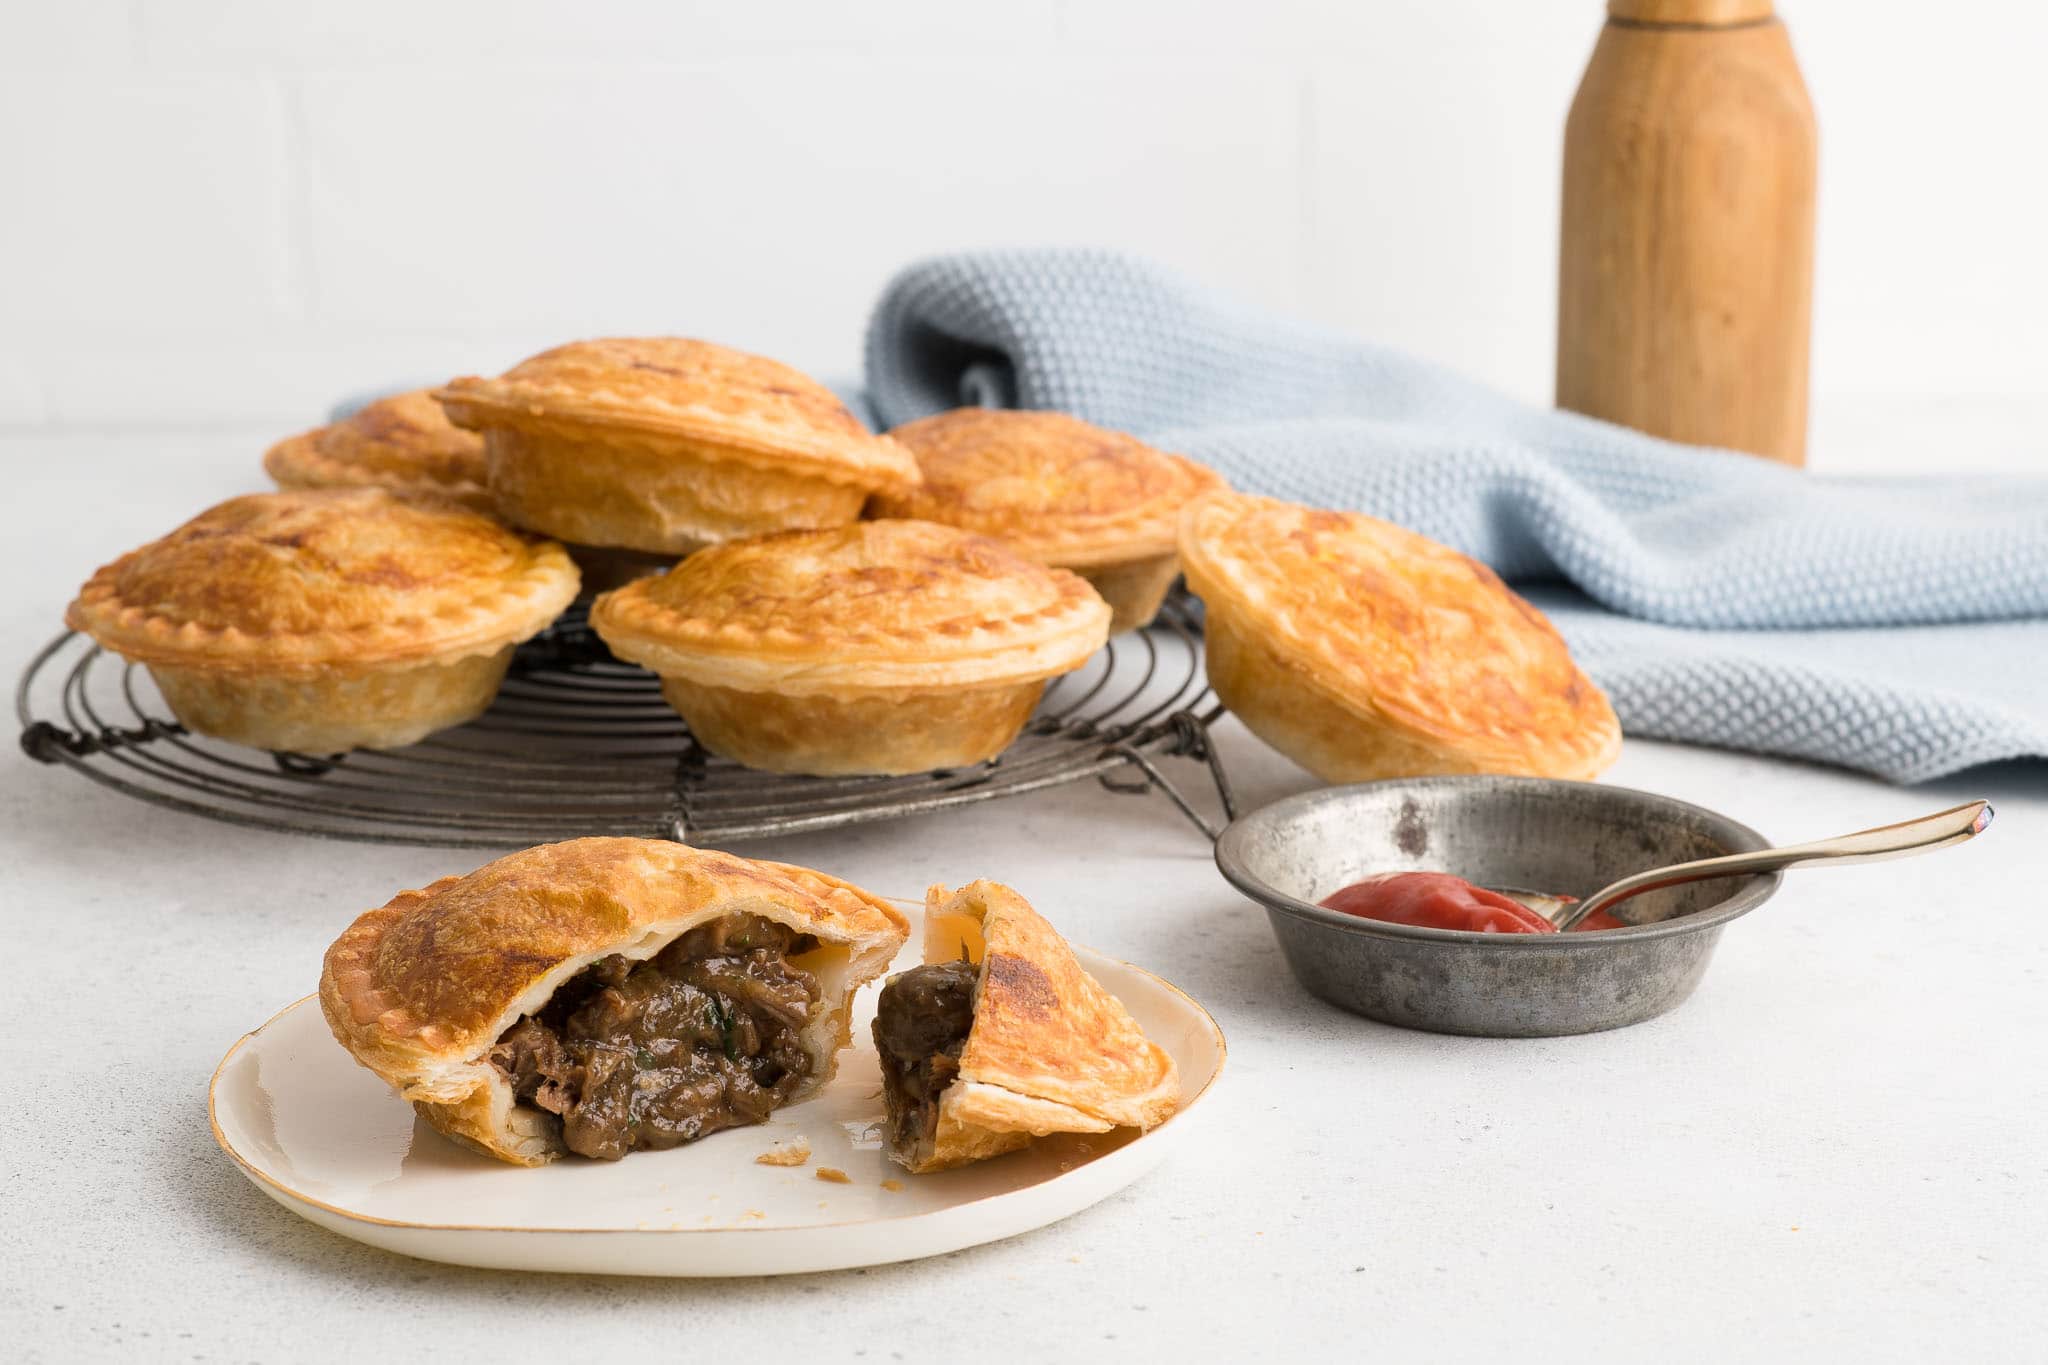
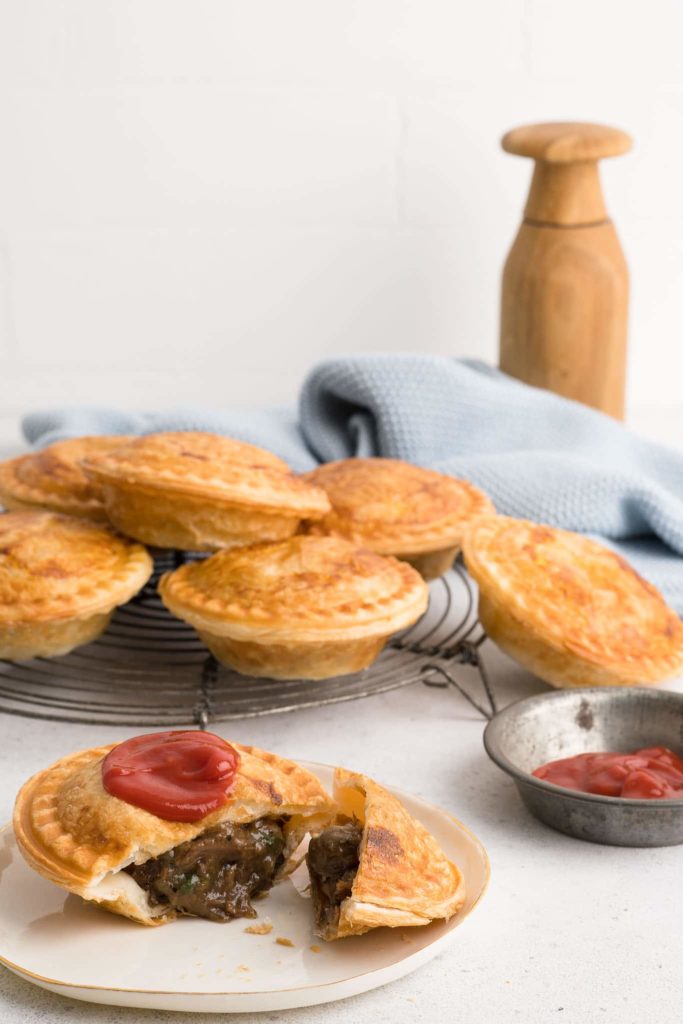
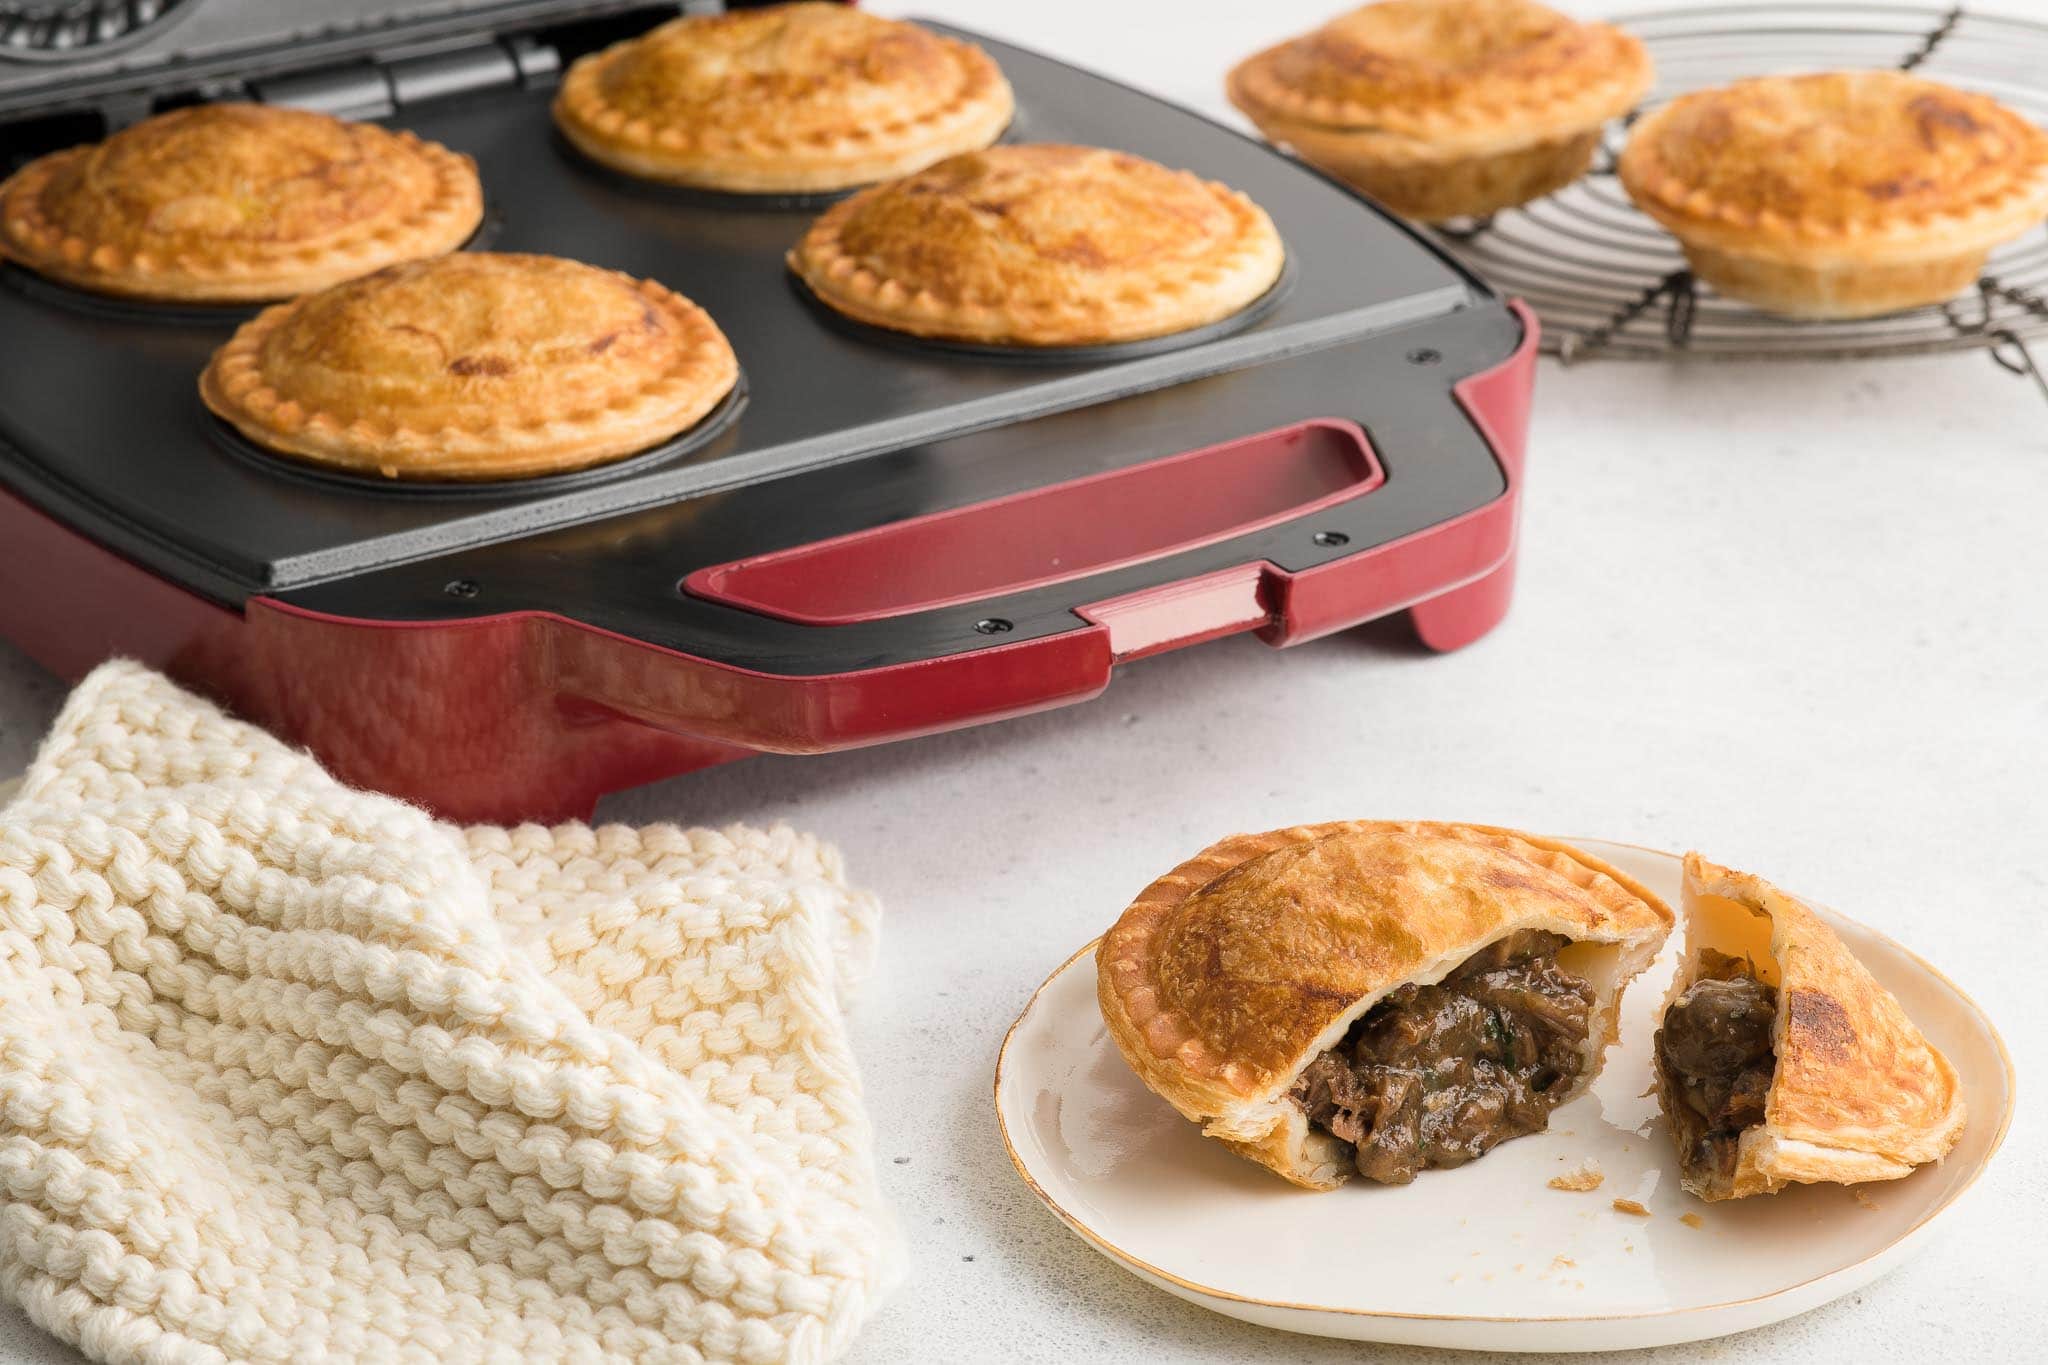
- Super crispy pies: These machines guarantee that your pies will not have a soggy bottom! Every pie I have made has had beautifully crispy pastry all over, more crisp than pies made the traditional way.
- Super quick: Although it might take some time to make the filling, the pies themselves take a mere 10 minutes to cook (albeit 4 at a time).
- Super easy: To make a good meat pie with crispy pastry on the bottom, you usually have to blind bake the pastry, which can be a bit of a pfaff when it comes to mini pies. But a pie maker eliminates the need for blind-baking, which means the pies are much easier to make.
- Practical: If you regularly make sweet and/or savoury pies, you might find that your pie maker will be used more often than not.
Disadvantages of Using a Pie Maker
- Space: These machines are not exactly small – the models which make 6 pies are even bigger.
- Not child-friendly: As the pie makers are very hot, I recommend hands-on adult supervision if you plan to get the kids involved. Much like a hot waffle machine or a jaffle-maker, the kids need to be careful not to burn themselves on the insides of the machine.
Tips For Using a Pie Maker
- Prep everything in advance: Once the pie maker is hot, you should have all of your ingredients and components prepared, all ready to be assembled.
- Work quickly: As the machine will be hot, once you start placing the pastry into the pie maker, it will already start to cook. So work quickly, so that all of your pies can cook for roughly the same amount of time.
- Use a separate timer: Some pie makers have a built-in timer to let you know when the pies are done. However, I recommend checking at about 8 minutes to make sure the pies are not browning too much. Sometimes the pies might be golden brown, but the pastry might not be fully cooked through. So you might have to experiment with a few batches.
- Clean in between batches: In my experience, a lot of fat can seep out of the pastry during cooking, and my model collects quite a bit of hot fat around the edges after each batch. For easier cleaning up, I recommend using paper towels to quickly soak up the fat in between batches and once you have finished cooking. I find it easier to clean the machine this way, rather than letting the fat solidify at the end of cooking. Once the machine has completely cooled down, you should give the machine another proper wipe-down.
Pie Maker Meat Pies
Ingredients
To Make the Beef, Mushroom and Guinness Filling
- 1 kg (2 lb) chuck steak, beef brisket or other stewing steak, cut into 5 cm (2 inch) pieces
- 60 ml (¼ cup) olive oil
- 2 onions, sliced thickly
- 3 garlic cloves, finely chopped
- 250 ml (1 cup) Guinness, stout, pale ale, or beef stock
- 500 ml (2 cups) beef stock
- 5 sprigs thyme
- 2 bay leaves
- sea salt
- black pepper, freshly cracked
- 500 g (½ lb) white mushrooms, sliced thickly
- 2-3 tablespoons cornflour, (US: cornstarch) mixed with some water
- 2-3 tablespoons parsley, finely chopped
To Assemble the Pie Maker Meat Pies
- puff pastry sheets
- 1 egg, lightly beaten
Instructions
To Make the Beef, Mushroom and Guinness Filling
- Heat some oil in a large pan. I like to use a cast-iron pan with a tight-fitting lid.
- Season the beef generously with sea salt and freshly ground pepper.
- Brown the beef in small batches, and use a slotted spoon to remove the browned meat to a large bowl. Try not to over-crowd the pan, otherwise the meat will steam instead of brown; it is the caramelisation on the meat which gives a lot of flavour to the stew.
- Add the onions and garlic, and cook for 1-2 minutes.
- Add the Guinness and let everything bubble away.
- Use a wooden spoon to scrape off any caramelised bits on the pan.
- Add the beef stock, thyme and bay leaves.
- Return the beef to the pan, together with any meat juices which have collected in the bowl.
- Turn the heat down to low, and cook gently on a low simmer for about 2 hours, or until the beef is tender. See Kitchen Notes below for instructions using a pressure cooker.
- Once the beef is tender, add the mushrooms.
- Simmer gently for a few minutes until the mushrooms have softened slightly.
- During this time, try to remove the thyme and bay leaves.
- Turn up the heat to medium-high, and slowly add the cornflour slurry. You may not need all of it – just add enough until you have a fairly thick consistency.
- Taste the sauce for seasoning.
- Stir through the parsley.
- Set the mixture aside to cool completely.
To Assemble the Pie Maker Pies
- Preheat the pie maker.
- Refer to the manufacturer’s instructions for the dimensions of the pie bottoms and lids. Or simply use a ruler to work out the dimensions you need.
- Cut 4 pie bottoms and 4 pie lids from the pastry.
- Once the pie maker is ready to use, place the pie bottoms into the pie maker, one at a time. Use your fingers or a small glass to gently push down the pastry. As the machine will be very hot, you will need to be careful, but also work quickly as the pastry will start cooking the moment it hits the pan.
- Quickly fill each pie bottom with 1 to 2 tablespoons of filling.
- Place the pie lids on top of the filling.
- Brush each pie with some egg wash.
- Close the pie maker.
- Set the timer for 10 minutes, but you may wish to check at about 8 minutes.
- While the pies are cooking, prepare the pie bottoms and lids for the next batch.
- Once the pies are cooked to your liking, serve immediately or keep them warm in an oven at 150°C (300°F).
- Repeat with the remaining pastry and filling.
Kitchen Notes
- COOKING TIMES
Prep Time and Cook Time specified here are just for using the pie maker. - WHICH TYPE OF PASTRY TO USE
Traditionally, meat pies have a bottom made from shortcrust pastry and a lid made from puff pastry. I tend to use only puff pastry when making mini pies to save on waste, but you can use whichever you prefer. - INSTRUCTIONS FOR AIR FRYER
Re-heat frozen pies at 180°C/356°F for 8-10 minutes, or until warmed through. - USING THE PRESSURE COOKER
If you are short on time, I recommend using a pressure cooker to make the filling. Follow Steps 1 to 8 as per the instructions above, but add only 1 cup of beef stock. Cook on high pressure for 30 minutes, and then quickly release the pressure. Remove the lid, add the mushrooms, and proceed with the rest of the recipe. If the stew needs more liquid, add some more beef stock or boiling water. - FREEZER TIPS
If you plan to make the pies in order to freeze them, I recommend cooking the pies until they are just lightly golden, but the pastry holds its shape. This is so that, upon reheating, the pastry does not dry out too much. Leave them to cool completely before freezing them in freezer bags. To reheat the pies, I recommend reheating them in the oven at 200°C/392°F until they are nicely golden and warmed through. - OVEN & STOVE TEMPERATURES
All recipes on this website have been tested on an induction stove and/or with a conventional oven (i.e. an oven without fan). All recipes on this website use temperatures for a conventional oven, unless otherwise mentioned. Convection ovens (i.e. fan-forced ovens) are typically 20°C/70°F hotter than conventional ovens, but please check your manufacturer’s handbook. - CONVERSIONS
To convert from cups to grams, and vice-versa, please see this handy Conversion Chart for Basic Ingredients.


I’d love to try this, but I’m having trouble finding a pie maker. All the ones listed on Amazon seem not to be available. Could your please tell me what kind of pie maker you purchased and where you purchased it? Thanks! During this pandemic I’m cooking more than ever and would really like to try your Aussie meat pie.
Hi Sandy,
Below the recipe, I have included some links to Amazon for pie makers. I have checked the links and they are all in stock. Hope you will enjoy this recipe!
I can’t wait to start
My husband bought me a pie maker for Mother’s Day and I had no idea where to start! I made a chicken and leek filling and used your instructions for using the pie maker. The crispiest and easiest pies I have ever made!! I’m going to try your beef and Guinness filling next. Love your site.
Where can I buy a pie maker machine?
Made these for dinner last night and they were absolutely fantastic. Will definitely be using this recipe again.
Hi Jaclyn,
That’s wonderful to hear that you enjoyed this recipe! I love these pie maker meat pies too 🙂
hi are you able to freeze the pies once made as only me and the wife,so to make up a batch of filling would be a waste unless i freeze the filling,think i answered my own question lol
Hi Ian,
Yes, you can of course freeze the pies once they are made and cooked. I do this for my kids so that I have a stash of ready-made pies to reheat for a quick snack or lunch. Simply reheat them in the oven until they are warmed through and crispy.
Ideally, the pies should be frozen when they are uncooked, as you can bake pies straight from frozen. But as using a pie maker involves making and cooking them at the same time, you don’t really have the option of freezing the pies uncooked.
When reheating the cooked pies, I find the pastry and filling to be a bit on the drier side, but they will still taste good.
If you know in advance that you are going to freeze the pies, I recommend undercooking them somewhat, i.e. cook the pies until the pastry is only just lightly golden, but still holds its shape. That way, when you reheat them, you can also finish cooking them, which will help everything to stay more moist. I hope this helps!
Hi,I am attempting to make steak and onion pies today and I am a bit confused. In your recipe it says to make the filling and leave to cool completely. In my pie booklet it says never reheat pies. Isn’t leaving my pie filling to go cold then adding it to the pie maker the same as reheating it. I’m confused lol,please can you advise me. Thankyou
Hi Marion,
I’m not sure why your pie booklet says to never reheat pies? If the pies have been frozen and defrosted, they should not be re-frozen and reheated. But it is otherwise fine to reheat the filling, as well as reheat the pies (although freshly-made pies always taste better than reheated pies).
Here, I recommend leaving the filling to cool because, if you add hot filling to cold pastry, it will melt the pastry and prevent you from getting a lovely crispy crust. I hope this helps!
Great instructions for using the pie maker. I made your Beef Bourguignon and used the leftovers in these meat pies. Wonderful idea!
Beautiful recipe! Had no idea how to use the pie maker but your photos and instructions were great.
Assemble pastry in cold machine, easier and no chance of burns. Add 4 mins to cooking time. Bingo.