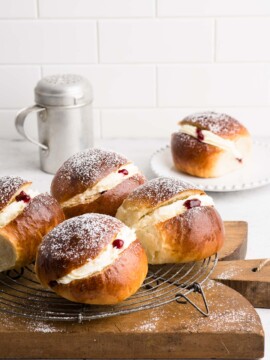
Lamingtons
Lamingtons have an iconic status in Australia and, although they are traditionally made on Australia Day, they are also enjoyed throughout the year.
Lamingtons are quite popular at bake sales, and anyone growing up in Australia will know of the lamington drives, a fundraising event (usually in schools) where lamingtons would be sold by the half dozen to raise money for charity.

What is a Lamington?
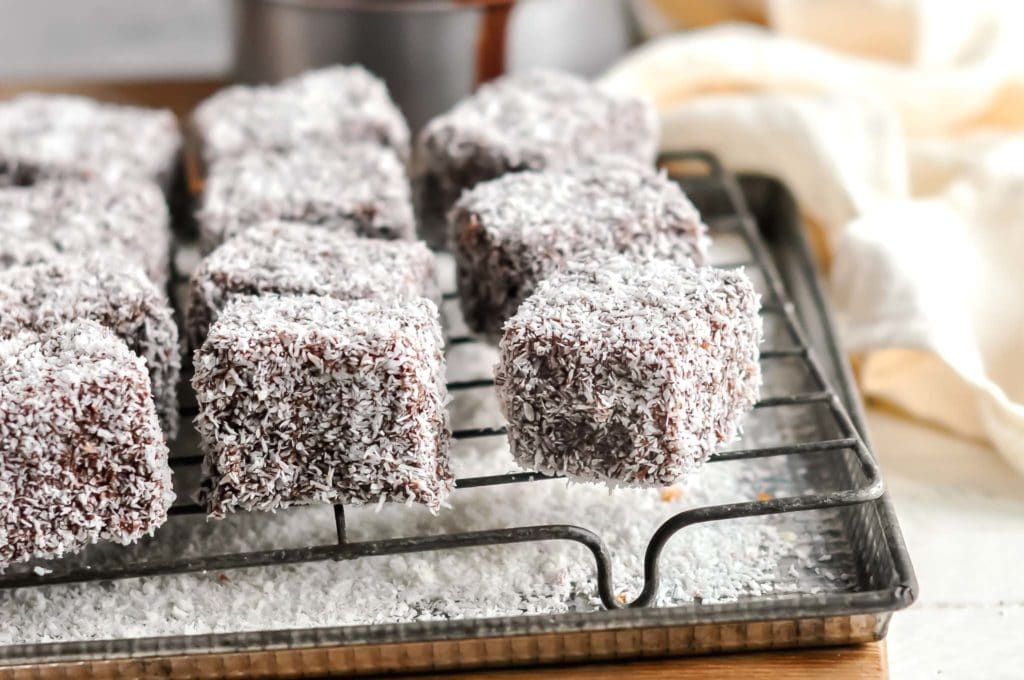
A lamington is a small piece of vanilla sponge cake, coated in a chocolate sauce and then rolled in dessicated coconut.
Lamingtons are often found in local bakeries and supermarkets in Australia, though local coffee shops are increasingly serving these little cakes as a posh, yet nostalgic, bite.
Some bakeries sell lamingtons which have a layer of jam in the middle, some with jam and cream. More innovative bakeries sell different flavoured lamingtons, but my favourite will always be the classic “plain” lamington 🙂
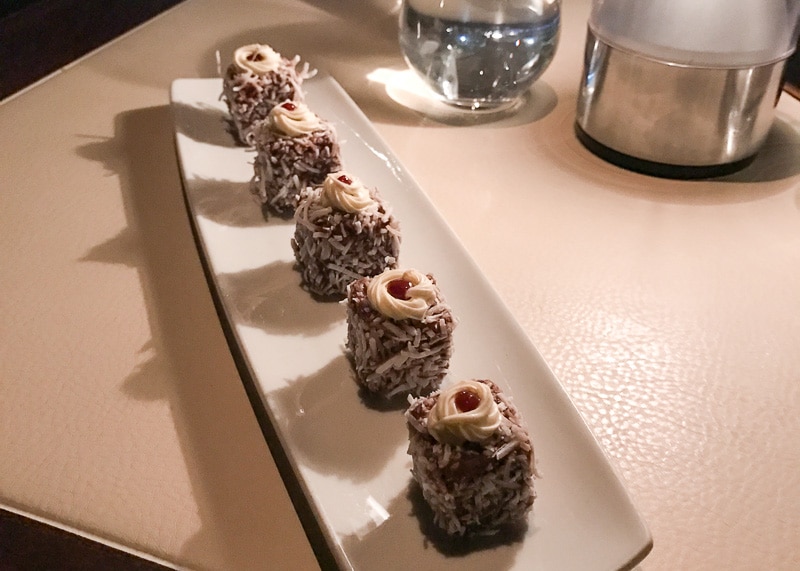
When we were in Australia one year, we treated ourselves to dinner one evening at Rockpool Bar & Grill in Melbourne, and I was delighted to find that they had lamingtons on the dessert menu, served as petit fours with a white chocolate chantilly and strawberry jam. What a great way to serve lamingtons!
Lamington Recipe
Over the years, I have played around with several lamington recipes. Some have produced really eggy sponges, others have been too heavy for my liking.
So I have eventually arrived at my own concoction, which has been a hit with my family and friends for many years now.
This lamington recipe produces a light, yet firm, vanilla sponge which goes perfectly with the rich chocolate icing.
Most traditional recipes use a chocolate sauce which is used to lightly coat the sponge and provide a wet surface for the coconut to adhere to. My recipe uses real chocolate in the icing which later sets to give the lamingtons a thicker coating than normal, which is not only totally delicious, but it also helps the lamingtons to keep better for longer.
Why This Recipe Works
- The sponge is light with the perfect fluffy texture, but firm enough to hold up the chocolate coating.
- The sponge can be made using a food processor – just add all of the ingredients and blitz to combine! Perfect if you need to make a double or triple batch, e.g. for a bake sale.
- The chocolate coating is made with a thin chocolate icing, rather than a sauce, to give the lamingtons a bit of structure, but also helps to keep the lamingtons moist for longer.

How to Make Lamingtons
To make lamingtons, you need to start with the sponge cake.
The sponge cake needs to be both light and fluffy, but it also needs a bit of structure so that it can hold its shape once it is rolled in the chocolate icing and coconut.
If the cake is too soft and crumbly, it will be difficult to work with and it may also absorb too much icing.
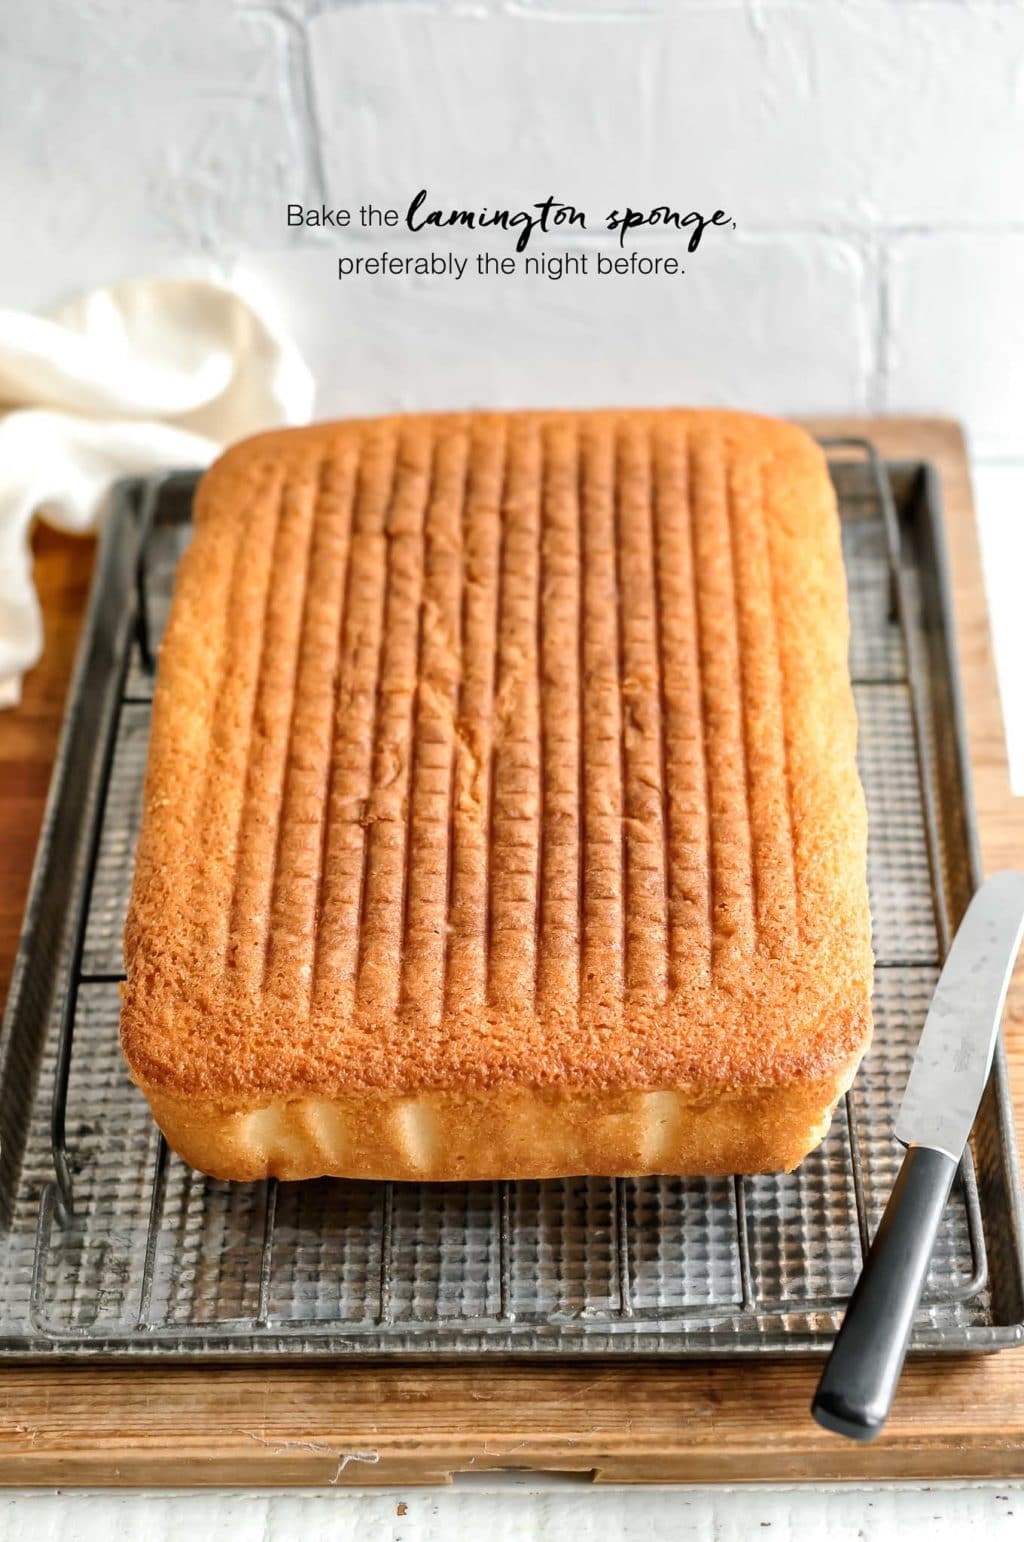
I like to make the sponge cake the night before, so that the cake has had a chance to cool down completely and also dry out slightly, making it easier to work with the next day.
But if you don’t have time to make the cake a day ahead, simply cut the cake into squares once it has cooled, and then freeze the cakes for about 1 hour before proceeding with the rest of the recipe.

How to Serve Lamingtons
I like my lamingtons plain, but it is also common to find them with a layer of jam or cream (or both) in the centre. These days, you can even find some cafés and bakeries in Australia selling lamingtons with a layer of chocolate in the centre!
And whilst lamingtons are traditionally served in small sizes, it is not uncommon to see them in a large cake form. I recall having many birthday parties as a child where my mother had made a lamington cake to celebrate.
How Long Can You Keep Lamingtons?
I find that lamingtons made using this recipe keep very well because the icing helps to keep the sponge inside moist. Because there is real chocolate in the icing, the coating of the lamington will harden a little, a bit like icing on a cake, but it is still really delicious.
I keep them on a cake stand covered with a glass lid for up to one week, though you would be lucky to still have any leftover after a few days!
Tips for Making Lamingtons
- Room temperature ingredients: To prevent the sponge from curdling (which will result in a dense cake), make sure all of your ingredients are at room temperature before starting.
- Make ahead: The sponge needs to be somewhat firm so that it can stand up to the dipping and rolling, so I recommend making the sponge the night before, and letting it dry out on a wire rack overnight.
- Cool the cake upside down: To ensure a flat surface on the top of the cake, cool the cake upside down on the wire rack.
- Use a food processor: I frequently make this cake recipe using a food processor, and it produces the perfect soft and tender cake texture every time. A food processor is also handy if you need to double and triple the recipe (e.g. for a bake sale), as it will be much faster to make the cake batter than using the more traditional method.
Lamingtons
Ingredients
For the sponge cake
- 200 g (2 sticks) unsalted butter, softened
- 230 g (1 cup plus 1 tablespoon) caster sugar, (superfine sugar)
- 185 g (1 ¼ cup) plain flour, (all-purpose flour)
- 10 g (2 teaspoons) baking powder
- 40 g (⅓ cup) cornflour, (US: cornstarch)
- 3 eggs
- 125 ml (½ cup) milk
- 2 teaspoons vanilla extract
For the chocolate icing
- 200 g (7 oz) dark chocolate, 60-70% cocoa
- 15 g (1 tablespoon) unsalted butter
- 500 g (3 ⅔ cup) icing sugar, (powdered sugar), sifted
- 125 ml (½ cup) milk, plus more
- 325 g (12 oz) dessicated coconut, (shredded coconut)
Instructions
For the sponge cake
Ideally, make the cake the night before or see my Kitchen Notes below if you want to make everything on the same day
- Make sure that the butter, eggs and milk are at room temperature. If they are not at room temperature, this can cause the batter to curdle, which will result in a dense cake.
- Preheat the oven to 180°C (350°F) (without fan).
- Butter a baking pan measuring approximately 17 x 27 x 4 cm/7 x 11 x 1.5 inch, and line the bottom with greaseproof paper.
If using a food processor:
- Place all of the ingredients for the cake into a large food processor and blitz until everything is thoroughly combined.
- If the batter looks a bit curdled (which can happen if not all of the ingredients are at room temperature), blitz for a few more seconds.
If using a stand mixer or by hand:
- Cream the butter and sugar until it is pale and fluffy. This step takes about 2-3 minutes on low speed.
- Add the flour, baking powder and cornflour.
- Mix until everything is just combined.
- In a jug, whisk together the milk, eggs and vanilla.
- Slowly add the liquid ingredients to the batter.
- Mix until everything is well combined, but take care not to over-mix.
To bake the cake
- The batter should be pale yellow and quite thick.
- Pour the mixture into the prepared baking pan and bake for about 30-35 minutes, or until a skewer inserted into the centre of the cake comes out clean. Check on the cake after about 20 minutes, as you may need to cover the cake with some foil if it is browning too quickly.
- Leave the cake in the pan for about 5 minutes before turning it out onto a wire rack to cool, with the bottom of the cake facing up. This will help to ensure that the top of the cake flattens while it cools. Remove the baking paper.
To make the chocolate icing
- Melt the butter and chocolate over low heat in a bain-marie (or a large bowl over a pan of simmering water).
- Add the icing sugar (powdered sugar) and whisk in the milk until you have a thick, but slightly runny, mixture. The icing needs to be thick enough to coat the cakes, but runny enough to only leave a light coating.
- Leave the bain-marie on the stove over very low heat.
To assemble the lamingtons
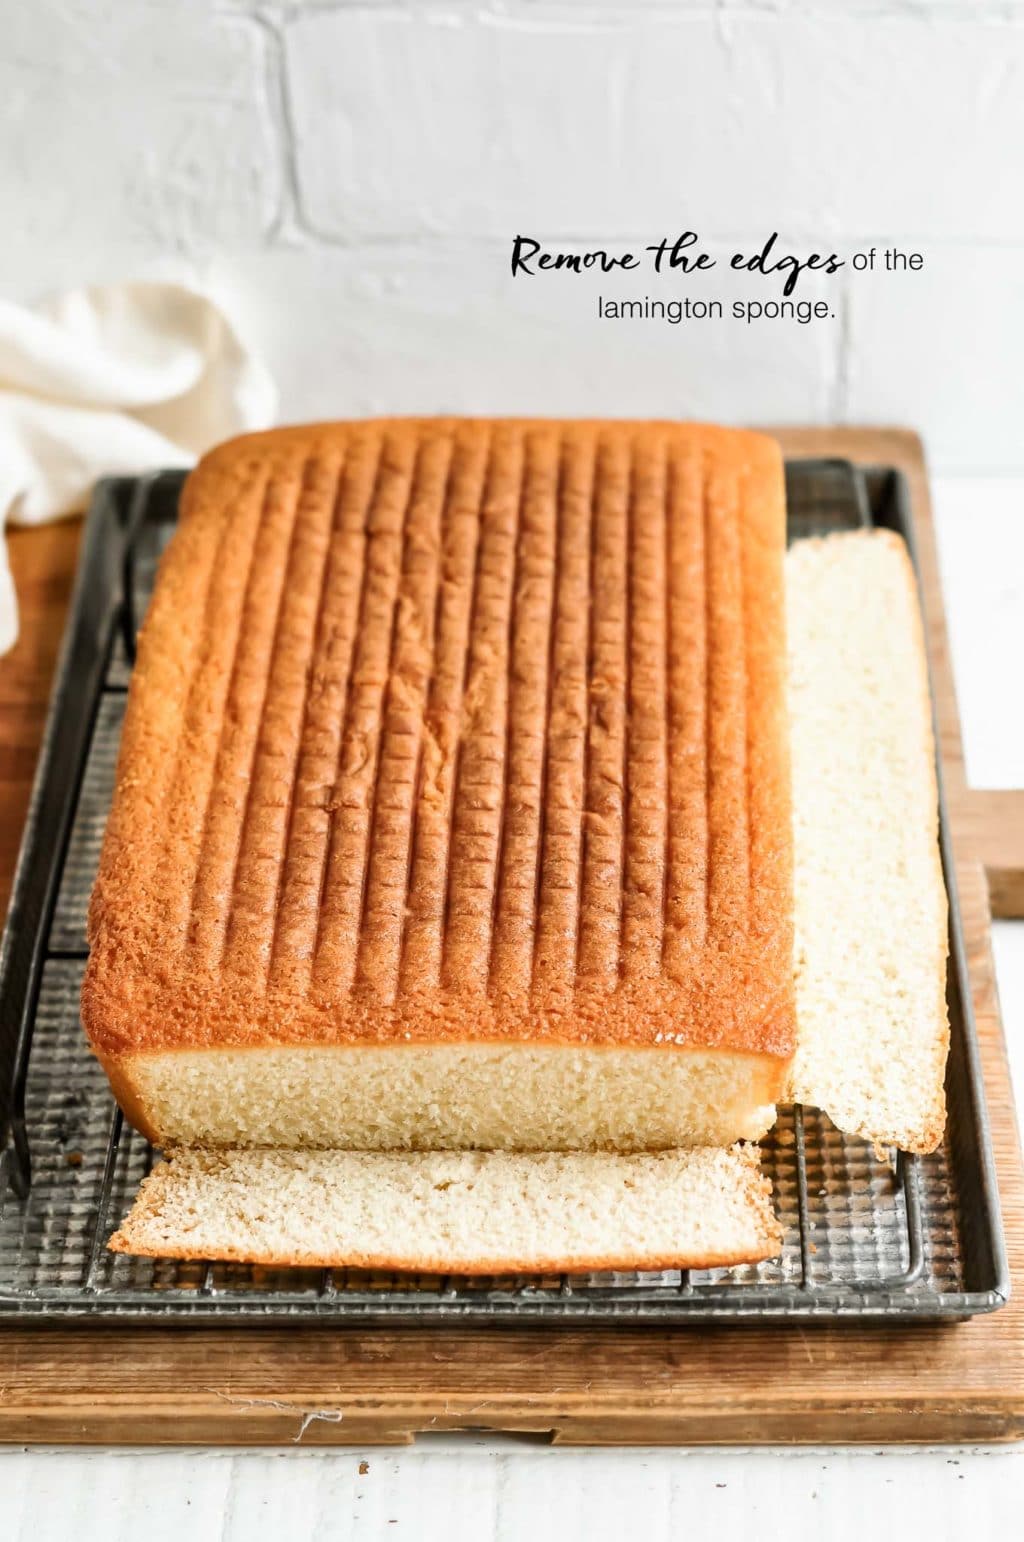
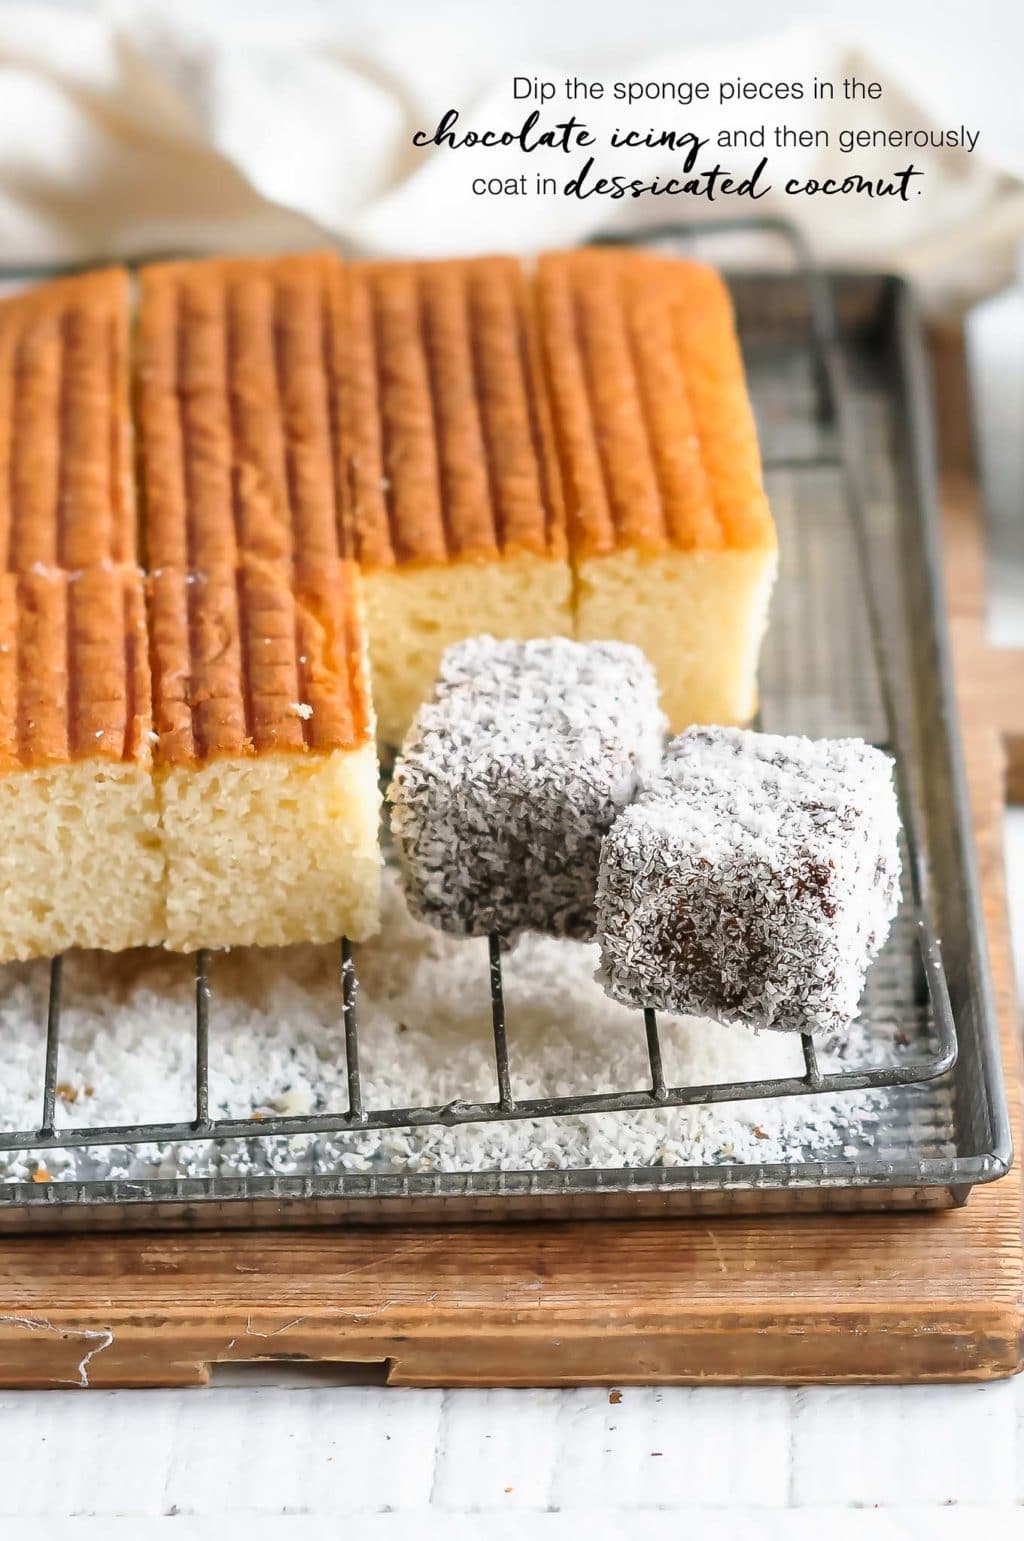
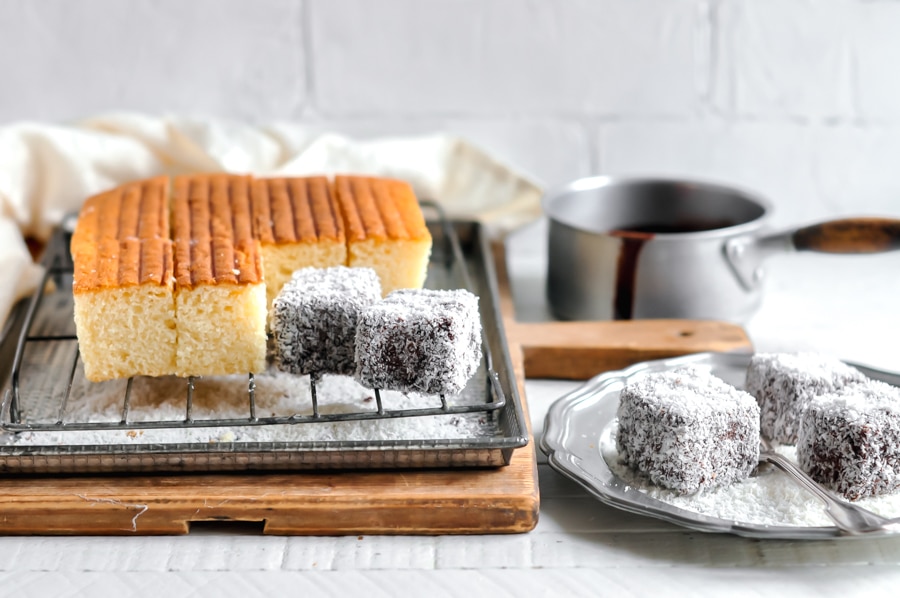
- Using a serrated knife (ideally a long, serrated bread knife), remove the edges of the sponge by cutting a thin slice. This is a cook's treat!
- Cut the sponge into 32 squares, or whatever size you wish. Keep in mind that, once coated in chocolate and coconut, the cakes will be much bigger in size.
- Pour the dessicated coconut onto a large plate.
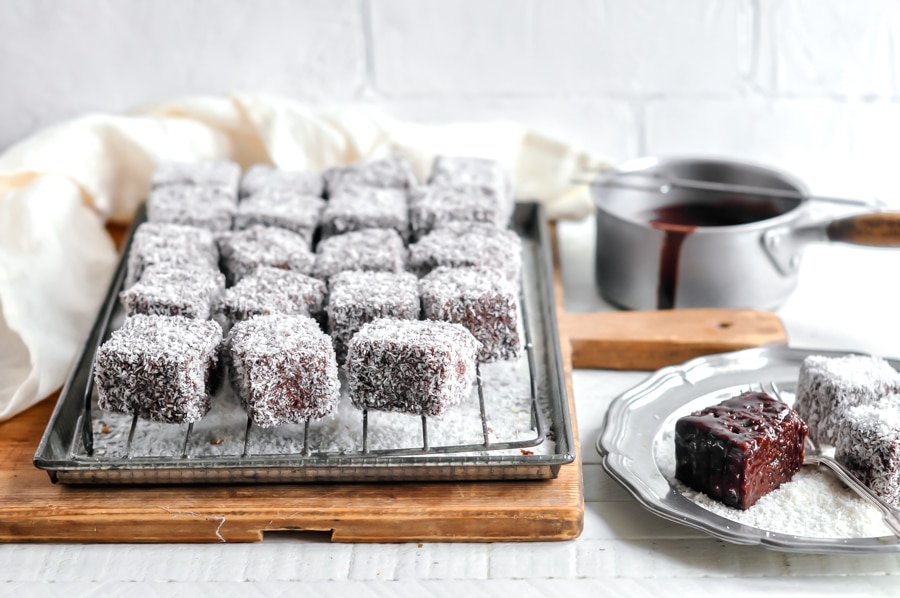
- Using two forks, dip a piece of sponge into the chocolate icing mixture, making sure that all sides are lightly coated, and allow any excess icing to drain off.
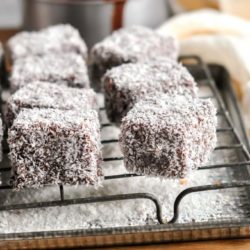
- Then roll the chocolate-coated sponge in the dessicated coconut, and place the lamington on a wire rack to dry.
- Repeat with the remaining sponge pieces.
- If the icing mixture becomes too thick, whisk in some milk to thin it out.
- Let the lamingtons set on a wire rack for about 30-60 minutes.
Kitchen Notes
- MAKE AHEAD TIPS
I prefer to make the sponge cake the night before serving, and to leave the cake to cool and dry on the wire rack overnight. By letting the cake dry out overnight, the cake will be easier to handle and less crumbly when dipping it into the chocolate. - FREEZING TIPS
If you don’t have time to make the cake a day ahead, I recommend cutting the cake into squares once it has cooled, and to then freeze the cake for about an hour before proceeding with the rest of the recipe. - STORAGE TIPS
These lamingtons keep very well for several days in an airtight container or on a cake stand with a glass lid. - OVEN TEMPERATURES
All recipes on this website state temperatures for a regular oven (i.e. a conventional oven without fan). If you have a convection oven with a fan, please consult the manufacturer’s handbook on how to adjust the temperature and baking time accordingly. - CONVERSIONS
To convert from cups to grams, and vice-versa, please see this handy Conversion Chart for Basic Ingredients.
Did you make this recipe?
Please leave a comment below and share your photos by tagging @eatlittlebird on social media and using #eatlittlebirdUpdate
This post was first published on 26 January 2012. It has been updated with new photos and more comprehensive recipe notes.
More Australian Recipes

Gorgeous Lamingtons. Happy Australia day!
Happy Australia Day, I also made Lamingtons but as a guest post today. Enjoy your holiday!
Hi Julie! I just saw your post and your lamingtons look great! The recipe you used is a little similar to Bill Granger’s in that there are a lot of eggs! Great to see you spreading the word on lamingtons also on this side of the world 🙂
Hi, these are so lovely!!
Have a great day
Aw Creme, you’re so lovely. Bet Emma will be squealing in delight when she sees this. Yet again, lamingtons are something else I’ve never had! But your photos are lovely and I love the idea of you in some sort of lammy factory with the mountains of the little beauties above stacked up around you! happy Australia Day to you xxx
Thanks Jo!! Hopefully you’ll get to try a lamington one day as they are really delicious, perhaps my favourite cake … I often make them in huge batches, so my kitchen does look like a factory line with sponge, chocolate sauce and coconut everywhere!
LOL what amazes me is that you said you made these paticular ones a few years ago and even ‘back then’ your photos are stunning, stage by stage and artful. You’ve just been a stunning photographer and blogger in waiting having you!!!
I always thought lamingtons were coated in jam before the cocount which is what put me off but now i know it’s a chocolate sauce, well lady, you’re talking my language!!! I think I need to make some just to offer apology for shunning these sweet treats so long :o)
Now missy, what you need to do is gather all emma’s assorted gifts and parcel them up in one huge box and send them all at once as a Happy Australia Day/I miss you and the fun times gift. Seriously, she’ll be over the moon.
Thanks for starting my day off smiling with another super, simple but wonderful, blog xxx
Ah you’re too kind 🙂 I’ve been snapping photos of my cooking for quite a few years now and was having some fun going through the old photos last night, so I thought I would include some in this post. I make lamingtons regularly so I have quite some many photos!
And now that you have a better idea of what a lamington is, hopefully you will try it one day 🙂 Just don’t leave it as long as I have been putting off a trip to the post office!
Gorgeous photos! How long have you been at this before FB and the blog?!!
I have never made nor eaten lamingtons. I wonder about the history surrounding them and how they have come to be understood as something particularly Australian. Not bad either, it’s always great to be represented in cake form!
I so hear you on the Laziness or better, lack of time front with posting…I have several boxes which have been staring at me indignantly for weeks now. I have taken to avoiding the room! haha!
Happy Australia Day Thanh!!!! :-))
Lamingtons apparently originated in Australia (in Queensland) but I think New Zealand also lays a claim to this cake (and many other things! ;-))
I seem to be quite good at buying gifts in advance of an event, but sending them on time is just not something I seem to be capable of. I think I need a personal assistant!
A week! You can make homemade lamingtons last a week? Amazing.
I love ’em and they are best homemade, but by someone else – they are just so messy to put together.
Hi Amanda,
Yes, I think because these lamingtons are coated in icing, they keep quite well. Lamingtons which are coated in a chocolate sauce, as opposed to a chocolate icing, would not keep as long or they would dry out more quickly.
Now that I’ve tried homemade lamingtons, and it has been eons since I’ve eaten a shop-bought lamington, I might be biased to say that I like my homemade ones the best 🙂 Indeed, it can be a bit messy to put together but the mess is worth it – I say that as a fussy clean freak!
I love lamingtons, I have a friend who does them and always gives me some.
How lovely of your friend! I also like to make them in big batches (by doubling the above recipe) and give some away to friends and neighbours. I like to introduce as many people as I can to lamingtons on this side of the world 🙂
WOW. I am not Australian but I sure don’t care! I really want to make these!
I hope you will get a chance to make these one day! Plain sponge coated with chocolate icing and sprinkled with coconut – it can only taste good 😉
Happy Australia Day for yesterday. My youngest loves lamingtons and as you said in your post, these are often sold at the cake stalls at school. When we were in Perth and it was fundraiser day he would spend all his money on lamingtons and one icy pole. The laming ton would be popped into his mouth in one go no matter the size of it. Another fabulous post and stunning photos.
Hi Billie! Lovely to see you here 🙂 I’m glad you enjoyed this post. I have fond memories of lamingtons at school and hope the lamington drives will continue as a tradition. Cake stalls are not so common in Switzerland so I jump at the chance to make lamingtons whenever there is one.
But now you’ve reminded me of icy poles … oh to be back in Australia! 🙂
Goodness! My mouth is watering and I am smiling as I am typing this thinking about our wonderfully wholesome and nurturing cooking sessions. How many cups of tea did we drink??! Absoluely LOVE your blog – it oozes with you’ness – as it should, being your blog, i guess. Have just started reading and will read everything (am home with a cold) so apologies if you have already done so – but I would LOVE a posting on your other pies – and your roast chicken. Yum. Must be the only person in the world that has a cold yet still has an appetite! Eat, little bird’s frenchy is the luckiest person in the world! xx
PS – my baby neice of 1.4 yrs sent me (clever baby!) Donna Hay’s Seasons book and it is absolutely beautiful and a nice little holiday looking at every photo. I made an apple and date strudel from it last night – yummy.
Emma!! Yay, great to see you here 🙂 Yes, I know what a great appetite you have, no matter the circumstances 😉 I miss you heaps and hope we can catch up soon … hubby might be in your neck of the woods for work so I might tag along if that eventuates!
Will definitely post some more pie recipes soon and also a roast chicken recipe, just for you 🙂
I also love Donna Hay’s Seasons book – it is indeed such a beautiful book. I bought it on our trip to Oz in 2010 and lugged it all the way back to Zurich, along with almost half a suitcase full of other cookbooks! Thanks for sending me the recipe for the strudel – I’ll take your word for it that it was delicious!
These look amazing! I’d like to try making them for Australia Day this year, but I’ve never made lamingtons before. I’m sure they’re not too hard, but I was wondering, given the icing has real chocolate in it, doesn’t it set hard?
Yes, the icing does set hard, but not overly so. I think the trick is to make sure that the consistency of the icing is runny enough to coat the pieces of sponge lightly. Once dry, the icing will have set a little, but not in such a way that there would be a big contrast in texture between the icing and sponge. I think it is precisely because the icing contains real chocolate and sets once dry, that the lamingtons keep really well for several days in a covered container. If the consistency of the icing is too thick, this would more likely produce a “harder” icing once set and which would not give the soft bite which you would expect when eating lamingtons.
Thanks! I will make sure the icing is quite runny. I’m taking them to a friend’s house for Australia Day so I doubt they’ll need to keep for long! 🙂
I made these last night in preparation for my Australia Day lunch today and they were very good. The cake tasted really good un-iced also, however the lamingtons did firm up a bit more overnight than I expected, but we still loved them.
That’s great to hear! Thanks for your feedback 🙂
hi, i am working on a project at school about Lamigtons and i am having a hard time figuring out why Lamingtons are popular in Austraillia when it was made in New Zealand.If you know why please reply.
Thank you
Thank you for this recipe, I’ve made these before omitting the cornflour and they were very good. Planning to make more and follow the exact recipe, so I would like to ask if you use the corn starch or the cornmeal?
Hi Ingrid,
I use what they call in Australia and the UK “cornflour”, which I think is called “corn starch” in the US. Both of these ingredients are white and resemble a fine flour.
Cornmeal is made from crushed dried corn kernels and is used to make (amongst other things) polenta. It is typically yellow in colour, although you can also find white cornmeal. Unlike cornflour or corn starch, cornmeal is grainy in texture.
I hope this helps! Have fun making the lamingtons 🙂
How long do you recommend to leave the lamingtons to set once iced before serving? I’m making this for my brothers 30th as he LOVES lamington. We were going to ice it 2 hours before we take the cake to the venue but I’m worried that the cake wont set in time.
Hi Kaitlyn, I think it depends on how cool or warm your home is. But I think 2 hours should be plenty of time for them to set, unless your home is really warm and humid. If you’re a bit worried, you could certainly make the lamingtons the night before. I find that the lamingtons keep well for several days as the icing keeps the sponge inside moist. I hope you will enjoy this recipe!
Excellent recipe! Loved the real chocolate used in the coating. Thanks for the recipe!
YUM! I want to try it immediately! Looks great!
I love this cake, So soft and yummy!! My kids like so much 🙂 Thank you for such a yummy share!!
You’re welcome! So glad your kids enjoyed these lamingtons 🙂
One of the simpler lamington recipes I have found and all the conversions are included. Plus the end result is delicious! I give this recipe 5/5!
Hi Kylie,
I’m so glad you enjoyed this recipe! It’s one of my favourites and I ought to make lamingtons again soon. Thanks for popping back to leave your comment 🙂
Hi, I love the look of this recipe, and am thinking of turning it into a ‘lamington cake’ for my husband’s birthday. Because of time factors I think I will have to bake the cake first and perhaps freeze it..do you know if this cake freezes well? and if so will defrosting it overnight in the fridge be the best way forward? thanks!
Hi Theresa,
I’m afraid I don’t have too much experience with freezing cakes, and I have not tried to freeze this lamington sponge before.
But if it helps, I have been told by friends who regularly freeze their cakes that most cakes tend to freeze well. Just let the un-iced cake cool completely before carefully wrapping in clingfilm and then a layer of foil. To defrost, my friends suggest letting the cakes thaw on a wire rack at room temperature overnight. Hope this helps! Please let me know how you get on 🙂
Thank you so much for this recipe, it turned out perfect! The conversion of all the measurements was also super helpful. I’m living overseas at the moment, so this made me feel right back at home!
Hi Kiara,
That’s so great to hear! Glad you enjoyed this lamington recipe. It’s a favourite with our friends and family and I often make a double batch because they disappear so quickly 🙂
Thank you for the recipe. It is perfectly explained! I enjoyed baking this lamington cake and my family loved it! ⭐️⭐️⭐️⭐️⭐️
So glad that you and your family enjoyed this recipe! Lamingtons are definitely one of my favourite cakes 🙂
Hi. Tried to make the cake but i ended with a very dense cake. Any advise on where i may have gone wrong?
Hi Dino,
Sorry to hear about your cake. A dense cake is often due to an over-beaten batter. So if you mixed the batter for too long, this can lead to a tough cake.
Another cause for a dense cake is using ingredients which are not at room temperature, and which might cause the batter to curdle.
It’s always a bit difficult to pinpoint why a recipe hasn’t turned out, but I hope the above helps.
Around 10 years ago, I stumbled upon my first lamington in a small cafe in London when I was on vacation, and I fell in love. I haven’t had any since then, and I can’t find any bakery that makes them in my hometown in Saudi Arabia. I’m definitely intrigued by your recipe and I plan on trying it out soon. But I must admit, I have quite the sweet tooth. How does the dark chocolate turn out to be? As I’m not really that big of a fan of it. Do you think I should substitute for milk chocolate instead?
Hello, you can, of course, use milk chocolate in the icing instead of dark chocolate. I know some people who use only dark chocolate (around 80% cocoa) in the icing! It all comes down to individual taste, so you can make what you like 🙂 For me, as I find both the cake and coconut to be on the sweet side, I like to use slightly more dark chocolate in my icing. I hope you will enjoy this recipe!
I think this is the best lamington recipe I have ever tried! The cake itself was delicious and I loved the real chocolate in the icing. My family kept complimenting me on these lamingtons. I’m definitely making these again soon as they didn’t last around my family. Thanks also for the very clear instructions.
Glad you enjoyed the recipe!
Brilliant and so easy. Very tasty too
Great to hear that you enjoyed this recipe!
I am planning to make this recipe for an Australian friend who I am seeing next weekend. My question is: Can I freeze the already, cut, iced and coconut covered Lamington’s for a week and then take them out and defrost before serving?
Hi Lynda,
I’ve never tried freezing lamingtons (our freezer fits a tub of ice-cream and that’s about it!), but I imagine that it should be fine to freeze the lamingtons already cut, iced and covered with coconut. I would recommend that you wrap them well in plastic and foil beforehand. In any event, these lamingtons keep pretty well for a few days on a covered cake stand or in a sealed container. Hope you will enjoy the recipe!
Excellent recipe!!! My daughter asked for lamingtons for her birthday and these were devoured within seconds! Can’t wait to try more of your recipes.
I made a double batch of these lamingtons for the school bush fire appeal today and they were gone in seconds! Absolutely delicious. Will make another batch for Australia Day this weekend. Thanks for the helpful recipe.
Happy Australia Day! Great to hear that you enjoyed this recipe 🙂
Made these today for Australia day. The texture of the sponge left a lot to be desired. I should have known when I saw the instructions “Place all of the ingredients for the cake into a large food processor and blitz until everything is thoroughly combined” that the sponge was never going to be light and fluffy. The chocolate coating is however much nicer than the traditional coating made with cocoa.
Hi Fabian,
Sorry to hear that the recipe didn’t work out for you. I don’t typically make cakes by throwing everything into the food processor, but I was making a triple batch of lamingtons one year, tested the recipe with the food processor, and I found they worked out just as well as making them the old-fashioned by creaming the butter and sugar first, etc. However, regardless of which method you choose (I’ve put directions for both methods in my recipe above), it is important that all of the ingredients are at room temperature. This helps to produce a smooth batter, which will create a lighter sponge.
The lamington sponge was a bit firmer than I expected, but it was still nice and soft. I used milk chocolate for the icing but it was too sweet so I made a second batch with dark chocolate and it was much better. It was my first time making lamingtons.
Hi Marie,
That’s great that you enjoyed this recipe! I also prefer to use dark chocolate to offset the sweetness of the cake, as well as the coconut. Happy Australia Day!
Family loved the lamingtons! Great recipe.
Hi Matt,
Glad to hear that everyone enjoyed the lamingtons! Thanks for popping by.
Easy to make, really delicious.
Hi Kim,
So glad you enjoyed this recipe 🙂 Happy Australia Day!
Awesome recipes. Awesome pics?
Thank you!
Omg It looks sooo good, I would love to try it
Hope you will enjoy the recipe!
Awesome recipes.A really marvelous effort at sharing tried and tested recipes
Thank you!
Brilliant and so easy. Very tasty too
Thank you!
Awesome, A real effort at sharing tried and tested recipes
Thank you!
Wow, amazing. I wish I could try them all.
Thank you!
Yum! These were great. The sponge was flavourful and the chocolate icing even better. Definitely making these again.
Hi Donna,
So glad you enjoyed these lamingtons!!
I love lamingtons.
Thank you for sharing this recipe, it looks delicious! I’ve had them before but have yet to try them myself.
A question on the type of chocolate –
You have listed
dark chocolate (bittersweet chocolate, 60% or 70% cocoa content)
Are you using a bar baking chocolate or a regular chocolate bar? I clicked on the hyperlink you have associated with the chocolate and it appears to be a regular chocolate bar. Not sure if the list of things is lost in the different words used between countires.
Many thanks,
Brittany
Hi Brittany,
Thanks for your question. I use a regular chocolate bar for this recipe and for all of my baking recipes (mostly because it is not easy to find baking chocolate where I live).
The link I have used will show you the actual chocolate that I use when I make these lamingtons. You could, of course, use any chocolate you like, even baking chocolate.
What’s important is using a chocolate bar which has the right percentage of cocoa content, but this can differ according to people’s tastes. I’ve specified chocolate with a fairly high cocoa content because there is a lot of icing sugar (powdered sugar) to sweeten things up.
I hope this helps! And I hope you will enjoy this recipe ????
Excellent recipe. I appreciated the North American clarifications for some of the ingredients. My results were delicious. The sponge was especially lovely. I will use it as the base of a trifle or strawberry shortcake for Canada Day.
Hi there, I was wondering what is the height of the cake pan that’s recommended for this recipe? Looks so fluffy!
Hi Mindy,
I use a pan which is 4 cm/1.6 inches high. I hope you will enjoy this recipe!
Hi, as a food lover I’m always looking for new meals and recipes to try. I am fortunate that I came to your post, as it provided me with numerous ideas that have greatly inspired me. Thanks for sharing.
You’re welcome! Thanks for popping by 🙂
My go too lamington recipe! I made these on my 2 year anniversary in Australia and my manager told me they were the best lamingtons he’d had!
Hi Donna,
That is the best compliment!! 🙂 Thank you so much. And what a great way to celebrate your anniversary in Australia … you are so lucky! I can’t wait to get back Down Under soon.
This is my favourite Lamington recipe! I really love the chocolate coating, which really does help to keep the cake moist for longer. Absolutely yum!
Wow! great article, Thank you for sharing. Please keep on posting.
Hi are you sure it’s 500 gr icing sugar for the chocolate coating, I was trying it and the proportion seems off
Absolutely delicious! I made a double batch for my mother’s birthday and they disappeared within minutes. Luckily I had saved a few slices for myself and only wish I had more hidden away!
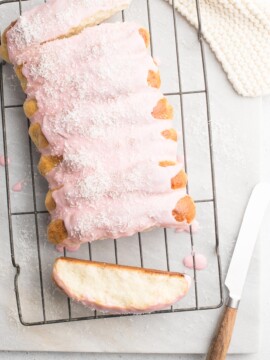
Great recipe! My eight year old used the sponge recipe to make pink lamingtons for a school video assignment and they turned out perfectly, even with some wild measuring! https://www.facebook.com/210500142/videos/468595521766053/
Your daughter is adorable! And a pro in the kitchen at 8 years old! Thank you so much for sharing this video – I loved every second 🙂 Now my daughter wants to try the pink lamington version too ????
We all loved this recipe! The lamingtons were nice and soft inside, and we liked the chocolate coating. We will make these again for sure!
My daughter made these lamingtons at school using your recipe and they turned out marvellously. We are so proud of her. Thank you for your tips!
Wow! Australian lamington was one of my favorite. I think its my second time to leave a comment of this recipe.
These were fantastic! I made them dairy free using almond milk and dairy free butter and they still turned out great. I ended up with far too much chocolate sauce though. I probably only used a third of the sauce that I made. I understand you need extra so that you’re able to dip in the lamingtons, but still if I’m to make these again I would halve the chocolate sauce
Hi Kimberley,
Yes, that’s true that the recipe makes a lot of the chocolate sauce to make the dipping process easier. Also, if you prefer a thinner chocolate sauce, you would end up with more sauce than if you were to make a thicker sauce. I generally make my sauce on the thick side and have only a bit leftover at the end. But I think you could totally reduce the quantities for the chocolate sauce 🙂
Wow! I am not Australian but I love there foods.
My 10 year old daughter made these lamingtons on the weekend and just loved your recipe. Very clear instructions and the lamingtons were simply delicious! I’m so proud of her!
We enjoyed your recipe very much. The chocolate icing is firmer than what one is normally used to (ie if you are used to buying your lamingtons at the supermarket) but I rather enjoyed it much more. This recipe is definitely worth the effort.
Great recipe, very delicious lamingtons. I made a mess of the kitchen but it was worth it!
Fantastic recipe!
I was unsure about making the batter in the food processor but the sponge was actually really nice and soft. I can see how this method would be really great if you had to make a large batch of lamingtons like for a bake sale. Overall we really enjoyed these lamingtons and I would make them again for sure. Cheers!
This Lamington recipe is so easy to follow and delicious! I love how it’s made with just a few simple ingredients. Thanks for sharing!
I can’t recommend this recipe….
It’s like crack, you can’t stop eating them once you start.
They’re delicious
Ha ha! They are, for sure, very good!
Hello! I wish to make these jam-filled, but am somewhat terrified of the possibility of the two pieces falling apart during the chocolate dunk (technical term) portion of the endeavor. Any suggestions?
I mean to fill these with a layer of apricot jam, and then do a little piped Chantilly ring with a dot of jam on top!
Thank you!
Hi Vi,
When you fill the sponge pieces with jam, the jam sort of acts like a glue, so they shouldn’t fall apart when coating in chocolate. Although, that might also depend on the size of the lamington pieces. If you want to be extra careful, I would use two forks to hold the jam-filled sponge when dunking in chocolate. It should be fine 🙂 Btw apricot jam sounds delicious here!!
Hello, As a Swiss Australian living in Geneva, I stumbled across your site looking for some tastes from home and really enjoyed reading your story and love the layout and simplicity of your site. Bravo! It warmed my heart to read about your parents and their bakery. I have similar memories of the Jurian Bay bakery in Western Australia, I believe it is run by a Vietnamese family and they were so good at all the things and many recipes that you describe on your website. Actually it makes me miss home when seeing all the special Aussie bakery items that I can attempt to make
Hi Alison,
Lovely to hear from another Aussie here in Switzerland! I was born in Perth and still have family living in WA ???? I hope you will get to try some of my recipes soon to alleviate any homesickness, or it might make you miss home even more ????
never tried it but I am doing a report on Australa so I am going to make it for my family also my name is Jolie and I am 10 years old!!!!!!!!
I absolutely love this Lamington recipe! The step-by-step photos make it so easy to follow. I can’t wait to try making these delicious treats at home. Thank you for sharing!
Thank you!
I just made these Lamingtons using your recipe, and they turned out amazing! The step-by-step photos really helped me along the way. Thank you for such a delightful treat; I can’t wait to share them with my friends!
So glad you enjoyed this recipe!
This Lamington recipe looks absolutely delightful! I love how detailed the step-by-step photos are; they make it so easy to follow along. Can’t wait to give this a try—thank you for sharing!