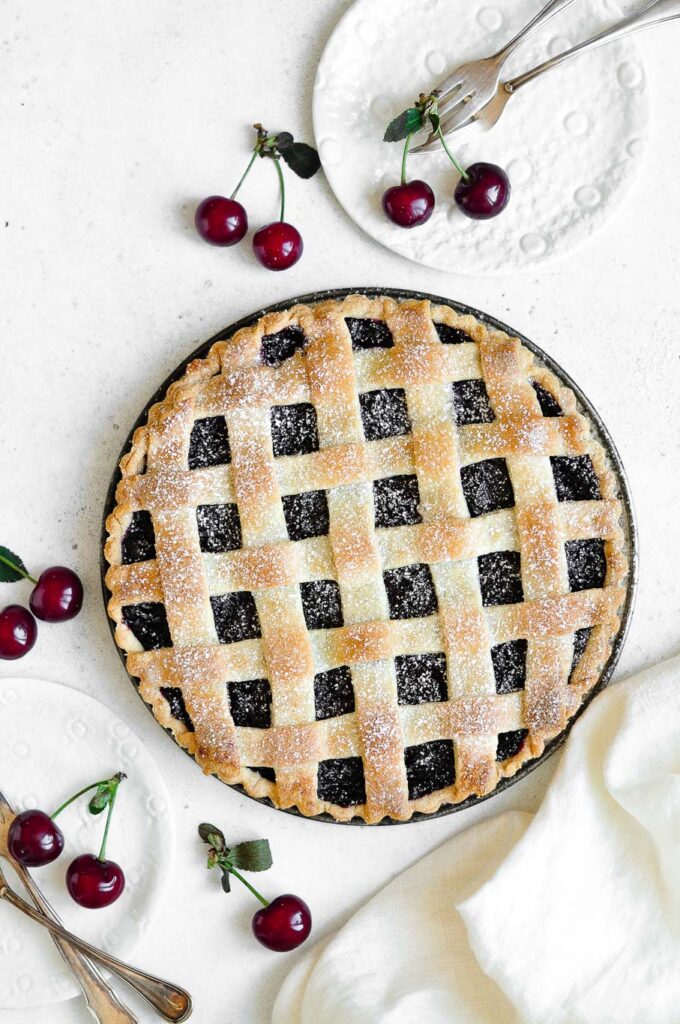
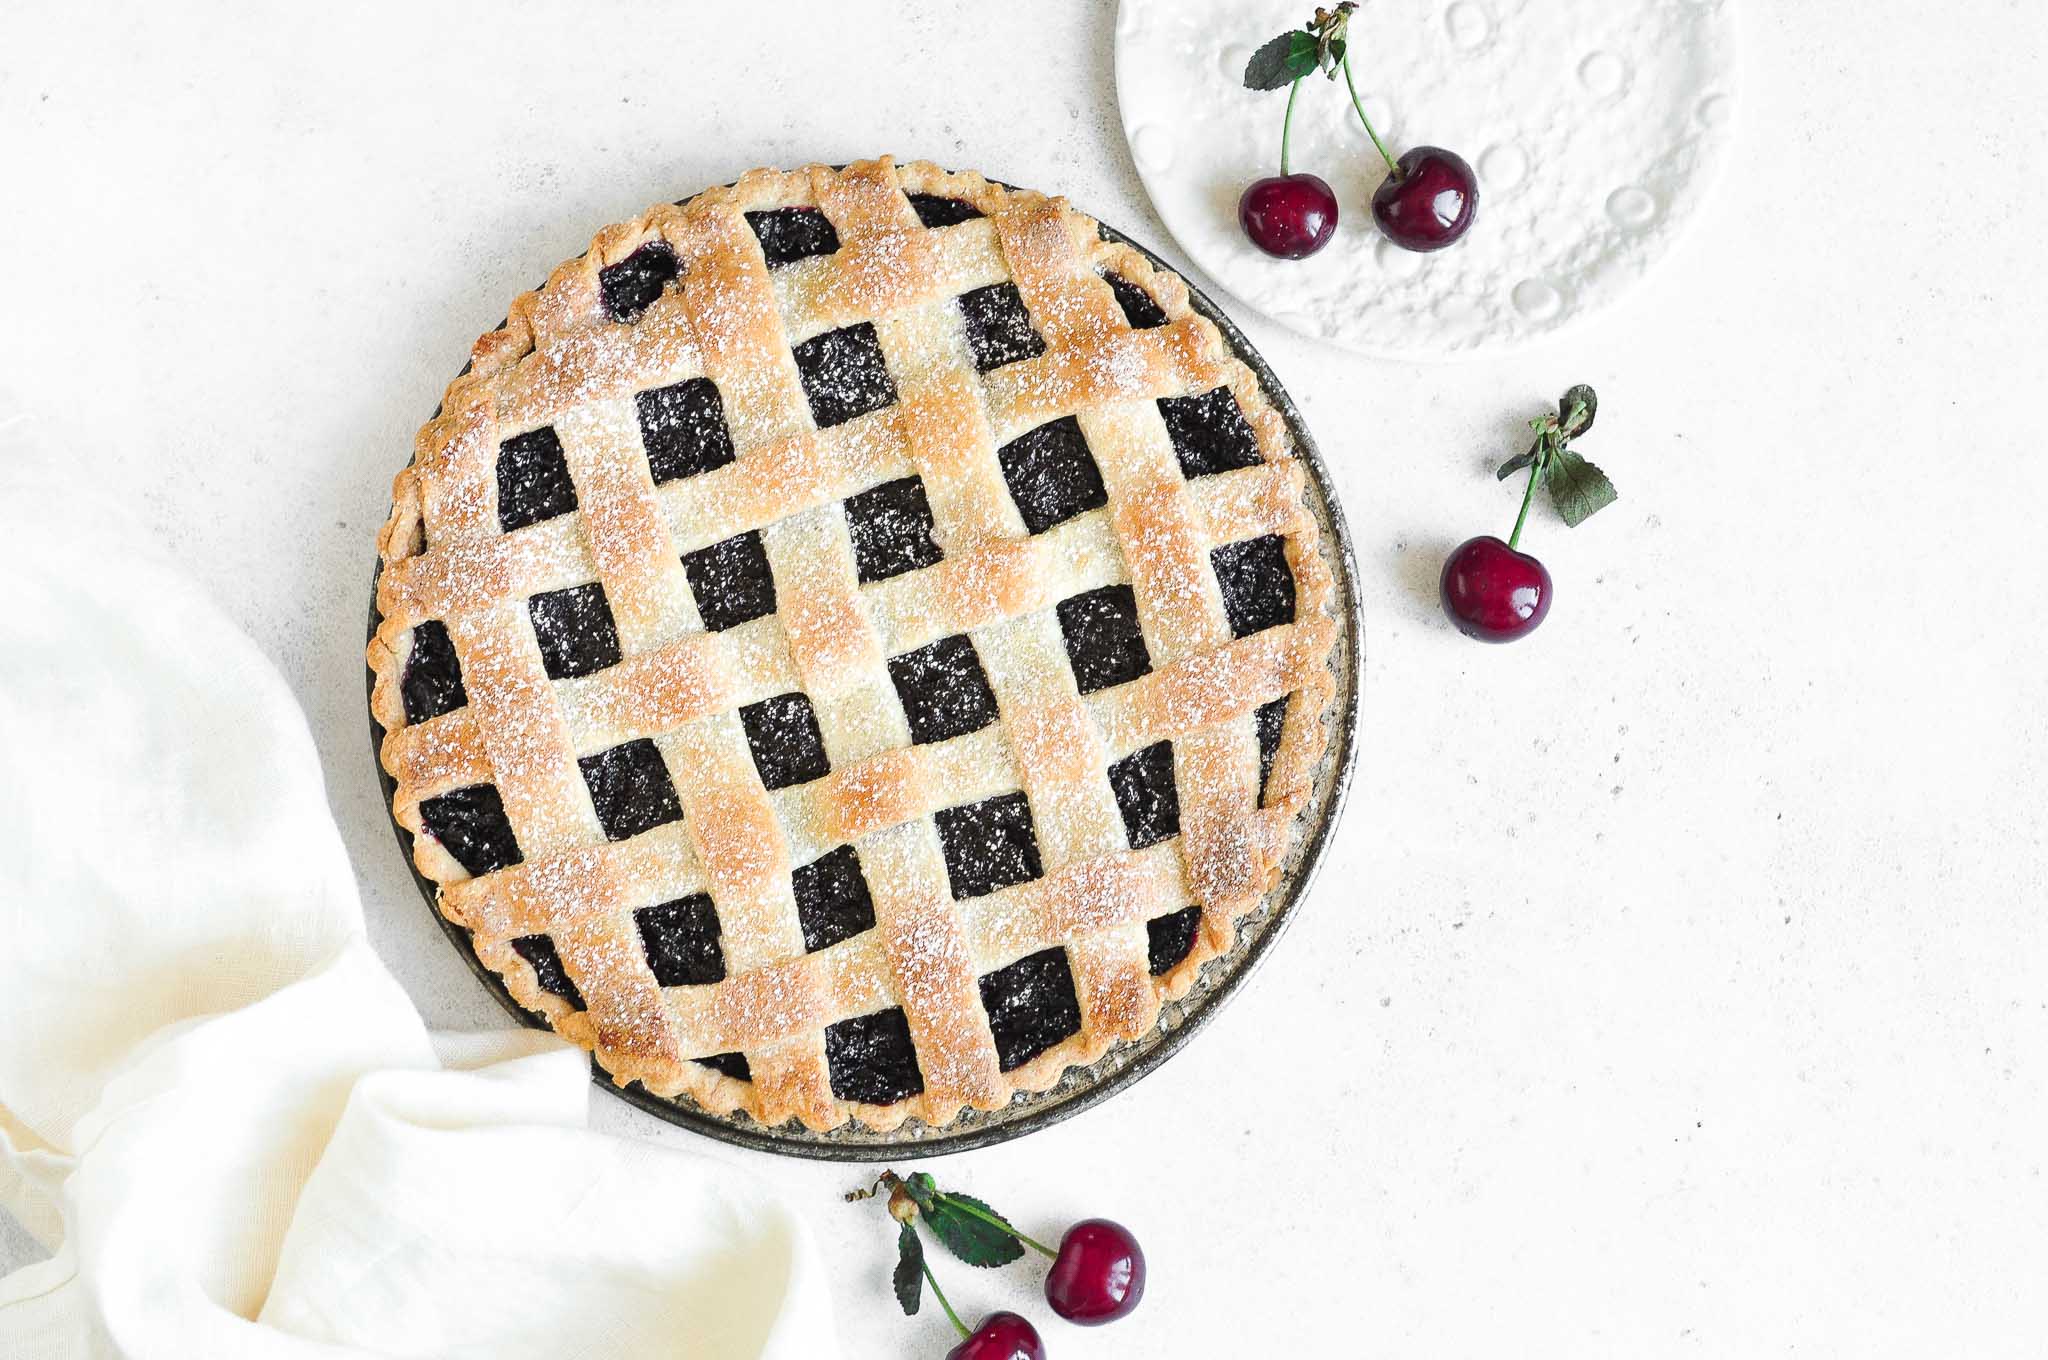
Lattice Pie Crust
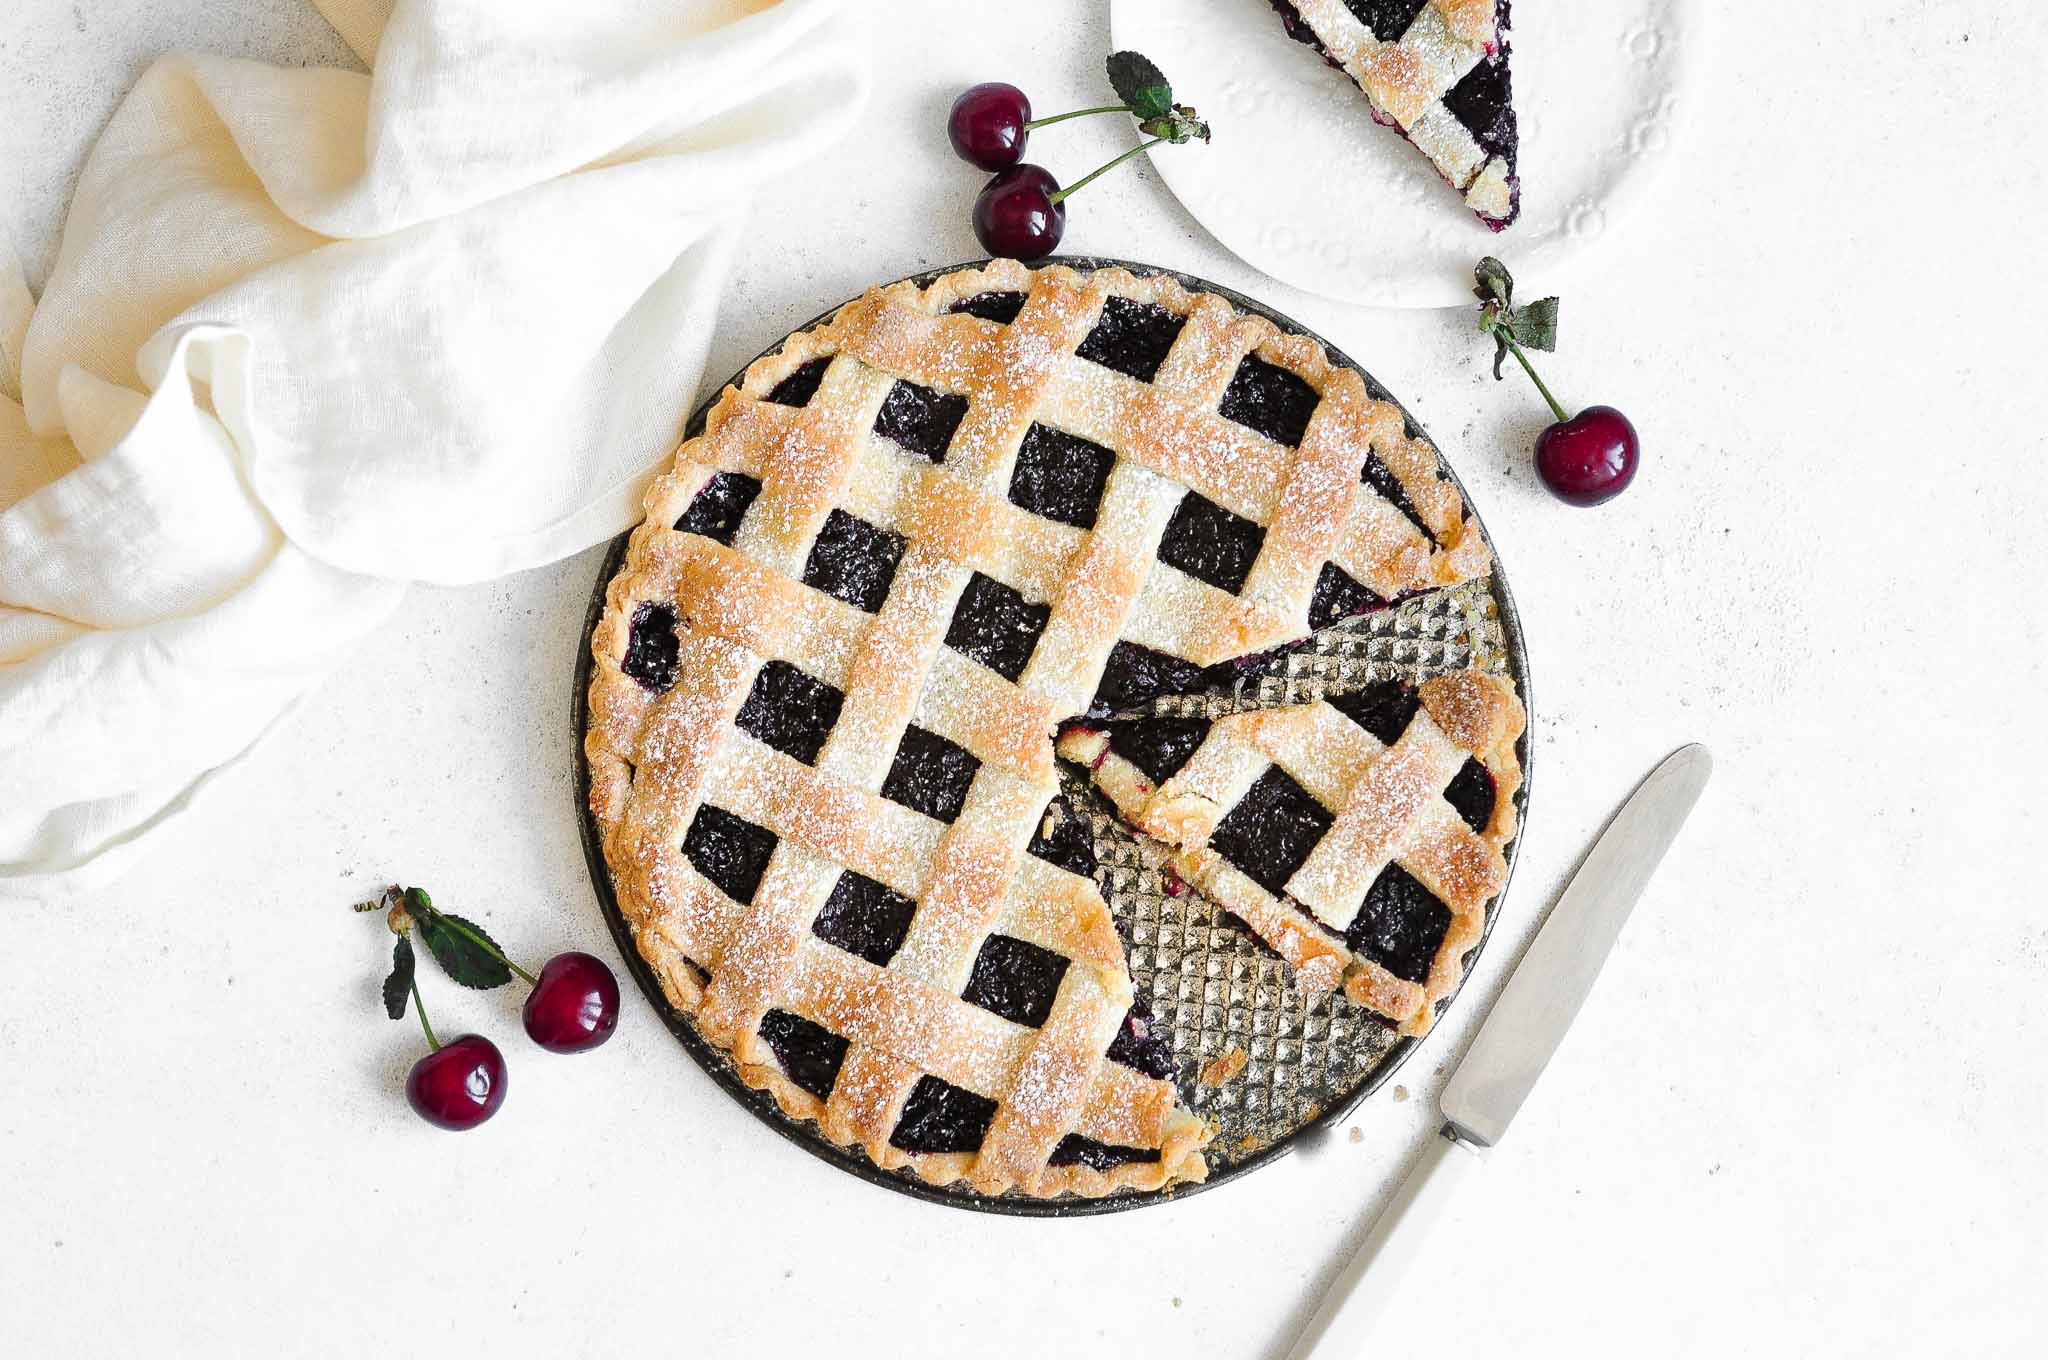
One of my favourite things to make in summer is a Cherry Pie. And this year, for something a bit different, I thought I would try my hand at a fancy lattice pie crust.
And while a lattice pie crust might look fancy and elaborate, it is actually quite easy to make!
Easy Pie Crust Recipe
The pie crust recipe below is one that I use for all of my fruit pies.
It is quick and easy to make, it is a dream to roll out, and the most important part is that it does not shrink upon baking.
This means that your pie will keep its beautiful shape upon baking, an important point if you like to make fancy or intricate pastry details on your pies.
How to Make a Lattice Pie Crust
For a printable recipe, please scroll down.
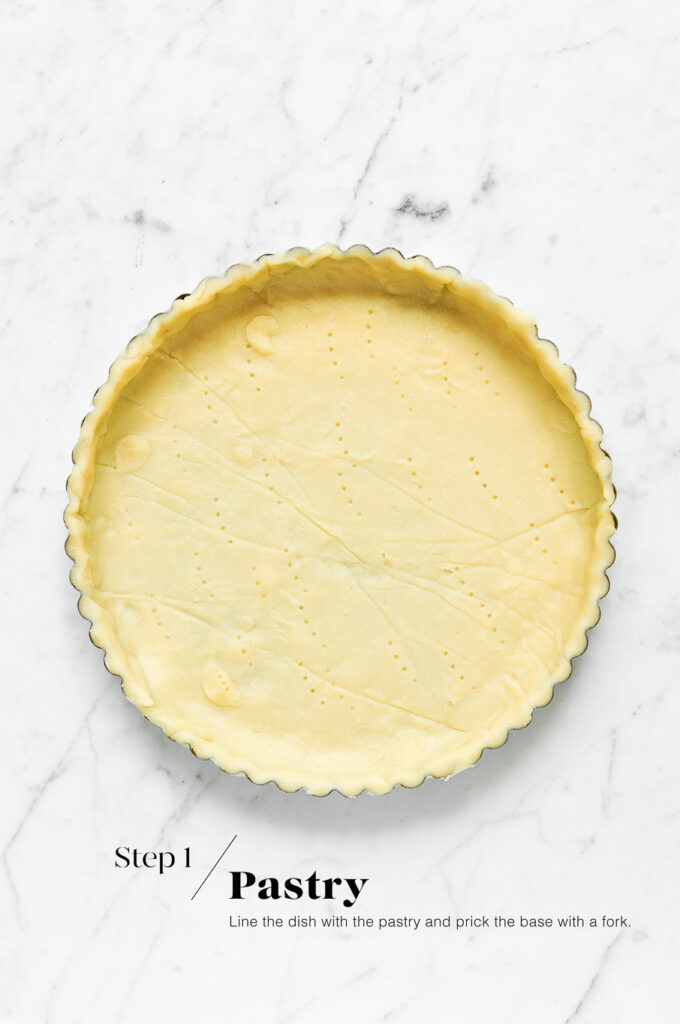
Step 1
Start by lining the pie tin or tart tin with your pastry. Simply fill any holes in the pastry with some leftover dough, and prick the base with a fork.
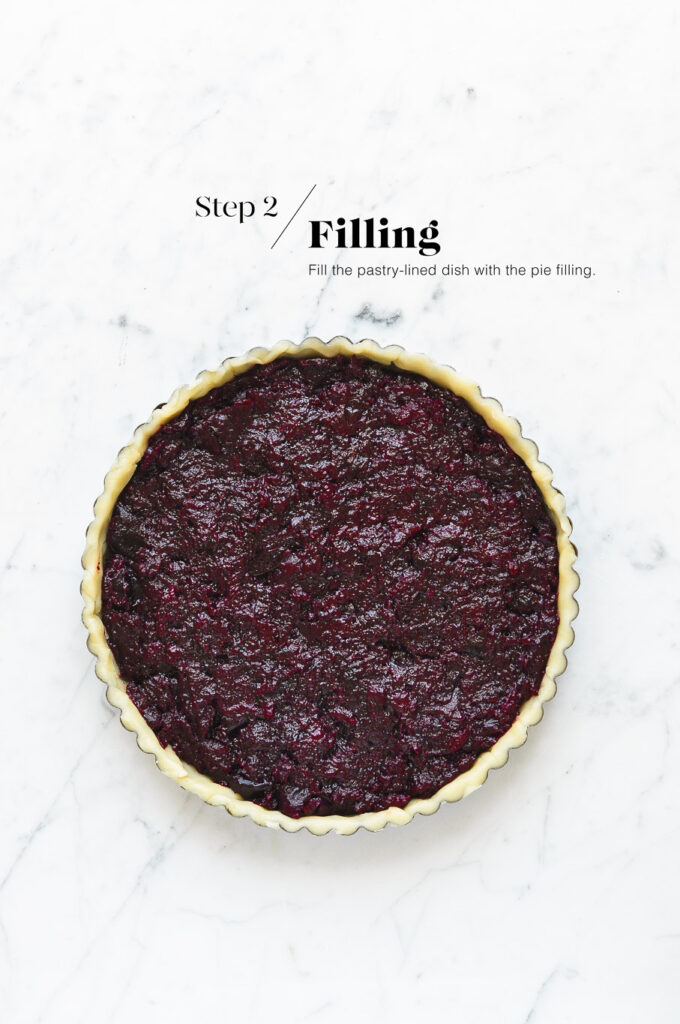
Step 2
Fill the pastry-lined tin with your pie filling. The pie filling should be either cold or at room temperature.
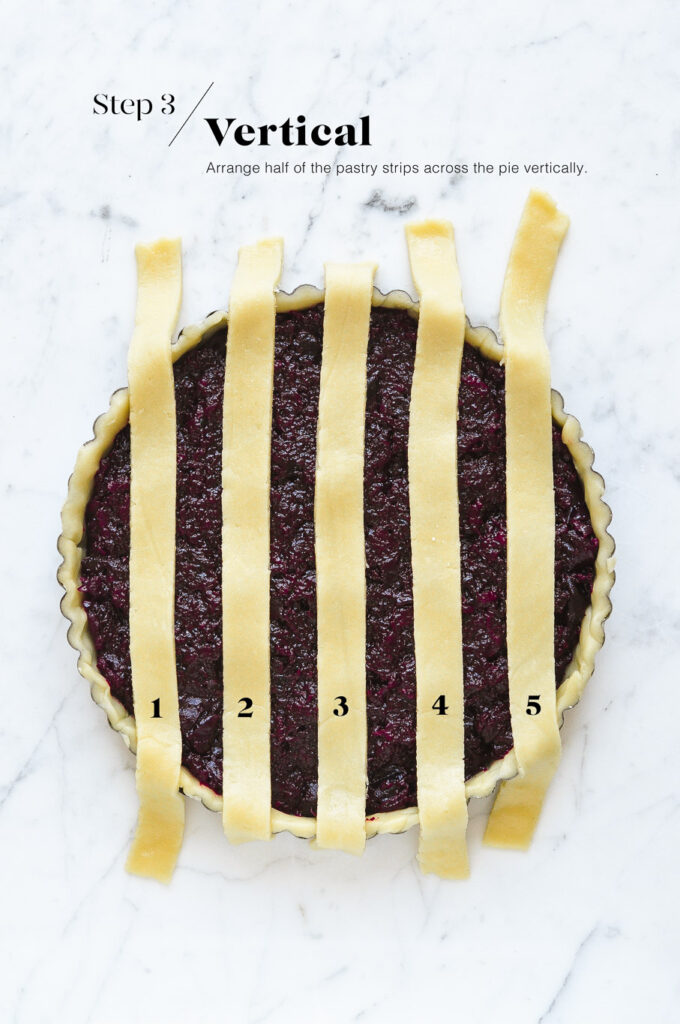
Step 3
Cut an even number of strips of pastry of the same width. Use a sharp knife, straight pastry cutter, or pizzer cutter, to cut the strips of pastry. For best results, use a ruler to ensure that your strips are the same size.
Lay half of the pastry strips across the pie vertically.
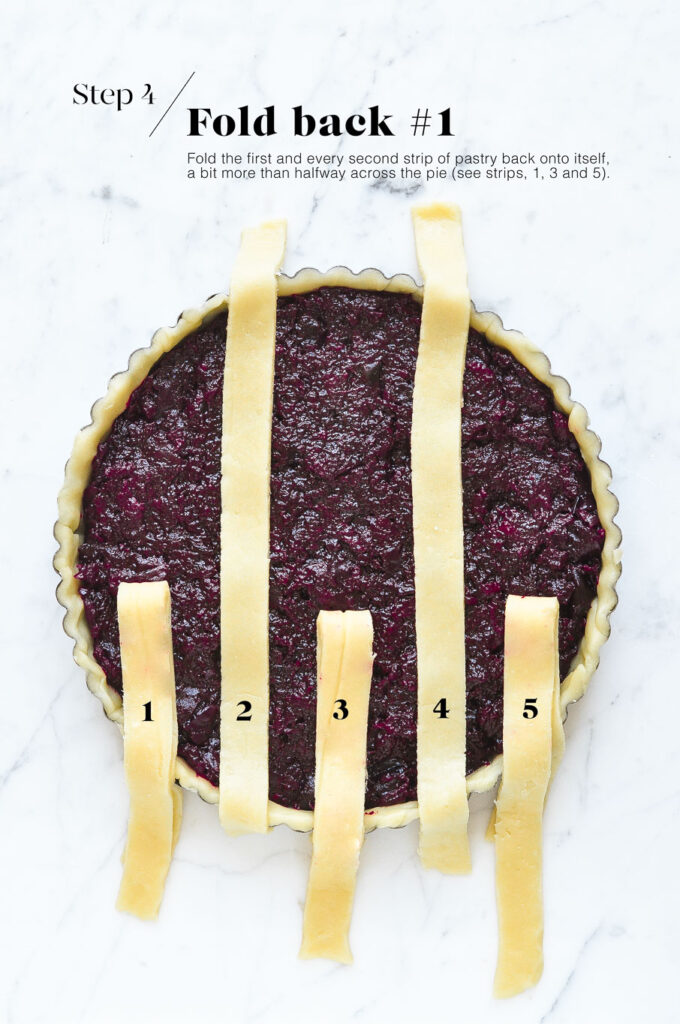
Step 4
Fold back the first and every second strip of pastry onto itself, a bit more than halfway across the pie. See strips 1, 3 and 5.
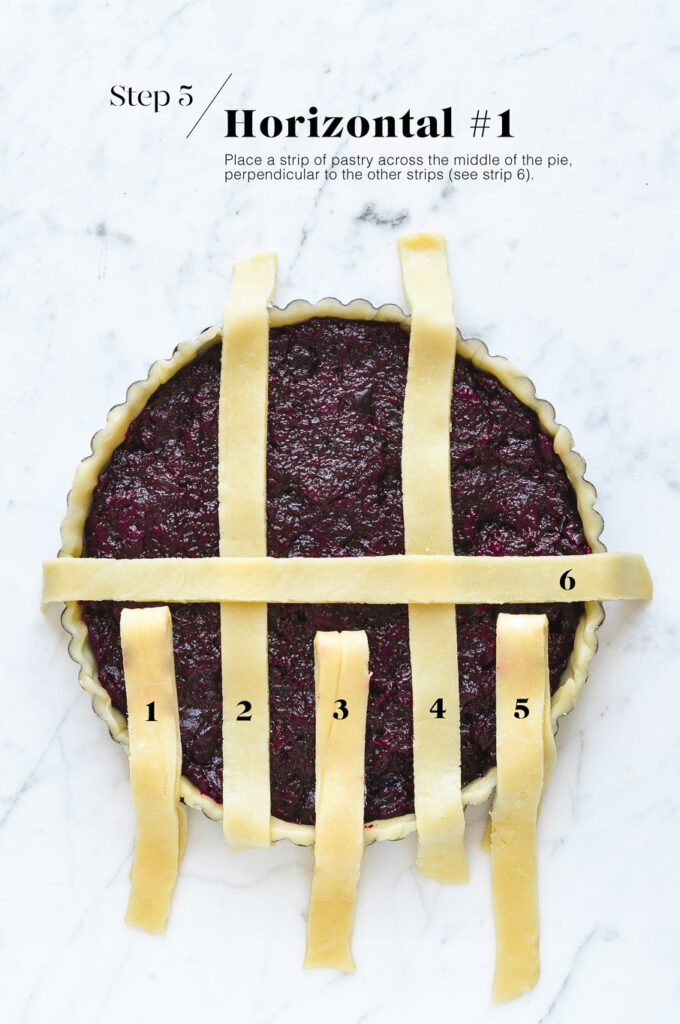
Step 5
Place a strip of pastry perpendicular to the remaining strips on the pie. See strip 6.
If you are making a pie with an odd number of strips in each direction (like that pictured), the first perpendicular strip of pastry should be in the middle of the pie.
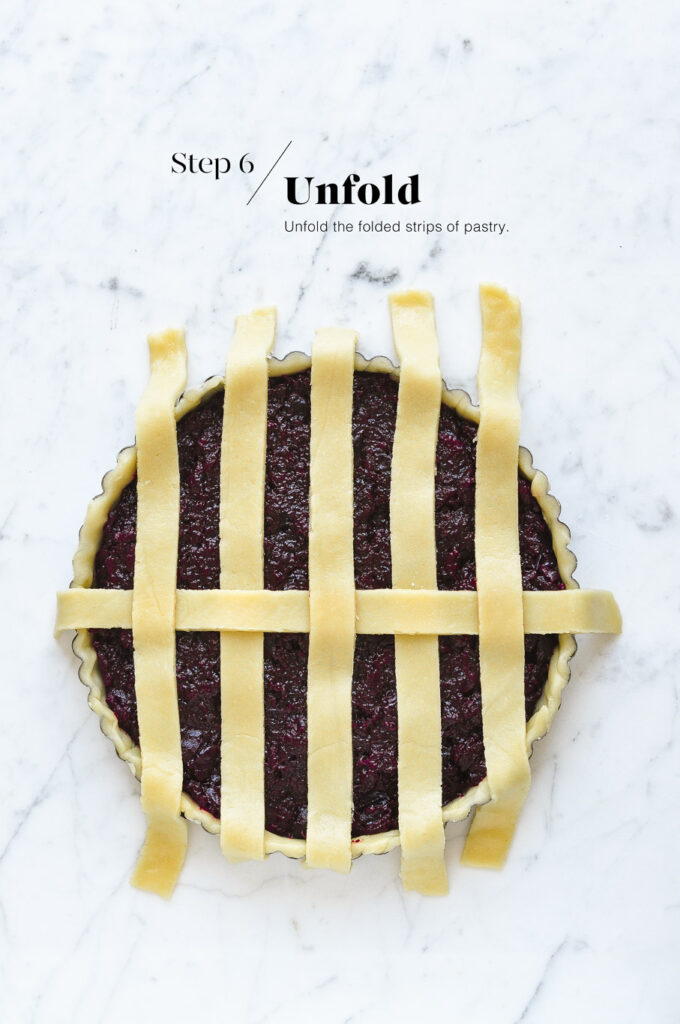
Step 6
Unfold the folded strips of pastry across the perpendicular strip of pastry. You will then proceed to create the lattice pattern on each side of this first perpendicular strip of pastry.
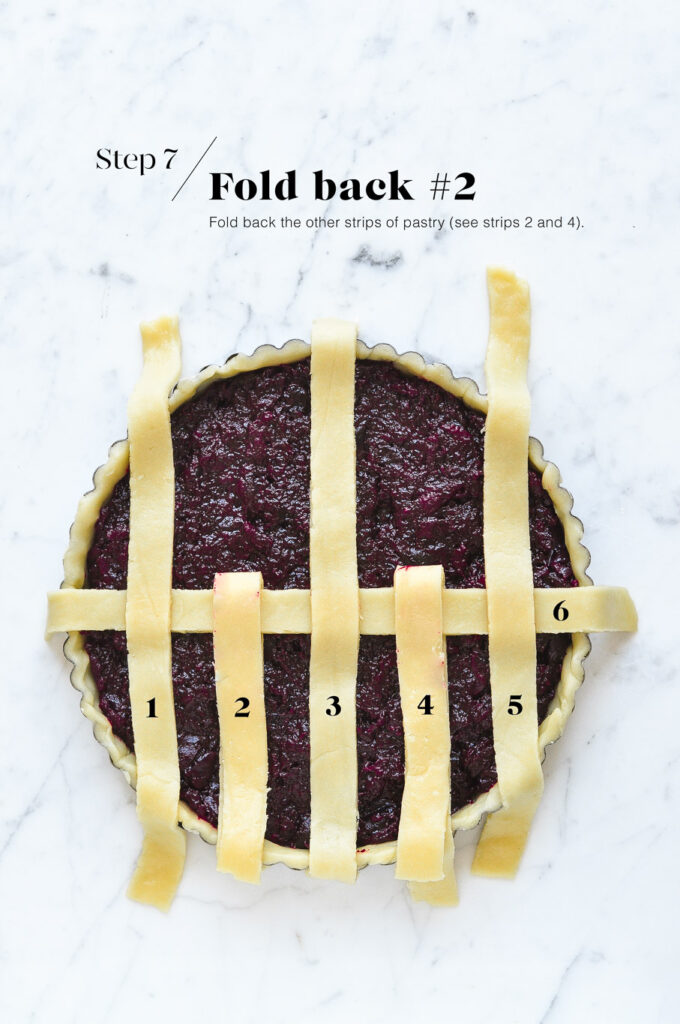
Step 7
Next, fold back the other strips of pastry. See strips 2 and 4.
Step 8
Place another strip of pastry perpendicular to the original strips of pastry. See strip 7.

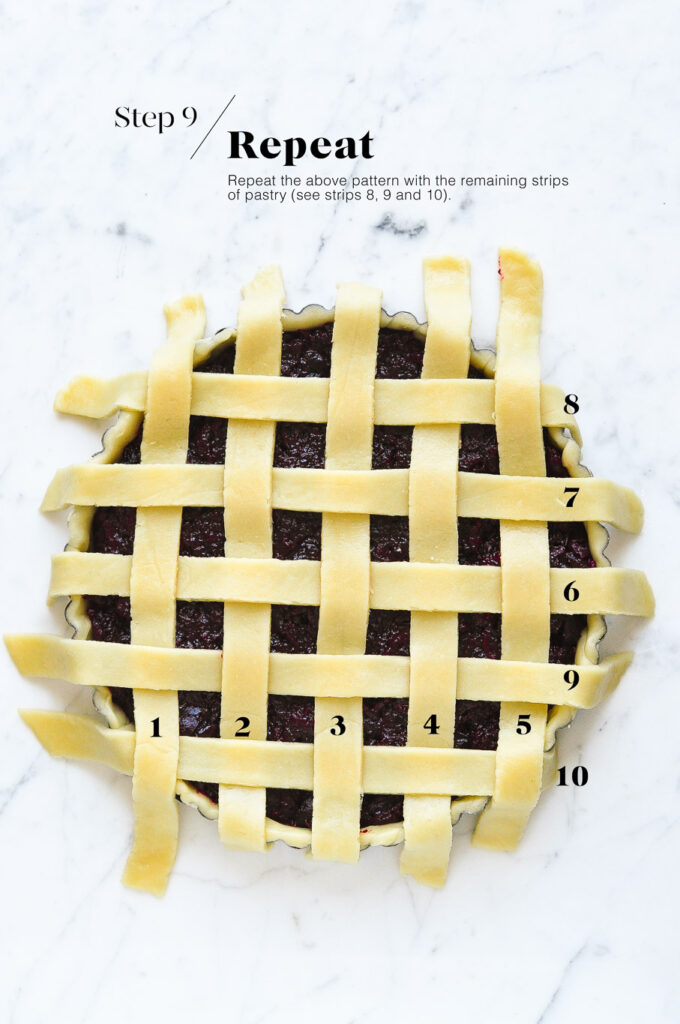
Step 9
Repeat this pattern with the remaining strips of pastry. See strips 8, 9 and 10.
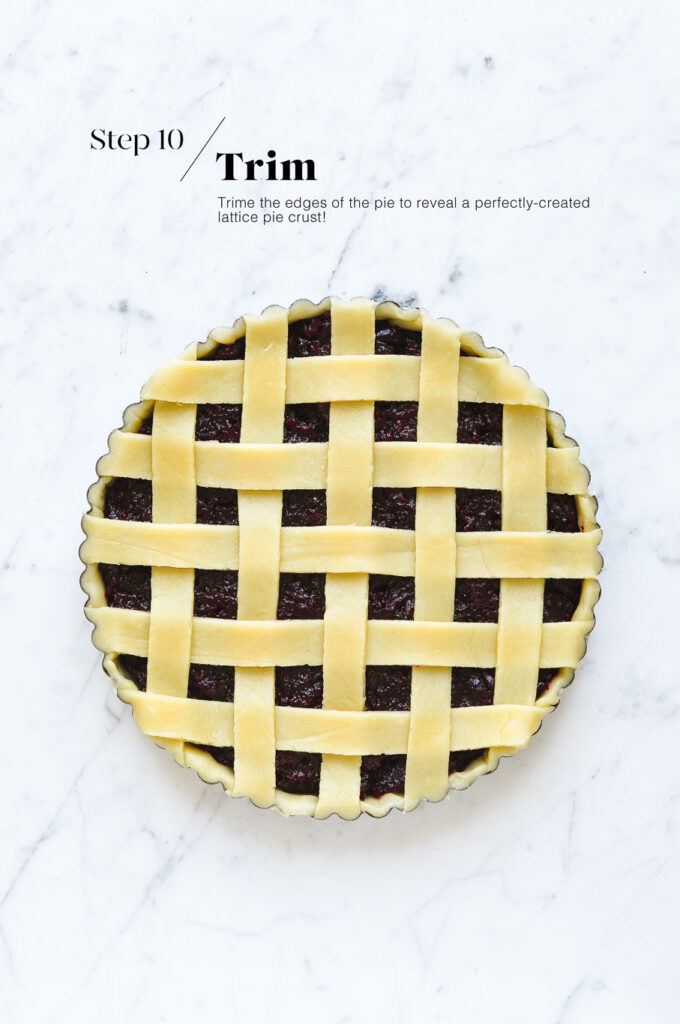
Step 10
Trim the edges of the pie.
At this stage, I recommend putting the pie in the fridge to chill for at least 30 minutes before baking. As you have been working with the pastry at room temperature, the pastry will have warmed up and softened. For best results, and to avoid the pastry shrinking upon baking, it is always best to chill the prepared pie just before baking.

Lattice Pie Crust
Ingredients
For the Pie Crust
- 150 g (1 ⅓ stick) unsalted butter, cold
- 200 g (1 ⅓ cup) plain flour, (all-purpose flour)
- 30 g (¼ cup) icing sugar, (powdered sugar)
- 1 egg
- 1/2 tablespoon water
To Bake the Pie
- 1 egg, beaten with a dash of water or milk
- granulated sugar, or demerera sugar
Instructions
To Make the Pastry
- Place the butter, flour and icing sugar (powdered sugar) into the bowl of an electric stand mixer.
- Using the paddle attachment, mix until everything looks crumbly or like wet sand.
- Alternatively, you can do this in a food processor, or by simply rubbing the butter into the flour and sugar with your fingertips.
- In a small bowl or cup, gently whisk together the egg and water.
- Add the egg mixture slowly to the dry ingredients.
- Mix until everything just comes together. You may not need all of the egg mixture.
- Do not knead the dough.
- Push the mixture together into a ball.
- Wrap the dough in some plastic wrap.
- Chill the dough in the fridge for at least 30 minutes.
To Make the Lattice Pie Crust
- Separate the dough into two balls. One ball will be used to line the tart tin, whilst the other ball will be used to make the lattice pie crust.
- Roll out one ball of dough into a circle and about 5mm thick. I recommend rolling the dough between two sheets of baking paper or plastic wrap as this will make it easier to transfer the dough to the pie dish.
- Line the pie dish with your pastry.
- Fill any holes in the pastry with some leftover dough, and prick the base with a fork.
- Fill the pastry-lined tin with your pie filling. The pie filling should be either cold or at room temperature.
- Roll out the second ball of dough into a circle and about 5 mm thick.
- Cut an even number of strips of pastry of the same width. Use a sharp knife, straight pastry cutter, or pizzer cutter, to cut the strips of pastry. For best results, use a ruler to ensure that your strips are the same size.
- Place half of the strips on top of the pie, evenly spaced apart.
- Fold back every second strip of pastry onto itself, a bit more than halfway across the pie.
- Place a strip of pastry perpendicular to the remaining strips on the pie. If you are making a pie with an odd number of strips in each direction (like that pictured), the first perpendicular strip of pastry should be in the middle of the pie.
- Unfold the folded strips of pastry across the perpendicular strip of pastry.
- Next, fold back the other strips of pastry, i.e. the strips which have not been folded back yet.
- Place another strip of pastry perpendicular to the original strips of pastry.
- Repeat this pattern with the remaining strips of pastry.
- Trim the edges of the pie.
- Chill the prepared pie in the fridge for at least 30 minutes before baking.
To Bake the Pie
- Preheat the oven to 175°C/350°F (without fan).
- Place a metal baking tray in the middle of the oven.
- Brush the pie with some egg wash.
- If using, sprinkle the pie with some granulated sugar or demerera sugar.
- Place the prepared pie onto the pre-heated metal baking tray.
- Bake for about 35 minutes, or until the pie is lightly golden.
Kitchen Notes
- COLD PASTRY
The secret to working with pastry is to make sure that the pastry is always cold. Place any unused portions of pastry dough in the fridge while you are working on another piece of dough or another part of the recipe. - MAKE-AHEAD TIPS
The dough can be made ahead of time and kept in the fridge for a few days.
You can also assemble the pie ahead of time and keep it in the fridge until just before baking. - OVEN TEMPERATURES
All recipes on this website state temperatures for a regular oven (i.e. a conventional oven without fan). If you have a convection oven with a fan, please consult the manufacturer’s handbook on how to adjust the temperature and baking time accordingly. - CONVERSIONS
To convert from cups to grams, and vice-versa, please see this handy Conversion Chart for Basic Ingredients.
Did you make this recipe?
Please leave a comment below and share your photos by tagging @eatlittlebird on social media and using #eatlittlebirdUpdate
This recipe was first published on 27 June 2018. It has been updated with new photos and more comprehensive recipe notes.


I’ve always been intimidated by these types of pies so I appreciate you breaking down the steps!
You’re welcome! It’s quite easy once you get past the first few steps 🙂
I’ve never actually tried making a lattice pie crust. So these step by step directions are perfect!
Thank you! I don’t make lattice pie crust often, but I just reminded myself of how easy it was 🙂
This is the most amazing pie crust! Absolute perfection!
Thank you for your lovely words!
I’ve always been fascinated with lattice crust. It’s so beautiful and now I see how easy it is to make one. Thanks for sharing a detailed tutorial!
You’re welcome! It can seem daunting at first, but it really is quite simple 🙂
Excellent photographic instructions for weaving latticework. Lovely pie by the way!
Thank you so much!
love the instructions. clear and understandable, beats a long nerve wracking video.of endless chatter.
thanks, from tess
Very helpful instructions!
Great instructions! Once I got the hang of it, the lattice pattern was very easy. Love your site!
This pie crust recipe is perfect!
Great pie crust recipe! It was delicious