Hot Cross Buns
There are so many baking choices at Easter, and Hot Cross Buns are a must for me. My Easter Egg Nest Cake is also an annual treat for us which I like to make on Easter Sunday.
But Hot Cross Buns are something I try to make at least twice during the Easter period so we can enjoy them at breakfast, morning tea and afternoon tea. We just never tire of them at Easter!
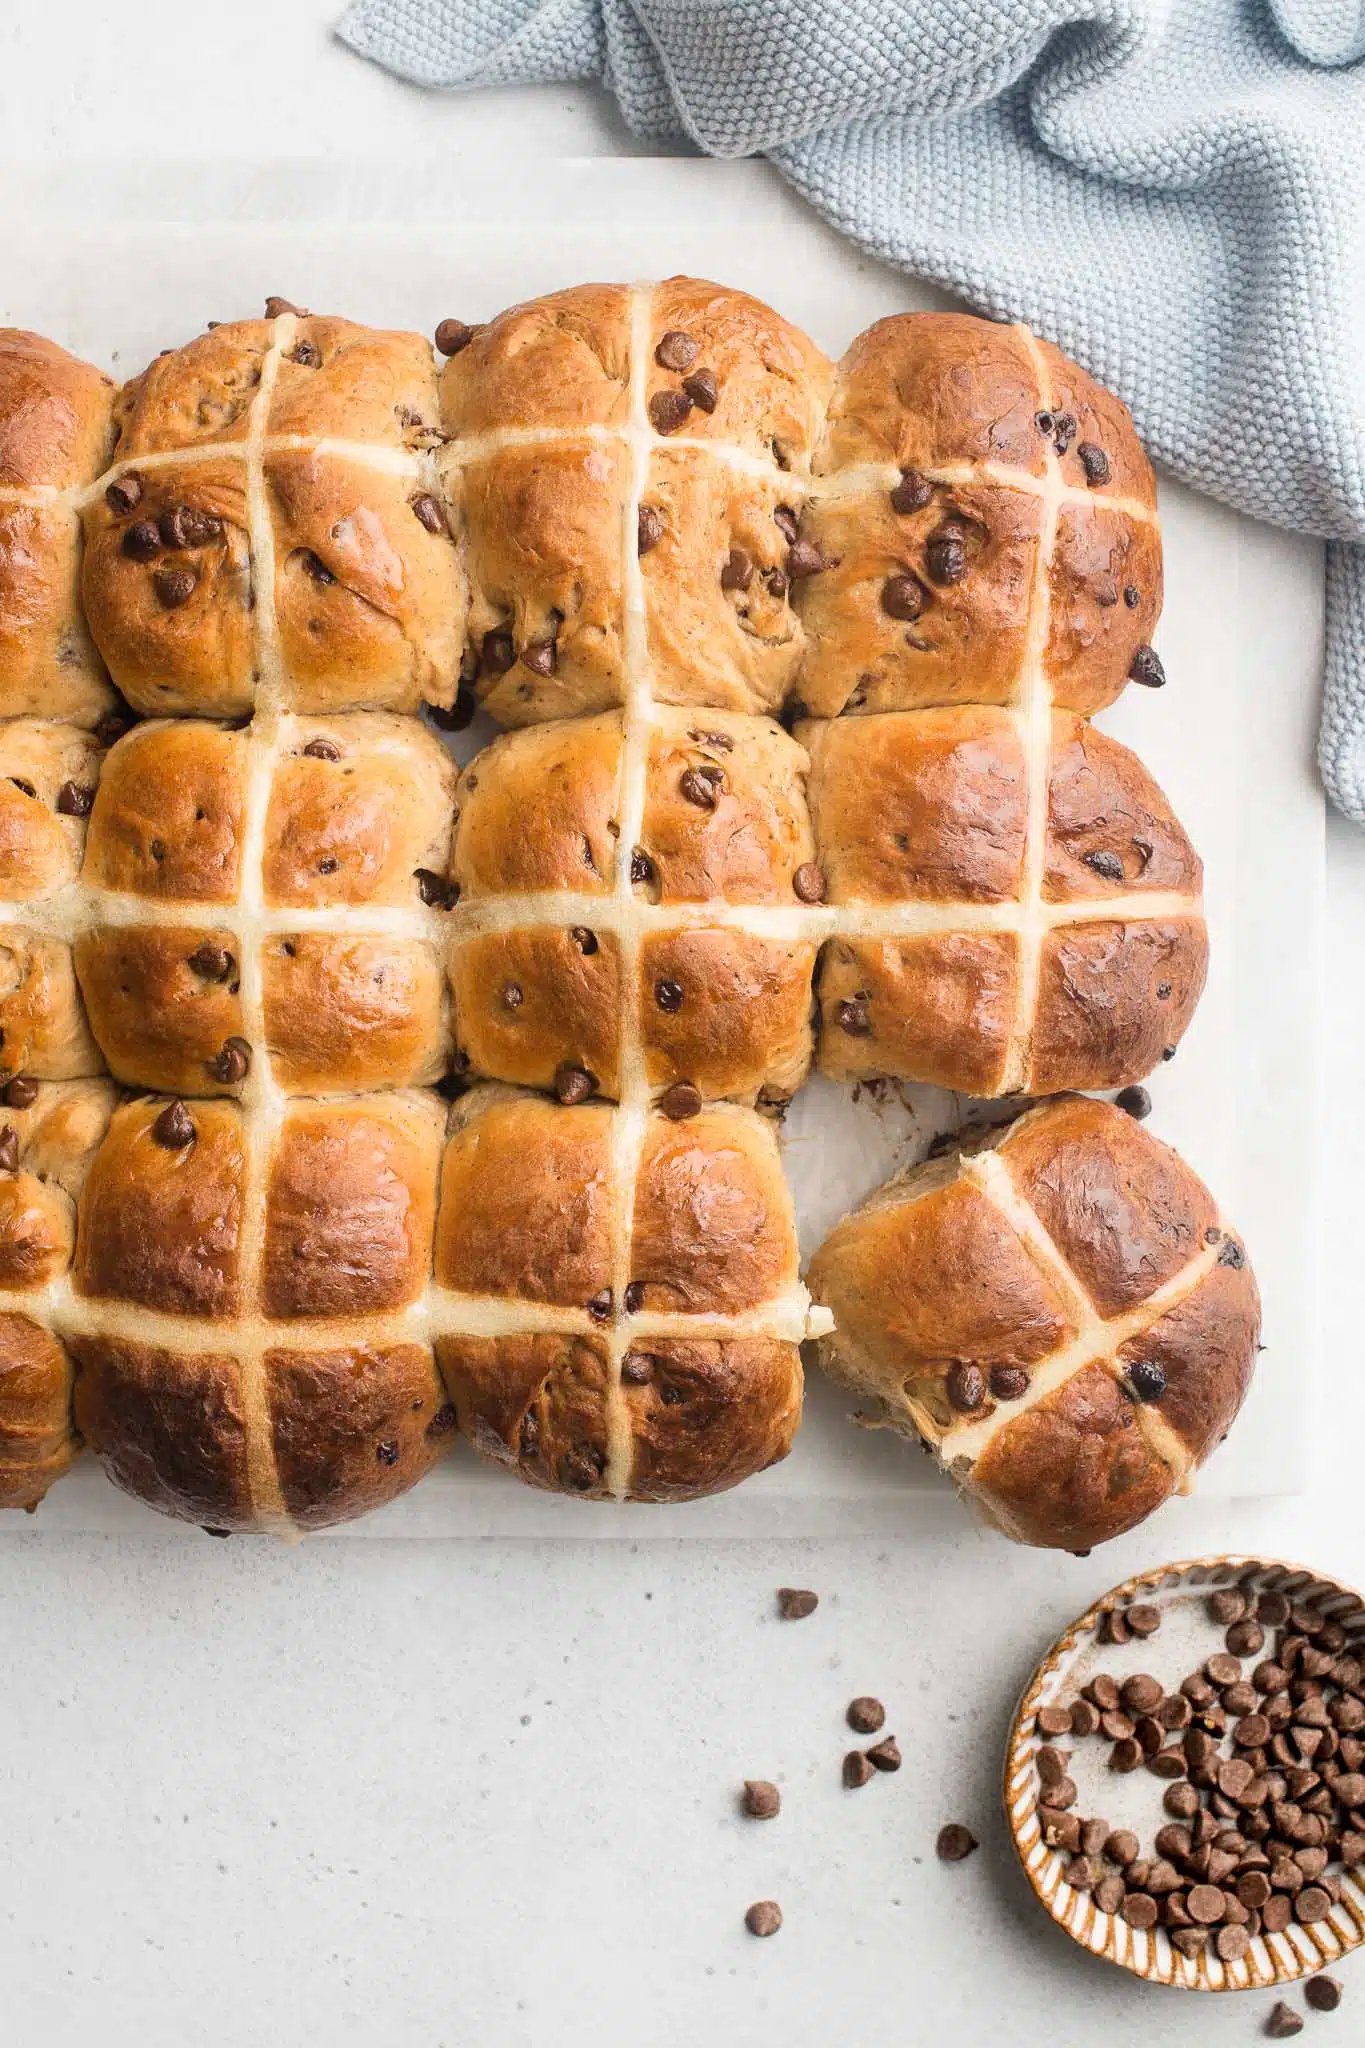
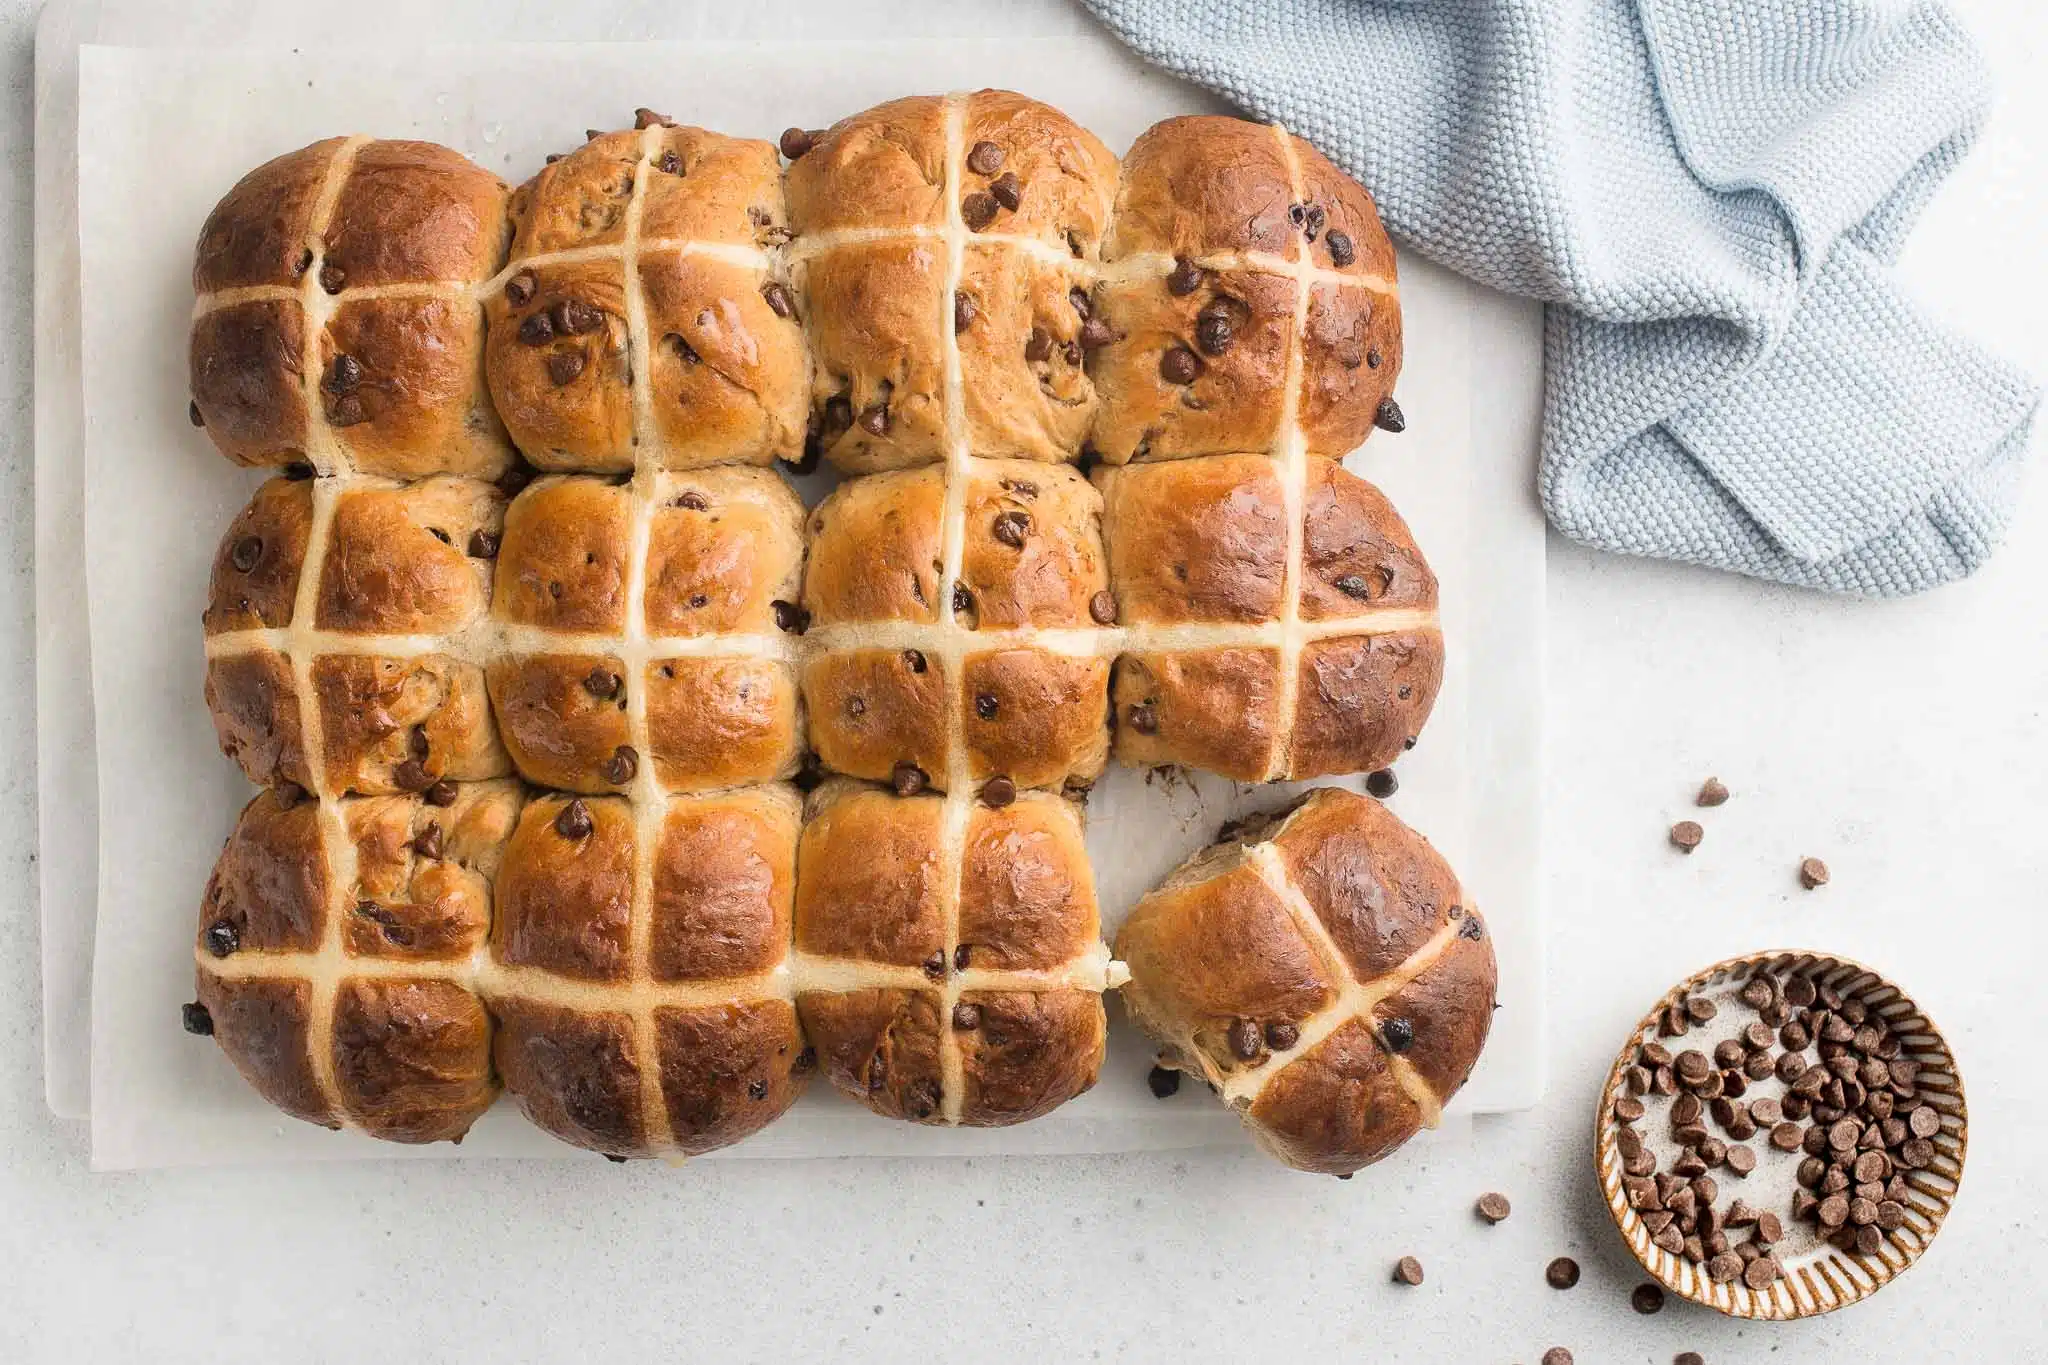
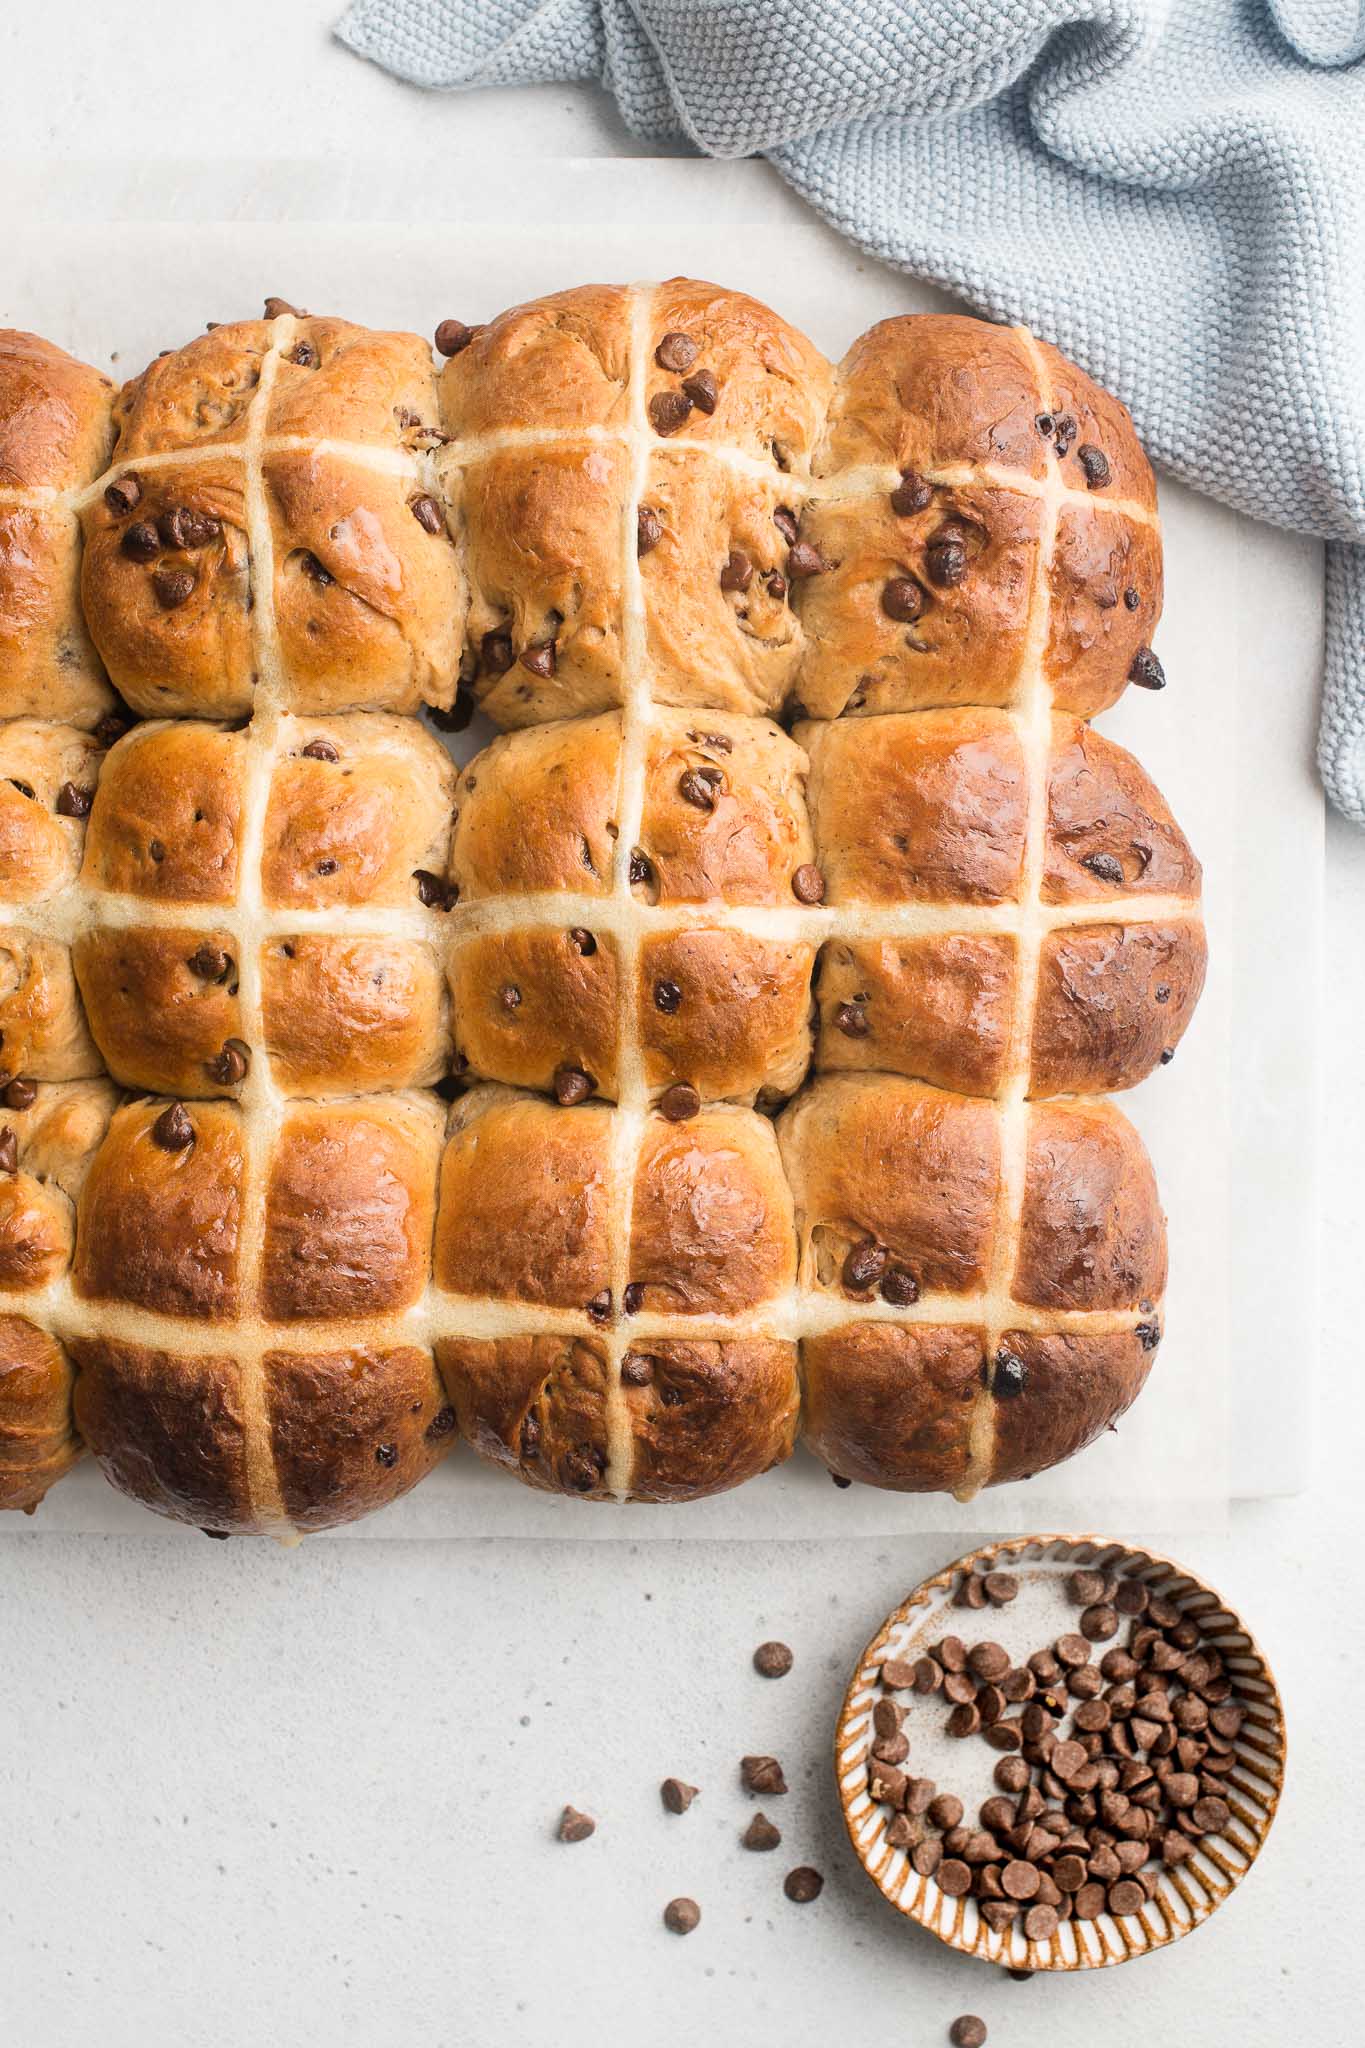
Chocolate Chip Hot Cross Buns
I was hoping to make my regular Hot Cross Buns this year, but poor planning meant that I didn’t have oranges and raisins to hand. But I did have an over-supply of chocolate chips which I had stocked up on during a recent trip to France. Curiously, chocolate chips are hard to find in Switzerland, i.e. the land of chocolate!
And who can resist a spiced bun speckled generously with chocolate chips anyway??
These Chocolate Chip Hot Cross Buns are so delicious that I might have a hard time convincing the children to eat the regular version!
Hot Cross Buns Recipe
This recipe for Chocolate Chip Hot Cross Buns is very similar to my recipe for regular Hot Cross Buns, except I have swapped the raisins for chocolate chips.
You can use milk or dark chocolate chips in this recipe, and I recommend using proper chocolate chips instead of chopping up a bar of chocolate; the chocolate chips usually contain wax to help them withstand the heat of the oven, so that they retain their shape upon baking.
If you like the combination of oranges with chocolate, I would recommend adding the zest of 1 orange to the milk in the recipe below.
How to Make Chocolate Chip Hot Cross Buns
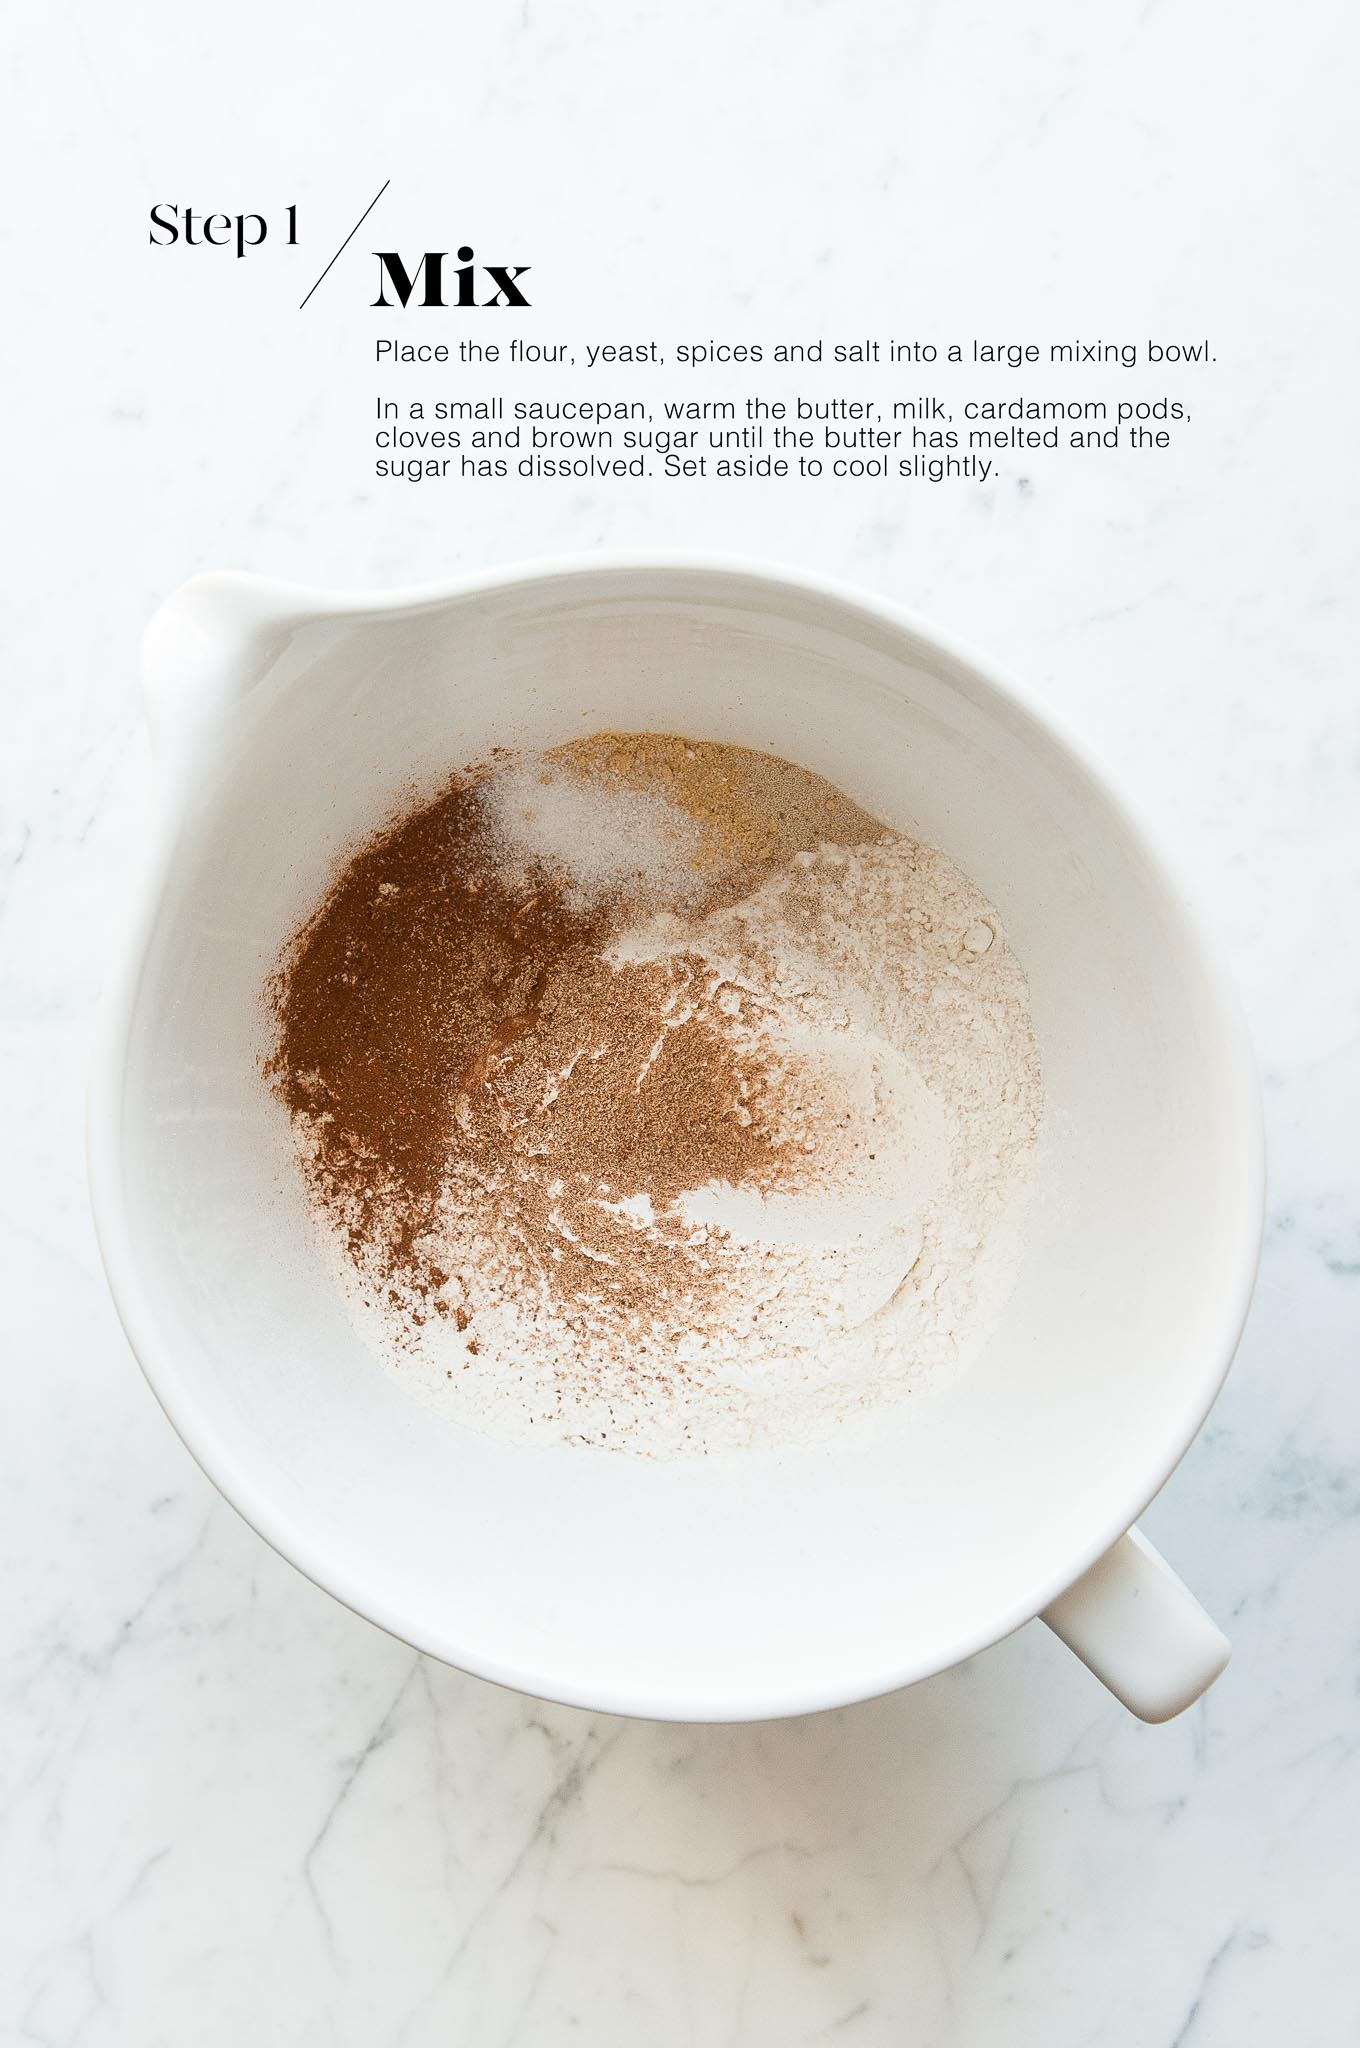
Step 1
Heat the milk, butter, cloves and brown sugar in a small saucepan. When the butter has melted and the sugar has dissolved, set the saucepan aside for the mixture to cool to about 37°C/98°F. Discard the cloves.
Place all of the dry ingredients into a large mixing bowl, or the bowl of an electric stand mixer.
Step 2
Slowly add the milk mixture to the dry ingredients. Then add the eggs, one at a time.
Mix until everything is combined, and continue kneading the dough until it is smooth and elastic in texture. If you are using a stand mixer, this step will take about 10-12 minutes on medium speed.

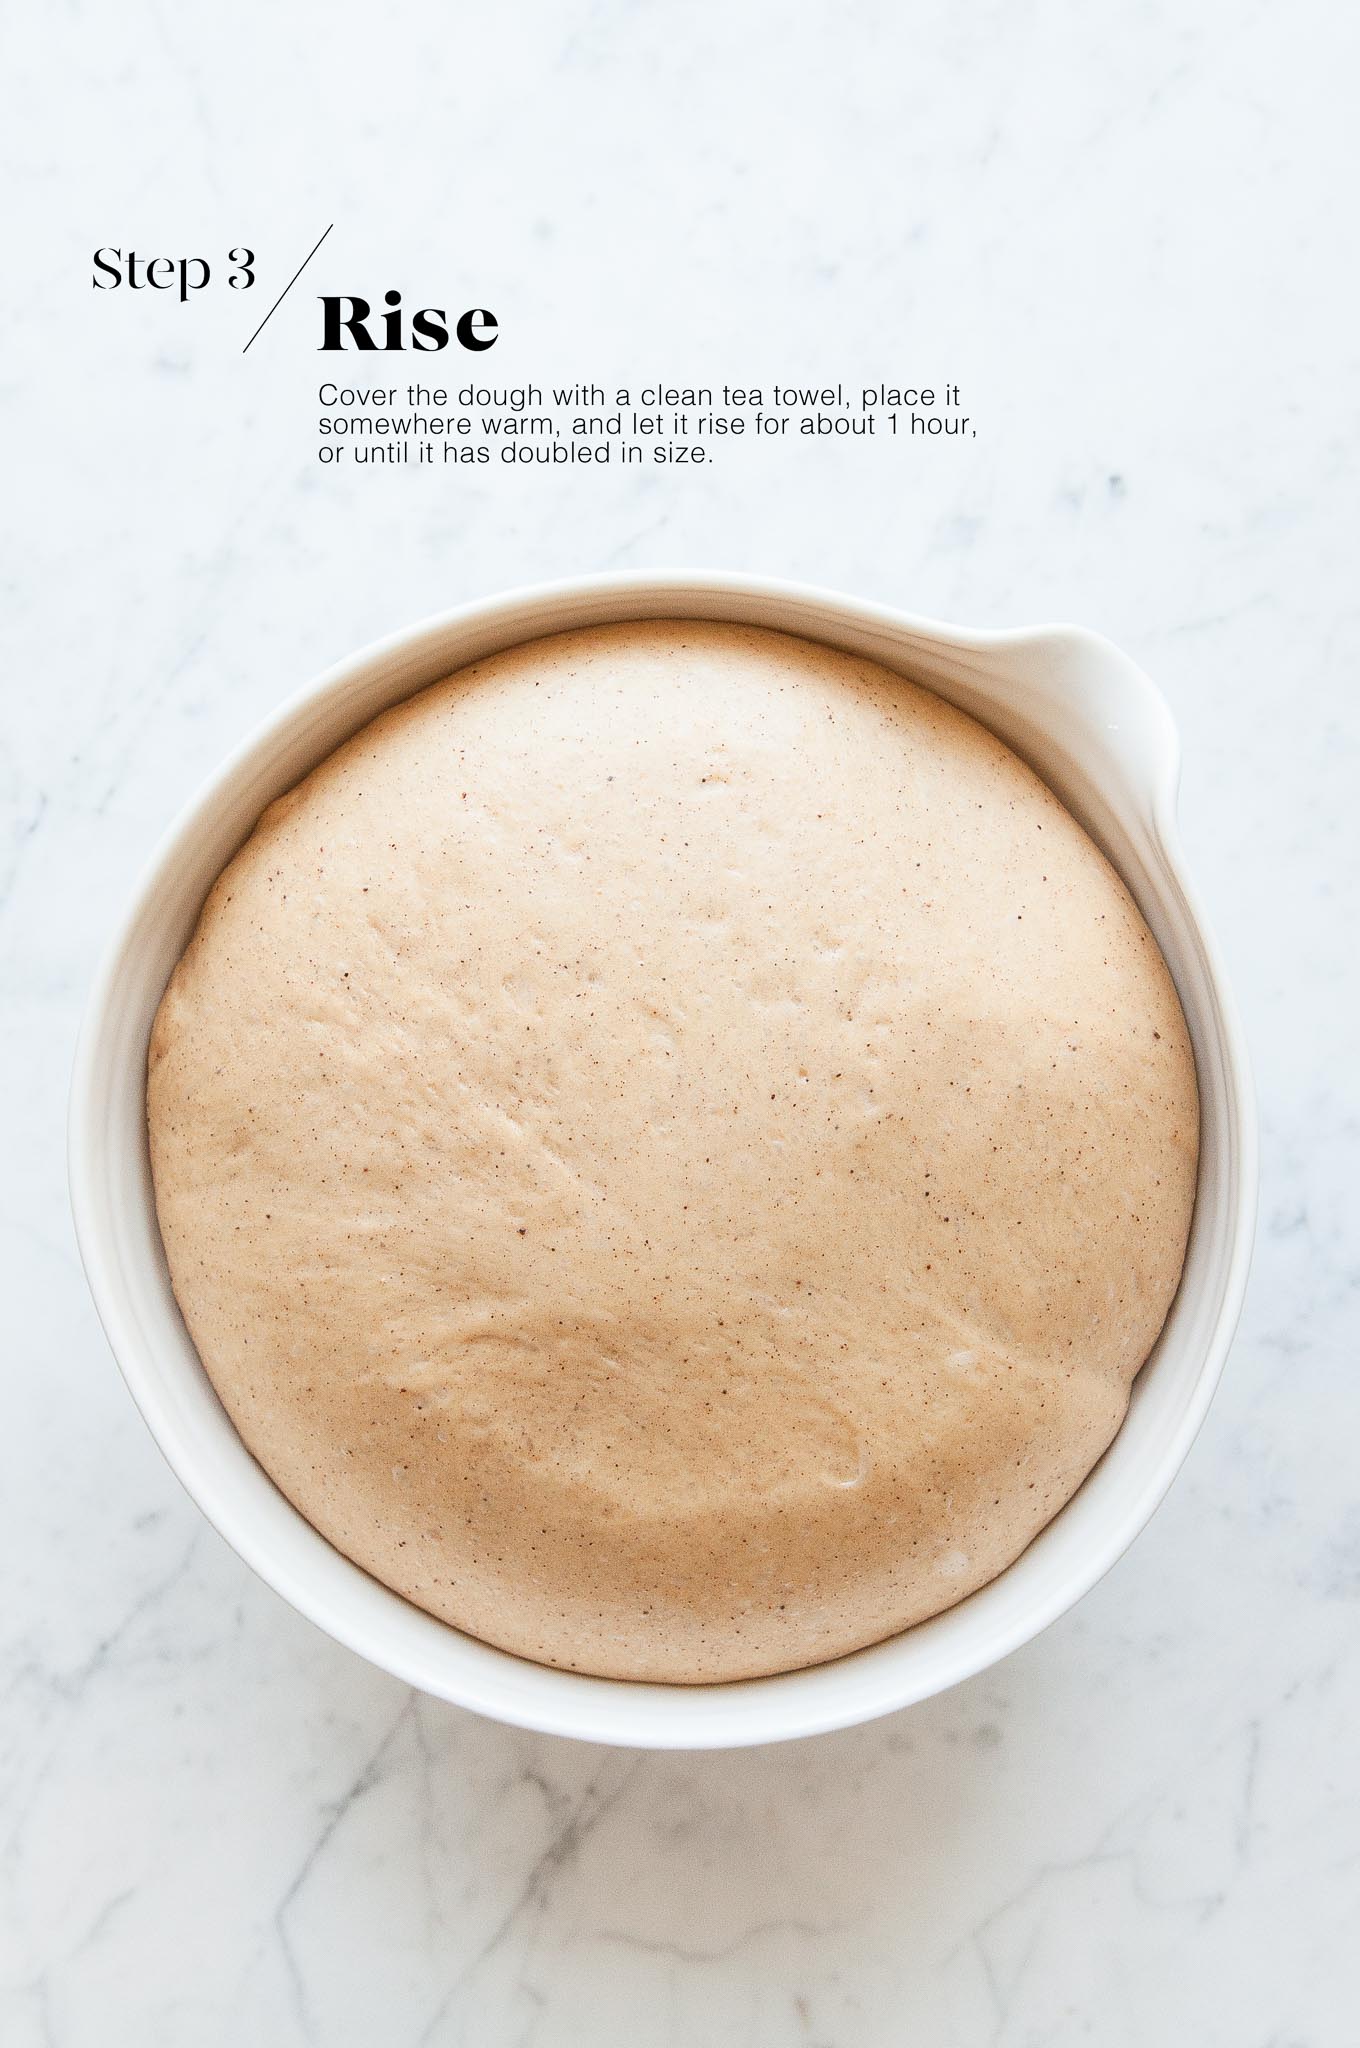
Step 3
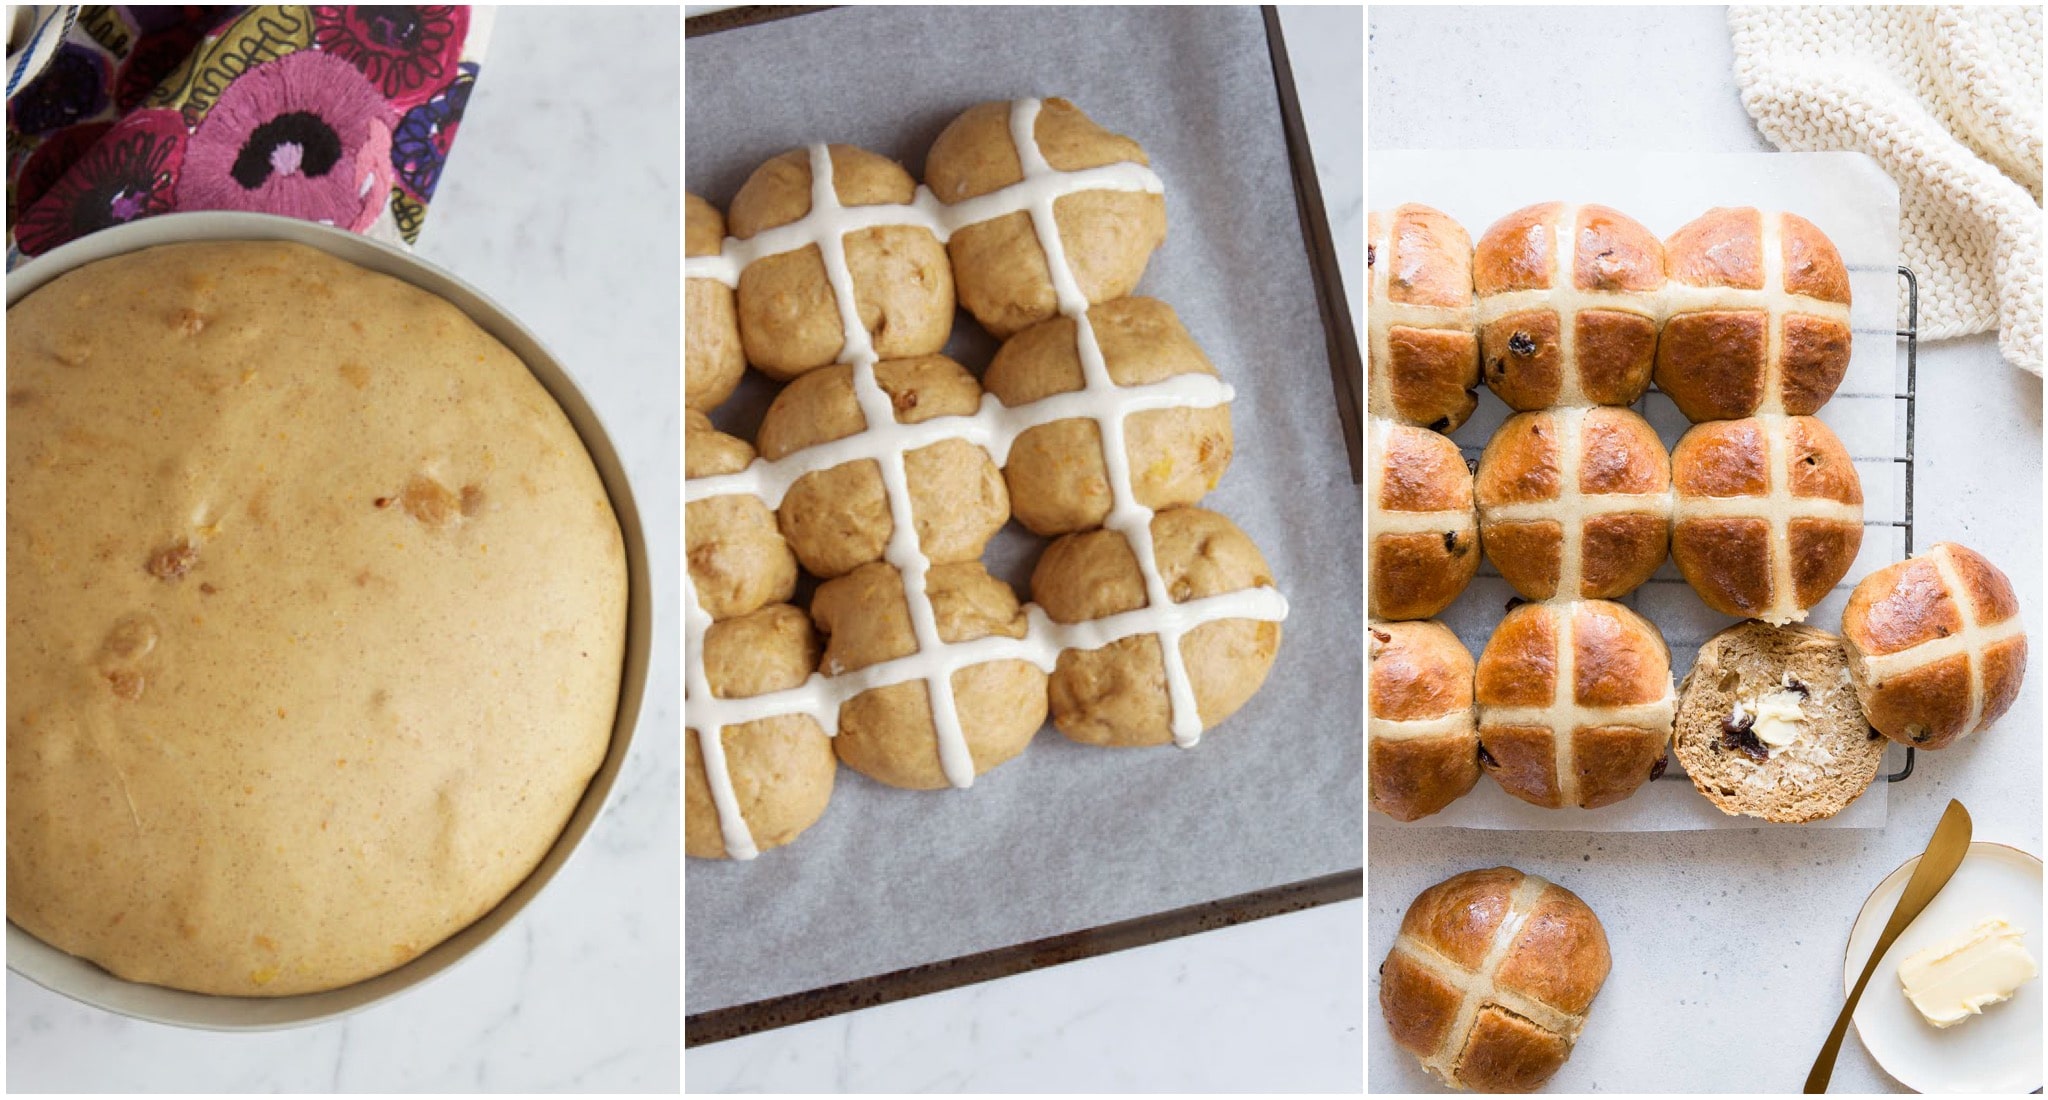
Lightly oil a large mixing bowl, and place the dough into the bowl. Cover with a clean tea towel, and place the bowl somewhere warm for the dough to prove for about 1 hour, or until the dough has doubled in size.
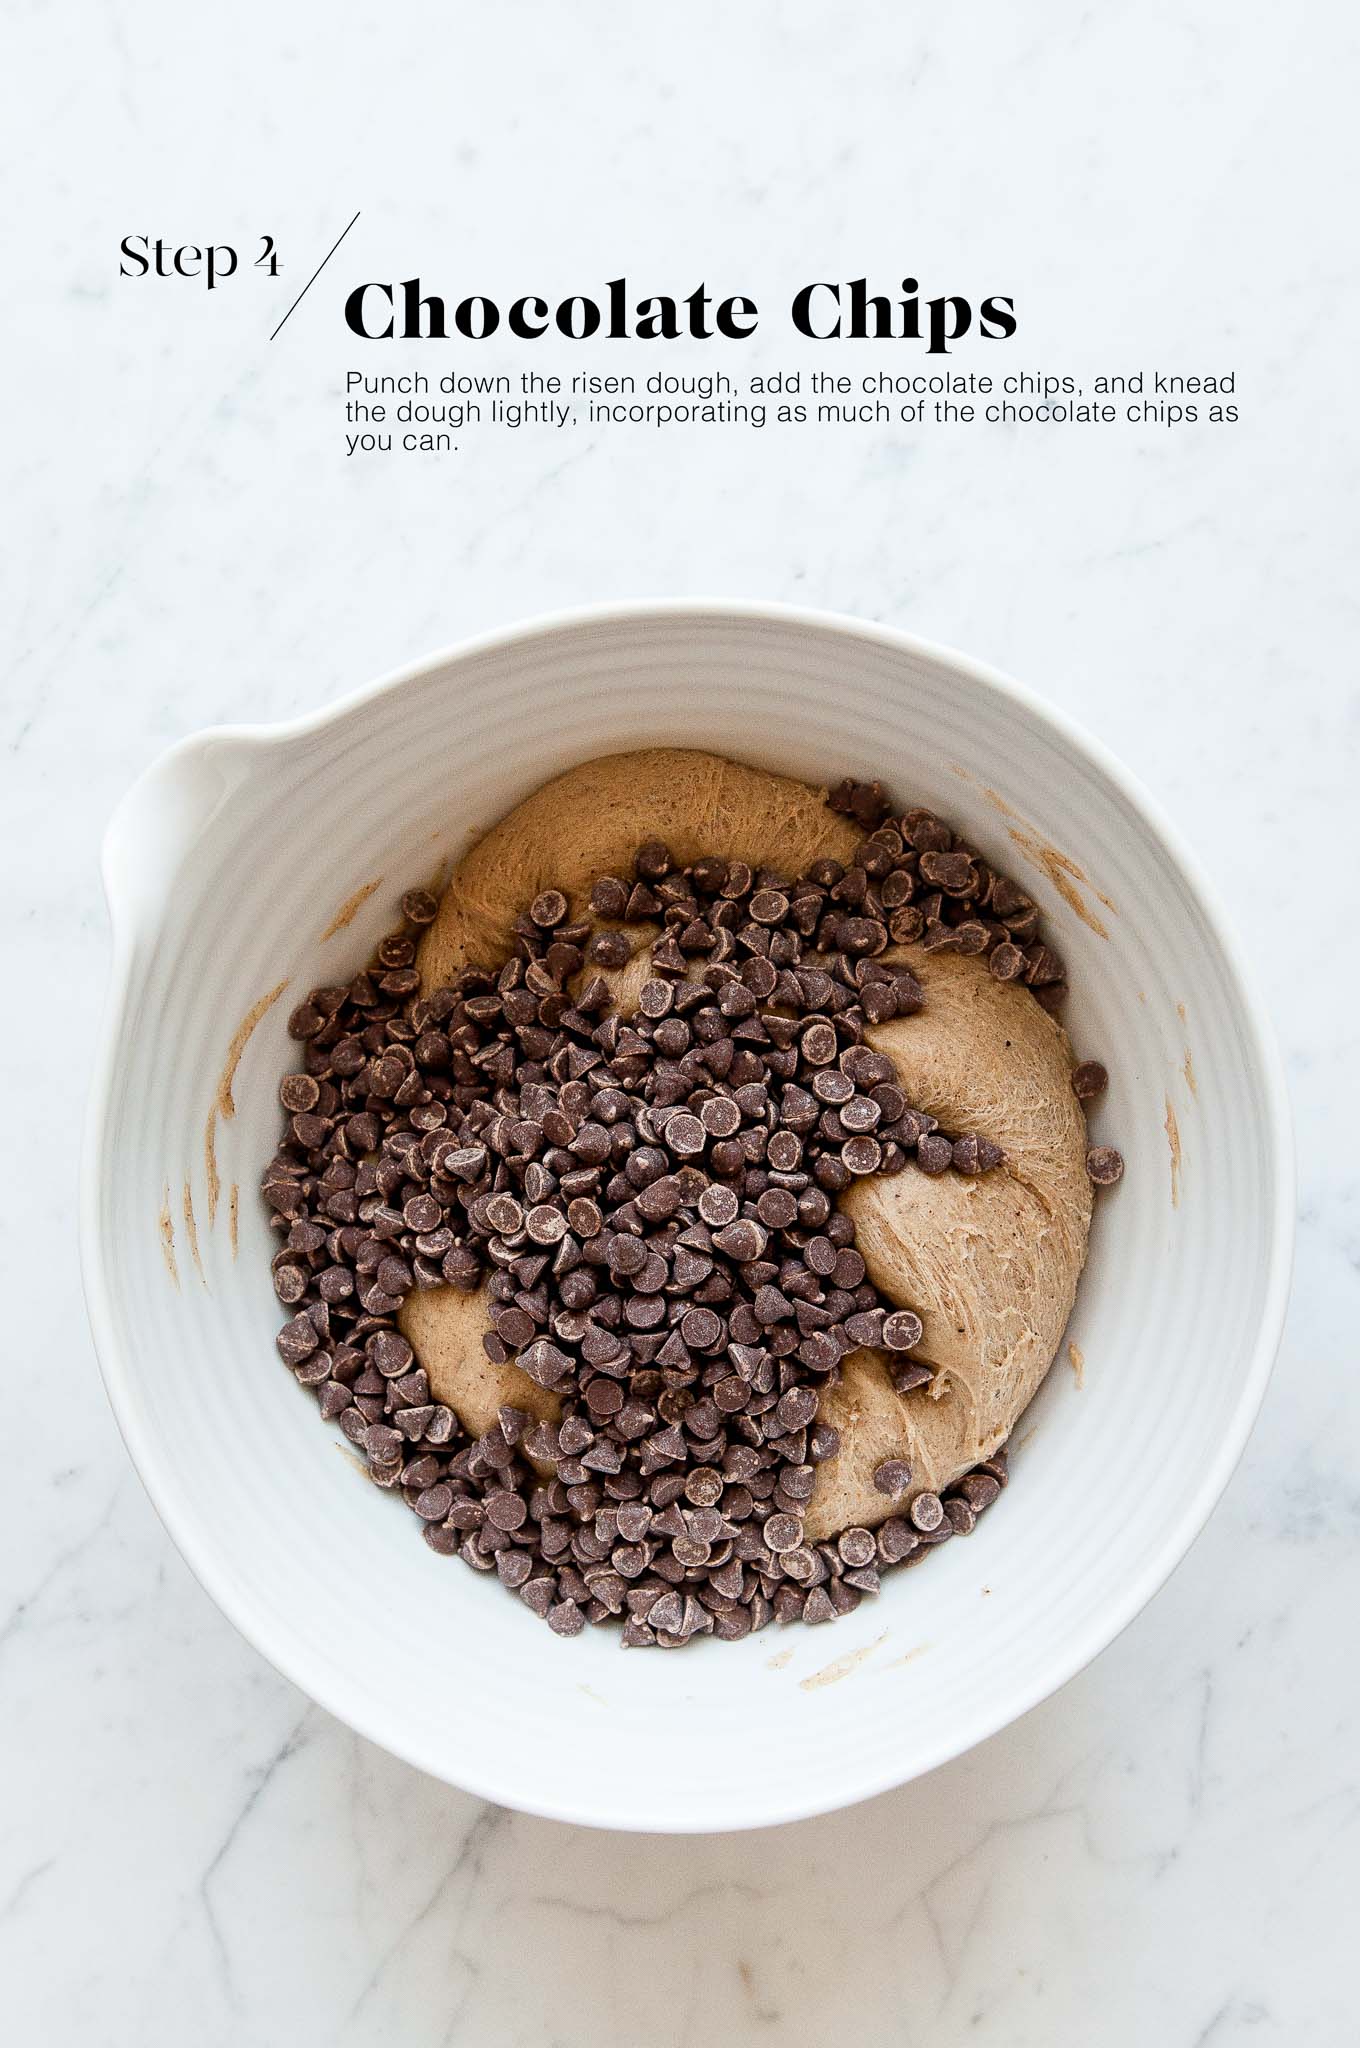
Step 4
Add the chocolate chips, and lightly knead the chocolate chips into the dough. Don’t worry if you cannot incorporate all of the chocolate chips at this stage.
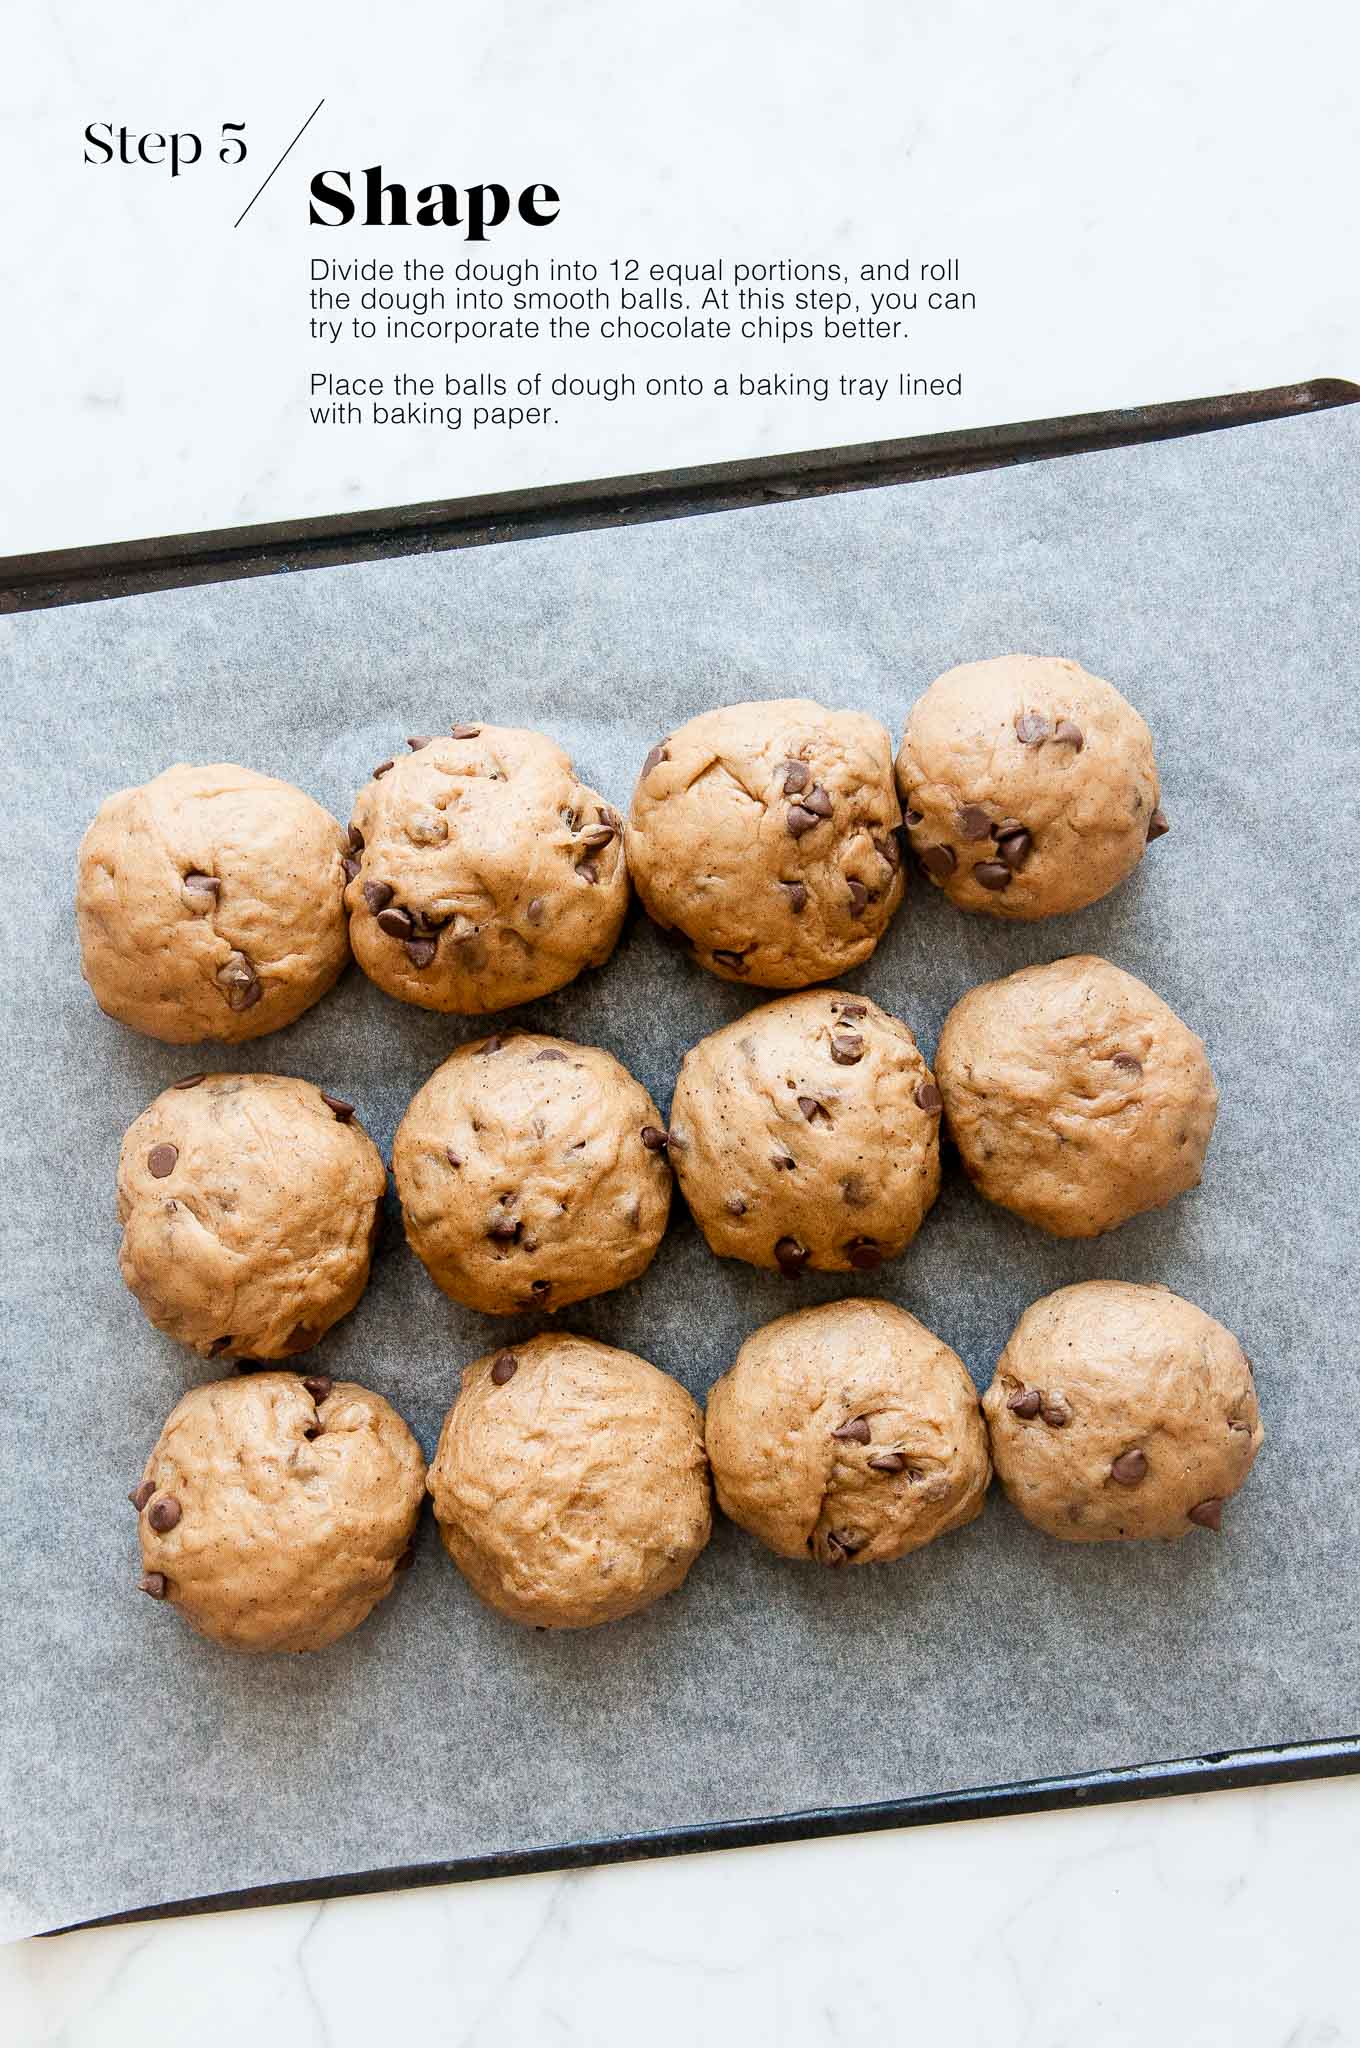
Step 5
Divide the dough into 12 equal portions. I like to weigh the whole dough first, divide this number by 12, and then weigh each portion of dough as I roll them.
As you are rolling the individual buns, try to incorporate the chocolate chips again into the dough.
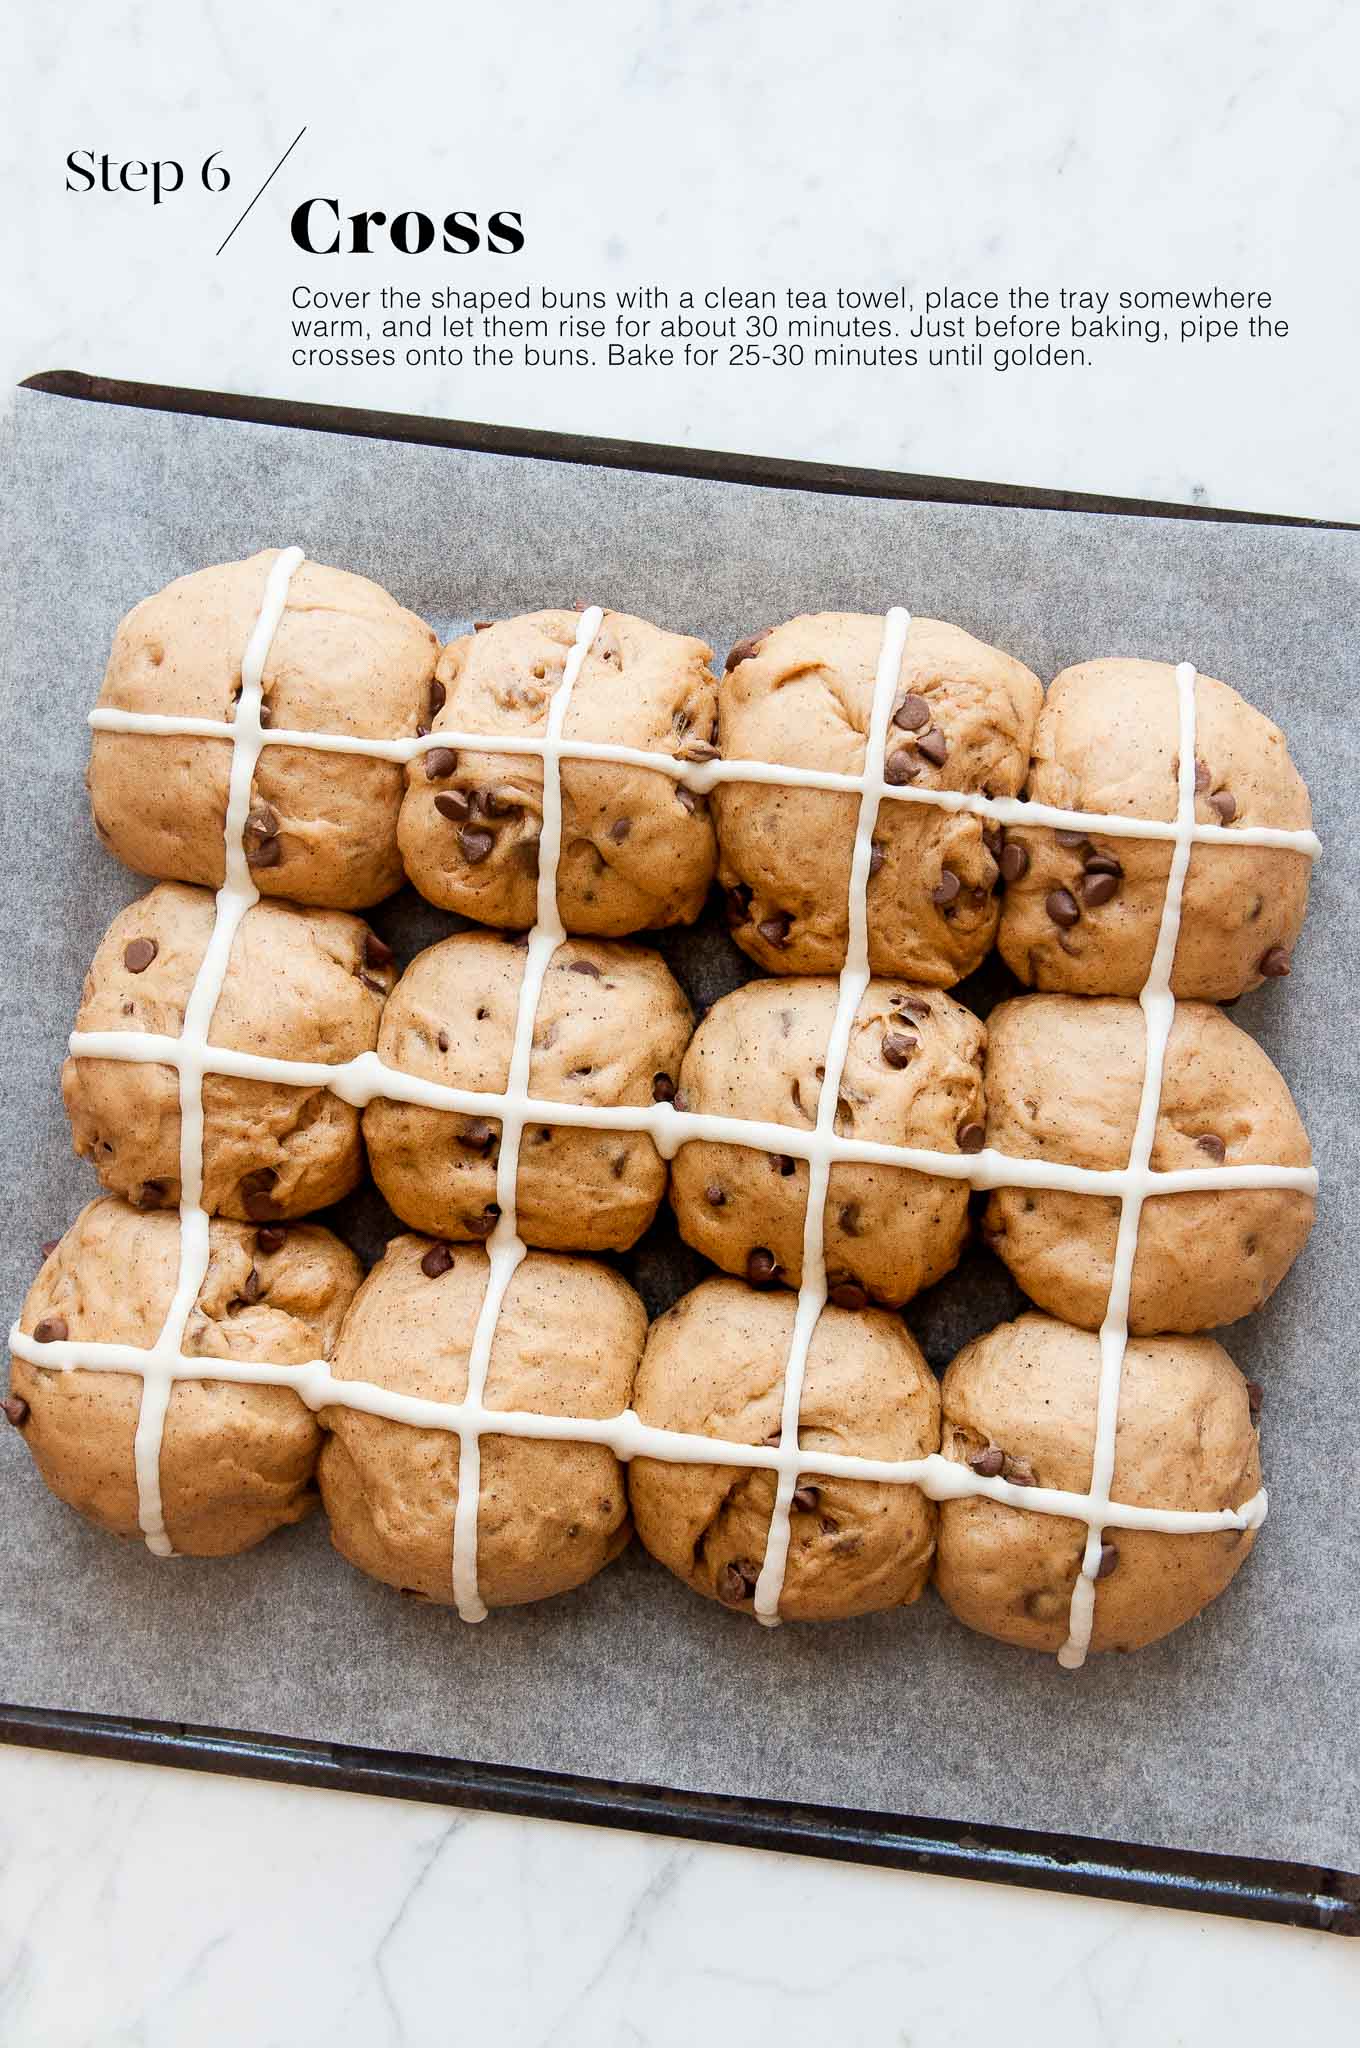
Step 6
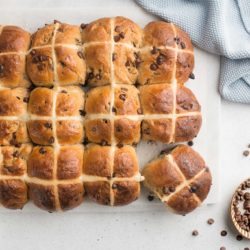
Arrange the balls of dough on a baking tray lined with baking paper. Cover with a clean tea towel and place them somewhere warm for about 30 minutes for them to puff up slightly.
Meanwhile prepare the paste for the crosses.
Once the dough has risen slightly (they will rise just a little bit more in the oven), pipe the crosses onto the buns.
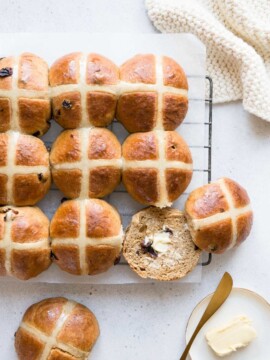
Bake for 25-30 minutes at 170°C/340°F, or until they are lightly golden.
Brush with buns with the glaze as soon as you remove them from the oven.
Classic Hot Cross Buns
To make classic Hot Cross Buns with raisins, please see my recipe with step-by-step photos here.
Tips for Making Bread Dough Ahead of Time
I love baking bread, but I don’t love getting up extra early to get started on the dough. So I typically make the dough the night before and allow it to rise slowly in the fridge overnight. The longer proofing time has the added benefit of allowing the dough to develop more flavour and a better texture. Come the morning, the dough will have at least doubled in size, and it will be ready for shaping as per the recipe.
To make the dough the night before:
- Make the dough as per the recipe.
- Place the dough into a large oiled bowl.
- Cover the bowl with plastic wrap or a reusable bowl cover.
- Place the bowl into the fridge.
- Let the dough rise overnight, or for at least 8-10 hours.
- The next morning, the dough should have at least doubled in size.
- Gently remove the dough from the bowl.
- The dough is ready for shaping and the second proof as per the recipe.
- As the dough will be cold from the fridge, the second proof may take slightly longer.
Chocolate Chip Hot Cross Buns
Ingredients
For the Hot Cross Buns
- 185 ml (¾ cup) milk
- 125 g (1 stick plus 1 tablespoon) unsalted butter
- 2 cloves
- 90 g (½ cup plus 1 tablespoon) light muscovado sugar, or light brown sugar
- 625 g (4 cups plus 3 tablespoons) white bread flour, see Kitchen Notes
- 7 g (2 teaspoons) instant dried yeast, see Kitchen Notes
- 2 teaspoons ground cinnamon
- 1 teaspoon nutmeg, freshly grated
- ½ teaspoon ground ginger
- ½ teaspoon cardamom seeds, freshly ground, optional
- 1 teaspoon fine salt
- 3 eggs
- 200 g (1 cup) dark chocolate chips
For the crosses
- 60 g (⅓ cup plus 1 tablespoon) plain flour, (all-purpose flour)
- 125 ml (½ water) water
For the glaze
- 1 tablespoon boiling water
- 1 tablespoon caster sugar, (superfine sugar)
Instructions
Making the dough
- Combine the milk, butter, cloves and brown sugar in a small saucepan and gently heat until the butter has melted and the sugar has dissolved.
- Leave the milk mixture to cool until it is lukewarm (about 37°C or 98°F).
- Remove and discard the cloves.
- In a large bowl, mix together the flour, yeast, ground cinnamon, ground nutmeg, ground ginger, ground cardamom (if using) and salt.
- Slowly mix the milk mixture into the flour mixture.
- Add one egg at a time.
- Knead the dough on a lightly floured surface until it is elastic in texture. If you have an electric stand mixer, you can knead the dough using the dough hook for about 10-12 minutes on the lowest speed.
- Lightly oil a large bowl.
- Place the dough into the bowl, cover with a teatowel, and leave it to prove in a warm place for about 1 hour or until it has doubled in size. I like to do this in an oven at 50°C or 120°F.
Shaping the buns
- Once the dough has doubled in size, add the chocolate chips.
- Gently knead the dough into a smooth ball. Don’t worry if you are unable to incorporate all of the chocolate chips into the dough at this stage.
- Divide the dough into 12 equal portions. I like to weigh the whole dough, divide the weight by 12, and then weigh each portion of dough as I form them.
- Roll each portion of dough into a ball and place them on a tray lined with baking paper. This step gives you another chance to incorporate the chocolate chips into the dough.
- Cover the balls of dough with a tea towel, and return the tray to a warm place to prove for 30 minutes or until the balls of dough have slightly risen.
Decorating the Buns
- Meanwhile, preheat the oven to 170°C/340°F (without fan). If you have been using the oven to prove the buns, make sure you have taken them out of the oven by this step!
- To make the crosses, mix together the flour and enough water in a small mixing bowl until you have a thick paste, but which is still runny enough to push through a piping bag.
- Fill a small piping bag with the paste, or a small plastic bag and snip off the corner.
- Pipe a cross onto each bun. I do this by piping a line horizontally across all of the buns, and then vertically.
Baking the Hot Cross Buns
- Bake the buns for 25-30 minutes, or until they are golden.
- Meanwhile, make the glaze by heating the water and sugar together in a small saucepan until it comes to a boil and the sugar has dissolved.
- Brush the glaze over the buns as soon as you take them out of the oven.
- Serve the hot cross buns warm or cold.
Kitchen Notes
- MAKE AHEAD TIPS
To start the dough the night before:
* Make the dough as per the recipe.
* Place the bowl of dough (covered) in the fridge to proof overnight, or for at least 8 to 10 hours. During this time, it should have at least doubled in size.
* The next day, proceed with the rest of the recipe. As the dough will be cold, it may require a bit more time for the second proofing period. - DIFFERENT TYPES OF YEAST
Please note that there is a difference between instant yeast (also called instant dried yeast or fast-action dried yeast) and dried yeast (also called active dry yeast). If you are not sure what type of yeast you have, please check the packaging for instructions on how to use the yeast.
* With instant yeast, you can add it directly to the flour mixture without having to activate it first.
* With dried yeast, you will need to activate it first (usually in some warm liquid). - DIFFERENT TYPES OF FLOUR
* Bread flour contains 11-13% protein content, which is required to develop more gluten in the dough, which in turn gives yeasted bread a nice, chewy texture.
* For Swiss readers, I use Zopfmehl (or farine pour tresse) when making bread and enriched dough. - PROOFING THE DOUGH
Dough needs a warm environment for the yeast to activate and cause the dough to rise. If you don’t have a warm place in your home, try one of the following ideas:
* In the oven with the oven light switched on (works only for some ovens).
* In the oven with a tray of boiling water on the bottom shelf.
* In the oven at a low temperature of about 25-30°C (77-86°F). - MAKING SMALLER BUNS FOR KIDS
This recipe produces 12 large buns. You could also divide the dough into 15 portions to produce slightly smaller buns which are more kid-friendly. - CHOCOLATE & ORANGE
If you are fan of the combination of chocolate and orange, add the zest of 1 orange to the milk mixture. - STORAGE
Hot Cross Buns are best eaten the day they are made. Any leftover hot cross buns can be stored in the freezer and toasted before serving. - OVEN TEMPERATURES
All recipes on this website state temperatures for a regular oven (i.e. a conventional oven without fan). If you have a convection oven with a fan, please consult the manufacturer’s handbook on how to adjust the temperature and baking time accordingly. - CONVERSIONS
To convert from cups to grams, and vice-versa, please see this handy Conversion Chart for Basic Ingredients.


Delicious recipe!! This is the only hot cross bun recipe I have found with clear and easy to follow instructions. I can’t wait to make these again.
Family loved it! My buns looked like your photos. Very happy with the result. Might even add more chocolate chips next time.
Thanks for the great recipe and helpful photos. This was my first time making hot cross buns and they turned out perfectly. Do you think I could add cocoa powder to make them extra chocolatey?
Hi Rachel,
So glad you enjoyed this recipe ???? I’ve been experimenting with chocolate choc-chip hot cross buns myself, so I will post the recipe once I get a formula I am happy with. But yes, this basically involves substituting some of the flour for unsweetened cocoa powder, about 1-3 tablespoons, depending on how chocolately you like your buns ???? Let me know if you try this!
I have made it. But when i kneed it with chocolate chips, they’re all melted with the dough…it’s okay, the taste still exotic ????
Hi Heni,
It sounds like the dough was maybe too warm when you mixed through the chocolate chips? That has happened to me a few times as well ???? Ideally, you should wait for the dough to cool down a bit before adding the chocolate chips, especially if you have used a warm place like the oven to prove the dough. This should take only about 5-10 minutes at room temperature.
The other tip is to use chocolate chips which are especially made for baking. These generally contain wax or similar so that the chocolate chips do not really melt but hold their shape during baking. You will have to check the ingredients as not all chocolate chips hold their shape.
If you chop up a normal bar of chocolate, this is likely to melt upon baking. This is usually ok for cookies or muffins, but sometimes you want the chocolate chips to stay as they are.
I hope this helps! But I’m glad you still enjoyed the recipe ????
I made these chocolate hot cross buns today. They were delicious! I took your advice and made them into smaller buns (I got 16 from this recipe), which I thought was the perfect size. I will be making these again closer to Easter.
Very delicious hot cross buns! I liked that they were not too chocolately and you could still taste the spices in the dough. My kids ate everything!
A great recipe! They were not sickly sweet like some chocolate buns can be – these tasted perfect. Amazing recipe and photos.
I tried this recipe yesterday, expecting the buns to last us until Sunday. It has been less than 24 hours and we have eaten them all!! These hot cross buns were so good! I guess I need to make a new batch for brunch on Sunday! 🙂
Beautiful hot cross buns! The taste is wonderful. The paste for the crosses was too runny so I had to thicken it with more flour. Otherwise, great recipe!
These hot cross buns were amazing. I would add more spice next time, but that is just my personal preference. My family thought they were perfect as they were though. Great recipe.
Excellent recipe! My hot cross buns looked better than the bakery’s! Loved the taste too and it was a nice change from the more classic recipe.
Simply delicious! I’m going to make a second batch to freeze.
Wonderful recipe
These are the best instructions I have found for making hot cross buns – thank you! Can’t wait to try your other recipes too.