Salted Egg Yolks
- Prep Time: 10 mins
- Cook Time: 1 hour
- Total Time: 1 hour 10 minutes
- Yield: Makes 6
- Method: Oven
- Cuisine: Chinese, Vietnamese
An easy recipe for Salted Egg Yolks with step-by-step photos.
Ingredients
- lots of fine salt
- 6 egg yolks (or as many as you want to make)
Instructions
To cure the egg yolks
- For this recipe, I like to use a rectangular glass container with an air-tight lid.
- Pour about 2 cm/1 inch depth of salt into the container.
- Use a teaspoon to create some dents in the salt where the egg yolks can sit.
- Carefully separate the yolks from the egg whites, making sure there is no white attached to the yolks. (Do not discard the egg whites. Freeze them in pairs in zip-lock freezer bags for recipes like Pavlova, Friands or Angel Food Cake).
- Carefully place the yolks into the dents in the salt, taking care that there is enough space between the yolks and that they do not touch each other.
- Use a tablespoon to gently sprinkle the remaining salt over the yolks until they are completely covered.
- Place the lid onto the container, and place the container in the fridge for at least 8 hours, or overnight.
To bake the egg yolks
- Preheat the oven to 90°C/200°F.
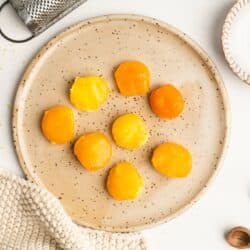
- Carefully remove the yolks from the salt. By this stage, the yolks should be somewhat firm and sticky.
- Rinse the yolks gently with cold water, and place them on some kitchen paper to dry. At this stage, the yolks will look a bit like shiny dried apricots.
- Generously oil a wire rack and place it on a baking tray lined with baking paper.
- Place the yolks onto the wire racks.
- Bake for about 90 minutes, or until the yolks have dried and are firm to the touch.
- Let the yolks cool completely.
- The cured yolks can be kept in an air-tight container in the fridge for up to 3 months.
Kitchen Notes
 OVEN TEMPERATURES
All recipes on this website state temperatures for a regular oven (i.e. a conventional oven without fan). If you have a convection oven with a fan, please consult the manufacturer’s handbook on how to adjust the temperature and baking time accordingly.
 CONVERSIONS
To convert from cups to grams, and vice-versa, please see this handy Conversion Chart for Basic Ingredients.
View the recipe online: https://eatlittlebird.com/salted-egg-yolks/