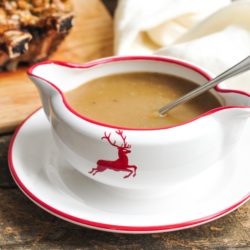
Jamie Oliver’s Get Ahead Gravy

- Prep Time: 15 mins
- Cook Time: 2 hours
- Total Time: 2 hours 15 minutes
- Yield: Serves 6-8
- Category: Christmas
- Method: Roast
- Cuisine: British
My version of Jamie Oliver’s Get Ahead Gravy is the perfect accompaniment to any roast. Make it ahead of time for maximum flavour with minimum stress!
Ingredients
- 2 large brown onions, peeled and roughly chopped
- 2 large carrots, peeled and roughly chopped
- 2 celery stalks, roughly chopped
- 4 rashers of streaky bacon, sliced thickly
- 2 fresh bay leaves
- 2 sprigs of fresh sage
- 2 sprigs of fresh rosemary
- 10–12 chicken wings
- olive oil
- 4 tablespoons plain flour (all-purpose flour) (omit for a gluten-free gravy)
- 60ml (1/4 cup) dry sherry or white wine
- sea salt
- freshly ground pepper
- 2 tablespoons cornflour (cornstarch) mixed with some water
- parsley, finely chopped (optional)
- chives, finely chopped (optional)
Instructions
To make the gravy (ideally, start the day before)
- Preheat the oven to 200°C (390°F) (without fan).
- Place the onions, carrots, celery, bacon, bay leaves, sage, and rosemary into a large, high-sided roasting dish. The roasting dish should be oven-proof and also suitable for using on the stove later.
- Using a very sharp knife, break the chicken wings so that the bones are cracked in places, but the wings are still intact.
- Place the chicken wings on top of the other ingredients in the roasting dish.
- Drizzle with olive oil and season generously with sea salt and freshly ground pepper.
- Roast for 1 hour or until the chicken wings are golden and nicely browned. The more colour the chicken wings have, the more colour and flavour your gravy will have.
- Remove the roasting dish from the oven and place it on the stove over medium-high heat.
- Sprinkle over the flour and let it cook for several minutes.
- Add the sherry or white wine, and let it bubble away for a few minutes until most of it has evaporated.
- Add enough boiling water to just cover the ingredients (about 1.5-2 litres or 6-8 cups).
- Simmer over medium heat for about 30-45 minutes, topping up with boiling water as necessary to maintain the same level of liquid.
- During this time, use a potato masher to squash and mash everything together, and to extract as much flavour as you can from the ingredients. Towards the end of the cooking time, all of the vegetables will have broken down and the chicken wings will have also fallen apart.
- Once everything in the pan looks like mush, strain everything through a fine sieve into a large bowl or jug, extracting as much liquid as you can from the ingredients by pressing down with a wooden spoon. What you will have left is the gravy stock.
- If there is a lot of fat on the surface of the gravy stock, skim this off and discard.
- Let the gravy stock cool before storing in the fridge or freezer.
To finish and serve the gravy
- Bring the gravy stock to a simmer in a large saucepan over medium-high heat.
- Taste the gravy stock for seasoning, keeping in mind that you will be adding the pan juices from the roast later.
- Slowly whisk in the cornflour slurry, adding enough until the gravy has thickened to your liking.
- Once you have roasted your meat (turkey, chicken, beef or pork), skim off and discard any excess fat from the pan juices.
- Pour the pan juices into the gravy.
- Taste the gravy for seasoning.
- I like to add fresh herbs to my gravy, such as parsley and or chives, to add some colour and freshness just before serving.
Kitchen Notes
 GRAVY COLOUR
Roasting the chicken wings until they are golden will help to give your gravy a nice, dark colour. But if you find that your gravy is too pale, or you want to make it a bit darker, I recommend adding a dash of soy sauce. Slowly add the soy sauce until you have the desired colour, but keep in mind that the soy sauce will also add additional salt (as well as umami flavour) to your gravy.
 FREEZER TIPS
You can make the gravy stock or finished gravy well ahead of time and store it in the freezer. I typically freeze food in zip-lock freezer bags. Defrost the gravy in the microwave on a gentle setting until it has partially defrosted, before transferring the gravy to a saucepan to finish defrosting on the stove on low heat. Upon defrosting, the gravy may have a thicker consistency, which you can thin with some water.
 GLUTEN-FREE GRAVY
Simply omit the flour from the recipe, and use cornflour (cornstarch) to thicken the gravy towards the end. The gravy will have slightly different consistency, but it will taste the same.
 RECIPE CREDIT
This recipe is inspired by the Get Ahead Gravy recipe by Jamie Oliver.
 OVEN TEMPERATURES
All recipes on this website state temperatures for a regular oven (i.e. a conventional oven without fan). If you have a convection oven with a fan, please consult the manufacturer’s handbook on how to adjust the temperature and baking time accordingly.
 CONVERSIONS
To convert from cups to grams, and vice-versa, please see this handy Conversion Chart for Basic Ingredients.
Nutrition
- Calories: 230
View the recipe online: https://eatlittlebird.com/jamie-oliver-get-ahead-gravy/
