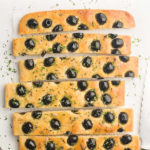
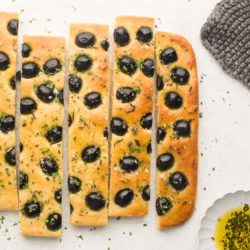
Focaccia with Herbs and Olives
- Resting Time: 2 hours
- Prep Time: 15 mins
- Cook Time: 20 mins
- Total Time: 35 minutes
- Yield: Makes 1
- Category: Bread
- Method: Oven
- Cuisine: Italian
An easy-to-make Focaccia with Herbs and Olives which is soft and chewy on the inside and crisp on the outside. Perfect as a starter or as a side dish! Recipe with step-by-step photos.
Ingredients
For the Focaccia
- 320 g (2 cups plus 3 tablespoons) strong white bread flour
- 7 g (3 teaspoons) instant dried yeast (see Kitchen Notes)
- 1 teaspoon fine salt
- 1 tablespoon caster sugar
- 200 ml (3/4 cup plus 2 teaspoons) warm water
- 3–4 tablespoons olive oil
For the Toppings
Instructions
BEGIN THIS RECIPE ABOUT 3 HOURS BEFORE SERVING
To Make the Focaccia Dough
- Measure the flour, yeast, salt and sugar into the bowl of an electric stand mixer.
- Lightly mix the dry ingredients together with the dough hook.
- Measure the water and olive oil into a small measuring jug.
- Slowly add the wet ingredients to the dry ingredients.
- Knead the dough on low-medium speed until the mixture comes together into a smooth and soft ball of dough. This step should take about 5 minutes.
First Proof
- Generously oil a baking tray measuring 22 cm x 30 cm/9 inches x 12 inches. I use about 3-4 tablespoons of olive oil.
- Place the dough onto the oiled baking tray and gently stretch it to fill the tray. The dough will shrink back and relax as you do this but, with a bit of patience, you should be able to stretch the dough ultimately.
- Cover the dough with a clean tea towel and place the tray somewhere warm for about 1 hour, or until the dough has risen and doubled in height.
Second Proof
- Use your fingers to make random indents in the dough.
- Place the olives into the indents.
- Cover the dough with a clean tea towel and place the tray somewhere warm for another 1 hour, or until the dough has risen and puffed up.
To Bake the Focaccia
- Place most of the chopped rosemary into a small bowl with the olive oil and let it infuse. I usually do this during the second proof, but a short infusing time is also ok.
- Preheat the oven to 220°C/430°F.
- Place a metal baking sheet on the middle shelf of the oven.
- Brush the dough generously with the herb oil.
- Sprinkle over some coarse sea salt.
- Bake for 15-20 minutes, or until the focaccia is lightly golden.
- Brush the cooked focaccia with some more herb oil.
- Garnish with the chopped parsley and reserved rosemary.
- Slice and serve immediately.
Kitchen Notes
 VARIATIONS
* Omit the olives to make a simple herb focaccia.
* Replace the olives with halved cherry tomatoes.
* Replace the olives with roasted garlic cloves.
 DIFFERENT TYPES OF FLOUR
* For Swiss readers: I use Zopfmehl (or farine pour tresse) when making bread and enriched dough.
 DIFFERENT TYPES OF YEAST
* Please note that there is a difference between instant yeast (also called instant dried yeast or fast-action dried yeast) and dried yeast (also called active dry yeast). If you are not sure what type of yeast you have, please check the packaging for instructions on how to use the yeast.
* With instant yeast, you can add it directly to the flour mixture without having to activate it first.
* With dried yeast, you will need to activate it first (usually in some warm liquid).
 PROOFING THE DOUGH
Dough needs a warm environment for the yeast to activate and cause the dough to rise. If you don’t have a warm place in your home, try one of the following ideas:
* In the oven with the oven light switched on (works only for some ovens).
* In the oven with a tray of boiling water on the bottom shelf.
* In the oven at a low temperature of about 25-30°C (77-86°F).
* On the open oven door, with the oven turned on at 100°C (212°F).
 OVEN TEMPERATURES
All recipes on this website state temperatures for a regular oven (i.e. a conventional oven without fan). If you have a convection oven with a fan, please consult the manufacturer’s handbook on how to adjust the temperature and baking time accordingly.
 CONVERSIONS
To convert from cups to grams, and vice-versa, please see this handy Conversion Chart for Basic Ingredients.
View the recipe online: https://eatlittlebird.com/focaccia-with-herbs-and-olives/