Checkerboard Cookies
Serves: 30 cookies
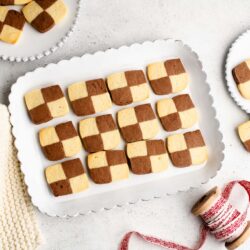
Fun and easy Checkerboard Cookies which are a great addition to any Christmas Cookie Box! Recipe with step-by-step photos.
Ingredients
For the Cookie Dough Base
- 200 g (2 sticks minus 1 tablespoon) unsalted butter, softened
- 3 g (½ teaspoon) fine salt
- 100 g (¾ cup) icing sugar, (powdered sugar)
- 2 egg yolks
- 1 egg white
For the Vanilla Cookie Dough
- ½ of the Cookie Dough Base
- 200 g (1 ⅓ cup) plain flour, (all-purpose flour)
- 1 teaspoon vanilla extract
- ½ to 1 tablespoon cold water
For the Chocolate Cookie Dough
- ½ of the Cookie Dough Base
- 200 g (1 ⅓ cup) plain flour, (all-purpose flour)
- 10 g (2 tablespoons) cocoa powder
- 1 teaspoon vanilla extract
- ½ to 1 tablespoon cold water
Instructions
To Make the Cookie Dough Base
- Place the butter, salt and icing sugar (powdered sugar) into a large bowl.
- Cream the ingredients together until the mixture is light and fluffy. If you are using an electric stand mixer, use the flat-paddle attachment.
- Add the egg yolks.
- Beat to combine well.
- Weigh the mixture in a clean bowl.
- Halve the mixture into separate mixing bowls.
To Make the Vanilla Cookie Dough
- Place one half of the Cookie Dough Base into the mixing bowl.
- Add the additional ingredients for Vanilla Cookie Dough.
- Beat the mixture together until the mixture resembles wet sand.
- Add just enough water to bring the mixture together into a soft dough.
- Remove the mixture to the kitchen bench.
- Knead the dough lightly so that all of the ingredients are well-combined and there are no air-pockets in the dough.
- Shape the dough into 2 logs, measuring 4 cm in width, 2 cm in height, 16-18 cm in length.
- Wrap each log in plastic wrap.
- Place the dough in the fridge for 30 minutes, or in the freezer for 15 minutes, to firm up.
To Make the Chocolate Cookie Dough
- Repeat the same steps as for the Vanilla Cookie Dough.
To Shape the Checkerboard Cookies
- Unwrap the cookie dough logs from the plastic.
- Slice each log in half lengthwise, so that you have 4 logs of each flavour, which are 2 cm in width.
- Take one vanilla log.
- Brush each vanilla log with some egg white.
- Place a chocolate log on top of each vanilla log.
- Brush one pair of the vanilla-chocolate logs with egg white.
- Place the other vanilla-chocolate log on top, so that the colours are alternating.
- Wrap the checkerboard cookie dough in plastic wrap.
- Place the dough in the fridge for 30 minutes, or in the freezer for 15 minutes, to firm up.
To Slice the Checkerboard Cookies
- If you want even-sized cookies, use a ruler to mark the width of each cookie (about 1 cm thick). Otherwise, you can eye-ball it and cut as you please.
- Use a sharp knife to slice the cookie dough.
- Place a sheet of baking paper on a large baking tray.
- Arrange the cookie slices on the baking tray. The cookies do not spread very much upon baking, but space them apart to allow them to bake evenly.
To Bake the Checkerboard Cookies
- Preheat the oven to 180°C/356°F (without fan).
- Preheat a metal tray on the middle shelf in the oven.
- Place the tray of cookies on the preheated metal tray.
- Bake the cookies for 15-18 minutes, or until the cookies are lightly golden.
- Remove the tray from the oven.
- Leave the cookies on the hot tray for about 5-10 minutes to firm up.
- Remove the cookies to a wire rack to cool completely.
Kitchen Notes
- OVEN TEMPERATURES
All recipes on this website state temperatures for a regular oven (i.e. a conventional oven without fan). If you have a convection oven with a fan, please consult the manufacturer's handbook on how to adjust the temperature and baking time accordingly. - CONVERSIONS
To convert from cups to grams, and vice-versa, please see this handy Conversion Chart for Basic Ingredients.