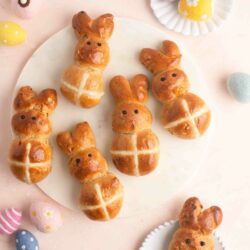
Hot Cross Bunnies
Serves: 12 buns
These Hot Cross Bunnies are a fun twist on an Easter classic which your kids will love! Recipe with step-by-step photos.
Ingredients
For the Hot Cross Buns
- 185 ml (¾ cup) milk
- 125 g (1 stick plus 1 tablespoon) unsalted butter
- 1 orange, zested
- 2 cloves
- 90 g (½ cup plus 1 tablespoon) light muscovado sugar, or light brown sugar
- 125 g (4 ½ oz) raisins
- 625 g (4 cups plus 3 tablespoons) white bread flour, see Kitchen Notes
- 7 g (2 teaspoons) instant dried yeast, see Kitchen Notes
- 6 g (1 teaspoon) fine salt
- 2 teaspoons ground cinnamon
- ½ teaspoon nutmeg, freshly grated
- ½ teaspoon ground ginger
- ½ teaspoon cardamom seeds, freshly ground, optional
- 3 eggs
For the crosses
- 60 g (⅓ cup plus 1 tablespoon) plain flour, (all-purpose flour)
- 125 ml (½ cup) water
To decorate
- dried blueberries, or raisins
For the glaze
- 1 tablespoon boiling water
- 1 tablespoon caster sugar, (superfine sugar)
Instructions
To make dough
- Combine the milk, butter, orange zest, cloves, brown sugar and raisins in a small saucepan and gently heat until the butter has melted and the sugar has dissolved.
- Leave the mixture to cool until it is lukewarm (about 37°C or 98°F).
- Remove and discard the cloves.
- In a large bowl, mix together the flour, yeast, salt, ground cinnamon, ground nutmeg, ground ginger, and ground cardamom (if using).
- Slowly mix the milk mixture into the flour mixture.
- Add one egg at a time.
- Knead the dough on a lightly floured surface until it is soft and elastic in texture. If you have an electric stand mixer, you can knead the dough using the dough hook for about 10-12 minutes on medium speed.
- If the dough is too wet, add some flour (about a tablespoon at a time) until the dough forms a soft ball.
- Lightly oil a large bowl.
- Place the dough into the bowl, cover with a teatowel, and leave it to prove in a warm place for about 1 hour or until it has doubled in size.
To portion the dough
- For each bunny, you will need 3 pieces weighing 20 g/0.7 oz (ears), 30 g/1 oz (head) and 50 g/1.8 oz (body). From this recipe, you should have enough dough for 12 bunnies, with a bit leftover. Weighing the pieces will help you to make nicely proportioned bunnies, but you can also simply guess the weight and improvise as you go.
- Roll each piece of small dough into a smooth ball by pulling the edges together underneath and pinching them together. Roll until there are no visible seams.
To shape the dough
- Line a large baking tray with baking paper.
- Form the bunnies on the lined baking tray.
- Attach the heads to the bodies of each bunny by firmly pressing them together.
- For the ears, roll the dough into an oval shape. Use a sharp knife to cut an incision in the middle of the dough, but only 3/4 down the length of the dough, to form the ears.
- Loosely cover the bunnies with a sheet of cling film, and place them somewhere warm for 20-30 minutes, or until they have puffed up slightly.
To decorate the Hot Cross Bunnies
- To make the crosses, mix together the flour and enough water in a small mixing bowl until you have a paste which is thick, but still runny enough to push through a piping bag.
- Fill a small disposable piping bag with the paste.
- Cut off the end of the piping bag, small enough to pipe a thin line of paste.
- Pipe a cross onto the body of each bunny.
- Insert the dried blueberries to form eyes on the heads.
To bake the Hot Cross Bunnies
- Preheat the oven to 180°C/356°F (without fan).
- Bake the buns for about 20-30 minutes, or until the bunnies are lightly golden. Check the bunnies at about 10 minutes, and if they are browning too quickly, cover them with a loose sheet of foil for the rest of the baking time.
- The bunnies are cooked if an internal thermometer reads 85°C (185°F).
- Meanwhile, make the glaze by heating the water and sugar together in a small saucepan until it comes to a boil and the sugar has dissolved.
- Brush the glaze over the buns as soon as you take them out of the oven. Be careful around the eyes as they can easily detach.
- Serve the Hot Cross Bunnies warm or cold. Leftover Hot Cross Bunnies are best split horizontally, toasted and slathered with lots of butter.
Kitchen Notes
- DIFFERENT TYPES OF YEAST
Please note that there is a difference between instant yeast (also called instant dried yeast or fast-action dried yeast) and dried yeast (also called active dry yeast). If you are not sure what type of yeast you have, please check the packaging for instructions on how to use the yeast.
* With instant yeast, you can add it directly to the flour mixture without having to activate it first.
* With dried yeast, you will need to activate it first (usually in some warm liquid). - DIFFERENT TYPES OF FLOUR
* Bread flour contains 11-13% protein content, which is required to develop more gluten in the dough, which in turn gives yeasted bread a nice, chewy texture.
* If you do not have strong white bread flour, plain flour (all-purpose flour) also works well in this recipe. The texture will be a little softer and less bread-like, but the difference is otherwise not very noticeable.
* For Swiss readers, I use Zopfmehl (or farine pour tresse) when making bread and enriched dough. - MAKE AHEAD TIPS
To start the dough the night before, make the dough as per the recipe. Place the bowl of dough (covered) in the fridge to proof overnight, or for at least 8 to 10 hours. During this time, it should have at least doubled in size. The next day, proceed with the rest of the recipe. As the dough will be cold, it may require a bit more time for the second proofing period. - PROOFING THE DOUGH
Dough needs a warm environment for the yeast to activate and cause the dough to rise. If you don't have a warm place in your home, try one of the following ideas:
* In the oven with the oven light switched on (works only for some ovens).
* In the oven with a tray of boiling water on the bottom shelf.
* In the oven at a low temperature of about 25-40°C (77-104°F). - DRIED FRUIT
You can also play around with the dried fruit content, or omit it completely for just a plain spiced bun. - STORAGE
Hot Cross Buns are best eaten the day they are made. Any leftover hot cross buns can be stored in the freezer and toasted before serving. - OVEN TEMPERATURES
All recipes on this website state temperatures for a regular oven (i.e. a conventional oven without fan). If you have a convection oven with a fan, please consult the manufacturer's handbook on how to adjust the temperature and baking time accordingly. - CONVERSIONS
To convert from cups to grams, and vice-versa, please see this handy Conversion Chart for Basic Ingredients.