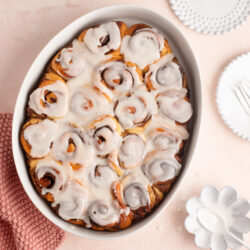
Mini Cinnamon Rolls
Serves: 24 mini rolls
Your favourite Cinnamon Rolls but a mini version! Recipe for Mini Cinnamon Rolls with step-by-step photos.
Ingredients
For the Dough
- 400 g (2 ⅔ cups) white bread flour
- 75 g (⅓ cup) caster sugar, (superfine sugar)
- ½ teaspoon fine salt
- 9 g (3 tsp) instant dried yeast, see Kitchen Notes below
- 1 egg, at room temperature
- 250 ml (1 cups) milk, warmed to 37°C/98°F
- 45 g (3 tbsp) unsalted butter, softened
For the Cinnamon-Sugar Filling
- 100 g (1 stick) unsalted butter, softened
- 100 g (½ cup plus 1 tablespoon) light muscovado sugar, or light brown sugar
- 2 teaspoons ground cinnamon
- ¼ teaspoon fine salt
For the Icing
- 135 g (1 cup) icing sugar, (powdered sugar)
- 2 tablespoons milk
- 15 g (1 tbsp) unsalted butter, softened
Instructions
For the Dough
- Measure the flour, sugar, salt and yeast into the bowl of an electric stand mixer.
- Lightly mix the ingredients together using the dough hook.
- Add the egg to the bowl.
- Slowly pour in the warm milk, and continue mixing until everything comes together into a rough dough.
- Add the butter, one tablespoon at a time. Once the butter has been fully incorporated into the dough, add the next tablespoon of butter.
- Once all of the butter has been added, continue kneading the dough on medium speed for about 15 to 20 minutes.
- The dough is ready when it is soft and smooth, and no longer sticks to the side of the bowl. The dough will be somewhat sticky from the butter and egg.
For the First Proofing Session
- Lightly oil a large mixing bowl.
- Place the dough inside the bowl.
- Cover the dough with a clean tea towel, plastic wrap, or a reusable bowl cover.
- Leave the dough somewhere warm for 1 to 1.5 hours, or until the dough has doubled in size (see Kitchen Notes below).
For the Cinnamon-Sugar Filling
- Just before the dough is ready, make the filling by beating together the ingredients.
- Divide the filling into two portions.
To Shape the Cinnamon Rolls
- Line a baking pan with baking paper. For this recipe, I have used a ceramic baking dish measuring approximately 30 x 20cm/12 x 8 inches. To make it easier to line the baking pan, scrunch up the baking paper and then unfold it again. The baking paper will then be easier to mould to line your baking pan.
- Once the dough has doubled in size, gently remove the dough from the bowl. The dough will deflate as you handle it.
- Divide the dough into two even-sized pieces (I use a digital scale for this task).
- Roll out one piece of dough into a rectangle shape measuring approximately 20 x 35 cm/8 x 14 inches.
- Use a small palette knife to evenly spread one portion of the filling all over the dough.
- Roll up the dough tightly from the long end, i.e. to produce a log that is 35 cm/14 inches long.
- Cut the dough into 12 even pieces. I find it easiest to do so using a long piece of unflavoured dental floss, which will allow you to slice through the dough cleanly and sharply, and without flattening the dough. Simply slide the floss under the dough, then pull both ends of the floss across each other, which will cut through the dough as you pull.
- Arrange the slices of dough in the baking pan with a bit of space in between each roll to allow them to rise and puff a little.
- Repeat Steps 4 to 8 with the other piece of dough so that you end up with a total of 24 pieces.
For the Second Proofing Session
- Place the pan somewhere warm for about 15 minutes, or until the buns have risen and puffed up slightly. At this stage, the buns should be touching with no space in between.
To Bake the Mini Cinnamon Rolls
- Preheat the oven to 200°C/390°F (without fan) with a metal baking tray on the middle shelf.
- Place the pan of buns on the preheated baking tray.
- Bake the buns for 10 minutes.
- Reduce the heat to 180°C/356°F and bake for another 20 minutes, or until the buns are lightly golden. Check the buns at about 10 minutes, and if they are browning too quickly, cover them with a loose sheet of foil for the rest of the baking time.
- The buns are cooked if an internal thermometer reads 85°C/185°F.
- If the centre of the buns pop up during baking, simply push them down with a teaspoon whilst the buns are still hot.
- Leave the buns to cool in the baking pan for about 5 minutes.
- Gently remove the buns (intact) to a wire rack, and leave them to cool completely. I also recommend removing the baking paper so that the bottom of the buns do not steam and become soggy.
To Ice the Mini Cinnamon Rolls
- Make the icing by whisking together the ingredients. Add the milk gradually until the icing is a thick, but runny, consistency.
- Place the wire rack of buns over a baking pan or a sheet of baking paper to catch the icing drips.
- Drizzle the icing all over the cooled Mini Cinnamon Rolls.
- If you wish, you can return the iced Mini Cinnamon Rolls to the same baking dish which you used to bake them.
- The Mini Cinnamon Rolls can be served immediately or once the icing has set. They are best eaten the same day they are baked.
Kitchen Notes
- MAKE AHEAD TIPS
To make the Mini Cinnamon Rolls the night before:
* Make the dough as per the recipe.
* Place the bowl of dough (covered) in the fridge to proof overnight, or for at least 8 to 10 hours. During this time, it should have at least doubled in size.
* The next day, proceed with the rest of the recipe. As the dough will be cold, it may require a bit more time for the second proofing period. - DIFFERENT TYPES OF FLOUR
For Swiss readers: I use Zopfmehl (or farine pour tresse) when making bread and enriched dough. - DIFFERENT TYPES OF YEAST
* Please note that there is a difference between instant yeast (also called instant dried yeast or fast-action dried yeast) and dried yeast (also called active dry yeast). If you are not sure what type of yeast you have, please check the packaging for instructions on how to use the yeast.
* With instant yeast, you can add it directly to the flour mixture without having to activate it first.
* With dried yeast, you will need to activate it first (usually in some warm liquid). - PROOFING THE DOUGH
Dough needs a warm environment for the yeast to activate and cause the dough to rise. If you don't have a warm place in your home, try one of the following ideas:
* In the oven with the oven light switched on (works only for some ovens).
* In the oven with a tray of boiling water on the bottom shelf.
* In the oven or a steamer oven at a low temperature of about 25-40°C (77-104°F). - OVEN TEMPERATURES
All recipes on this website state temperatures for a regular oven (i.e. a conventional oven without fan). If you have a convection oven with a fan, please consult the manufacturer's handbook on how to adjust the temperature and baking time accordingly. - CONVERSIONS
To convert from cups to grams, and vice-versa, please see this handy Conversion Chart for Basic Ingredients.