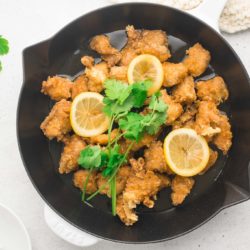
Chinese Lemon Chicken
Serves: 4
Easy and delicious Chinese Lemon Chicken which tastes better than your local take-away! Crispy pieces of fried chicken tossed in a fresh and vibrant sticky lemon glaze. Recipe with step-by-step photos.
Ingredients
For the Marinade
- 700 g (1 ½ lb) chicken breast fillets and/or chicken thigh fillets, with or without skin
- 1 teaspoon sea salt
- 1 teaspoon black pepper, freshly cracked
- ½ to 1 teaspoon Chinese five spice powder, optional
- 30 ml (2 tablespoons) soy sauce
- 15 ml (1 tablespoon) mirin, or Chinese shaoxing wine
- 3 garlic cloves, finely chopped or finely grated
- 2 teaspoons ginger, finely chopped or coarsely grated
- 1 egg white
For the Crispy Chicken
- 300 g (2 cups) plain flour, (all-purpose flour)
- vegetable oil, for shallow frying
For the Sticky Lemon Sauce
- 250 ml (1 cup) chicken stock
- 60 ml (¼ cup) Shaoxing cooking wine
- 60 ml (¼ cup) white wine vinegar, or apple cider vinegar
- 30 ml (2 tablespoons) soy sauce
- 1/2 teaspoon sesame oil
- 6 tablespoons honey
- 110 g (½ cup) caster sugar, (superfine sugar)
- 1 tablespoon cornflour, (US: cornstarch)
- 1 to 1 ½ lemons, juiced, or to taste
- ½ lemon, thinly sliced into rounds
To Serve
- coriander, (cilantro) finely chopped
- Steamed Jasmine Rice
Instructions
For the Marinade
- Cut the chicken into bite-sized pieces, about 2 cm (1 inch) cubes.
- Place the chicken into a medium-sized bowl.
- Add the marinade ingredients.
- Mix everything together until the chicken is well-combined in the marinade.
- Set aside to marinate for at least 30 minutes.
For the Crispy Chicken (Please see my recipe for Japanese Fried Chicken for step-by-step photos)
- Heat a large saucepan with enough vegetable oil to about 2 cm (1 inch) depth.
- Place the flour into a large bowl or baking tray.
- Pour the chicken, together with all of the marinade, onto the flour.
- Use your hands to coat the chicken in the flour. The liquid in the marinade will mix with the flour to form a light batter.
- Press the flour into the chicken to help form a craggy coating on the chicken. It is this craggy coating which will make the chicken crispy and crunchy.
- The oil is ready when it reaches 165°C or 325°F, or when a wooden chopstick inserted in the oil creates lots of small bubbles.
- Cook the chicken in batches until golden in colour.
- Drain the chicken pieces on kitchen paper or on a wire rack.
For the Sticky Lemon Sauce
- Mix all of the ingredients, except for the lemon juice and lemons, together in a bowl or measuring jug.
- Heat a large skillet or saucepan over medium-high heat.
- Pour the sauce into the skillet.
- As the sauce starts to simmer, use a whisk to stir the sauce to prevent any lumps from forming.
- The sauce needs to come to a boil to activate the cornflour (cornstarch), which will thicken the sauce.
- Once the sauce has thickened to your liking, take the pan off the heat.
- Whisk in the lemon juice. Start by adding the juice of half a lemon, and keep adding more to taste.
- Once you are happy with the Sticky Lemon Sauce, add the lemon slices. These are mostly to serve as garnish or decoration.
- This recipe makes a lot of sauce so there is enough to drizzle over some steamed rice or vegetables. If you don't want a lot of sauce in this dish, remove half of the sauce and store it in the fridge for another time.
To Serve
- Add the Crispy Chicken pieces to the Sticky Lemon Sauce.
- Use a spoon to quickly toss the chicken pieces in the sauce.
- Serve immediately.
Kitchen Notes
- WHAT TYPE OF CHICKEN TO USE
For this recipe, I like to use boneless chicken thigh fillets with the skin. The skin crisps up during frying, adding extra crunch and texture. But you can also use chicken breast. - OVEN & STOVE TEMPERATURES
All recipes on this website have been tested on an induction stove and/or with a conventional oven (i.e. an oven without fan). All recipes on this website use temperatures for a conventional oven, unless otherwise mentioned. Convection ovens (i.e. fan-forced ovens) are typically 20°C/70°F hotter than conventional ovens, but please check your manufacturer’s handbook. - CONVERSIONS
To convert from cups to grams, and vice-versa, please see this handy Conversion Chart for Basic Ingredients.