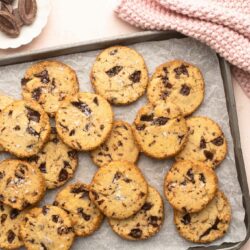
Salted Butter Chocolate Chip Cookies
- Resting Time: 1 hour
- Prep Time: 30 mins
- Cook Time: 15 mins
- Total Time: 45 minutes
- Yield: Makes about 50 cookies
- Category: Cookies
- Method: Oven
Addictive and moreish Salted Butter Chocolate Chip Cookies. Recipe with step-by-step photos.
Ingredients
For the cookies
- 500 g (4 1/2 sticks) salted butter, softened
- 220 g (1 cup) caster sugar
- 120 g (3/4 cup) light muscovado sugar or light brown sugar
- 2 teaspoons vanilla extract
- 670 g (4 1/2 cups) plain flour (all-purpose flour)
- 350 g (12 oz) good quality milk chocolate or dark chocolate, roughly chopped with large and small pieces
To decorate
- 1 egg, lightly beaten
- 220 g (1 cup) demerera sugar, for rolling
Instructions
To make the cookie dough
- Place the butter, sugars and vanilla into the bowl of a stand mixer.
- Using the flat-paddle attachment, cream the butter and sugars for about 5 minutes on medium speed, or until the mixture is light and fluffy.
- On low speed, add the flour, one tablespoon at a time.
- Once the flour is almost all incorporated, add the chopped chocolate.
- Lightly beat the chocolate into the dough so that it is evenly distributed. This should take a few rotations of the stand mixer.
To shape the cookie dough
- Place a large sheet of plastic wrap on the kitchen bench.
- Using your hands or a bench scraper, scoop some dough onto the plastic wrap, and continue until you have enough for a long log which is roughly 4-5 cm (1.5-2 inches) in diameter (or however big you like your cookies).
- Lightly shape the dough into a long log, although it doesn’t need to be perfect at this stage.
- Tightly wrap the dough in the plastic wrap, forming a smooth log as you do so.
- Squeeze and secure the ends.
- Repeat the above steps with the remaining dough.
- Place the logs of dough in the fridge for at least 1 hour to firm up, or you can store them in the freezer to bake another time.
To decorate the cookies
- Line a large sheet pan with baking paper.
- Unwrap the cookie dough log and leave it to rest on the plastic wrap.
- Using a brush to lightly brush the cookie dough with egg wash.
- Place a generous amount of demerera sugar on a baking sheet or plate which is big enough to hold the cookie dough log.
- Roll the cookie dough in the sugar until it is evenly coated.
- Using a sharp knife, slice the cookies from the log, about 1 cm (1/2 inch) thick.
- Occasionally, your knife will hit a piece of chocolate, making it difficult to slice neat rounds. If your cookie slices fall apart, simply squish them back into shape.
- Place the cookies on the sheet pan, spaced about 2 cm (1 inch) apart.
To bake the cookies
- Preheat the oven to 180°C (350°F) (without fan).
- Bake the cookies for 12 to 15 minutes, or until the edges are golden and caramelised, and the cookies or lightly golden on top.
- Leave the cookies on the hot sheet pan for 5-10 minutes before removing them to a wire rack to cool completely.
Kitchen Notes
 HALVING THE RECIPE
To make a smaller quantity of cookies, simply halve this recipe. I have intentionally doubled this recipe as I like to bake some cookies right away, but freeze the rest for another time.
 FREEZING COOKIE DOUGH
This recipe will produce about 4 logs of cookie dough. I usually use 2 logs right away and freeze the remaining 2 logs for another time. When you are ready to make the cookies, you can bake the cookies from frozen, but you will need to partially defrost the cookie dough first until it has softened enough to slice. Once the dough is ready to slice, brush it with egg wash and proceed with the rest of the recipe.
 HOW TO MAKE PERFECTLY ROUND COOKIES
* Take the cookies out of the oven 2 minutes before they have finished baking.
* Find a round cookie cutter which is slightly larger than your cookies.
* Place the cookie cutter over the hot cookies, and use a circular motion to gently shape the cookies into a perfectly round shape.
* Return the cookies to the oven to finish baking.
 RECIPE CREDIT
This recipe is adapted from Dining In by Alison Roman.
 OVEN & STOVE TEMPERATURES
All recipes on this website have been tested on an induction stove and/or with a conventional oven (i.e. an oven without fan). All recipes on this website state temperatures for a conventional oven. If you have a convection oven (i.e. an oven with a fan), please consult the manufacturer’s handbook on how to adjust the temperature and baking time accordingly.
 CONVERSIONS
To convert from cups to grams, and vice-versa, please see this handy Conversion Chart for Basic Ingredients.
View the recipe online: https://eatlittlebird.com/salted-butter-chocolate-chip-cookies/