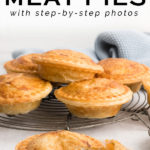
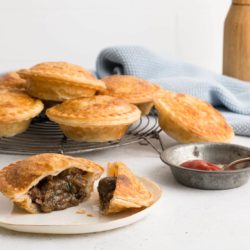
Pie Maker Meat Pies
- Prep Time: 10 mins
- Cook Time: 10 mins
- Total Time: 20 minutes
- Yield: 24 mini pies
- Category: Pies
- Method: Pie Maker
- Cuisine: Australian
Makes these delicious meat pies using a pie maker! Perfect for parties and entertaining. Easy pie maker recipe with step-by-step photos.
Ingredients
To make the Beef, Mushroom and Guinness Filling
- 1 kg (2 lb) chuck steak or blade steak, cut into 5 cm (2 inch) pieces
- 60 ml (1/4 cup) olive oil
- 2 brown onions, sliced thickly
- 3 cloves garlic, finely chopped
- 250 ml (1 cup) Guinness, stout, pale ale, or beef stock
- 500 ml (2 cups) beef stock
- 5 sprigs of fresh thyme
- 2 fresh bay leaves
- sea salt
- freshly ground pepper
- 500 g (1/2 lb) mushrooms, sliced thickly
- 2–3 tablespoons cornflour (cornstarch), mixed with some water
- 2–3 tablespoons fresh parsley, finely chopped
To assemble the Pie Maker Meat Pies
- puff pastry
- 1 egg, lightly beaten
Instructions
To make the Beef, Mushroom and Guinness Filling
- Heat some oil in a large pan. I like to use a cast-iron pan with a tight-fitting lid.
- Season the beef generously with sea salt and freshly ground pepper.
- Brown the beef in small batches, and use a slotted spoon to remove the browned meat to a large bowl. Try not to over-crowd the pan, otherwise the meat will steam instead of brown; it is the caramelisation on the meat which gives a lot of flavour to the stew.
- Add the onions and garlic, and cook for 1-2 minutes.
- Add the Guinness and let everything bubble away.
- Use a wooden spoon to scrape off any caramelised bits on the pan.
- Add the beef stock, thyme and bay leaves.
- Return the beef to the pan, together with any meat juices which have collected in the bowl.
- Turn the heat down to low, and cook gently on a low simmer for about 2 hours, or until the beef is tender. See Kitchen Notes below for instructions using a pressure cooker.
- Once the beef is tender, add the mushrooms.
- Simmer gently for a few minutes until the mushrooms have softened slightly.
- During this time, try to remove the thyme and bay leaves.
- Turn up the heat to medium-high, and slowly add the cornflour slurry. You may not need all of it – just add enough until you have a fairly thick consistency.
- Taste the sauce for seasoning.
- Stir through the parsley.
- Set the mixture aside to cool completely.
To assemble the Pie Maker Pies
- Preheat the pie maker.
- Refer to the manufacturer’s instructions for the dimensions of the pie bottoms and lids. Or simply use a ruler to work out the dimensions you need.
- Cut 4 pie bottoms and 4 pie lids from the pastry.
- Once the pie maker is ready to use, place the pie bottoms into the pie maker, one at a time. Use your fingers or a small glass to gently push down the pastry. As the machine will be very hot, you will need to be careful, but also work quickly as the pastry will start cooking the moment it hits the pan.
- Quickly fill each pie bottom with 1 to 2 tablespoons of filling.
- Place the pie lids on top of the filling.
- Brush each pie with some egg wash.
- Close the pie maker.
- Set the timer for 10 minutes, but you may wish to check at about 8 minutes.
- While the pies are cooking, prepare the pie bottoms and lids for the next batch.
- Once the pies are cooked to your liking, serve immediately or keep them warm in an oven at 150°C (300°F).
- Repeat with the remaining pastry and filling.
Kitchen Notes
 COOKING TIMES
Prep Time and Cook Time specified here are just for using the pie maker.
 WHICH TYPE OF PASTRY TO USE
Traditionally, meat pies have a bottom made from shortcrust pastry and a lid made from puff pastry. I tend to use only puff pastry when making mini pies to save on waste, but you can use whichever you prefer.
 USING THE PRESSURE COOKER
If you are short on time, I recommend using a pressure cooker to make the filling. Follow Steps 1 to 8 as per the instructions above, but add only 1 cup of beef stock. Cook on high pressure for 30 minutes, and then quickly release the pressure. Remove the lid, add the mushrooms, and proceed with the rest of the recipe. If the stew needs more liquid, add some more beef stock or boiling water.
 FREEZER TIPS
If you plan to make the pies in order to freeze them, I recommend cooking the pies until they are just lightly golden, but the pastry holds its shape. This is so that, upon reheating, the pastry does not dry out too much. Leave them to cool completely before freezing them in freezer bags. To reheat the pies, I recommend reheating them in the oven at 200°C/392°F until they are nicely golden and warmed through.
 OVEN TEMPERATURES
All recipes on this website state temperatures for a regular oven (i.e. a conventional oven without fan). If you have a convection oven with a fan, please consult the manufacturer’s handbook on how to adjust the temperature and baking time accordingly.
 CONVERSIONS
To convert from cups to grams, and vice-versa, please see this handy Conversion Chart for Basic Ingredients.
View the recipe online: https://eatlittlebird.com/pie-maker-recipe-meat-pies/