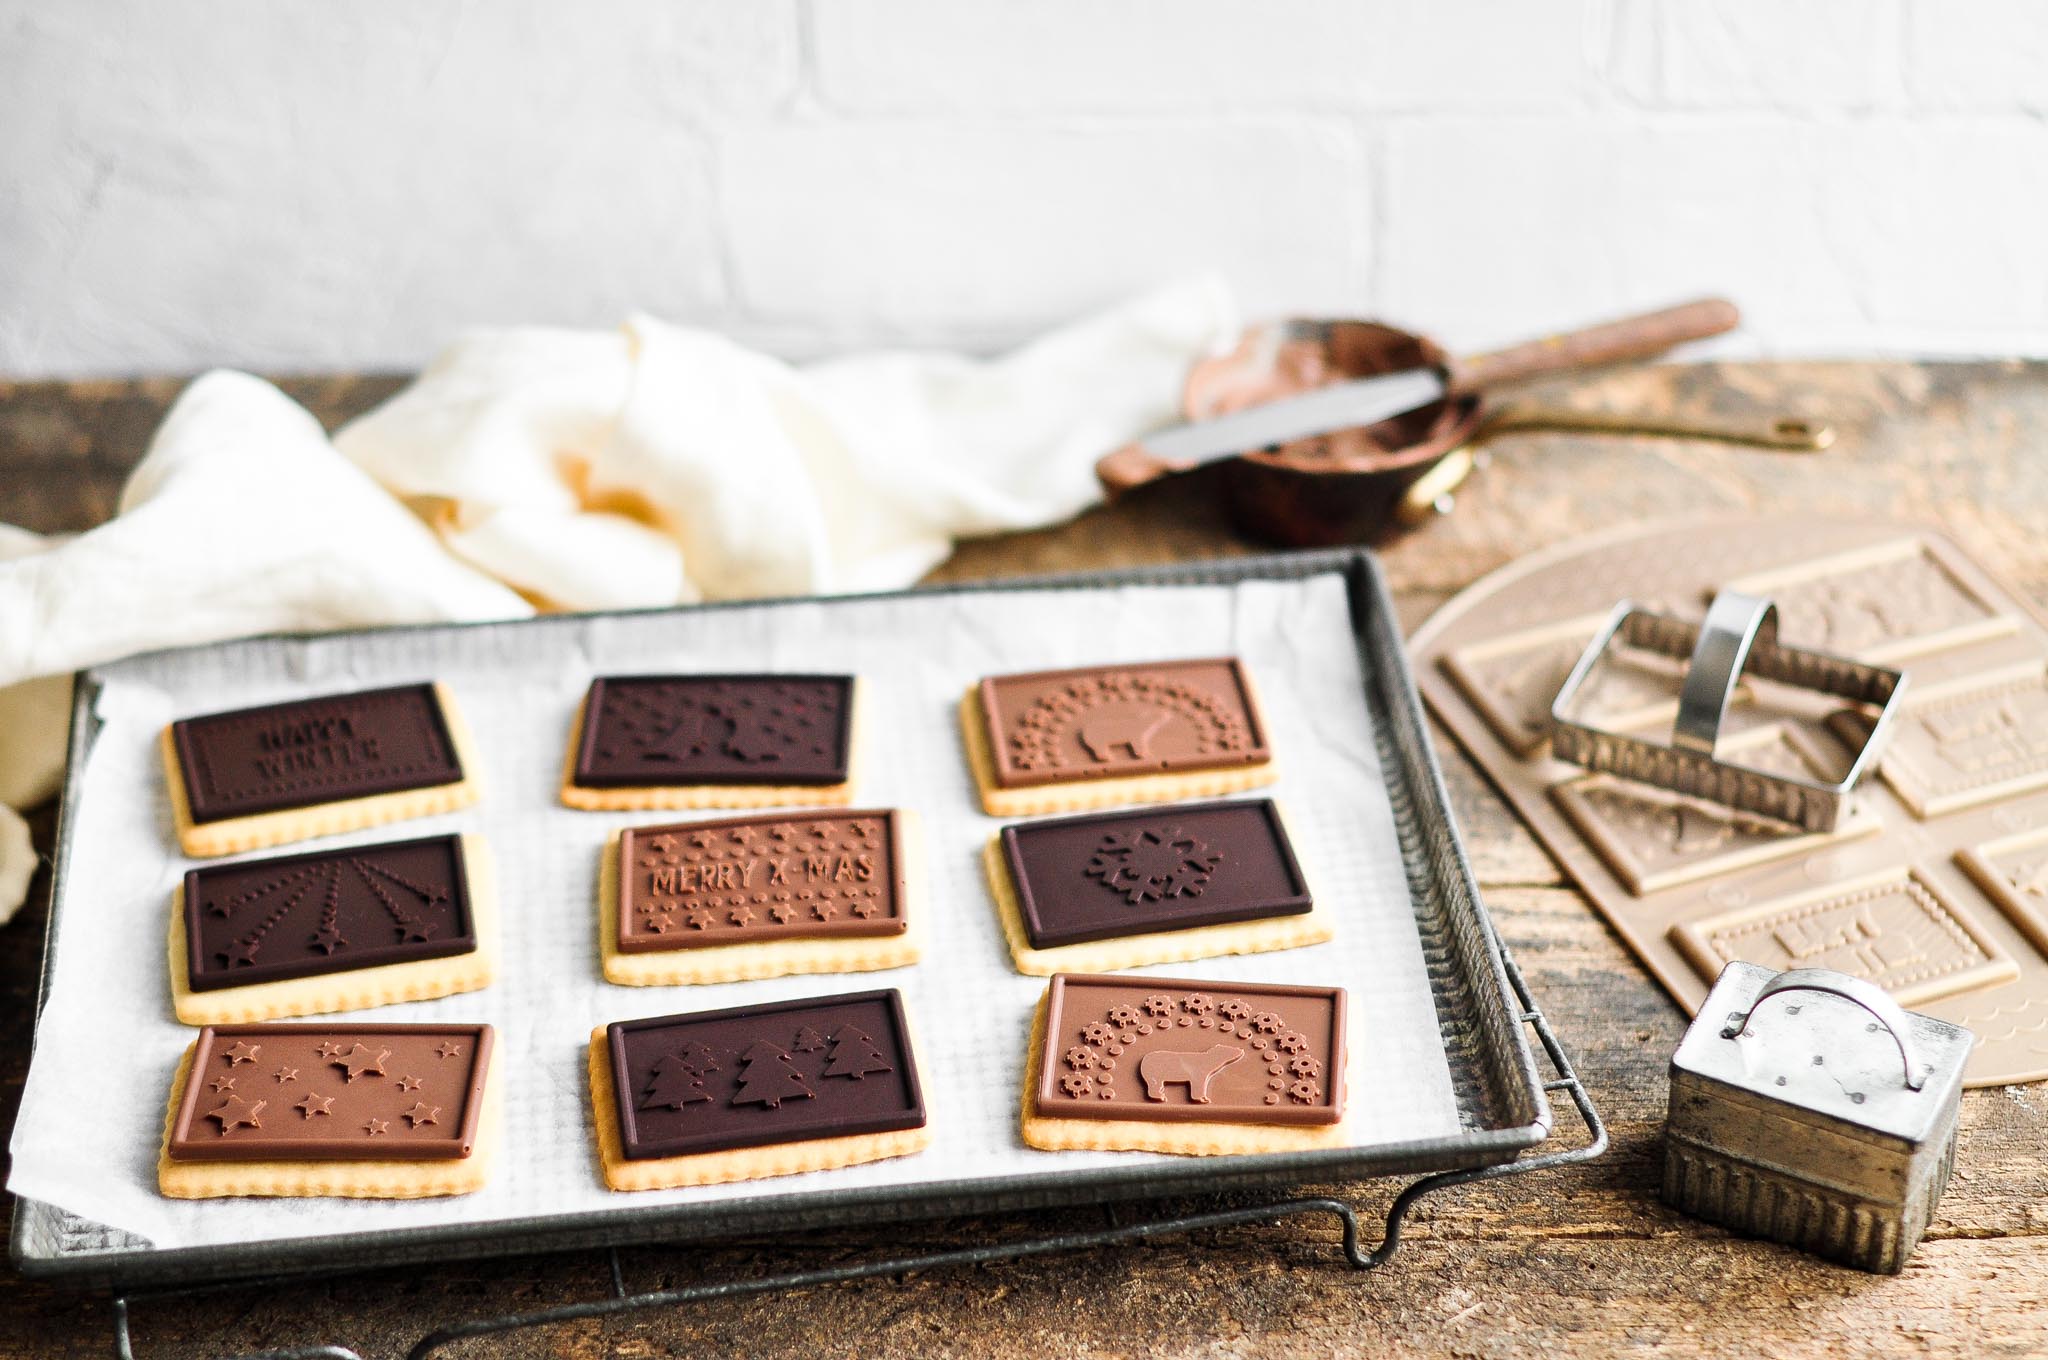
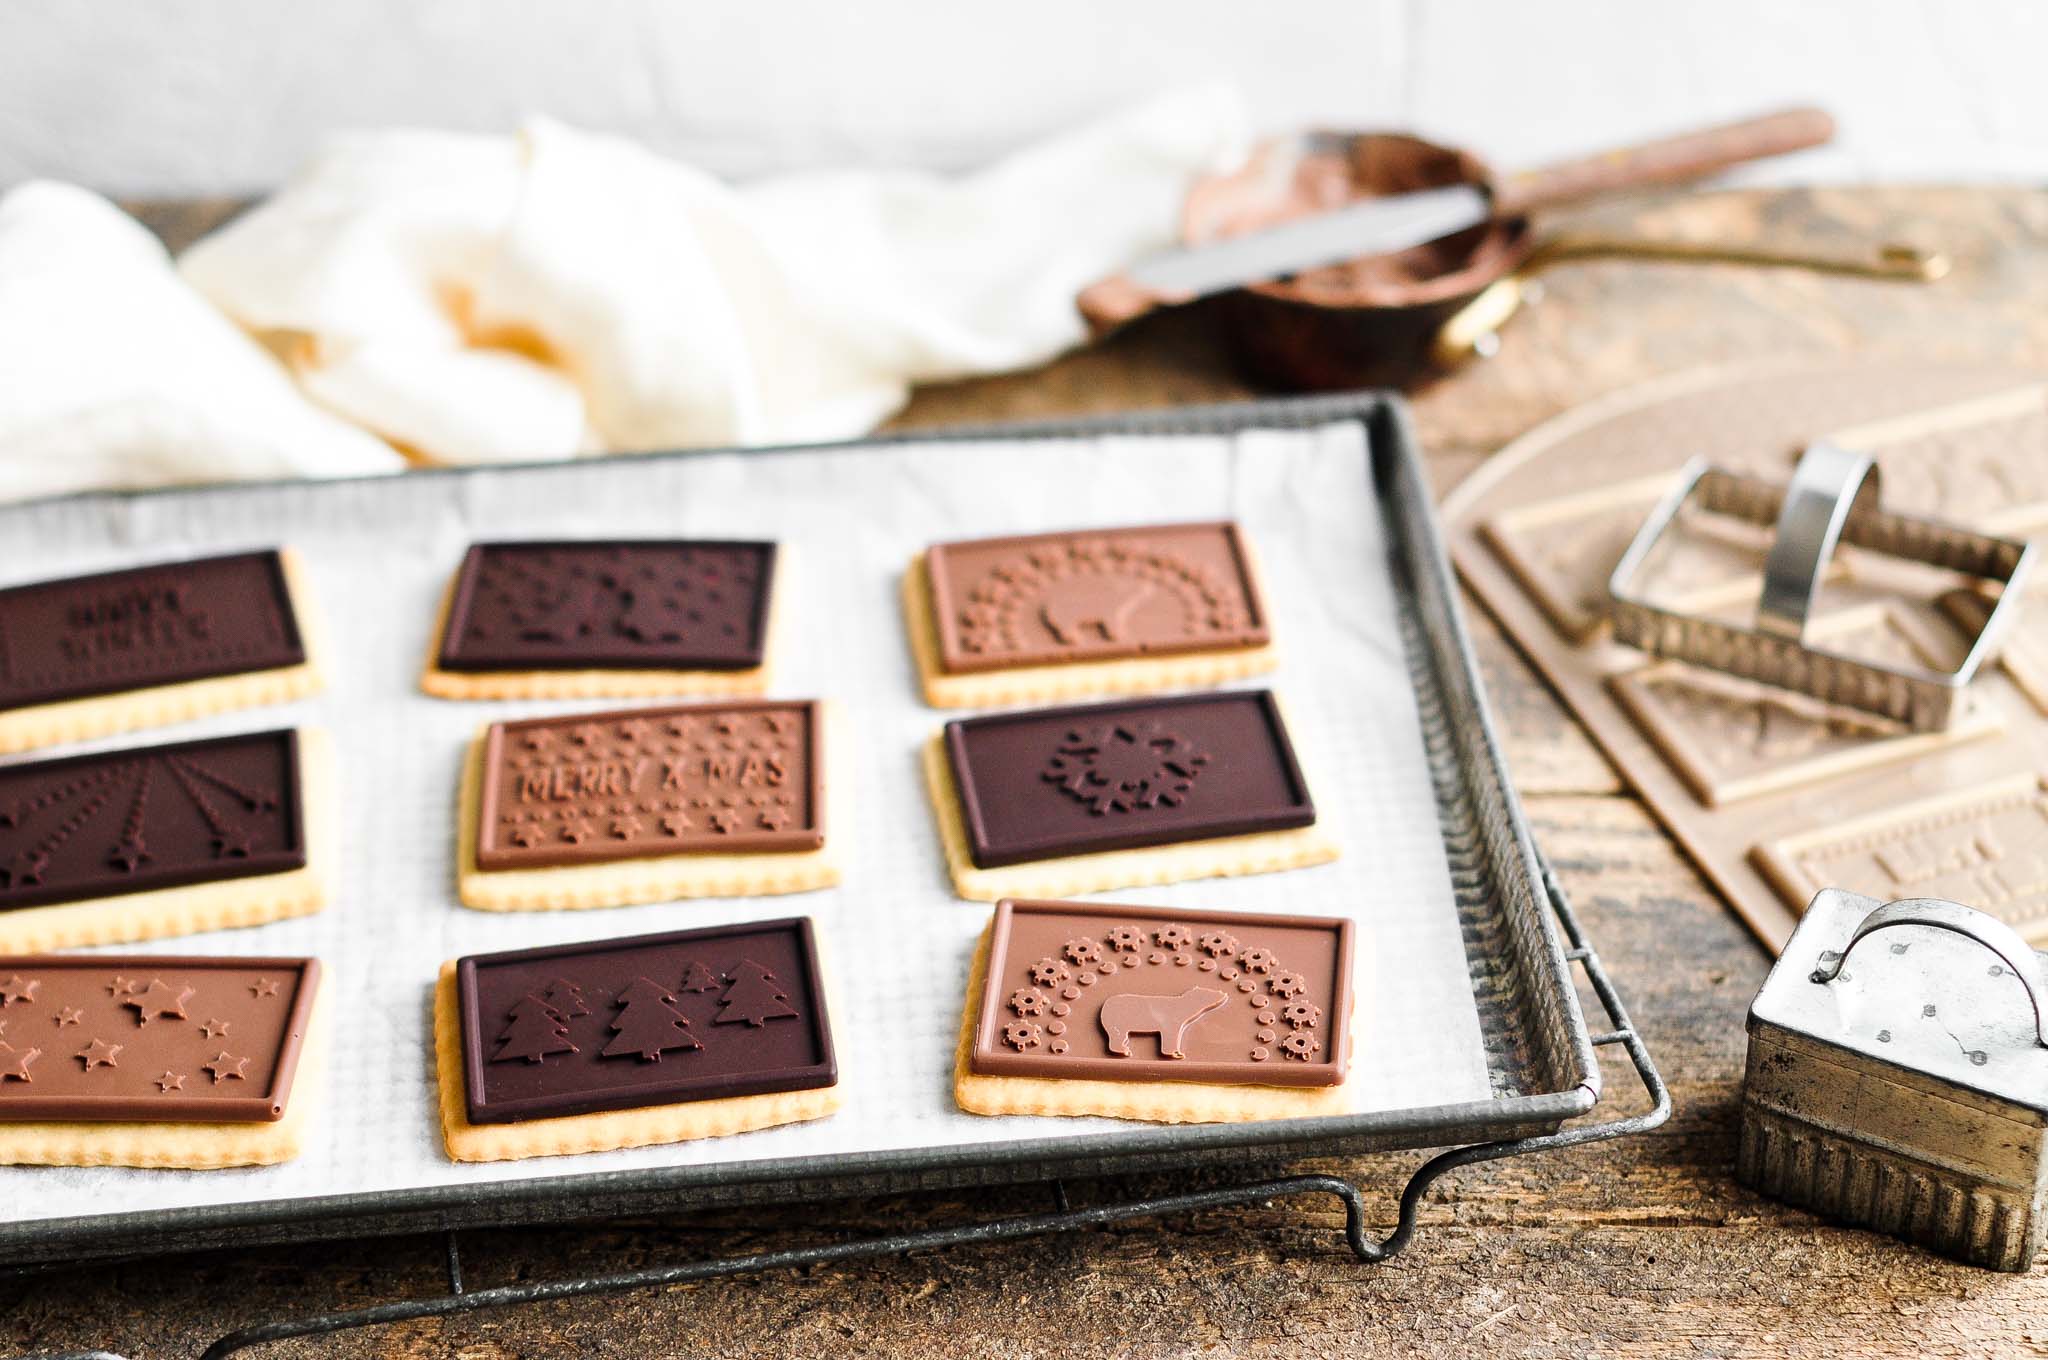
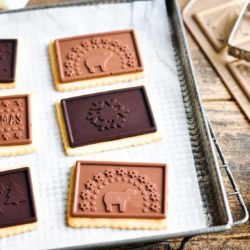
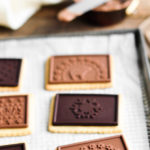
Delicious homemade French Cookies with Chocolate, also called Pétit Beurre or Pétit Écolier.
Pétit Beurre and Pétit Écolier
As a child visiting my family in France and Switzerland, I always loved snacking on Petit Beurre cookies, especially those made by the French brand, Lu, and especially the ones which came with a bar of chocolate on top, called Petit écolier.
Brands of French Cookies
While I like to remain faithful to the original French brand, other companies now also make similar biscuits, and it is hard to ignore the Swiss companies which use good-quality Swiss chocolate … I know, because I have become a connoisseur of sorts when it comes to these biscuits 😉
I buy them unashamedly for my children because I love to sneak a few for myself.
In case you were wondering, the Swiss brand, Wernli, make Petit Beurre biscuits with an assortment of chocolate toppings, including milk, dark, white and caramel. Plus, they sell packets of mini Petit Beurre biscuits for on the go, which means that I always have something to bribe the children with when in public.
And for lovers of Ovomaltine chocolate, they also have a very addictive version of these biscuits too. For moments when I want to eat with a good conscience, I buy the organic version from Co-op.
Homemade French Cookies
Given that the shop-bought varieties are so good, I never really thought about a homemade version until recently.
And with Christmas around the corner and lots of gifts to prepare for school teachers and neighbours, I thought this would be a fun activity to do with the children.
Except that it is an incredibly messy process with tiny tots!! But gosh they loved filling the moulds with chocolate and licking the excess off their fingers, which I am sure got there deliberately and not through lack of precision 😉
French Cookie Recipe
I have tried a few french cookie recipes for the base and have come to the conclusion that it is quite hard to replicate the shop-bought version.
Hence, instead of imitating the manufactured product, you are better off making a biscuit which tastes delicious and which can hold its shape with the chocolate bar on top.
My go-to french cookie recipe is the one used for my Gingerbread Sablé but without the spices.
But, for something a bit different, I settled on the following French cookie recipe which produces a crisp and crunchy base, and which works well with the chocolate topping.

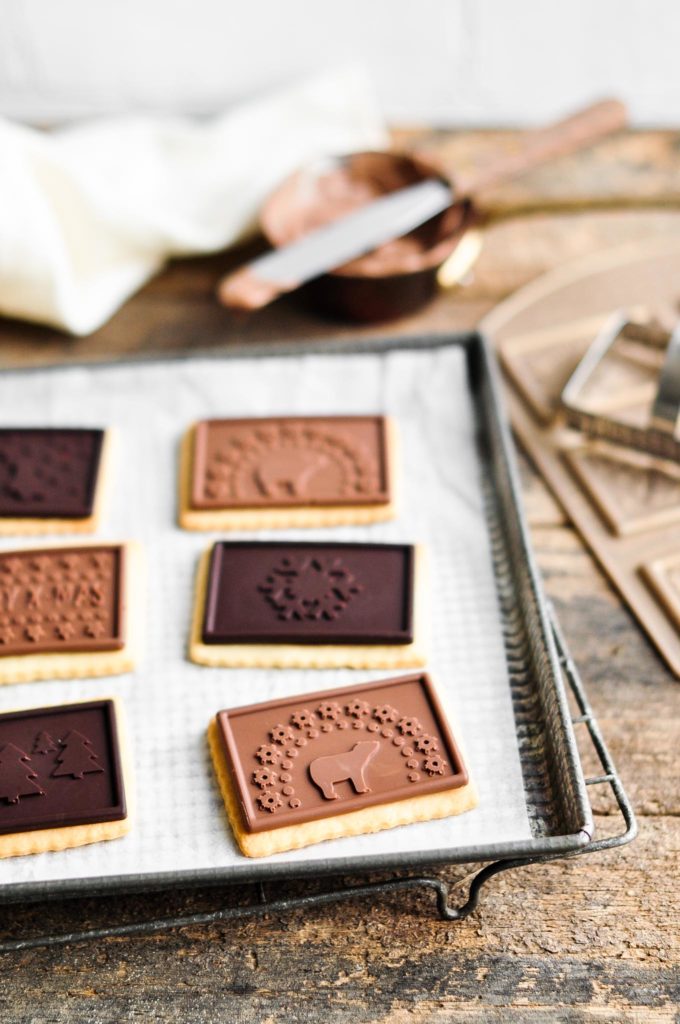
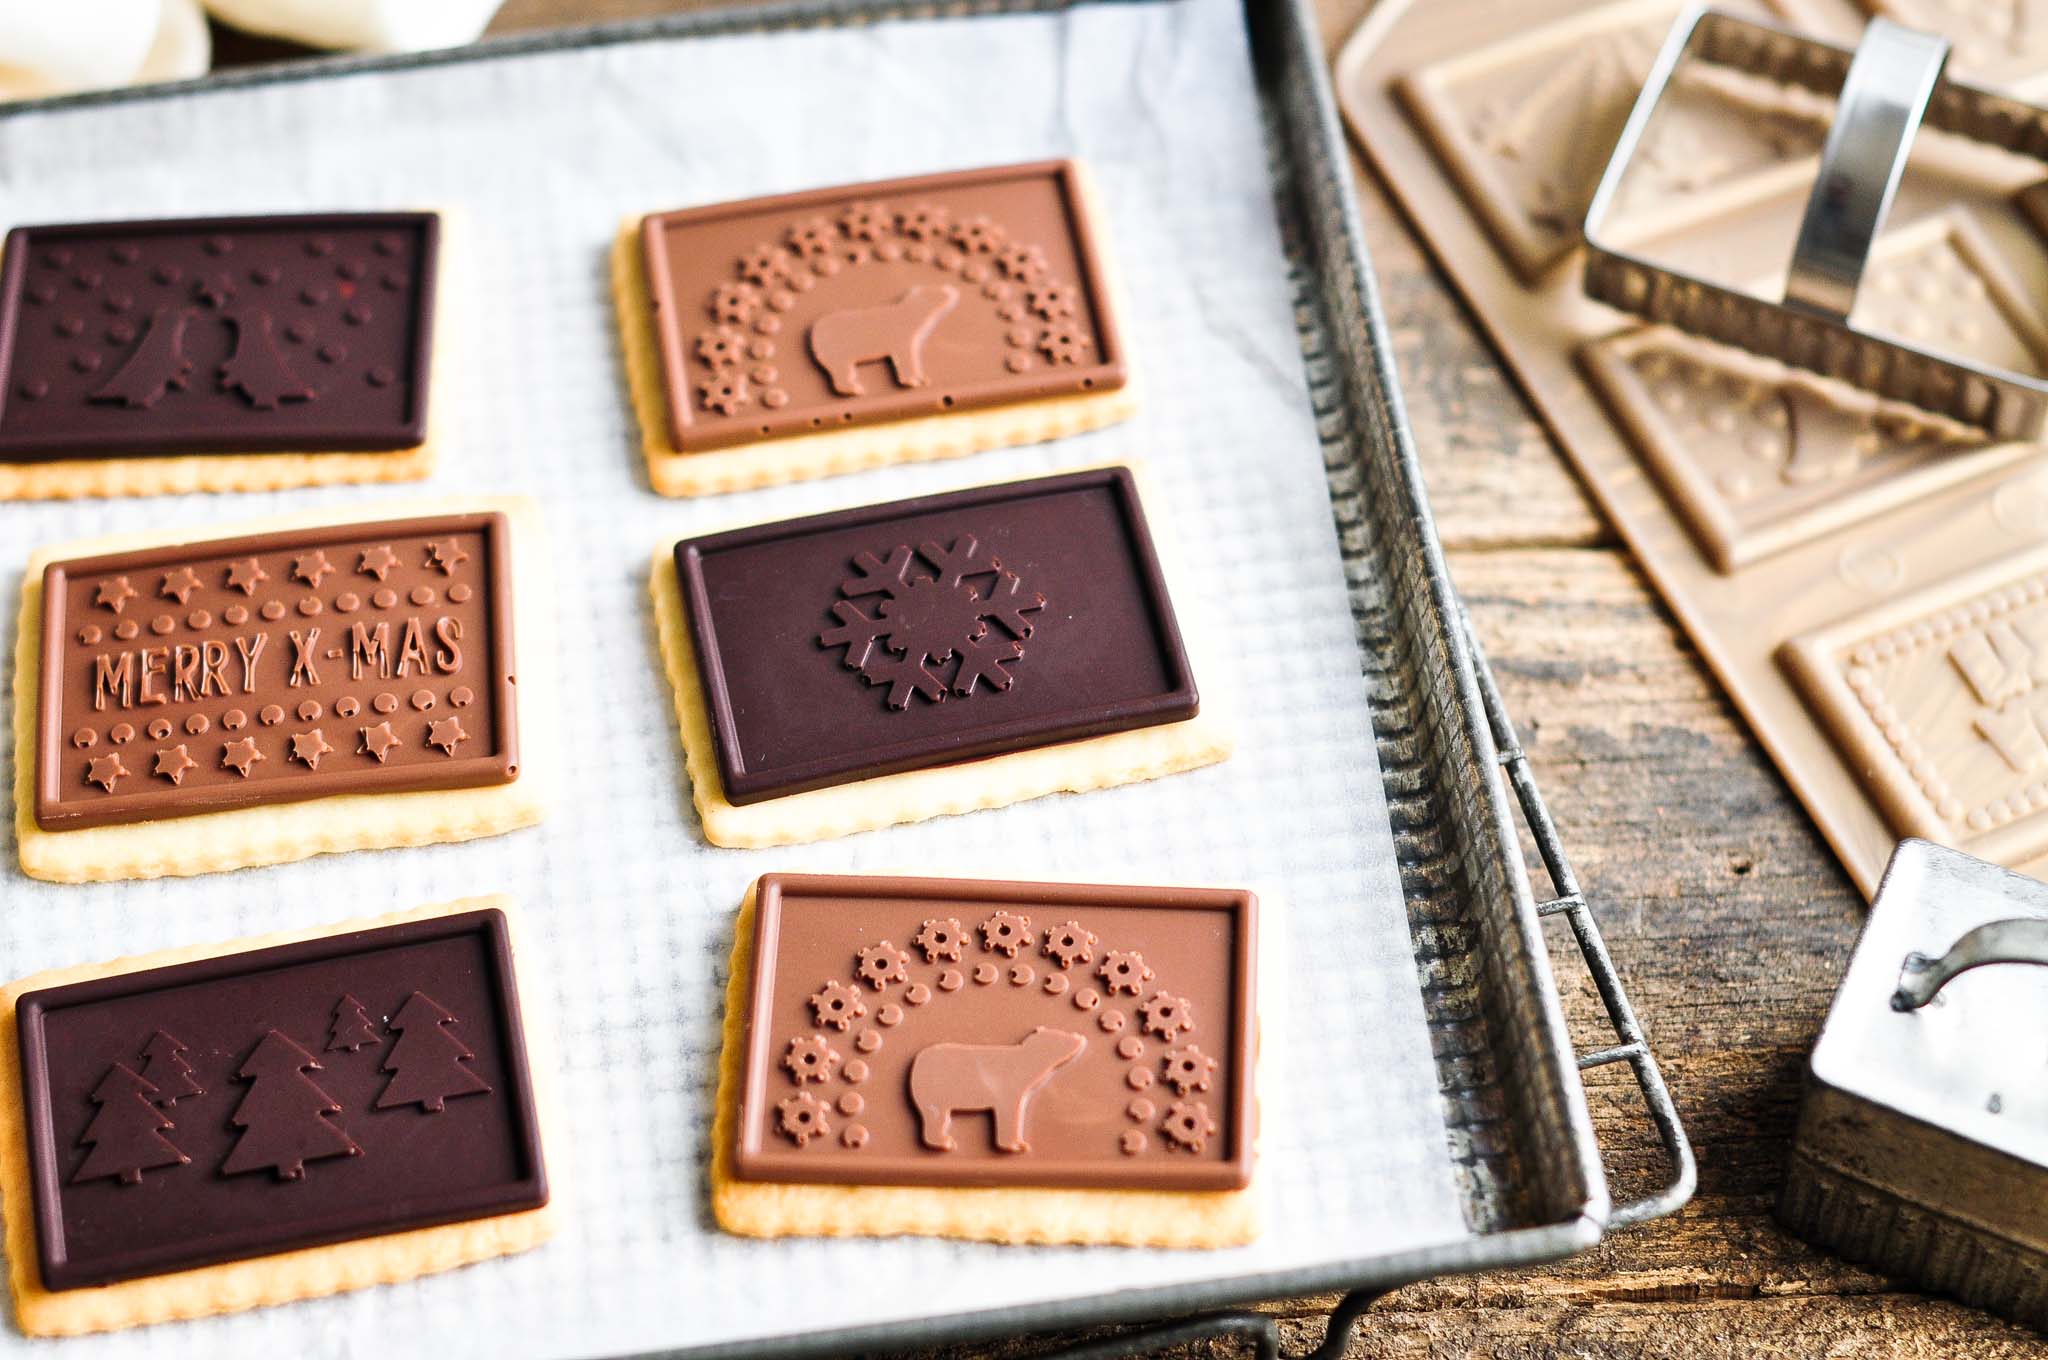
Equipment for Making Pétit Écolier Cookies
You will need a special chocolate mould for these biscuits, as well as the requisite fluted rectangular cookie cutter.
Some specialty stores will sell these in special baking sets and which are a good idea because the cookie cutters and chocolate moulds will be the right size for each other.
My set is from Tchibo, but you might be able to find similar online in other countries.
I have also seen Pétit Beurre and Pétit Écolier sets sold in tourist shops in Paris, should you find yourself there one day.
In Switzerland, the supermarkets tend to sell these Pétit Beurre and Pétit Écolier sets around Christmas and, as they are relatively inexpensive, it is worth buying a few sets so that you can make a large batch in one go.
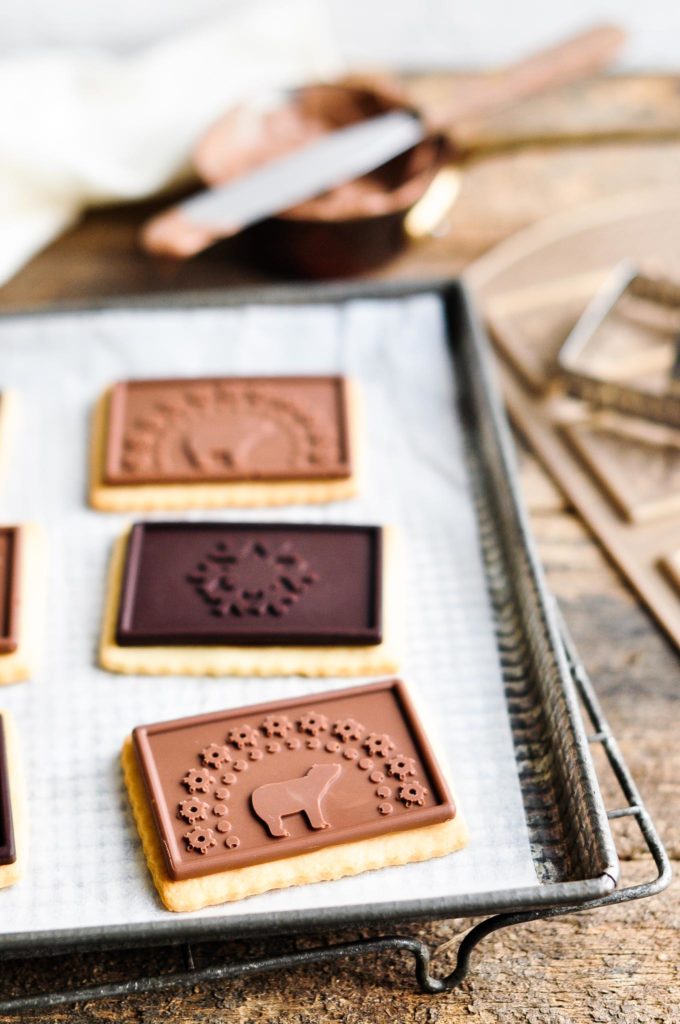
How to Make French Cookies (Pétit Écolier)
Unlike most of the recipes on my blog, this one involves many steps and is a bit more fiddly than I would normally like. But if you break the recipe down into manageable components, it is totally doable, even with children!
I would recommend making the biscuit dough the night before and leaving it to rest in the fridge overnight. Then first thing in the morning, take the dough out of the fridge to let it come to room temperature, or at least soften so that it will be easier to roll out.
The chocolate toppings can also be made the night before, ready to be used the next day. Although, the advantage of making this recipe during winter in Europe is that our balcony serves as an extra fridge with unlimited space, and the chocolate toppings take no time to set when placed outside in the sub-zero temperatures 🙂
I’ve just packed a tin full of these biscuits, ready to give to my son’s kindergarten teacher. I hope she will enjoy them as much as the children enjoyed making (and eating) them!
More French Cookie Recipes
If you are looking for more French cookie recipes, you might also enjoy:
PrintFrench Cookies with Chocolate (Pétit Écolier)
- Prep Time: 3 hours 30 mins
- Cook Time: 30 mins
- Total Time: 4 hours
- Yield: Makes about 24 cookies
- Category: Christmas
- Method: Bake
- Cuisine: French
Delicious homemade French Cookies with Chocolate, also called Pétit Beurre or Pétit Écolier.
 Print
Print Pin Recipe
 Rate
RateIngredients
For the French cookies
- 100 g (1 stick) unsalted butter
- 100 g (1/2 cup) caster sugar (superfine sugar)
- 60 ml (1/4 cup) water
- pinch of fine salt
- 1 teaspoon vanilla extract
- 250 g (9 oz) plain flour (all-purpose flour)
- 1 teaspoon baking powder
For the chocolate topping
- 300g (10 oz) good-quality chocolate (see Notes below)
- extra 50g (1.5 oz) good-quality chocolate
Instructions
To make the French cookies
- Place the butter, sugar, water, and salt into a small saucepan over medium heat.
- Stir the mixture and heat until the butter has melted, but do not let the mixture boil.
- Take the saucepan off the heat and let it cool to about room temperature, which might take 15-20 minutes.
- When the butter mixture has cooled, add the vanilla extract.
- Place the flour and baking powder into the bowl of a stand mixer with the flat paddle attachment.
- Slowly add the liquid ingredients into the dry ingredients, and beat on low speed until everything is incorporated into a soft dough.
- Place a large sheet of clingfilm on the work surface and scoop the dough onto the clingfilm.
- Wrap the dough in clingfilm and chill in the fridge for at least 3 hours or overnight.
- When you are ready to bake, bring the dough to room temperature first so that it will be easier to work with. This might take 30-60 minutes, depending on how warm the room is.
- Preheat the oven to 180°C (350°F).
- Line a baking tray with baking paper.
- Place the dough between two sheets of baking paper and roll out the dough until it is quite thin, about 3mm thick. You want the dough to be as thin as possible as they will rise a bit upon baking.
- Cut out shapes from the dough using a fluted rectangular cookie cutter, and place the cut shapes onto the lined baking tray.
- Bake the biscuits for about 12 minutes, or until they are lightly golden.
- Leave the biscuits on the hot baking tray for about 3 minutes before transferring to a wire rack to cool completely.
To make the chocolate toppings
- Melt the chocolate in a bain-marie (or in a bowl over a pot of simmering water).
- Place the silicone chocolate moulds on a large flat tray which can fit in the fridge.
- Carefully fill the moulds with the melted chocolate.
- Transfer the moulds (on the tray) to the fridge to help it set.
- To unmould the chocolate, I find it easiest to take the moulds out of the fridge and let it sit at room temperature for about 15 minutes before removing the chocolate. If you try this when the chocolate is still fridge-cold, they might crack. I also find it helpful to unmould the chocolate over a large plate or wire rack.
- If you don’t have enough chocolate moulds, you will have to make the chocolate toppings in batches.
To assemble the Pétit Écolier Cookies
- Melt the extra 50 g (1.5 oz) of chocolate in a small saucepan, and let it cool slightly. This chocolate will be used to “glue” the chocolate topping to the biscuits.
- Remove the chocolate toppings from their moulds.
- Once the melted chocolate has cooled a little, dot a small amount on the cookie and place the chocolate topping on top. If the melted chocolate is too warm, it might melt the chocolate topping.
- Leave the cookies to set before serving.
Kitchen Notes
 WHAT TYPE OF CHOCOLATE TO USE
* I recommend using good quality chocolate for this recipe, especially since it is a key component of the biscuit. You can make the toppings with just milk chocolate or dark chocolate, but if you have the time, it’s worth making maybe a half batch of each.
* When buying milk chocolate, I recommend a minimum of 45% cocoa content (but less is also fine).
* When buying dark chocolate, I recommend a minimum of 70% cocoa content.
* White chocolate also works well in this recipe, and those sold specifically for baking (such as white chocolate chips) are usually easier to melt.
 WHAT TO DO WITH LEFTOVER CHOCOLATE
Should you find yourself with a lot of leftover melted chocolate, now is a good time to use any silicone chocolate moulds that you might have. Otherwise, I would suggest making some chocolate mendiants by dolloping large circles of the melted chocolate onto some baking paper on a baking tray, and sprinkle over some chopped dried fruit and nuts of your choice, or simply some coloured sprinkles (hundreds and thousands). Place in the fridge to set.
 MAKE-AHEAD TIPS
Due to the resting time required, I recommend making the biscuit dough the night before using, and leaving it to rest in the fridge overnight. First thing the next morning, take the dough out of the fridge to let it soften and come to room temperature.
The chocolate toppings also need time to set, and can also be kept in the fridge overnight.
![]() STORAGE TIPS
STORAGE TIPS
These biscuits are best eaten as soon as possible.
 OVEN TEMPERATURES
All recipes on this website state temperatures for a regular oven (i.e. a conventional oven without fan). If you have a convection oven with a fan, please consult the manufacturer’s handbook on how to adjust the temperature and baking time accordingly.
 CONVERSIONS
To convert from cups to grams, and vice-versa, please see this handy Conversion Chart for Basic Ingredients.
Nutrition
- Serving Size: Nutritional info per biscuit
- Calories: 157
- Sugar: 8.8g
- Sodium: 8.7g
- Fat: 8.3g
- Carbohydrates: 18.8g
- Fiber: 1.3g
- Protein: 1.9g
- Cholesterol: 9.7mg
#eatlittlebird
Update
This recipe was first published on 20 December 2017. It has been updated with new photos and more comprehensive recipe notes.

These are such beautiful cookies! I would love to spend an afternoon making these. Looks like fun — and I could get a few new baking items for my kitchen. 🙂
Your petit Beurre biscuits are just wonderful. They are the perfect little treat to hand out at Christmas, or for gifting. I am very impressed with your work, and the patience you must have had to make them, particularly with young children to ‘help’. Beautiful little biscuits.
Wow these are gorgeous! These would be so fun for a cookie exchange!
I give you TONS of credit for making your own chocolate engraved biscuits — it shows a skill and temerity — that I don’t think I possess. These are absolutely gorgeous and I can only imagine the fun you had making them with kids.
These are so beautiful and I wish you’d make a bunch for me to pass out to my kid’s teachers! They would love them.
Oh, yes, really brings back memories of eating petit beurre as a child, although I was usually given Choco-Leibniz, which is still my top request when I am ill. This looks like a wonderful project. I love your moulds!
Thank you! Oh Choco-Leibniz are really delicious too 🙂 I have a craving for these biscuits now!
YUM, these really sound delicious! I can’t wait to try it out!
Thank you so much for this recipe. I looked high and low for a recipe and this worked out better than I could imagine. I thought it was odd to melt the butter with the sugar and water, but this made there be gluten and for it to bake up crisp. If i could show a cross section of the cookie, you could see it is a perfect recipe for replicating Petit Ecolier cookies.
Thank you for your lovely comment! I’m glad you enjoyed this recipe 🙂 I also think it is very close to a Petit Écolier biscuit which you can buy in the shops, even though the biscuit recipe sounds a bit unusual. I’m currently baking a few batches of these to give as gifts to my childrens’ teachers at school. My favourite part is assembling them at the end – I always feel so proud once the cookies are assembled!
Gorgeous biscuits, I can’t wait to test out this recipe. (And hello from another Aussie recipe blogger/former lawyer who stumbled upon your site :))
Thank you! And thanks for popping by. I look forward to trying your recipes!
Hi , I am so fascinated with this biscuit recipe. I noticed you didn’t mention tempering the chocolates in the directions and your photos of the cookies are perfect. I had some issue with my chocolate leaving chalky streaks but I did not use Lindt. Any tips are help is greatly appreciated on how you melted the chocolate and had superb results. Thanks for sharing and love your site.
Hi Sandra,
No, I don’t temper the chocolate for this recipe, mainly because it is a bit difficult to control the temperature when I am making these cookies with the children. The only time I might temper chocolate is when making mendiants or similar. I do find that the type and quality of chocolate makes a big difference, so I definitely recommend using a high-quality chocolate for this recipe. If you have the time, I would also recommend tempering the chocolate for this recipe, but I usually skip this step with no problems. Good luck!
Bisciuts look amazing and not too difficult I was just wondering what size biscuits does your set make?
Thanks, Eleanor! My set produces biscuits which are approx 6 cm in length.
hello, do you think it would be ok if I used a stick of vegan margarine in place of the stick of butter? ^_^
Hello,
I’ve only tried this recipe with butter, but I imagine that margarine would give similar results, although the taste may not be as rich. Please let me know if you try this recipe with margarine. Happy baking!
I so want to make these, but how do you think they would do in a 78F degree house? Would the chocolate slab get too soft?
Hi Brigitte,
You can put the chocolate moulds in the fridge to set. But once the cookies are assembled, they should be kept in a cool place. I don’t think they will melt at 78F, but they will soften. Hope this helps!
Hey Thanh, just want to let you how much I appreciate that you created and posted this recipe. This is my favourite biscuit, but they just don’t sell it in a healthy version.
So I decided to make it and finally stumbled upon your post. Before that I mostly found digestive recipes. But it wasn’t what I was looking for.
I was happy and excited, even before reading it I knew this is the one.
I created a gluten and dairy free (and non-gmo, healtier sugar) version. Just replaced some of your ingredients one on one. It turned out fabulous.
I also like experimenting and saving job for me. (1) What I did is that I rolled the dough out on a parchment paper that was on the baking tray. So I could save the transfer. (And a parchment paper too.) (2) And after that I squared it up like you, and separated half of them, creating room between them, but I left the other half as it was. (Cut up, but not moved.) It turned out it baked just as good as the single ones and it was so easy to break them up by the cut-line. So appaerantly one more task can be saved. (3) And since this was my first time, I didn’t have the fancy equipment, like a chocolate mold. So I have just poured the chocolate over a parchment paper on a tray. And again to make an experiment, I put half of the biscuits in the choco when it was still liquid. I was wondering if it would make the biscuit wet or even too wet, but honestly it turned out great. I likey like it. So once again a task is saved.
I like it when I am being practical and efficient while not giving up on the quality.
Your recipe and everything you have put in posting it is truly appreciated. Blessing to you beautiful being.
Hi Réka,
Thank you so much for sharing! You have a lot of wonderful tips there and that’s great that you made the recipe work for you. Here in Switzerland, we can find a version of these cookies made from wholemeal flour, but it does not taste like a digestive biscuit. I’m going to experiment with a homemade version and I hope to share the recipe here very soon 🙂