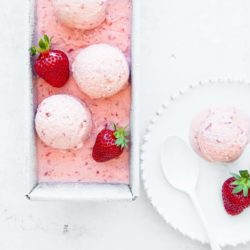
Homemade Strawberry Ice-Cream
- Resting Time: 3-4 hours
- Prep Time: 20 mins
- Cook Time: 15 mins
- Total Time: 35 minutes
- Yield: Approx 2 litres/8 cups
- Category: Dessert
- Method: Ice-Cream Machine
- Cuisine: International
A classic homemade Strawberry Ice-Cream which is fresh, creamy and bursting with real strawberry flavour! Recipe with step-by-step photos.
Ingredients
For the custard
- 500 ml (2 cups) full cream milk (whole milk)
- 500 ml (2 cups) double cream (heavy cream)
- 1 vanilla pod
- 10 egg yolks
- 175 g (3/4 cup) caster sugar
For the strawberries
- 500 g (1 lb) fresh strawberries (see Kitchen Notes)
- 2 tablespoons vanilla sugar (or caster sugar)
- juice of 1 lemon, or to taste
Instructions
To make the custard (approx 20 mins plus cooling time of 1-2 hours)
- Pour the milk and cream into a large saucepan.
- Split the vanilla pod and use a paring knife to scrape out the seeds.
- Place the vanilla seeds and pod into the milk and cream.
- Bring the saucepan almost to the boil.
- Take the saucepan off the heat.
- Allow the vanilla to infuse the milk and cream for about 20 minutes. (You can prepare the strawberries during this time.)
- In a large bowl (ideally with a pouring spout), whisk together the egg yolks and sugar.
- Remove the vanilla pod from the milk and cream mixture.
- Very slowly, pour a small amount of the slightly cooled milk mixture (about 3-4 tablespoons) into the egg mixture, whisking as you do so. This process is called tempering, which means to add the warm or hot component slowly so that you do not cook the eggs (otherwise you will have scrambled eggs). After you have incorporated a bit of the milk mixture, you can continue to whisk in some more, and continue slowly until you have whisked in all of the milk mixture.
- Once all of the milk mixture has been added, pour everything back into the saucepan.
- At this stage, I recommend cleaning the bowl which you just used and place it into the fridge to chill while you heat the custard.
- Place the saucepan on the stove over medium-high heat. If this is your first time making a custard, I recommend using a low-medium heat.
- Continuously stir the custard with a wooden spoon to prevent it from sticking to the bottom of the pan, and also to ensure that the heat is evenly distributed throughout the custard.
- Very slowly, the custard will start to thicken as it heats up.
- Once you see the custard start to thicken, take the pan off the heat and continue stirring. Often, the custard will continue to thicken from the residual heat in the pan. If the custard still looks too thin, return it back to the stove for a few more minutes.
- To test if the custard is the right consistency, it should coat the back of the wooden spoon. Use your finger to run a line through the custard. If the line remains, the custard should be the right consistency.
- Pour the custard into the large bowl which has been chilling in the fridge, and set aside to cool completely.
To prepare the strawberries (approx 10 mins)
- Hull the strawberries and roughly chop them.
- Place the strawberries into a bowl.
- Sprinkle the vanilla sugar (or caster sugar) over the strawberries.
- Mix gently with a spoon.
- Set the strawberries aside to steep while the custard is cooling.
- When you are ready to add the strawberries to the cooled custard, pour the strawberries, together with any juices which have collected, into the bowl of a large food processor.
- Pulse the strawberries a few times until you have a rough purée with some chunks of strawberries. If you prefer to have a smooth strawberry ice-cream, purée the strawberries until completely smooth.
To make the ice-cream (approx 30 mins plus freezing time of 3-4 hours)
- If necessary, pre-chill the bowl of your ice-cream machine.
- Add the prepared strawberries to the cooled custard.
- Mix everything together with a wooden spoon.
- Add the lemon juice and taste to see if it needs more lemon.
- Pour the custard into the bowl of the ice-cream machine. Check the manufacturer’s instructions to see how much custard you can churn at a time.
- Follow the manufacturer’s instructions for churning the ice-cream.
- Once the ice-cream has finished churning, transfer the ice-cream to a glass or plastic container suitable for freezing.
- Freeze the ice-cream for at least 3-4 hours to become firm.
- Take the ice-cream out of the freezer about 15 minutes before serving to let it soften slightly.
Kitchen Notes
 TIPS FOR USING STRAWBERRIES
* Coarsely blend the strawberries for bits or chunks of strawberry pieces in your ice-cream.
* Finely blend the strawberries to a purée for a smoother strawberry ice-cream.
* You can increase the strawberry content in the above recipe, but note that, as strawberries have a high water content, adding more strawberries will make your ice-cream less creamy and it may take longer to churn the ice-cream in your ice-cream machine.
* You can also use frozen strawberries which have been thawed.
 TIPS FOR MAKING ICE-CREAM AHEAD OF TIME
If you plan to serve the ice-cream for dessert in the evening, I recommend starting the recipe first thing in the morning, or making the custard the night before and let it cool overnight in the fridge. By letting the custard rest overnight, and especially with the strawberries added, this will allow the custard to intensify in flavour.
 WHAT TO DO IF YOUR CUSTARD CURDLES
* If you over-cook or over-heat the custard, it will curdle. You will know if the custard has curdled if it does not look smooth and has instead “split” or separated and looks lumpy in texture, a bit like scrambled eggs.
* If the custard curdles, take the pan immediately off the heat. Pour the split custard into a large mixing bowl (preferably one which has been chilled) and use a large whisk to quickly emulsify the custard again.
* If the above step does not work, it generally means that your custard can’t be rescued and you will have to start over again.
* If you are new to making custard from scratch, start with a low-medium heat so that the custard can slowly heat up and you can get a better feel for when the custard has thickened to the right consistency. Cooking a custard over low-medium heat will take longer, but there is less risk that it will curdle. Once you have had more practice at making custard from scratch, you can live more dangerously and cook the custard on a higher heat.
 RECIPE CREDIT
This recipe has been adapted from Forever Summer by Nigella Lawson
 CONVERSIONS
To convert from cups to grams, and vice-versa, please see this handy Conversion Chart for Basic Ingredients.
View the recipe online: https://eatlittlebird.com/homemade-strawberry-ice-cream/