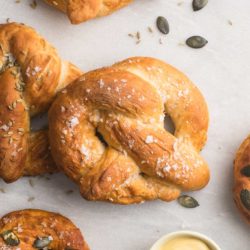
Homemade Soft Pretzels
- Resting Time: 2 hours
- Prep Time: 30 mins
- Cook Time: 20 mins
- Total Time: 50 minutes
- Yield: Makes 10
- Category: Bread
- Method: Oven
- Cuisine: German, Swiss
Delicious and easy Homemade Soft Pretzels, which are soft and pillowy, with the perfect chew. These pretzels are great for snacking and entertaining, and perfect served alongside some grilled sausages! Recipe with step-by-step photos.
Ingredients
For the pretzels
- 500 g (3 1/3 cup) strong white bread flour
- 1 1/2 teaspoons fine salt
- 3 tablespoons caster sugar
- 7 g (2 teaspoons) instant yeast (see Kitchen Notes)
- 300 ml (1 cup plus 3 tablespoons) full cream milk (whole milk), warmed slightly to about 37°C/98°F
- 50 g (1/2 stick) butter, softened
For the baking soda bath
- 230 g (1 cup) baking soda
- 500 ml (2 cups) water
For the pretzel toppings
- coarse sea salt flakes
- fennel seeds
- pumpkin seeds
- poppy seeds
To serve
- 1/4 cup milk
Instructions
To make the pretzel dough
- Measure the flour, salt, sugar and yeast into the bowl of an electric stand mixer, fitted with a dough hook.
- Lightly mix the ingredients together.
- With the speed on low, slowly add the warmed milk.
- Keep mixing on low speed until the ingredients come together into a sticky dough.
- Add the butter, about a tablespoon at a time, waiting for it to be completely incorporated before adding the next tablespoon.
- Once all of the dough ingredients have been added, mix the dough on a low-medium speed for about 15-20 minutes, or until you have a soft and smooth ball of dough. When you poke the dough gently, it should bounce back immediately.
- Lightly oil a large bowl.
- Place the dough into the bowl, and cover with some plastic wrap or a reusable bowl cover.
- Leave the dough somewhere warm for 1 to 1.5 hours, or until the dough has doubled in size (see Kitchen Notes below).
- During this time, start baking the baking soda (see instructions below for the baking soda bath).
- Once the dough has doubled in size, punch back the dough to release all of the air.
- Knead the dough gently a few times.
- Weigh the dough and divide this number by 10 to get the weight for each bun.
- Divide the dough into 10 equal portions. Alternatively, if you wish to make smaller pretzels, divide the dough into 12 pieces.
To shape the pretzels
- Line a large baking tray with baking paper.
- Roll each piece of dough into a smooth ball, and then roll each ball into a log measuring about 60 cm/24 inches.
- Form each log into a U shape.
- Cross over the ends to form a loop.
- Cross over the ends once again.
- Bring the ends down over the loop to form the pretzel shape.
- Place the pretzels onto the lined baking tray.
- Repeat the above steps until all of the pretzels have been formed.
- Place the tray of pretzels somewhere warm for about 30 minutes to puff up slightly.
To make the baking soda bath (see my recipe for Homemade Lye Water for step-by-step photos)
- Preheat the oven to 120°C/250°F (without fan).
- Place the baking soda in an oven-proof dish which is large enough to hold the water later.
- Bake the baking soda for 1 hour.
- Remove the dish from the oven and let the baking soda cool completely.
- When you are ready to prepare the pretzels in the next step below, make the baking soda bath (or lye water) by dissolving the water in the baked baking soda. Whisk until everything is dissolved. Sometimes, there are lumps of baking soda which remain, which is fine but make sure these do not stick to the dough later.
To prepare the pretzels
- Carefully place a pretzel dough into the baking soda bath using a large metal spider or slotted spoon. As the baking soda bath can irritate the skin, wear some gloves and/or avoid touching the water with your bare hands.
- Submerge the pretzel dough in the baking soda bath for 5-10 seconds.
- Lift the pretzel dough out of the water, and drain off as much water as possible.
- Transfer the pretzel dough from the baking soda bath back to the lined baking tray.
- Try to handle the pretzel dough carefully and to not deflate them. However, don’t worry if they look soggy after their water bath.
- Repeat the above steps with the remaining pretzel dough.
To bake the pretzels
- Preheat the oven to 200°C/390°F (without fan).
- Sprinkle the pretzels with sea salt and/or your choice of topping.
- Bake the pretzels for 15-20 minutes, or until they are golden and cooked through.
- Brush the warm pretzels with some milk to keep them glossy.
- Serve warm.
Kitchen Notes
 DIFFERENT TYPES OF FLOUR
* For Swiss readers: I use Zopfmehl (or farine pour tresse) when making bread and enriched dough.
 DIFFERENT TYPES OF YEAST
* Please note that there is a difference between instant yeast (also called instant dried yeast or fast-action dried yeast) and dried yeast (also called active dry yeast). If you are not sure what type of yeast you have, please check the packaging for instructions on how to use the yeast.
* With instant yeast, you can add it directly to the flour mixture without having to activate it first.
* With dried yeast, you will need to activate it first (usually in some warm liquid).
* If you are using fresh yeast, you will need about half a block (20 g fresh yeast = 7 g instant yeast). Crumble the fresh yeast into the warm milk, and stir to dissolve the yeast.
 PROOFING THE DOUGH
Dough needs a warm environment for the yeast to activate and cause the dough to rise. If you don’t have a warm place in your home, try one of the following ideas:
* In the oven with the oven light switched on (works only for some ovens).
* In the oven with a tray of boiling water on the bottom shelf.
* In the oven or a steamer oven at a low temperature of about 25-40°C (77-104°F).
 OVEN TEMPERATURES
All recipes on this website state temperatures for a regular oven (i.e. a conventional oven without fan). If you have a convection oven with a fan, please consult the manufacturer’s handbook on how to adjust the temperature and baking time accordingly.
 CONVERSIONS
To convert from cups to grams, and vice-versa, please see this handy Conversion Chart for Basic Ingredients.
View the recipe online: https://eatlittlebird.com/homemade-soft-pretzels/