Easy No-Knead Bread
- Resting Time: 14 hours
- Prep Time: 10 mins
- Cook Time: 60 mins
- Total Time: 1 hour 10 minutes
- Yield: Makes 1 loaf
- Category: Bread
- Method: Oven
- Cuisine: American
Make your own homemade artisan-style bread with this Easy No-Knead Bread recipe with step-by-step photos.
Ingredients
- 450 g (3 cups) plain flour (all-purpose flour) or strong white bread flour (see Kitchen Notes below)
- 1/4 teaspoon instant dried yeast (see Kitchen Notes below)
- 1 1/4 teaspoon fine salt
- 390 ml (1 1/2 cups plus 2 tablespoons) water, lukewarm or 37°C (99°F)
Instructions
Begin this recipe the day before.
Day 1
Make the dough & first proofing
- In a large mixing bowl, measure the flour, yeast and salt.
- Add the water.
- Use your hands or a wooden spoon to mix the ingredients together until you have a sticky, wet dough.
- Cover the bowl with clingfilm.
- Leave the bowl to rest at room temperature, about 21°C (70°F), for at least 12 hours, but preferably 18-24 hours.
Day 2
Prepare the dough & second proofing
- The dough should have risen, and the surface should be dotted with bubbles.
- For this recipe, I use a cast-iron pot or Dutch oven which is 24 cm (9.5 inches) in width with a 3.8 litre (4 quarts) capacity. (See Kitchen Notes below)
- Place a sheet of baking paper onto your work surface.
- Dust some flour onto the baking paper.
- Scrape the dough from the bowl onto the baking paper.
- Sprinkle the dough with some flour.
- Gently pat the dough into a rough ball. I like to do an “envelope fold”, that is, pull the top and bottom into the centre, and then pull both sides into the centre. But the dough might feel too wet to work with. You are just trying to incorporate a little bit of flour and to knock out some of the air bubbles.
- Transfer the baking paper with the dough to a large, clean bowl. For this step, I like to use a bowl which is about the same size as the cast-iron pot or Dutch oven.
- Cover the bowl with a clean tea towel.
- Let the dough rest for about 2 hours in a warm place, or until it has doubled in size.
Baking the bread
- About 30 minutes before the dough is ready, place a cast-iron pot or Dutch oven with its lid into the oven and preheat it to 230°C (450°F) (without fan) for about 30 minutes.
- When the dough is ready and you are ready to bake, carefully remove the pot from the oven. It will be ragingly hot at this point, so be careful.
- Quickly transfer the baking paper with the dough into the hot cast-iron pot. I do this by using the four corners of the baking paper as a sling.
- If you wish, you can use a very sharp knife to score the top of the dough and/or dust the dough with some flour.
- Place the lid on the pot, and on top of any overhang from the baking paper.
- Bake for 30 minutes.
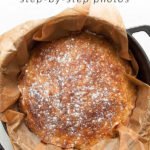
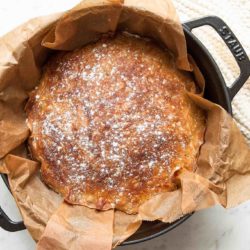
- Remove the lid and bake for a further 15 to 30 minutes, or until the loaf has browned to your liking.
- To check if the bread is fully cooked, it should make a hollow sound when you tap it underneath. A digital thermometer inserted into the centre of the loaf should read about 99°C (210°F).
- Cool the loaf on a wire rack for at least 20 minutes before slicing. This cooling time will allow the crust to develop.
Kitchen Notes
 DIFFERENT TYPES OF FLOUR
* This recipe works well with plain flour (all-purpose flour) or strong white bread flour.
* You can also use wholemeal flour which will produce a slightly denser bread. I would recommend a mix of white flour and wholemeal flour for better results.
* For Swiss readers: I use Zopfmehl (or farine pour tresse) when making bread.
 DIFFERENT TYPES OF YEAST
* Please note that there is a difference between instant yeast (also called instant dried yeast or fast-action dried yeast) and dried yeast (also called active dry yeast). If you are not sure what type of yeast you have, please check the packaging for instructions on how to use the yeast.
* With instant yeast, you can add it directly to the flour mixture without having to activate it first.
* With dried yeast, you will need to activate it first (usually in some warm liquid).
 WHAT TYPE OF POT TO USE
* For this recipe, I use a cast-iron pot or Dutch oven which is 24 cm (9.5 inches) in width with a 3.8 litre (4 quarts) capacity. You can use a larger cast-iron pot, but the finished bread will not be as tall.
* You can also use a Pyrex glass dish with a lid with similar results.
* If you don’t have a cast-iron pot or an ovenproof glass dish, you can also use a metal baking sheet with a large stainless steel bowl as a lid.
* Check that your cast-iron pot is ovenproof and suitable for use in the oven at 230°C (450°F). I use a Staub pot which can withstand temperatures up to 250°C (482°F).
* Make sure that the handles and lids are all ovenproof. Otherwise, due to the very high temperatures, they can melt in the oven. Some cast-iron lids have a plastic knob which cannot withstand the high temperatures in this recipe (most Le Creuset models have a plastic knob). So either remove the knob or wrap it in aluminium foil to protect it.
 RECIPE CREDIT
This recipe is adapted from Jim Lahey and Mark Bittman’s recipe for No-Knead Bread from the New York Times.
 OVEN TEMPERATURES
All recipes on this website state temperatures for a regular oven (i.e. a conventional oven without fan). If you have a convection oven with a fan, please consult the manufacturer’s handbook on how to adjust the temperature and baking time accordingly.
 CONVERSIONS
To convert from cups to grams, and vice-versa, please see this handy Conversion Chart for Basic Ingredients.
View the recipe online: https://eatlittlebird.com/easy-no-knead-bread/