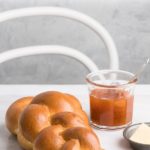
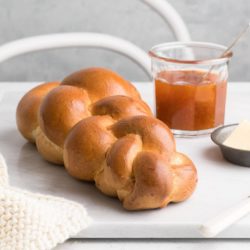
Butterzopf
- Resting Time: 2 hours
- Prep Time: 3 hours
- Cook Time: 35 mins
- Total Time: 3 hours 35 minutes
- Yield: Makes 1 loaf
- Category: Bread
- Method: Oven
- Cuisine: Swiss
Butterzopf is a classic Swiss bread which is often served for weekend brunches. Try this Butterzopf recipe with step-by-step photos.
Ingredients
For the Butterzopf
- 500 g (3 1/3 cups) white bread flour
- 1 teaspoon fine salt
- 2 tablespoons caster sugar (superfine sugar)
- 7 g (2 teaspoons) instant dried yeast (see Kitchen Notes below)
- 60 g (4 tablespoons) unsalted butter, softened
- 300 ml (1 cup plus 3 tablespoons) milk, warmed to 37°C (98°F)
For the Egg Wash
- 1 egg
- 1 tablespoon milk
Instructions
You will need approx 3.5 hours to make the Butterzopf
To make the dough
- Measure the flour, sugar, salt and yeast into the bowl of an electric stand mixer.
- Lightly mix the ingredients together using the dough hook.
- Slowly pour in the warm milk, and continue mixing until everything comes together into a rough dough.
- Add the butter, one tablespoon at a time. Once the butter has been fully incorporated into the dough, add the next tablespoon of butter.
- Once all of the butter has been added, continue kneading the dough on low-medium speed for about 15 to 20 minutes.
- The dough is ready when it is soft and smooth, and also slightly elastic in texture when you try to stretch it. If you poke the dough softly, it should bounce back right away.
- Lightly oil a large mixing bowl.
- Place the dough inside the bowl.
- Cover the dough with a clean tea towel.
- Leave the dough somewhere warm for 1 to 1.5 hours, or until the dough has doubled in size (see Kitchen Notes below).
To shape the dough
- Once the dough has doubled in size, gently remove the dough from the bowl. The dough will deflate as you handle it.
- Divide the dough into two pieces, and roll each piece into a long log, measuring approximately 70 cm (2 feet) long. Try to taper the ends so that they are slightly thinner than the middle section of the logs.
- Arrange the two strands of dough on your work surface so that they form a cross or plus symbol.
- Plait the strands of dough as indicated in the photos above. Alternatively, divide the dough into three pieces and do a traditional plait with three strands of dough.
- Carefully transfer the plaited dough onto a sheet of baking paper.
- Place the dough somewhere warm for about 30 minutes, or until the dough has risen and puffed up slightly.
To bake the dough
- Preheat the oven to 220°C (428°F).
- Place a metal baking tray in the middle shelf of the oven while it is preheating.
- Make the egg wash by lightly whisking together the egg and milk.
- Brush the dough with some egg wash.
- Bake for about 35 minutes, or until the bread is lightly golden. The bread is cooked if an internal thermometer reads 85°C (185°F).
- Transfer the bread to a wire rack and let it cool before serving.
Kitchen Notes
 DIFFERENT TYPES OF FLOUR
* For Swiss readers: I use Zopfmehl (or farine pour tresse) when making bread and enriched dough.
 DIFFERENT TYPES OF YEAST
* Please note that there is a difference between instant yeast (also called instant dried yeast or fast-action dried yeast) and dried yeast (also called active dry yeast). If you are not sure what type of yeast you have, please check the packaging for instructions on how to use the yeast.
* With instant yeast, you can add it directly to the flour mixture without having to activate it first.
* With dried yeast, you will need to activate it first (usually in some warm liquid).
* If you are using fresh yeast, you will need about half a block (20 g fresh yeast = 7 g instant dried yeast = 2 teaspoons instant dried yeast). Crumble the fresh yeast into the warm milk, and stir to dissolve the yeast.
 PROOFING THE DOUGH
Dough needs a warm environment for the yeast to activate and cause the dough to rise. If you don’t have a warm place in your home, try one of the following ideas:
* In the oven with the oven light switched on (works only for some ovens).
* In the oven with a tray of boiling water on the bottom shelf.
* In the oven at a low temperature of about 25-30°C (77-86°F).
* On the open oven door, with the oven turned on at 100°C (212°F).
 OVEN TEMPERATURES
All recipes on this website state temperatures for a regular oven (i.e. a conventional oven without fan). If you have a convection oven with a fan, please consult the manufacturer’s handbook on how to adjust the temperature and baking time accordingly.
 CONVERSIONS
To convert from cups to grams, and vice-versa, please see this handy Conversion Chart for Basic Ingredients.
View the recipe online: https://eatlittlebird.com/butterzopf/