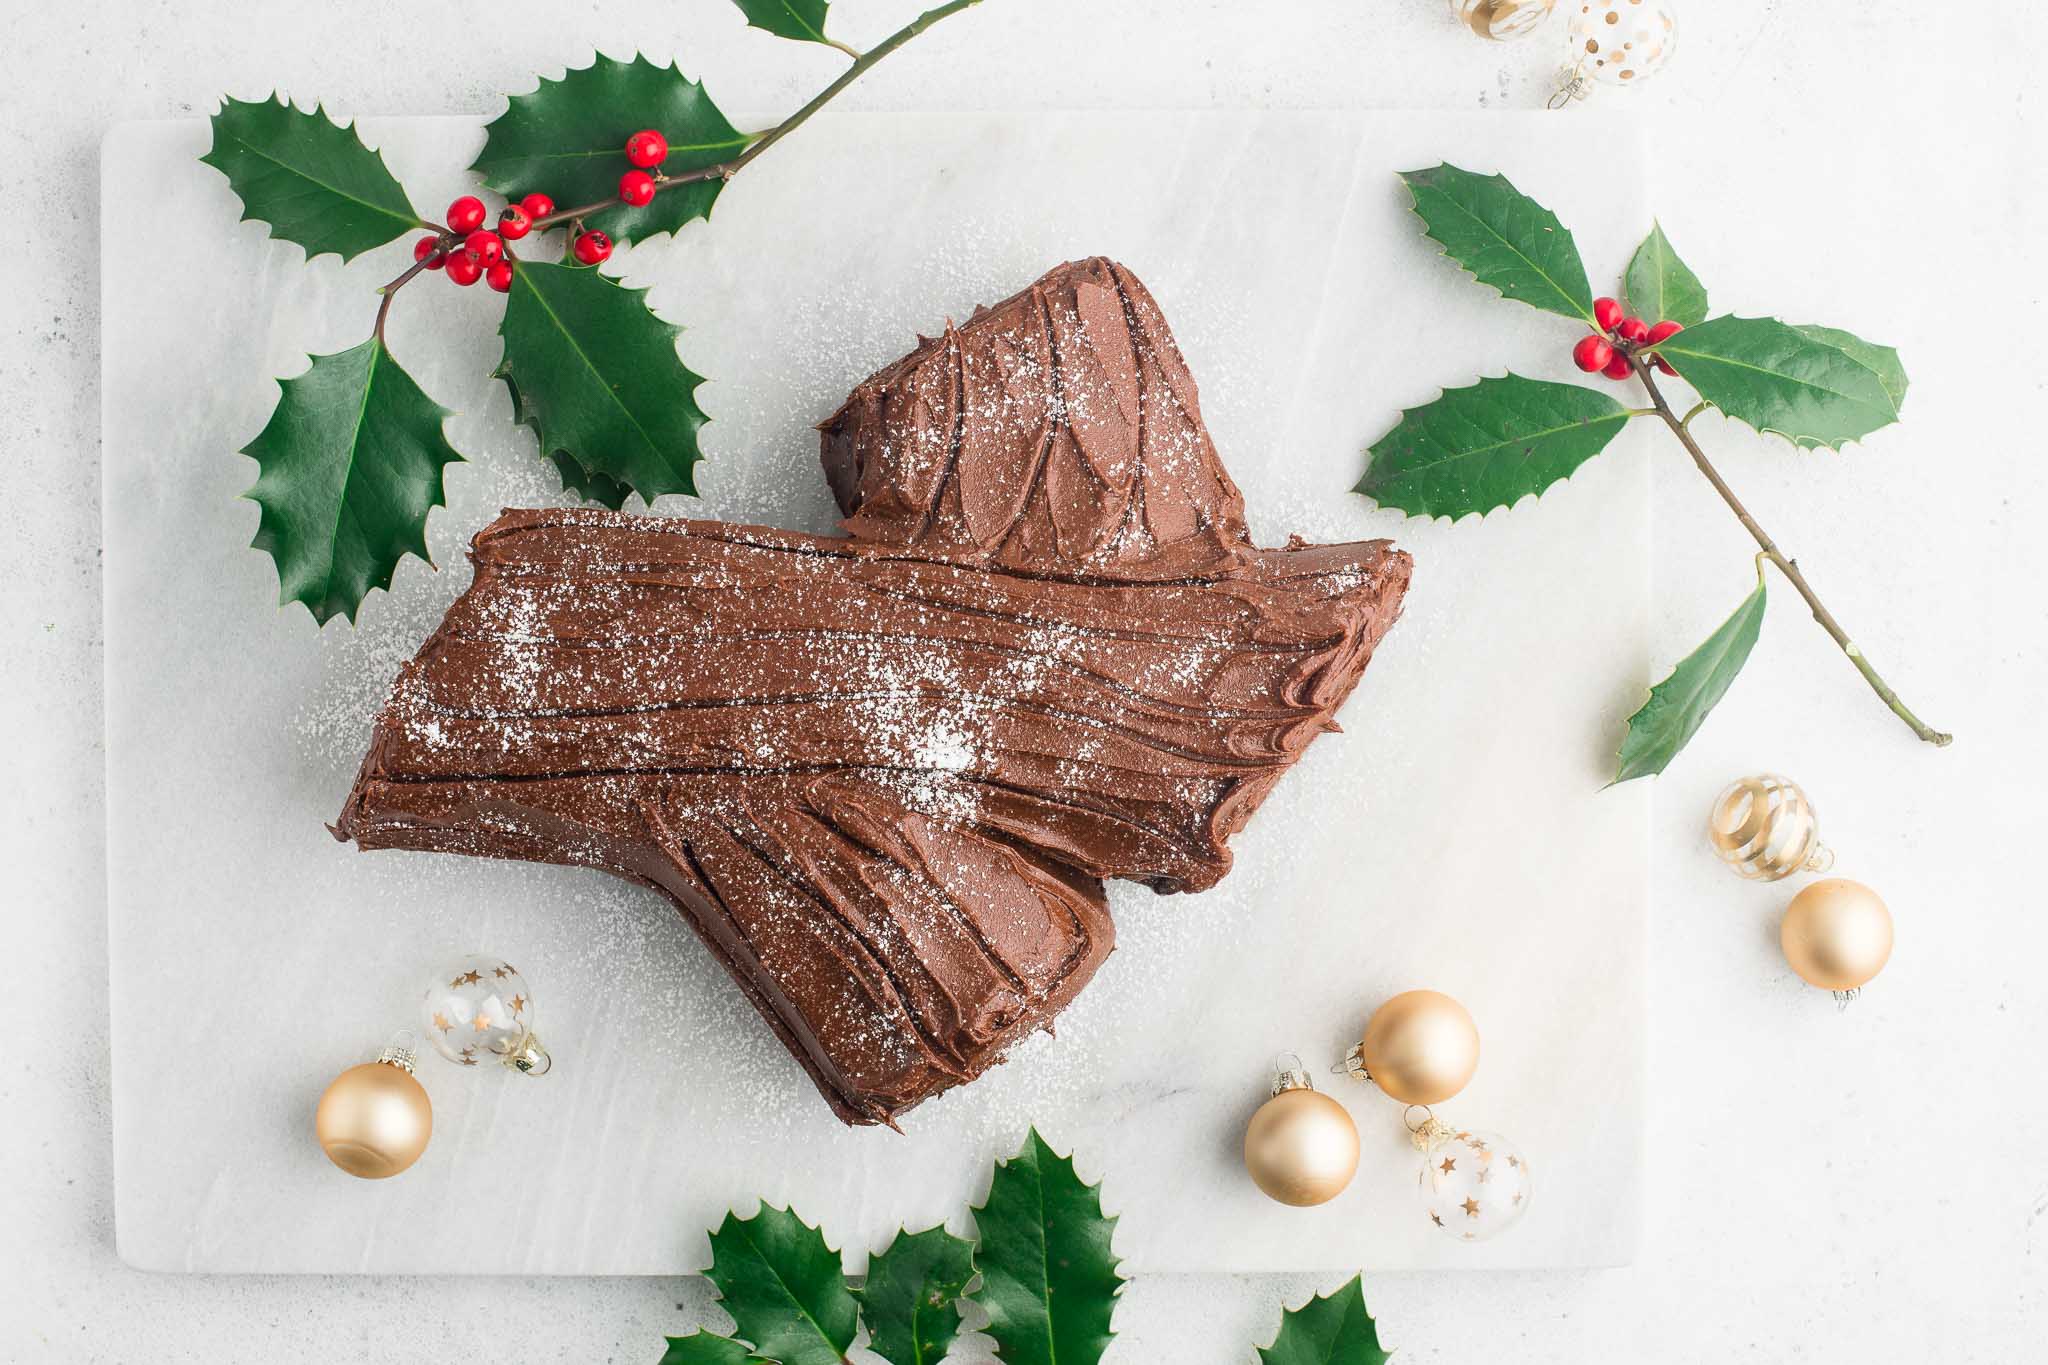
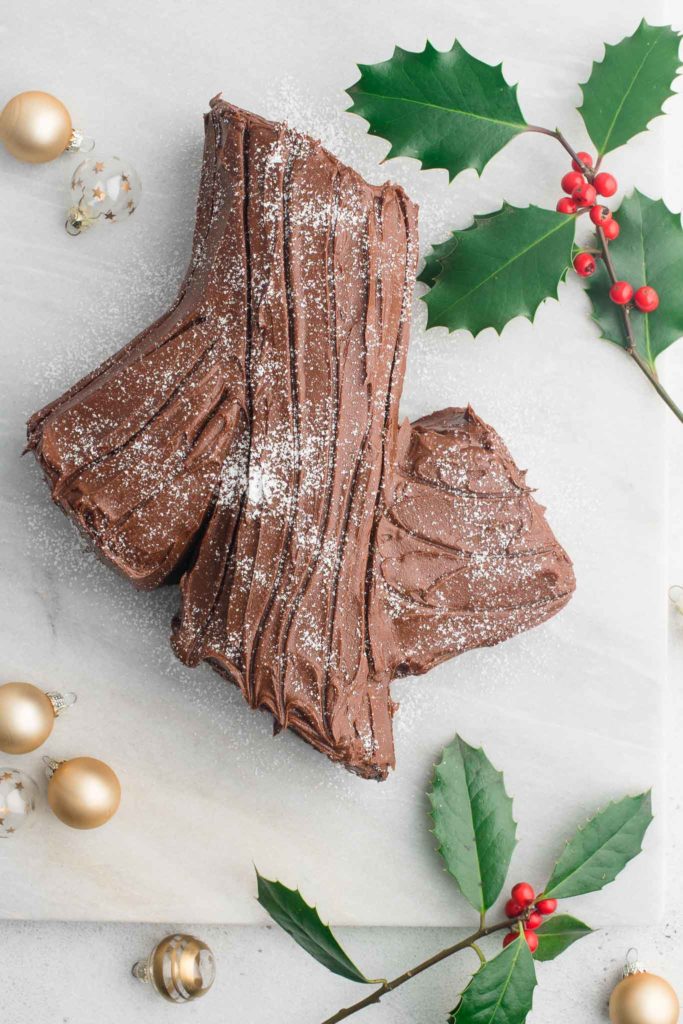
A spectacular and easy Yule Log (Bûche de Noël) to make at Christmas time. Tips to make a gluten-free Chocolate Yule Log Cake. Recipe with step-by-step photos.
Yule Log
My family in Switzerland has always celebrated Christmas with a Yule Log (or Buche de Noel), and when I realised that it was essentially a Swiss Roll rearranged to look like a log, I thought it was worthwhile trying to make my own one year. And now I find myself making it every year as part of our Christmas dessert!
Why This Recipe Works
- This Yule Log has a light and moist chocolate sponge, rolled in a decadent chocolate frosting.
- To make this Yule Log gluten-free, simply leave out the flour.
- You can make this Yule Log 1-2 days in advance, so it is perfect at Christmas time.
What is a Yule Log?
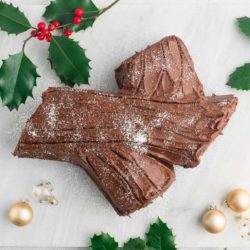
A Yule Log is essentially a Swiss roll which has been decorated to resemble a wooden log.
In the US, a Swiss Roll is sometimes called a Jelly Roll Cake.
A Yule Log is comprised of a thin layer of cake sponge which has been spread with cream, and then rolled into a log shape. It is then covered in a frosting or cream and then decorated to look like a wooden log or tree branch.
Yule Log Recipe
The first time I saw a Yule Log in a cake shop, I was instantly in awe and didn’t hesitate to buy one whenever we had friends or family visiting over the festive season.
But as I was flicking through my Christmas cookbooks, I came across this Yule Log recipe from the ever-inspiring Nigella Lawson; she promised that it was an easy recipe, if not also a bit finnicky. And, as always, she was right on both counts.
Gluten-Free Yule Log Cake
The Yule Log recipe below is adapted from Nigella Lawson; I have added a small amount of flour to the batter to give the cake a bit more structure. However, if you need the cake to be gluten-free, simply leave out the flour.
How to Make Yule Log Cake
I like to make the Yule Log the night before serving so that the frosting has had a chance to set properly, and not least to spend less time in the kitchen on Christmas Day itself (if I plan on serving the Yule Log as part of the dessert).
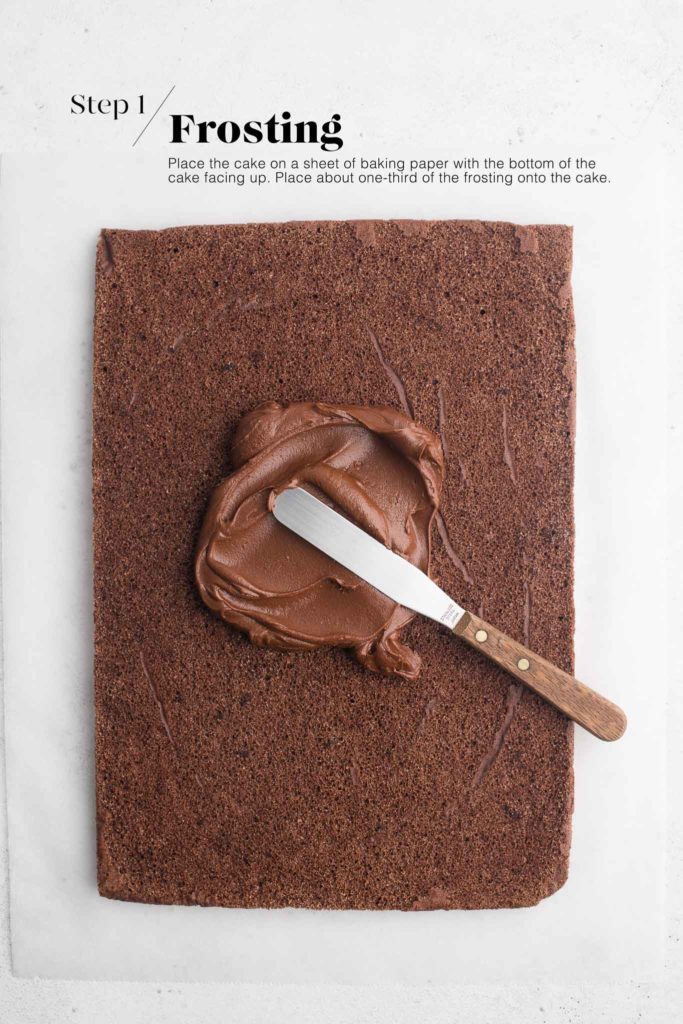
Step 1
Place the cake in front of you on a sheet on baking paper, with the bottom of the cake facing up.
Place about one-third of the chocolate frosting on top of the cake.
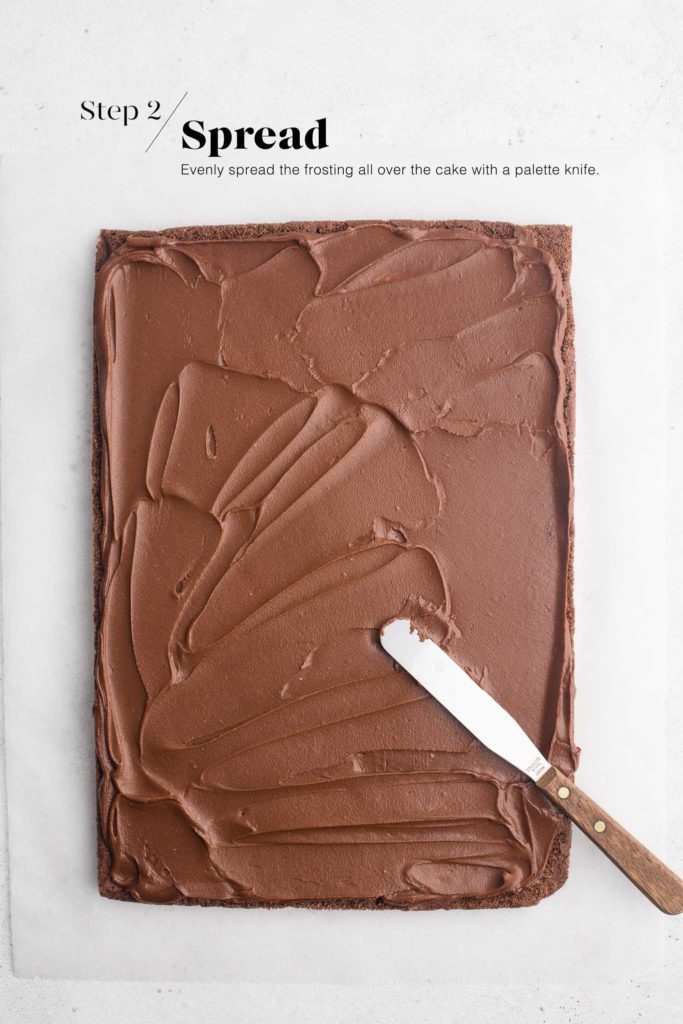
Step 2
Use a palette knife to spread the frosting evenly all over the cake.
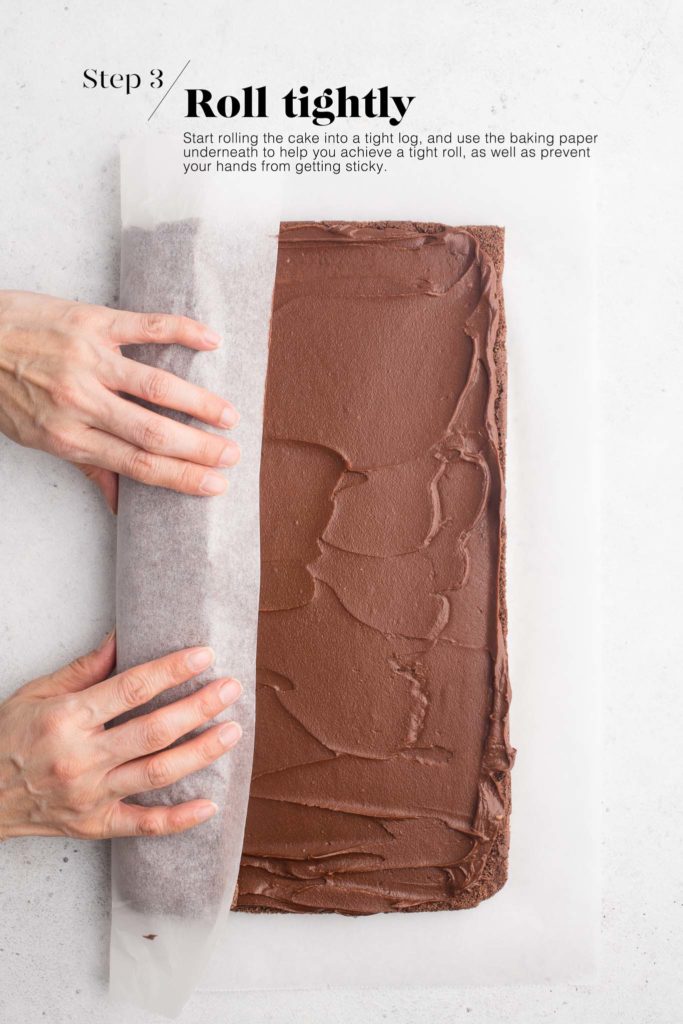
Step 3
Start rolling the cake into a tight log. The cake will be slightly sticky and moist to the touch, so I find it easiest to use the baking paper to help me roll the cake tightly.
Once you are about halfway, you can peel back the baking paper to finish rolling the cake.
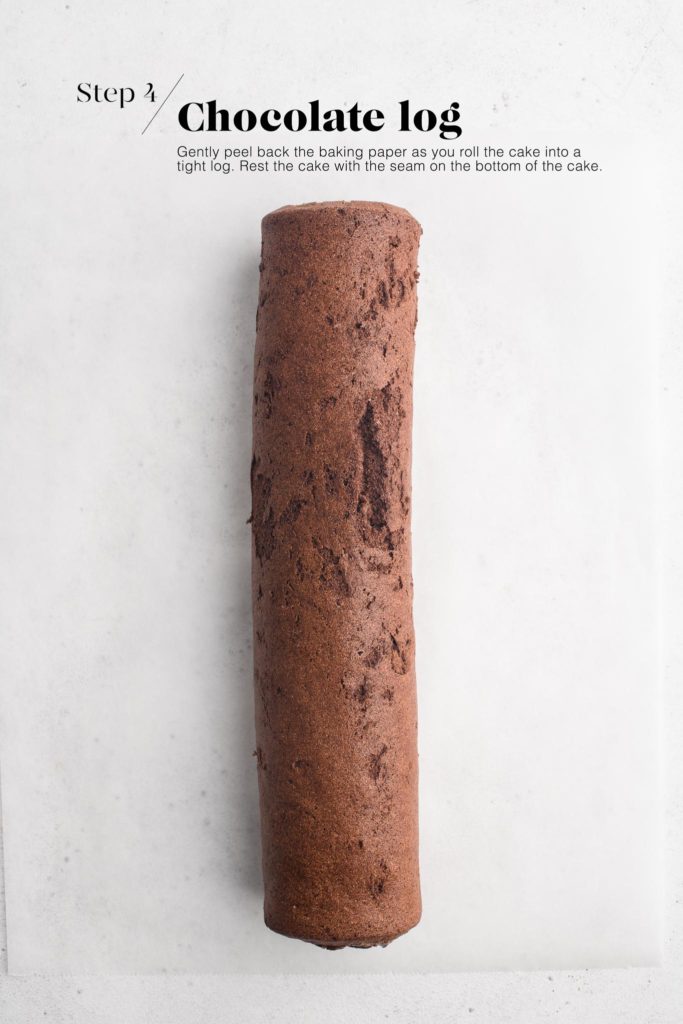
Step 4
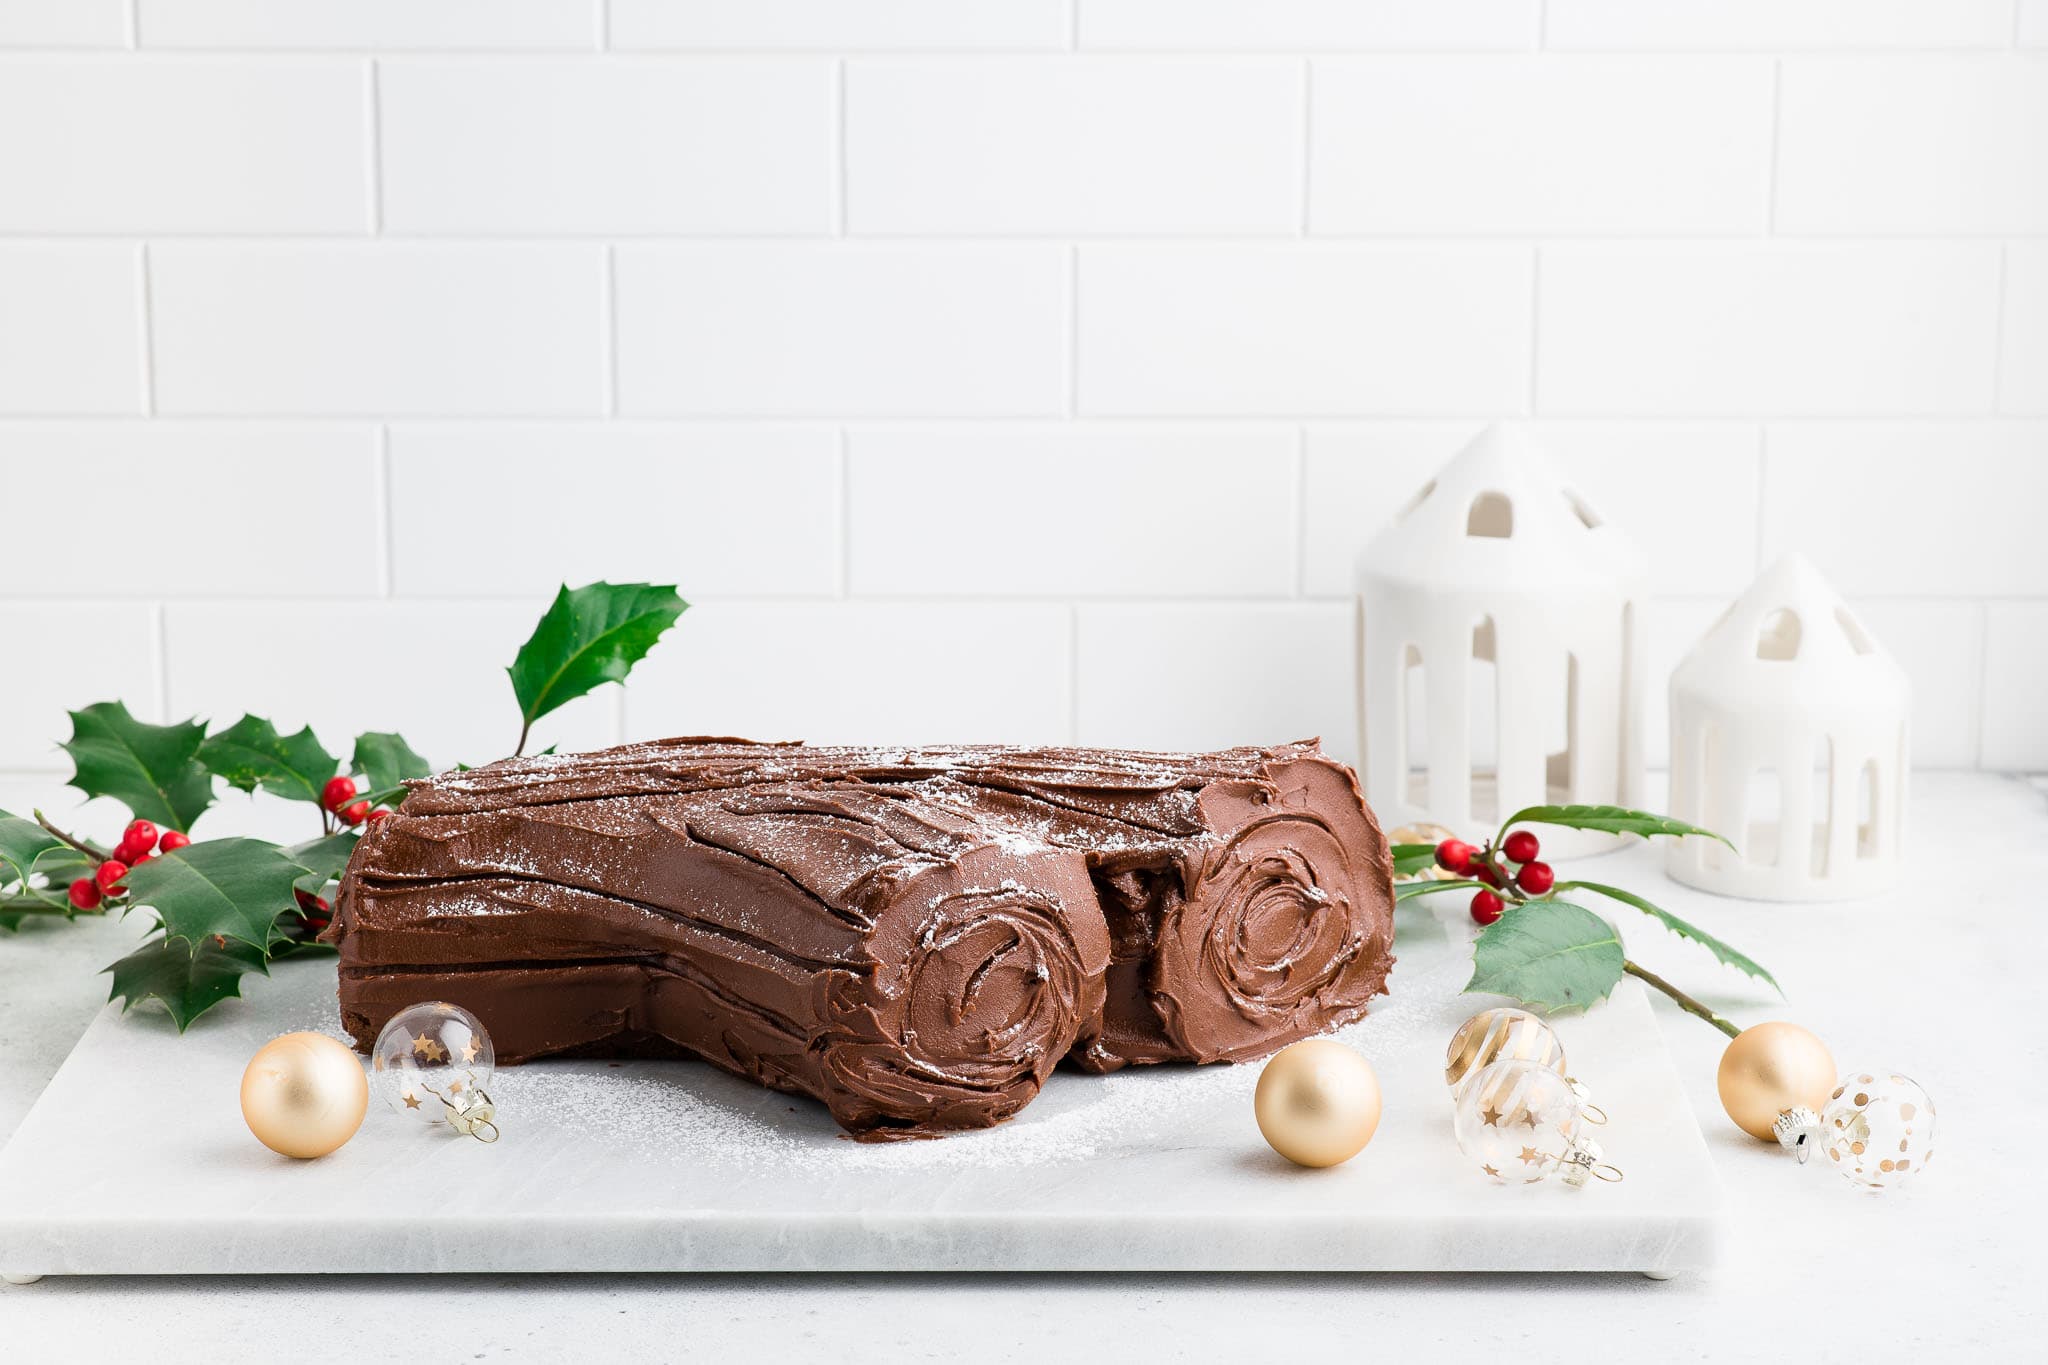
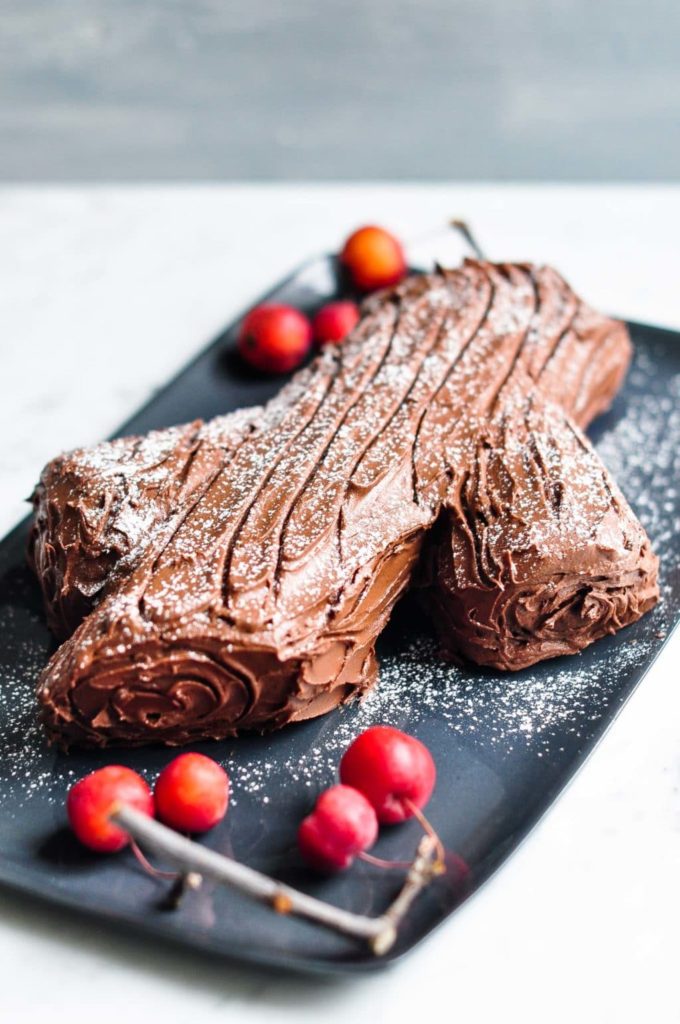
You should now have one long log of cake.
Don’t worry if cracks start to form in the cake as you are rolling it – you will be covering the cake with frosting later anyway.
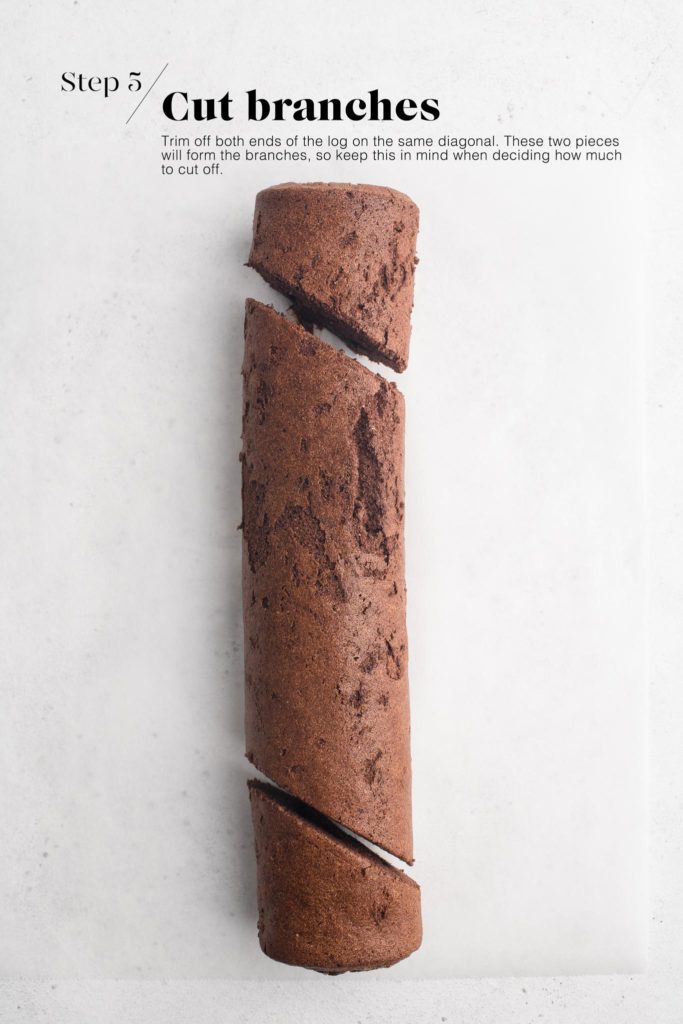
Step 5
Cut two pieces from each end, on the same diagonal, which will be used to form the branches on the log.
Keep in mind that, once frosted, the cake will look slightly bigger. Hence, I recommend cutting smallish “branches”.
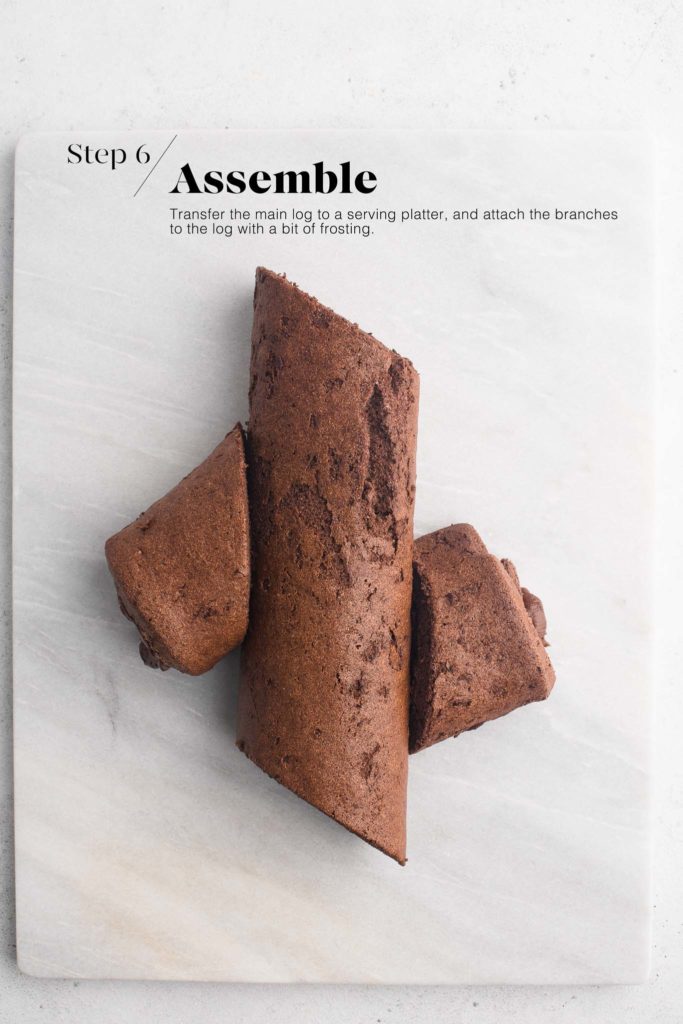
Step 6
Transfer the main log to a serving platter.
Use some of the frosting to attach the branches to the main log.
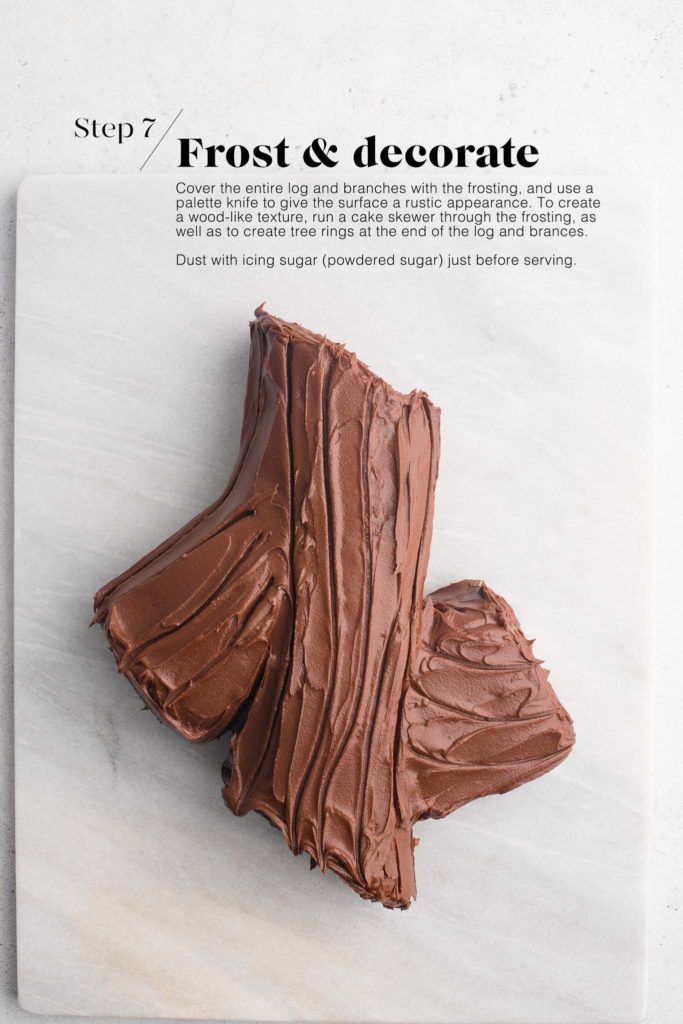
Step 7
Then use the remaining frosting to cover all of the cake.
To give the log a rustic appearance, use a cake skewer or similar to drag lines in the log and to form rings at the end of the log and branches.
Tips For Making a Yule Log
- I find it easiest or less stressful to make the Yule Log the day before serving. As you will be covering the entire Yule Log with frosting, this will help to keep the cake moist for longer.
- As I usually make the Yule Log the day before serving, I prefer to cover the ends of the log with frosting, which helps to keep the cake moist for longer.
- On the day of serving, as you cut into the log, you will then reveal the perfect layers of frosting and cake.
More Christmas Recipes
For more Christmas recipes, you might also like:
PrintYule Log (Bûche de Noël)
- Prep Time: 40 mins
- Cook Time: 20 mins
- Total Time: 60 mins
- Yield: Serves 4-6
- Category: Christmas
- Method: Oven
- Cuisine: French
A spectacular and easy Yule Log (Bûche de Noël) to make at Christmas time. Recipe with step-by-step photos.
 Print
Print Pin Recipe
 Rate
RateIngredients
For the chocolate cake
- 6 eggs, separated
- 3/4 cup (150 g) caster sugar (superfine sugar)
- 1 teaspoon vanilla extract
- 1/2 cup (50 g) cocoa powder
- 1/2 cup (75 g) plain flour (all-purpose flour)
- icing sugar (powdered sugar), to decorate
For the chocolate frosting
- 1 cup (175 g) dark chocolate (bittersweet chocolate, 60-70% cocoa)
- 1 2/3 cup (250 g) icing sugar (powdered sugar)
- 2 sticks (225 g) unsalted butter, softened
- 1 tablespoon vanilla extract
Instructions
To make the chocolate cake
- Preheat the oven to 350°F (180°C) (without fan).
- Separate the eggs into two large mixing bowls. For this recipe, I like to use a KitchenAid stand mixer with two separate bowls.
- Whisk the egg whites until stiff peaks form.
- In a separate bowl, whisk together the egg yolks and sugar until the mixture is thick and pale yellow.
- Add the vanilla extract,cocoa powder and flour.
- Lightly fold the whisked egg whites into the chocolate mixture, one-third at a time.
- Line a Swiss roll baking pan with baking paper.
- Pour the cake mixture into the pan and even it out with a palette knife.
- Bake the cake for 20 minutes.
- Leave the cake to cool for about 10 minutes, before carefully inverting it onto another sheet of baking paper. Remove the sheet of baking paper which is attached to the bottom of the cake (which should be now facing up).
- Let the cake cool completely.
To make the chocolate frosting
- Melt the chocolate in a bain-marie or in the microwave. Set aside to cool slightly.
- Cream together the icing sugar (powdered sugar), butter and vanilla extract until you have a thick and smooth mixture.
- Add the melted chocolate, and lightly beat to incorporate all of the ingredients.
To assemble the Yule Log
- Place the cake in front of you with the long edge of the cake facing you.
- Dollop some of the frosting (about 1/3 of the mixture) over the cake and use a palette knife to spread it evenly all over the cake.
- Start rolling the cake together from the long side facing you, and rolling away from you. Use the baking paper underneath the cake to help you get a tight roll.
- Once the cake has been rolled, carefully transfer it to a serving platter.
- Trim both ends at a slight angle – these pieces will from branches from the log, so keep this in mind when deciding on how much to trim.
- Arrange the trimmed pieces of cake next to the main body of the cake. I like to “attach” the branches to the log with a bit of frosting.
- Cover the entire cake with the remaining frosting.
- Create a wood-like texture by using a cake skewer to make grooves and tree rings on the cake. If you are unhapy with your artistic work, you can simply use a small palette knife to smooth out the frosting and start over again.
- Let the cake set for at least 1 hour before serving.
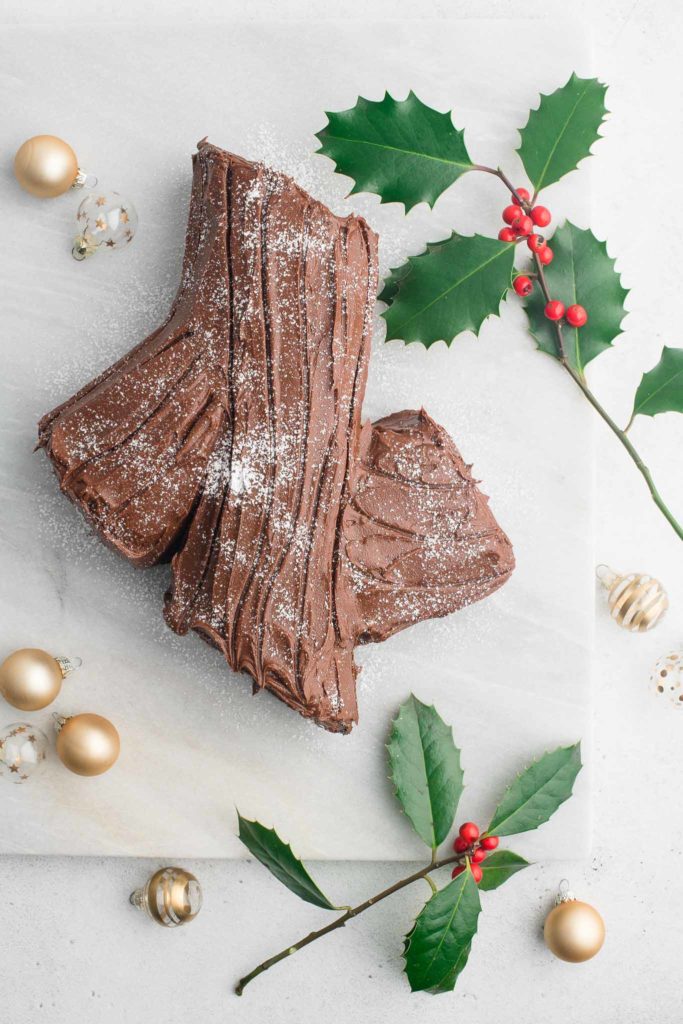
- Lightly dust with icing sugar (powdered sugar) just before serving.
Kitchen Notes
 MAKE-AHEAD TIPS
It is best to make and assemble this Yule Log on the same day when the sponge is still soft, which will make rolling the cake easier and also make it less prone to cracking. However, if there are any cracks in the cake when you roll it, don’t worry too much because you will be covering the cake with frosting anyway. I find it best to make this Yule Log the night before serving, which gives it a good amount of time for the frosting to set.
![]() STORAGE TIPS
STORAGE TIPS
As this is a frosted cake, it keeps very well for a few days under a covered container (in the rare event that you have any leftovers!).
 MAKE IT GLUTEN-FREE
You can omit the flour from this recipe to make the cake gluten-free. The texture of the cake will be slightly softer, but it will still be delicious.
 OVEN TEMPERATURES
All recipes on this website state temperatures for a regular oven (i.e. a conventional oven without fan). If you have a convection oven with a fan, please consult the manufacturer’s handbook on how to adjust the temperature and baking time accordingly.
 CONVERSIONS
To convert from cups to grams, and vice-versa, please see this handy Conversion Chart for Basic Ingredients.
Nutrition
- Serving Size: Nutritional info per slice
- Calories: 352
- Sugar: 26.6g
- Sodium: 43.1mg
- Fat: 23.9g
- Carbohydrates: 31.5g
- Fiber: 2.3g
- Protein: 4.9g
- Cholesterol: 134.4mg
Update
This recipe was first published on 9 October 2017. It has been updated with new photos and more comprehensive recipe notes.


This is also my go-to recipe for Yule Log at Christmas. Love Nigella’s recipes, as always!
What an AMAZING idea!!! I am definitely making this! looks delish!
Thank you for the step by step photos! I had no idea it was so easy. Too easy! I wanted to make a Swiss roll for my husband’s birthday this week, but thought I would turn it into a Yule Log for a bit of fun (I made a white chocolate ganache). I’m definitely making this again for Christmas this year 🙂
I made this for New Year’s because we ended up having pavlova for Christmas. I remember how everyone really loved it so I thought I would make it next week for a work Christmas event. Such a lovely recipe and very easy too!
Lovely recipe! Will make again.
I’ve just made this for Christmas lunch tomorrow and it was very easy to make, thanks to your photos! I tasted the off-cuts and they were delicious! Can’t wait to serve it tomorrow.